

Killar_of_giants
-
Posts
125 -
Joined
-
Last visited
-
Days Won
5
Content Type
Profiles
Forums
Events
Gallery
Blogs
Posts posted by Killar_of_giants
-
-
1 hour ago, parrot said:
I’m 14 x6 on the AE86 and 13 x 6 on the TE27 (when it can roll). 13 x 5.5 on the KE15 for now which is overkill unless I can find some nice period 13 x 5 for it.
Considering the Falcon GT had 6 inch wheels from memory.
It’s just too much unsprung weight. And of course modern tyres are incomparable to what was available back then. I appreciate tyre choices are somewhat limited, but not impossible.
Those wheels on MS car look phenomenal!
Yep, those Jovites do look good. I have a set on the ke25 that look very similarly sized. Not that it matters, thing hasn't been driven sinse I brought it home years ago.
Think from memory I saw MS's KE55 at a jap show couple years back up here in Brisbane. Very nice car.
-
 1
1
-
-
Those wheels look much better I reckon.
Thought about widening the rear rims?
I always like the way rims/tyres filled flares on the rear end of LX hatchbacks but obviously not 10's-12's on a KE55😆
-
1
-
-
I thoroughly enjoyed following the KE30 build from the beginning so I'm glad your back with this one.
-
Looking good and love the choice of going with Convo's.
-
FMD, Most important thing is your OK and secondly the car is too.
-
 1
1
-
-
I'm surprised it made it. We wouldnt get down the road without the police ripping us a new a hole. The fines would be 5x the value of the car. Looking forward to seeing you tackle the build. A big project, credit to you for saving it. Should be impressive when done.
-
Shame about the bonnet with all the effort you put into it. At least the gear knob and cage padding isnt too much of a pain.
-
so what happened, did they give you a hard time?
Never mind, didnt realise I had 2 emails. Bummer. Just the bonnet?
-
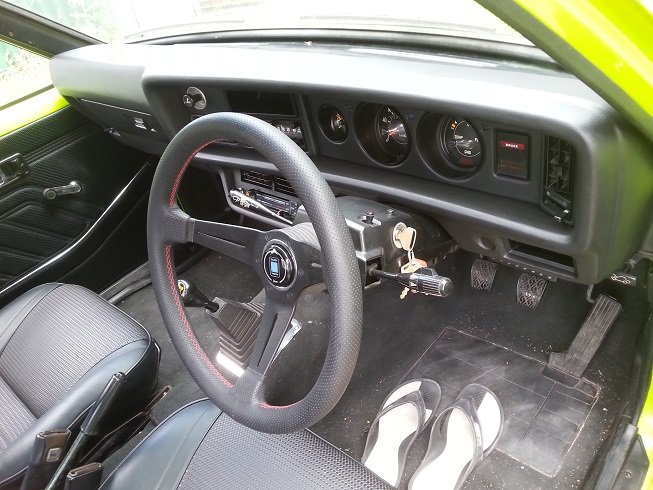
Finally got around to installing the refurbished dash that I got back a few weeks ago. From when I did the conversion I had the ECU check engine light dangling off a cable hanging under the dash. Ive been wanting to have the check engine light in the dash under the park brake light but looking stock. I bought some 3mm translucent amber perspex. Did all the cutting on my triton table saw so that the lens would be recessed. I sanded the top of the perspex with 600 grit to take the shine off and no longer see thru. Filed the notches out for mounting and used a soldering iron to melt the pre existing tabs in the dash facia to hold in the perspex in. Reworked the PCB on the cluster to suit so I could use the stock dash bulb and location. It doesn't look 100% stock but it will do.
I cleaned all dash components with a toothbrush and dish washing liquid. Even pulled the fins out of the vents. 40+ years of dirt and grime. time consuming but worth it.
I also replaced the $20 dollar Nardi copy with a genuine one the family bought me for last xmas.


-
2 hours ago, gibson88 said:
Beautiful 30! Love the paint and wheels.
Thanks mate
-
1
-
-
22 minutes ago, oh what a nissan feeling! said:
That is pretty awesome, keep the updates coming as you work on it, looks great in those pics.
cheers. I bought a passenger door off you a while back and you gave me a few door cards aswell which I ended up giving to Grant in NZ. Took me for a drive, love your car. Ive been following your build thread for a couple of years and always look forward to updates.
-
Yeah was looking to have a chat but no-one was by the cars (yours and MS's red ke55) when I stopped by. I didnt take my car this time around. I have a KE30 2 door.
-
Looking good. Been following this build for a while now and got to have a sticky beak at all jap. Those ITB's look flash.
-
I like the blue
-
1
-
-
Had this car for a while now and slowly getting there. It came with the green backyard paint job, jellybeans, threaded bolts, wheel well half full of water and spaghetti wiring amoungst other stuff. Needed a bit of tidy-up. Ive had a few 4 doors over time and managed to hang onto a few bits which went into this car. I bought a written off AE82 twincam and did the conversion. I rebuilt and installed an AE86 front end still with ADM calipers. Its not quick but I like the 4AGE. Grant from NZ did the interior, He's a legend. I love the styling of 70's 2 door OZ fords, Holdens, Chargers so I like my rollas to look ADM if that makes any sense.
Theres been a few guys on this site that have helped me with info and cheap parts - cheers
short term plans -
Dash Refurb in coming weeks
new carpet
I have steering issues but have parts to fix so need to sort that.
Think engine mounts might need replacing (ford laser)
Thinking of putting rubber bushes back in the rear suspension, rear end creeks
Longer term plans -
I have SSR meshies 16 x 7 fronts and 16 x 8 rears that will go on ( everyone rolls eyes but hey, its my car ). I also have some Aussie delta 13x7 that I'm refurbishing. The MK1's will go on my other Corolla.
T18 diff
Redo the wiring in the engine bay
spare 4AGE that I will rebuild at some stage with a little more poke. I don't know much about engines so might aswell have a go and learn something new.
Respray entire car, have XB side mirrors mirrors I bought to throw on at that stage if it suits.


-
1
-
1
-
-
Useful info regarding front suspension
https://www.rollaclub.com/board/topic/38573-tie-rodtubeke70ke3x5x-faq/
No bolt in diff options to handle boosted 3sge but the info is here regarding modifying diffs if your a rolla freak willing to do the research.
-
I remember this build, very nice. Facebook seems to be where the parts are at these days, especially now that tired ke's are rising in price and wreckers are on the decline. Photobucket hasnt been good to forums either. Perhaps when I start working on my cars again Ill start a rides thread to contribute the little I know.
-
I found making those fuel lines like yourself without a hoist a pain in the arse. The tabs welded to the body have that dimple in them, I crushed that dimple to make the tabs flat. That gave a little more space running the larger fuel line. With the throw on the clutch pedal, I cut the pedal in half and welded in a piece of steel moving the pivot point right to the top of the box. Cut the top off the end of the pedal just after the pivot. Obviously had to modify the top of the pedal housing to secure the pedal. May not be necessary but may help if you don't have enough throw when you get it running.
-
Nice. I like the Hoshino's, they suit your car.
-
Its looking good.
-
Appears to be a big difference in paint when comparing pics at the top of the page to the latest. Awesome job. Ive been following this build for a while now, its always good to see a rolla built right threw to registered. Gives me motivation to pull my finger out and get cracking.
-
1
-
-
looking good. I like the Te37 grill and tail lights, something not often seen in oz
-
-
With the site recently updated, I was able to sort out my original account as I started receiving notifications again. cheers!


Ke55-S Xx Coupe
in Rollaclub Rides
Posted
Great photos. Cars look really good side by side with their individual stylings.