

drift freak
-
Posts
265 -
Joined
-
Last visited
-
Days Won
4
Content Type
Profiles
Forums
Events
Gallery
Blogs
Posts posted by drift freak
-
-
So its been a while since I've posted anything here, I haven't had too much progress as the knee has been keeping me on the couch for most of it. I have however been able to get some stuff done in the last week. I headed to Jordain's place late last week to help him with painting his engine bay. We hooked in with the filler and etch and now its ready for him to finalize his engine bay setup then I'll get it painted for him.

 These two photos show how we shortened the strut tower braces after Jordain shifted his plenum chamber back to allow more room for his trumpets.
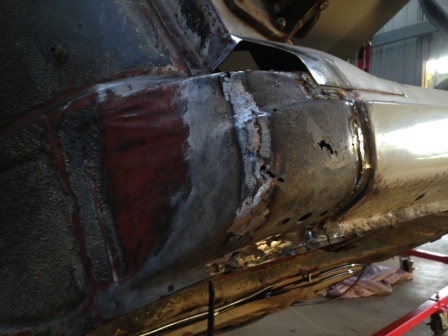
 This photo shows where the filler was needed. So working on Jordain's car really made my feet itch so after a weekend in Melbourne to watch some footy I got out there this arvo and started on the rust under the passenger side rear quarter behind the door. I started by cutting the rusted piece out and curving up a replacement panel with my bench folder.
 I then cleaned it up and etched it to prevent further rust forming.
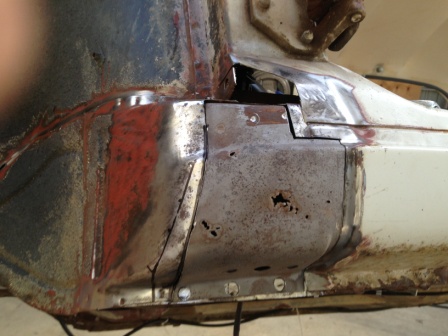
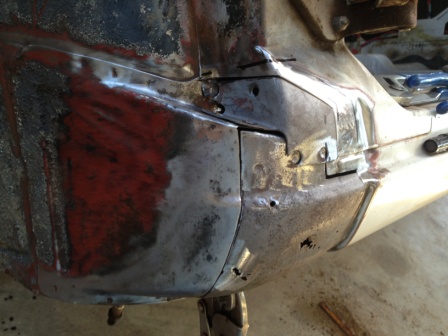
 I then cut a replacement piece for the outer skin that was taller than the missing piece as I wanted it to tuck in behind the original panel to allow for a better edge to weld too.

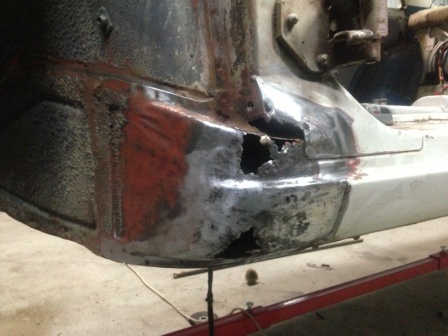
 I'm pretty happy how it has turned out so far, some more welding and some body filler to smooth it over and she should be sweet as :) I also ordered some split tubing so I can finally finish the wiring loom, it is out of the car at the moment and just needs the alarm and central locking wires connected then the tubing over the top and that part is sorted. Hopefully over the next couple of weeks some serious progress will occur as Davros el Davros is bringing his 10 around and this should provide some good motivation to power on with my build :)
 -
Oh yeah man that's awesome!!! Congrats!!!
-
Good work mate, keep this build up. Great to see another 10 being built, I'm sure your brother would be super stoked.
-
Philbey - yeah I finds hey wear out real quick but I just try and use it only in the tight spots as those discs are ridiculously expensive. Just been leaving the bulk of the cutting to the angle grinder.
KE70Dave- mate I bought a UniMig 200 inverter welder. It welds from 10-200amps so the thin stuff is fairly easy to weld. Mind you you still need good material thickness to weld too as the rusty stuff just blows out even on the lowest setting.
-
Hydro handbrake??? I thought this was a drag car??? Please explain??
-
Yeah answers the question perfectly. Awesome work :) interesting your using v-bands on the exhaust, looks sweet as!!!
-
Wow good work on the manifold 👍can I ask, did you mount the head flanges and turbo flange together in the position you wanted then make the runners to suit or just start onto the runners and position the turbo flange later???
-
This build is off the hook!!! Just read the whole thread, keep up the good work and keep up the updates :)
-
Cheers high roller!!! Yeah it would be nice to see more but at the same time I'm glad they are fairly rare :)
-
Yeah, EF LSD diff and hopper stoppers big brake kit for the front. 5x114.3 PCD all-round. In hindsight a should have stuck with 4x114.3 so I had a bigger range of rims to suit but that will probably happen in the future. Wheels are my last concern at the moment.
-
Hey high rolla, mate they are just stock ea falcon steelies. Ya can get em anywhere :)
-
Correct me if I'm wrong but shouldn't you have the engine and box I stalled before getting the tail shaft cut to size??
As for suspension AE86 struts are good with lots of choices for shock insert plus AE86 ps arms will give you more lock. T3 in the states also have a huge range of gear that's suitable too. Search button is your best friend right now. BTW have you ordered the brake kit from hopper stoppers?? If so to suit which strut????
-
So my mate came over today and spent most of the day working on the wiring loom. Its just about finished just need to finish wiring in the hazard switch and mount the relays and fuse block and its done :)
I also spent some time tack welding the A pillar rust patch in started to grind it back when the grinder decides to shit itself :rant: but ti made me a little happier considering my situation.


I also saw my specialist today and he says I should be walking as much as possible so I've got the rest of the week off work and will be in the shed as much as possible :rock:
More updates to follow :yes:
-
I've been doing my own repairs but there is a guy whiny mate is using. He is down in Nowra on the south coast but my mate says he is really good and reasonably priced. His business name is 'Waynes rust repairs' you can find him on google. Not sure about in Sydney but.
-
Sure, it's look like the middle of nowhere haha. How's progress coming along?? Got any updates on the cowling you moved to fit the trumpets??
-
HAHA look at all the traffic banked up behind you while your towing the coupe, I suppose your just taking it easy after all the accidents you've had in the last 12 months :harhar:
-
So I was going stir crazy and couldn't help myself. So I loaded up on the pain killers and headed down the shed. I set up a seat and got stuck into the passenger A pillar. I started by unstitching the repair section I had. I used an angle grinder, dreeml tool w/cutting disc and a spot weld drill bit (see photo) these are used to only drill through the top layer of steel which releases the spot weld.


I then cut the pieces down until they fit into the missing section with only minimal gaps, this will allow me to butt weld the pieces in and plug weld where the spot welds were.


So now I need to treat the pieces with some rust converter weld them in and patch up the little rust holes and she should be all good, much better than the rusty old section thats for sure.
-
Well it's official the Rolla will be on hold indefinitely. Completely torn my ACL, damaged the meniscus cup and grade 2/3 tear of the medial ligament. See you all in 6 months :(
-
AJPS lock spacers maybe???
-
Yeah Altezzaclub it was one of the worst injuries I've sustained and believe me I've had a few haha.
OrangeLJ its just lucky he isn't crawling yet otherwise I'd be screwed.
-
So I moved onto the A pillar on the passenger the other day. I started to remove the rusty section with the angle grinder w/cutting disc and 'flapper' disc and the dremel drill w/cutting disc. First I cleaned the area with the flapper disc to see where the worst of the rust was. As you can see there was a bit in this corner but it is mainly contained to the outer layers thank god.


Once it was cleaned back I proceeded to cut the areas out that was affected without going too crazy.


I was lucky enough to buy a wreck of Jordain on here a few months back, this has allowed me to cut the repairs I need out of unrusted sections. This means I don't have shape or form anything, just cut the new sections to size and weld them in. Here is the section I have to work with.

So I've had a bit of a spanner thrown in the works this week. I have ruptured my medial ligament in my left knee and possibly other damage so progress is really gunna slow down now as I'm on crutches and have to have it elevated as much as possible. I'll try and keep things rolling along and updates coming but they might dry up unfortunately.
-
Excellent service from Andrew, highly recommended!!! Thanks again
Luke Elliott
-
So while I was taking the windows out the other night I found some rust under the drivers side quarter window. I decided to clean up the area today using a black 'wooley' wheel that attaches to the air drill as it removes paint really well without putting to much heat into the area or getting messy like paint stripper. It turned out like this.

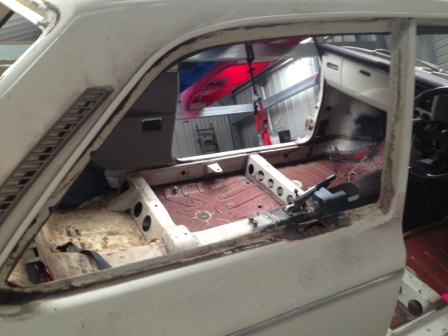
I then measured an area to cut out that would give me good solid steel to tack weld the patch to. I used an angle grinder and air hacksaw to cut it out. I was really lucky I found this early as it hadn't spread too much and is in an easy place to repair. So cut out it looked like this.


I made up a repair patch out of an old door skin my neighbour had layin around using a sheetmetal folder, angle grinder, hole punch and notcher. I made it so it sits under the existing panel allowing me a good edge to tack weld too.


For now this is how it will stay as the car is going to bee sand blasted soon and there is no point putting filler in if it just gunna get blasted out. I'll etch it tomorrow and move onto the next repair :)
-
 1
1
-
-
I'm with B.L.Z.Bub, Iam currently mid way through a 3SGE Beams into KE11 and it has cost me 15k while doing all the work myself. 4A would be the easiest but you will still need around 10k to do it properly. Maybe a 5k woiuld suit your budget more??? Good luck :)


Ke11 Beams
in Engine Conversions
Posted
So I got a bit more done yesterday and today, mainly more rust repairs and started sorting the wiring loom.
I finished off the rear quarter rust section by welding a few more lengths along the top edge of the replacement panel and then etched it to prevent further rust.
I also finished the front passenger pillar, I'd had to wait until I could get my hands on a can of weld through primer before welding on the last section, this primer was used to ensure I had everything primed up to prevent further rusting. The primer has a high zinc content which allows welding to penetrate without burning the protective coating off :)
I then moved onto the rust holes beneath the rear quarter window, this wasn't too hard to repair with the larger rusty area being removed with the dremel and a hacksaw blade, however due to the tricky position of the smaller hole I used a die grinder to remove the rusty material back to solid sheet metal.
I made a replacement piece for the larger hole and used an off cut that sat behind the smaller and filled it with weld, ground them flat and etched it up.
I'd had enough welding and grinding for now so I focused my attention to the wiring loom. I had stripped it from the car a few weeks ago so I layed it out on the floor to assess what was needed to finish it off
I required some more rolls of wire to hook up the central locking and alarm plus split tubing to cover the harness once it was finished. To make things easier on my back I brought it up to workbench height and starting connecting the remaining wires plus covered some of the finished wires with split tubing I had laying around.