

drift freak
-
Posts
265 -
Joined
-
Last visited
-
Days Won
4
Content Type
Profiles
Forums
Events
Gallery
Blogs
Posts posted by drift freak
-
-
Do it cohenbateson97, the more old rollas on the road the better :) what plans do you have for it???
-
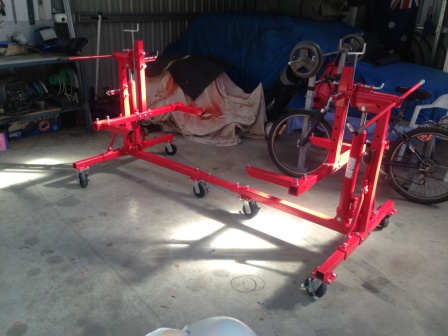
Yeah orangelj it's great. Heaps of adjustment to allow for a good centre of gravity and plenty wide enough to be extremely stable. I just need to sort the front mounting points a little better before I roll it all the way over. I've had to install some mounting points in the rails and they need some reinforcing before I flip it. Apart from that was super easy to assemble and is easy to use and wheel around. Very happy with the purchase. Ill upload some more pics tomorrow.
-
Dale - I am not all to familiar with performance parts for the 3SGE motor apart from ITB's and aftermarket computers. I would try Altezzaclub forums or even chase down 'CelicaRA45' on toymods.com he has built some serious track cars with the 3SGE Beams engine and done alot of R&D work too. Good luck.
On another note I picked up my rotisserie over the weekend and have started to mount the shell up in preperation for the rust and undercarraige work about to begin.
Here is a few photos so far.....


-
Very nice mate, looks sweet and will go like a rocket :)
-
That looks great!!! By any chance do you know where to get any more bodies??? Would love to build one for my son:)
-
Yeah buzz440 lots of 'miscellaneous items' but these photos are a little old. I've got my KE10 with beams conversion (http://www.rollaclub.com/board/topic/54478-ke11-beams/page__st__270) in there and my neighbours KE26 (he is in the process of sortin his shed out and I didn't want the old girl out in the weather :) but yeah I'm fast running out of space lol
-
Cheers Rian, I'm pretty happy with how its turned out, I also since installed a hoist and bought a decent welder. Like my old man always says to me 'things like tools and buildings are investments for the future and you should always buy the best that you can afford so you don't buy things twice' :) pretty wise words I reckon considering hes still got his first tool set he bought in his early 20's.
-
 1
1
-
-
So with the outside being finished I started on the work bench, I decide to put it in the middle bay of the shed as the shed is 7m deep I had extra room at the front of a car to work at the bench. I wanted something fairly heavy duty so I could fix things in the vice and literally swing of it if need be.
So I decided to use 40x40x3mm box tube fully welded with 20mm ply top cover and backing. I also got the local sheetmetal supplier to fold up a gal bench top to provide cover from any damage. I also attached it to the wall with some gal tech screws to stop it moving.


Over the last few years I realised that I was out of floor space and stuuf needed to be stored somewhere. So I built a mezzanine level. I decided to use the same materials the frame of the shed is built out of as this retains the original look and provides enough strength to support a few hundred kilos of CRAP!!!

This photo shows the span beam and also the dropper used to provide support and strength to the floor. It ties the whole triangular frame together and creates a really strong platform to build the rest of the floor from.

This photo shows the outside beams that the main floor beams attach to

This one shows the floor beams installed, I probably went a bit over board but I thought if I need to put something real heavy up there one day then i don't want to be modifying anything down the track.

This photo shows the floor installed and just how much darker this corner of the shed is now. Ive got to sort some lights out for under here but because I use it as a storage corner I'm not fazed at the moment.
-
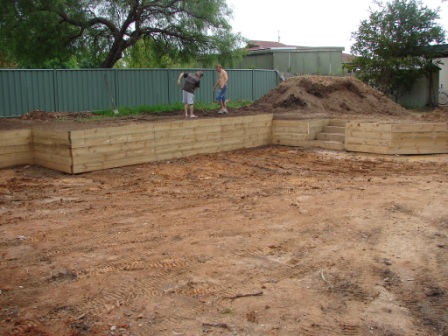
So from here we started on the retaining wall, what a job!!! Like I was saying the heavens opened and we ended up like this, workin ankle deep in sticky clay at the start of winter (not fun at all).

The only help this turned out to be was that it made hand digging all the holes a little easier, although it doesn't soften the rock that I hit along the way. So the retaining wall finished up looking pretty good i thought, the only two mistakes we made along the way was not putting any reclining angle on the taller sections of the wall to accomdate for the weight of the wall once finished and not measuring one of the wall elngths properly and it left an exposed join along one wall (visible in the second photo below)

With that done the slab was next, I got a pro in to do this as the stirrups for the shed were set into the concrete and I didn't want to stuff that up haha. I just went with the recommended concreter from the shed supplier.

Now to save on the total cost of the build I opted to erect the shed myself with the help of my old man and father-in-law....... FARK what a job!!! Due to none of us ever putting a shed up we struggled at first to get our heads around the jigsaw pzzle that a kit shed is but once we had a start it came together really well (although really slow, considering we could only work for around an hour after work during the week and over the weekends when everyone wasn't doing other things) but the positive side was we were coming out of winter and the weather was starting to clear and the days getting longer :)

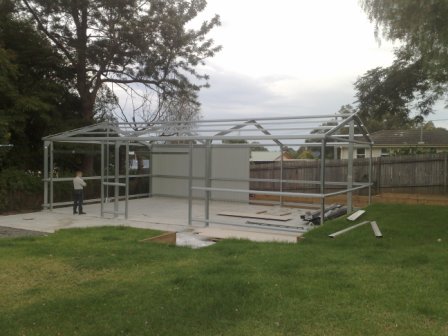


This is how it looks now :)

-
Hi everyone,
So I decided to pull my finger out and put a build thread up of my favourite room in the house :) My partner and I bought our house a few years ago now and while shopping around I told her I didn't care what sort of house we bought (new or old) but the yard had to be big enough to build a suitable shed :) I suppose I'm extremely lucky because she agreed and we settled on our current aboad.
So as you can see by the following photos we had our work cutout (just a bit of an understatement!!)
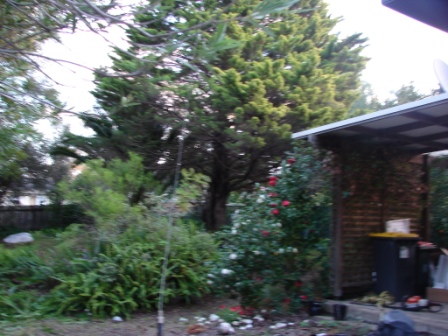

The third photo shows the backyard with the low lying shrubs etc removed and how many larger trees we had to remove, from the back door of the house you couldn't see the back fence it was that thick.
So with this out of the way we started excavating the slab area for the shed.


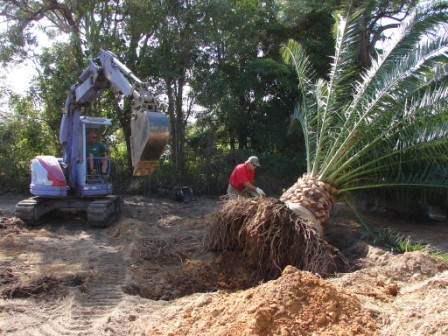
As with most residential backyards space is tight, a little to tight for my liking when this big rig rolled in to remove the excavated soil for dumping LOL

All in all we removed 11 truck loads of spoil (around 118t) and we were lucky enough to be able to bargain with the earthmover about the cost of excavation with a massive palm that we wanted gone, he eventually put it near his swimming pool :)

So this took about a month to sort out to here and during this time it was summer, stinking hot and super dusty!!! Well things were about to change thats for sure.
-
Altezzaclub - after some more deliberation and investigation I've decide not to use the engine stands. I realized that I would need to severely modify both of them too much as they are different heights therefore the car would rotate on different planes and not work. I've decided to buy a pre-fabbed one as after searching for supplies and associated pieces to make a dedicated rotisserie I've found one for less than I thought.
Davros - yeah mate thought I'd get back into the shed and get some progress happening, as good as it is just to spend all day with the little man it's totally unproductive haha and being so close to the end I just had to get into it :) yeah let me know when your coming down next as I'd like to come have a look at your shell before its put in primer and painted. Always good to brainstorm a bit before jumping in head first on my repairs.
-
So its been a while since I posted any updates and a few things have been completed. Firstly I had Todd from Signature Bars come back round and finish the rear sway bar. Awesome job, fits prefect and looks really good (will post up some shots of it tomorrow).
After a lot of thought I have also started to make a car rotisserie from engine stands. I was gunna buy a good one but realised I probably wont be building another car for a while after this so a budget rotisserie is now in the build. I had an engine stand just sitting around so I made a bracket up that mounts to the bumper bar mounts. It is height adjustable to allow for better weight distribution too.


I bought another engine stand for the rear and will be making some sort of bracket attachment up tomorrow (will post pics when its done).
So after getting the front mount sorted I started stripping the front end down to get it ready to sort the rust and body work out finally.


-
Cheers kickn5k and orangelj :) the little man is definitely a blessing. Yeah Todd is flat out at the moment but was more than helpful when it came to discussing options and sizes etc. well worth considering for any sway bar requirement.
-
Yeah way cheaper than I had expected. Best to call him on (02) 4421 2722 as he has a couple hundred templates for all different setups. Mine was just a custom one for my bitza setup lol
-
$275 mate, $550 for custom front and rears. Hopefully have the rear installed this weekend.
-
So I've been busy over the last few weeks with the arrival of my first child, a little boy :) I have however had Todd back around a to check his template he made before bending up the finished product. Before I continue I cannot endorse Todd from Signature Swaybars enough, top bloke and such a professional. So anyway he made up a test bar to make sure he was on the right track before bending up the finished item.


 So there were a few changes that we felt would make it a better product and came back this morning with the final product. What can I say it fits perfect, looks great and was extremely well priced. Here are some photos of the finished item.


-
Dj ke10 - I bought an otomoto coil over kit and modified the standard strut tubes. Check my thread out for more info.
http://www.rollaclub.com/board/topic/54478-ke11-beams/page__st__270
-
Yeah cheers Timbo. Its all aeroflow gear and I think they do a few different colors. I know speedflow is red/blue.
-
So I had Todd from Signature SwayBars come round the other day to measure up a custom 22mm front swaybar. After some discussion about routing we settled on a fairly simple design as seen in the pic below.

There was a few issues with this route which included the oil filter location and oil pressure sender location, both of which made it difficult to route the sway bar. You can see this in the photo below.

So I had to look at moving both. The oil pressure sender was easy, I just put a 90deg elbow into the block to move the sender into a vertical position.

The oil filter was also an easy solution, I purchased an Aeroflow remote oil filter relocation kit and installed. This solved two problems which were the sway bar route and also not being able to change the oil filter without removing the castor rod mount.The following photos are of it installed, I haven't finalized the filter location yet so it looks a bit funny but should look a bit better when I finish it.


-
So I got the old girl out in the street the other day. I need to sort the tune out as it leans out quite badly above 2500rpm but it's driveable and actually feels pretty good :)
-
Darren give RaceBrakes a call you won't regret it. Honestly if you get the m/cylinders right you won't need to boost it. I don't run a booster and my fiancé reckons the brakes feel fine with minimal pedal pressure needed, I also have a mate with a willwood under dash pedal setup - unboosted - and his feels great all day at the track with no leg pump. Running a remote booster just adds to the pain in the arse lines you need to make (remember the KISS rule - Keep It Simple Stupid (no offence) that way it's easier to fix in the long run :) where about are you located, might be worth a meetup if your not too far away (in on the south coast NSW) so you can see for yourself.
-
Darren, I rang RaceBrakes in Sydney for some advice on the m/cyl sizes. They were really good and open with their advice. He told me you really want to go bigger on the rear as the will bias the front to start with. Last thing you want is the rears locking on the strip. He told me that if you go a little larger on the rear your bias adjustment isnt as hectic, which would give you a smoother pedal feel. Everyone I have spoken with recommends getting the sizes right so the bias bar is central once installed. Pretty much how my setup is at the moment. Good luck, if you want any specific photos just let me know.
-
Hey Darren,
Thanks for the feedback mate. I've used 75 series m/cyls because like you said they are shorter. For the front I originally used a 1" bore but found it too big and didn't provide enough pedal travel and feel. So I have settled on a 5/8" front and 7/8" rear, both unboosted. The clutch m/cyl is also 5/8". Hope this helps mate, it's a tigh squeeze but worth it in the long run as it frees up heaps of room in the engine bay :)
-
So things have slowed down considerably with tasks around the house, christmas/new year and a new job all taking up most of my time. I have however made some progress with the rear shock absorber mounting setup and steering rack.
So I have a friend who runs his owns cnc machine shop and spoke with the other day about getting some brackets made to fit the new shocks to the diff. So I drew them up on a A4 sheet and took them out to him, he drew them up on his CAD program and viola!!


I also spoke to another bloke I know whos dad owns the local pedders shop and he got me in a set of KE20 rear shocks to try. I will probably be sending them back as they are a little long and are 3/4 compressed at ride height. But here they are with the machined brackets attached.


This is how it looks with the shock mounted and bracket seated against the diff tube.


The issue when setting the mounting bracket angle in relation to the diff tube is there needs to be a right angle from the shock absorber through the diff axle, similar to this drawing

So if the shock leans toward the front of the car the mounting bracket needs to be rotated clockwise to maintain the 90deg angle. This creates a force directly up the shock absorber during suspension travel.
While I was at my mates machine shop I droppped the steering rack off to him to have him shorten it by 30mm. This is to reduce the amount of steering angle I have because the tyres scrub on the inner footwell during full lock. It will still have heaps of lock for street duties. I had him re-machine the M14x1.5 thread in the end and also the notches for a spanner when installing the rack ends.


All in all I'm happy with progress but as time is scarce things will be taking their time to be done now :(


Ke11 Beams
in Engine Conversions
Posted
So Heres some more photos of the old girl on the rotisserie. Just need to make up some brackets to brace the front end and I'll be able to roll it all the way over :)