

Banjo
-
Posts
1795 -
Joined
-
Last visited
-
Days Won
85
Content Type
Profiles
Forums
Events
Gallery
Blogs
Everything posted by Banjo
-
Remove the fuel pump, & insulator, between the block & the pump mounting flange. Measure the width, or thickness of the insulator. This is critical. If it is too narrow, the travel of the fuel pump action will be too great, & damage will occur. It's too late, & too cold now, to head out to the shed, & measure the correct thickness, but off memory, it's quite thick, like somewhere between 10-15mm. Most replacement pumps come with two (2) gaskets, that go either side of the insulator mounting spacer block, but do not supply that block itself. I'll check that figure in the morning, & post it here. Cheers Banjo

-
I think when I was young & stupid, there was a name for them, whether they were a Mitzy or any other brand. "Shaggin Waggons" Used to be very popular with surfers. Boards on the top ! What a line up ! If you look down the comments list in this link, There was a guy who had a Corolla "Shaggin "Waggon", at high school. Cheers Banjo

-
While eating my lunch today, I Googled images of the Mitzy L300 van, to see what people around the world do to; & do with them. Some are really remarkable. We need pics of yours, please. Cheers Banjo

-
Great sketch Duffman ! You've missed your calling in life. Excellent ! You could easily sell those on-line ! I'd buy them, to line my den ! Cheers Banjo
-
When reassembling an engine, assuming one gets, all the right bits, in all the right places, & bolt tensions are correct, there is not too many procedures that can go wrong, assuming, you "take your time". However, one area, where the novice can come unstuck, is setting ring gaps, if you are fitting a new set; particularly if the block has been rebored. The following article on HP Academy, is probably one of the best I have read, in a long time. https://www.hpacademy.com/technical-articles/get-your-gap-right-piston-ring-gap-explored/ Cheers Banjo

-
Haven't got any KE20 LCAs, but measured my KE30 LCA, & can confirm 310mm is correct. Cheers Banjo
-
Hi Russell, Assuming the starter motor did turn over previously, & there is a good "earth strap" between the car's chassis & the engine block, then the first place I would be looking, is the "terminal bolt", attaching the heavy cable fron the battery +ve terminal, to the starter motor itself. If that is OK, then you will be looking for a lack of power to one or more "control" circuits. If for instance, if your lights all work, but the starter motor is dead, when you turn the key; then you have narrowed it down to the starting circuit. If however, everything is dead, then it may well be a burnt out in-line fusible link, that got "zapped", while hooking up jumper leads. P.S. Also remove the cover on the fuse block down below the steering wheel, & see if there is 12 volts on any of the fuses. If you do, find a fuse with 12 volts on it, check that there is volts, on the other end of that fuse. If not, the fuse will probably bee blown. Any fuses with no volts on either end, doesn't mean that the fuse is blown. Some fuses only have voltage applied to them, when the ignition switch is on. Let us know how you go. Cheers Banjo
-
Hi Russell, Your best friend in this situation, is a trouble shooting light, which are cheap, & can be found at any auto supply place, or even reject & cheap shops. You simply, hook the earth clip to the chassis somewhere, & then probe at various points from the battery +ve terminal, until it all of a sudden, the voltage isn't there. There is a "master fuse link", that doesn't even look like a fuse, but is usually mounted close to the battery itself. That will show up the open circuit, very quickly. Let us know how you go, & what you find. Cheers Banjo

-
Hi Col, That is absolutely beautiful, & takes me back to when I had a KE55 2 door, pillarless coupe. What a car it was with a 5K & a 5 speed box. I do miss it, as it went to "Corolla Heaven", after suffering terminal cancer in the upper back quarters, behind the side rear side windows. Being pillarlees, that model relied very much on those rear quarters. It does live on a bit somewhere as I sold the rear floor & wheel arches to someone on the Sunshine Coast, who wanted to "Tubb" his rear end. I'm gathering that is straight off the boat, & has been imported from the UK ? I had a quick look at some of the video of the Lombard Rally, to see if I could spot it in action, but not knowing what year it last competed, I couldn't find it. I loved that model, as it seemed so perfectly proportioned, & attractive to boot. I gather this one was probably a KE35 SR model. I can't see the grill, or the front edge of the bonnet clearly. Fill me in. Those alloy wheels just suit it to a "T". So I guess we'll see it in the next East Gippsland Rally, amongst the trees ? Cheers Banjo
-
Bloody Hell ! Talk about a blast from the past. Haven't seen You on here for 3-4 years, I reckon. Yeah ! That was a long time ago. i joined back in 2004, I think. You were a little bit behind me, around 2008. However, I'll never get anywhere near your posts. 8000 + ! I haven't got to 1700 yet. Don't knock "small hippie towns in New Zealand". My grandfather came from Kaiapoi, just outside Christchurch, on the South Island. I used to travel back & forwards to NZ, on business. I used to love seeing those big ships unloading all the domestic Jap Imports, in Auckland. Little "narrow gutted" things, because they used to charge rego on the width of a car in Japan, because the city streets were so narrow. https://garagedreams.net/car-facts/why-are-japanese-cars-so-small Keep in touch ! Cheers Banjo
-
Hi Jack, According to the Wiki on Rollaclub, the No 3 Head is a standard head on a 4K engine, so looks like your head & block go together,, & somehow, it go fitted with a set of 3K shorter pushrods. Cheers Banjo

-
It looks like you've nailed it Jack ! However, if someone who put this engine together previously; made that big mistake, there could be other issues or mistakes "lurking". I'd be pulling the head off, & taking a look. If you don't want to pull the head off, which allows You to check bore wear, at the top; valves & seats; & most importantly, the colour of the build up in the combustion chamber; then the very least, you should do, is a compression test. The head number is cast into the head on the outside of the head, between no: 3 & no: 4 spark plug holes. It's directly up on the head, above the block serial number. Let's know what you find. Cheers Banjo

-
Hi Si, Yes, my first thought also. Time for the head to come off, methinks ? Cheers Banjo
-
Hi Jack, Doubt very much that wear in the camshaft, or bearing wear, would cause that much tappet adjustment required. Unfortunately, it's probably time for the head to come off, so you can take a good look at everything. I'm presuming that the engine is a 4KC ? There are several parts on K series engines, (3K, 4K, 5K) that are interchangeable, & others that are not ! In 280K klms, anything could have been swapping around. Rocker gear & pushrods maybe ? Take the head number off the casting between no:3 & no:4 spark plug, & check whether the head was originally fitted to this 4K engine. Give us as much info about head & engine type & engine block number, & we might be able to start assisting. First thing is get all those pushrods out, & see if any are bent, & what their end to end length is. Measure their length, as they maybe not original. I believe Datto pushrods were commonly used on K Series engines that had hydraulic lifters, that were changed to solid type. More info & pictures you post, the quicker someone on here, will spot your problem/issue. Cheers Banjo
-
Hi Rupert, I'm sure someone on here will have one somewhere. Most of us have one in our "special tools draw", which we use as a "clutch plate alignment tool"; rather than those universal tapered ones you buy at SCA & auto tools & parts stores. I'll certainly look around my heap tomorrow, & see if I can help. P.S. I'll bet it has been a bit chilly, down Tassie way in the last few days ? Cheers Banjo

-
Hi Geoff, Hats off to You ! You've got more patience than I have, but I sure it will look perfect, when you finish it all. Cheers Banjo
-
For what it is worth, I'd be leaving the respray until last. With a different engine install, there will be a lot of mechanical work necessary, & maybe the engine/s in & out a few times. Most heart breaking outcome, would be to spray it; then scratch or damage it, during the mechanical side. Where are you located gegraphically ? I'd love to have a look at your acquisition, if you are nearby. To find one of theses KE-17 Sprinters, without substantial rust, is a real find. Cheers Banjo
-
There is something about the rear roof rake on the Sprinter models, that was/is so appealing. Forget about the 20V or 2TG conversion. I asked the question on here sometime back. Who is going to be the first to do an EV conversion on a KE. Your KE17 Sprinter is perfect. It would be the first, & only one in the world ! (I Googled it, & couldn't come up with anyone whose done it) Here is the standard in early model Corolla KE resto. https://www.wapcar.my/news/goldmine-brand-new-1972-toyota-corolla-sprinter-trueno--4057 No pressure to make yours as good or better than this one. Love this guy ! https://www.roadandtrack.com/car-culture/classic-cars/a12475265/teslas-shop-foreman-has-owned-36-first-gen-toyota-corollas-so-far/ Cheers Banjo
-
Welcome back ! Oh WOW, a KE17 Sprinter ! Arn't you a lucky guy. Carol looks in good shape for a resto. Will be really keen to see what you discover. Does it actually run, as it is ? So many of the KE17-20-25 series now are full of rust, but Carol looks likes she "has been loved", at some time in her life. Excuse my ignorance, as I've never got up close & personal, with a KE17; but is the circled component below a water heater control & shut off valve ? I've never ever laid eyes on one of them before ! Cheers Banjo

-
Hi Graeme, Not quite a Christmas Tree, but a a full set of clean; clearer, & brighter lights, which does give it a fresh new feel at night. Cheers Banjo
-
The LED changeover of all lights on my KE-30 has been finally completed, after the last LED bulbs for the rear ‘Number Plate illumination” arrived yesterday, & were fitted last night, with a really good result. I thought I would list them all, & their cost, so anyone else contemplating the changeover, will have the LED bulb type/model knowledge, & cost. There are a total 18 off bulbs involved . . . . . None of the bulbs required any modifications to connections or wiring. Headlight Bulbs: Two (2) off @ 36.57 total. eBay Description: 4-Sides H4 HB2 9003 LED Headlight Kit Light Bulb Hi-Low 2500W 375000LM 6000K HID _____________________________________________________________________________________________________________________ Front Side Guard Indicator Bulbs: Two (2) off 12V 5W Wedge Bulbs @ $ 2.00 ea. ________________________________________________________________________________________________________________________ Front Turn Indicator Bulbs: Two (2) off Front Parking Bulbs: Two (2) off Rear Stop Bulbs: Two (2) off Rear Reversing Bulbs: Two (2) off Rear Turn Indicator Bulbs: Two (2) off Rear Parking Bulbs: Two (2) off Total off 12 bulbs Three (3) off packs off 4 @ $ 5.99 ea. Total Cost: $ 17.97 eBay Description: 4 X 1156 BA15S Car While Globe 18 LED Brake Revers Turn Stop Tail Light Bulb 12V ___________________________________________________________________________________________________________________________ Rear Number Plate Illumination Bulbs: Four (4) off @ $ $ 7.48 (note: You only need two, but the pack includes 4 off) eBay Description: 4X BA15S 1156 CAR GLOBE 50 LED BRAKE REVERSE TURN STOP TAIL LIGHT BULB WHITE 12V _____________________________________________________________________________________________________________________ Interior Dome/Ceiling Light: One (1) off @ $ 6.65 ea. (note: You only need one, but the pack includes 2 off) eBay Description: 2x CAR 12V LED 31MM FESTOON INTERIOR WHITE LIGHT BULB 18SMD AUTO DOME GLOBE _________________________________________________________________________________________________________ You will also need to swap your turn indicator flashing unit, over to a model suitable for LED lamps, as the existing one, (designed for high current bulbs) will “hyper-flash", if used with LED lamps. LED Flasher Unit: One (1) off @ $ 12.99 ea. ebay Description: 3 Pin LED Flasher Unit Relay Indicators 12V For LED Light Turn Signal So all up cost is about $ 100.00, & you get a couple of spare bulbs, to pop in the gove box. The results were more than pleasing. There was no mods carried out to the wiring or connections needed. Obviously, whilst, you've got the "lenses" off to swap over the bulbs, you will give the lenses a good clean. I found the little rear bumper bar mounted licence plate glass lenses, needed a very good clean. The flasher unit, is simply a plug out; plug in; requirememt. It is located down behind the plastic panel, next to the drivers accelerator pedal & leg. The only other advice I can provide, is about the electrical contact points in the car, for all these bulbs. The existing filament bulbs carry reasonably high currents, that "burn through" slight corrosion on the electical contact points, in the sockets. However, the LEDs, have very small DC currents, by comparison, & I would suggest giving all the electrical contact points a good clean, before inserting the new LED bulbs. I found an easy way, was to a bit of steel wool wrapped around the end of a pencil, or similar object worked well. Just make sure to blow out any tiny bits of steel wool, before inserting the new LED bulbs. For complete safety; this cleaning suggestion, should be carried out, with the negative terminal of the battery isolated. Probably the best results, I've had on my car, for a $100 spend. Cheers Banjo


-
Excellent ! There is an olde saying that says; "a workman is as good as his tools". Always makes it easier when you have the right tools for the job. Good work ! I gather the exercise, has given you a lot of interest in the trade. My guess is; that as you've "I took a few tafe courses . . . . ", You might move to this field untimately ? What a dream job, working for a company restoring olde cars professionally, would be ! Cheers Banjo
-
Hi Geoff, That is awesome ! All cudos to you, as many of us would not have the skills or inclination, to tackle what you are doing, to that level of detail. (No bog involved) Your pictures tend to indicate, you have a wealth of metal working machinery to work with. Is that all your own, or do you work in that trade, normally ?. Keep up the excellent work, & please keep posting pics. You'd be surprised, how inspiring this is to others, who may be considering tackling, something similar. Cheers Banjo
-
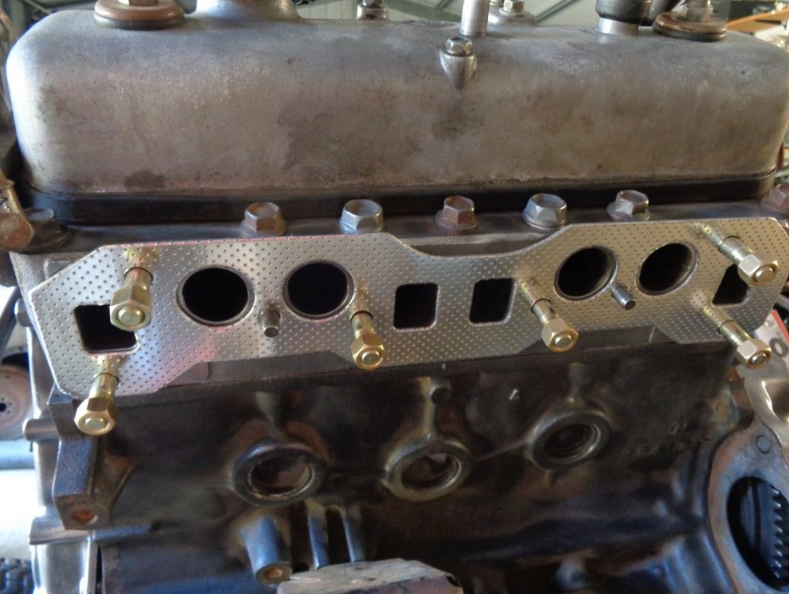
Hi Ben, Sorry to hear you are having so many issues with this particular problem. My only comment at present is, that the special one piece gasket you have purchased, does not look like the the one, we have available here in Australia. The one available to us, is quite thick, & tends to take up those small gaps, between manifolds & head face. It appears from your picture to be a metal gasket, with "facing" added to it. If it is metal, one would think, it wouldn't have the ability to "absorb", small clearance descrepancies between the inlet & exhaust manifold faces. Cheers Banjo
-

KE70 - Headlights not working from relay.
Banjo replied to MissKE70X's topic in KE70 Technical Questions
When trouble shooting electrical issues, in olde Corollas; the problem is often compounded, when You turn to the wiring diagram at the back of a manual; whether it be a Toyota factory "Yellow Bible" manual, or an aftermarket ones, like Haynes, InterEurope, or Gregorys. Generally, a mass of wiring lines, running all over the page, which are very hard to trace, & has your eyes straining, after a few minutes. Commonly, you are only interested in one part/section of the car's wiring, related to your issue at harnd, (say head-lights); but you get confused when it is swamped by the complete wiring diagram. Some wiring diagrams, depict various items, with a shape that is easily recognised. (eg: battery, headlight, or alternator) but many wiring diagrams, simply depict, the various items, as little rectangles or circles; (as above), with a number next to it, for which you have to look up the "KEY" or "LEGEND", to find out what it actually is. The simplest way, is to photo copy the wiring diagram, from the manual, then high-light with a texta pen, just the wires & electrical components, that you have an issue with. Altezzaclub, has often placed wiring diagrams, here in that format, & that certainly assists. However, even if you just isolate the wiring diagram for your area of interest, the little rectangular boxes with a "KEY" number next to them, & 2,3,4, 5, or 6 wires attached to it; give you no idea, as to what is going on inside the retangle. This is especially a problem, if the rectangle represents a switch, or a relay. A classic example would be the "hazzard switch", LEGEND 41, which is a little rectangle depiction with 6 off wires going into it. (good luck with that one) I was looking at a problem at the weekend, that I came across; whilst comverting all the lighting in my KE-30, to all LED lamps. I had previously also added to the complexity, by adding relays; so that lighting & dip switches, which originally carried heavier currents (especially in the case of the head lights), would often burn out the switch contacts. The conversion of lighting to LEDs, overcomes this problem altogether, as the same, or greater light levels, are produced, with much lower currents.. So I sat down, & drew a circuit of my KE-30 "Lighting Only" wiring diagram, & depicted within the relays & switches, just how they work, which greatly assists, whilst chasing lighting issues. I've even put the wiring "colour codes' to assist. However, please don't blame me, if some of the colours are incorrect. Even on the factory wiring diagram, you'll find wires that are labelled one colour at one end, & another colour at the other end. I remember well, several years ago, when completely rewiring the engine bay of my KE-30, that when I unwrapped the factory cable loom, I found badly crimped factory wiring, where the wire changed colour, inside the harness/loom. (Must have run out of that colour wire ?) I have depicted the Light switch & Dipper/Dimmer switch, as two seperate items, only for understanding; as to what goes on inside them. They are in fact, one unit. One of the issues with this switch is that; +ve 12 Volts power, is switched to the headlights, with a relay; but the switching, of the same high currents, betweeen low & high beam; is accomplished with fairly small switch contacts in the lighting switch itself, which switches to the ground/negative side of the supply. This, often burns the contacts in the switch, & requires a replacement switch. (Been there, done that !) https://www.rollaclub.com/board/topic/65882-after-market-ke-light-column-switch/#comments This problem can be overcome by either fitting LED head light bulbs; or fitting two relays between the Dimmer/Dipper switch & the head lights, which Altezzaclub has described on here previously. In the Light switch section, there are 3 positions. 1. OFF 2. TAIL 3. HEADLIGHTS + TAIL The Dipper switch is a little morre complicated, as you may want to flash the head lights high beam during daylight hours, when the lights are not on; so the dipper switch also has to turn on the Headlight relay, as well as select the high beam, when you pull back, on the spring loaded dipper switch. Hope someone, somewhere is helped by the above wiring diagram. Cheers Banjo.


