

GJM85
-
Posts
1821 -
Joined
-
Last visited
-
Days Won
17
Content Type
Profiles
Forums
Events
Gallery
Blogs
Everything posted by GJM85
-
Blowers are always a temperary mod. Running high end pressure through a motor that doesn't have the bottom end and head work for it will always lead to problems. If you want a freak motor with massive power from a tiny displacement do the work, spend the money and get it right. For a reliable top ender just go N/A, big head work, solid bottom end with balance and plenty of fuel with pressure behind it. It will howl like a 9krev banshee and live to do it tomorrow. The positive behind blowers is the instant rpm boost, which leads to the impound should you choose to unload in the wrong place, at the wrong time. Think about doing 100kph, cresting a hill, dropping 3rd and watching 180kph come around before you casually knock 4th then 5th as you deccelerate in a cackle of fire and brimstone.... who needs a blower....
-
should shove the 3Y in the lawnmower. think 4A-G, 3T-GTE, 18R-G, 1J-ZE.... 2J even.... I say Y 3 Y? did it fall out of your hilux?
-
121hp sounds fair considering its probably a 17 yr old motor. Nevo pullies are poo. needs cams for more draw on the intake stroke which will get more out of the pully. definately needs big injectors. microtech cpu is poo unless dyno tuned. should seriously consider some bottom end work, like pistons and rods, flywheel and clutch to get higher rpm. therefore higher output.
-
My second car was a ke70 4k 4speed. It also had a 2 row timing chain. I miss it so. Solid motor, held powerslides longtime , like i love you. :P
-
Went on a fishing trip today, 1/5/10. On the way home I was feeling charged. Time to see where the ol' 4A-FC could take me. Its currently on the home page of this website under members galleries. With current mods, visible on my profile page, the Seca went through to 7500rpm in 3rd. That's 150kph in 3rd gear. Wasn't sure if it was pure luck that I didn't POP the f*^king thing so I did it again and the old girl pulled through.... .........................oh yeah, she's tough as nails. You can call her Mrs C. Oncrete from now on.
-
cam, ports, valves, roller rockers, forged and balanced bottom end, light flywheel, twin clutch. At that point you'll find it starving for fuel at around 7500rpm. DUEL WEBBERS and fuel pump. Then you'll see 9000rpm. I also heard that if you go around with a hammer and beat your car till it resembles golf ball it will have less wind resistance and go faster. no liability accepted
-

Put A New Carb On And Now Idle Fluctuates
GJM85 replied to 19914afc's topic in AExx Corolla Discussion
Yeah he sold it a few months ago but swapped the carbi back to standard before he waved goodbye. It was a neat job. Even made his own extractors.
-
Put A New Carb On And Now Idle Fluctuates
GJM85 replied to 19914afc's topic in AExx Corolla Discussion
Yeah! Neat. It's just that I have a 180 Holley handy! Recently recoed for my Dad's 2T. They don't make em for that. Not all that keen on wasting time on this motor anymore other than keeping it running..... got other plans now.....muahahahaha! -
just got a front strut brace on ebay for 49.99$! WOOT! WOOT! I had a look on the the firewall and the holes its supposed to bolt to aren't there! Never fear! Drill and Tap are here! WOOT WOOT!!!

-
Owner: Gavin M Username: Mirage1172 Location: Beaudesert Vehicle Name: Vehicle Model: AE92 Body Shape (# Doors): Liftback 4 door Date Made: 06/90 VIN: 6T164AE9209611545 Colour: Red Engine: 4A-FC

-
I currently own a 1990 AE92 Seca CS. Its a 4A-FC motor and therefore a carburettor based model. I'm coming into a shite load of cash in the next month or two from a car accident I was in 2 years ago and will have more than enough dollars to do what I want to my little road rat. I want to convert to the AGE.... Now a cousin used to own a black sillyca fastback, powered by an 18RG, fed by twin sidedraft Solex's. Yummy! It made me sweat like a pedo at a wiggles concert. I am interested in a carbi fed 4A-G motor but am unsure of what phase motor, gearbox, lume I need and if it's even possible. I'm not the sort of person that needs the most and best power out of an engine. I just want power when I need it, reliability and maybe a lot more power when I need it. I expect people will say, "just go injection!!!" I will if its less work than a carbed AGE in an already carbed car.
-
Put A New Carb On And Now Idle Fluctuates
GJM85 replied to 19914afc's topic in AExx Corolla Discussion
sounds interesting. I was going head down the wreckers and get an inlet manifold for 4a-fc. my plan was to get it all blocked up with some of my brothers uber alloy welding skills get my dad to machine up a adapter plate for a 180 holley. I'd get him to fit suitable jets and see how it goes. It would no longer comply to standards for my motor but it would be an interesting combo. -
Hey I own a 4a-fc. It also has an extra port that runs from the manifold to the head. Well it actually flows into the manifold from the head. In the 1st exaust port there is a small hole which takes exaust gases back through the head and up into the inlet manifold. On the carbi motor the manifold is water cooled and the gases help warm the manifold and to vaporise fuel when the engine is cold. As Hiro previously stated the 1st phase FE motor has direct port injection and there for has no need for early vaporization, where the 2nd phase FE motor has manifold injection and therefore may require assisted heating and fuel vaporization on cold starts.
-
The rpm of my seca at 100kph tends to depend on the temperature outside. on really hot days it will be about 3200rpm. on cooler days it's around 2900rpm. strange....
-
I would welcome and further input from anyone with know how on how to improve the 4A-FC motor or and corrections in my current posts.

-
9)Suspension and Wheels -Finally, an effective way of achieving a higher rate of acceleration is through the use of stiffer suspension and low profile tyres on suitable size wheels. The AE92 Corolla Seca CS came standard with 13X6inch steel rims and 185/75 series tyres. -I changed to a 15X6 1/2inch alloy rims with a 195/50 series tyre.(image 1) I could of gone 16 or 17inch in the wheel department but was more concerned with real on road performance rather than the big bling look. This wheel and tyre combo has roughly the same diameter as the standard set up but is far lighter. -The bitumen roads in south Brisbane are among the worst in Australia so I opted for a degree of ground clearance, only using a 2inch lowering spring.(image 2) It was a little bit bouncey until the springs set in, but now it's really quite stiff. It still has some bodyroll but is very stable in heavy cornering. Could probably fix the body roll with a strut brace. -Again could have gone lower but speed bumps and gutters aren't friendly towards my exaust. People tend to go for the cheaper option of cutting standard springs down a coil or two but it makes for a seriously rough ride and will destroy the struts in no time. -Also in the steering department I went for a small fat leather wheel with a 1974 Corolla boss kit. Helps when throwing through tight corners.(image 3)


-
8)Timing & Tuning -Starting with the carbi, make sure all vacuum lines are intact and in good condition. Even one leak will cause misfiring or sluggishness. -Leave air/fuel mixture as standard -Leave the idle at 900rpm at warm idle. Don't try and set the idle on a cold engine. -Don't be afraid to give it a venturi full of carbi cleaner. -Check there is no slack on the accelerator cable as it will stop the carbi reaching 'full open'. The most important factor in a well running 4A-FC, the timing. -Warm the engine -Release two 10mm bolts on the distributor -Using your timing light, turn the distributor until the white timing mark on the crankshaft pully lines up to the 15 degree mark on the timing gauge. (image below.) -Quickly tighten the 10mm bolts. -Recheck the timing. -You may need to reset your idle now your timing is slightly advanced. -Idle should be smooth and quiet. 900rpm.

-
6)Finish the Service All in all a service on this engine entails the following- -Check powersteering fluid. -Check brake and clutch fluid. -Check front and rear brake pads -Check battery level & remove any corrosion -Radiator coolant level -Wiper washer water -Air filter. -Fuel filter. -Oil filter. -Oil change. NB: The recommended oil grade for this motor is 20W50. The oil you use should be dependant on the amount of kilometers and the wear on your engine. Mine has 360,000km on the OD but its more likely around 390,000km as I had a different cluster in for sometime. I currently use Gulf Western Engine Extender 25W60 SG/CD. It's pretty cheap and great for my old donk.
-
6)Ignition if you have some extra coin -I removed the standard coil and fitted a Bosch high energy coil. $40 image 1 -Champion premium coil wire silicon leads. $110 image 2 -NGK heavy duty plugs. $30 (Not Irridium. Waste of your money on this engine) -New distributor cap. $26 -New rotor. $10 A premium ignition system is a good investment because there is nothing more annoying than your cheap leads arching out on the plug cylinder walls. You'll think you've done a head gasket!Bosch leads are cheap


-
5)Induction/Inflow This gets a little bit complicated. Using aftermarket components for the induction when your using the standard carbi seems a waste of time. -To start I removed the front attachment that draws air from behind the head light and from the front wheel arch. (image 1) -Fit a new aircleaner. These can be expensive. $25-$35. But you'll notice the difference. -Now in the second image you will see a number of coloured markings. The orange dot represents the hot air induction fitting. This contains a vacuum powered vent that opens during warm up to draw hot vapour from the exaust manifold (shown by blue dots & red arrows). It has several benefits. It assists in warming the engine faster reducing cold start wear and also assists in vapourizing fuel whilst the choke is open. The white arrows show where the vacuum line feeds the shut-off vent. (shown in image 2 & 3) -Here's the relation to the cooling system. Because the engine is now running cooler and never gets to its original running temp this vent stays open feeding your engine with hot air from the exaust manifold full time. Remove the vacuum line and block it off at the air cleaner. (image 3) NB: I left the black exaust vapour pipe in place becuase it looks ratty without it and also more likely to avoid a defect notice should the Po Po even look under your hood. -I also removed the standard grill and folded an aluminium one from grill I bought at Supercheap for $25, allowing increased cool air over the radiator and into the induction.(image4)


-
4)Cooling Systemonly if it's broke From here i'll go into the cooling system. It started when I cracked a radiator due to over heating. I believe there is a blow in the head gasket because I was getting oil into the cooling system. Overtime this has glued up the thermostat causing limited flow of the coolant and increased running temperature. pop -To start I went to the wreckers and picked up a second hand Denso radiator from an EFI model. -New top and bottom radiator hoses for $9 each -I removed the old radiator and thermo fan and while I was there started removing the AC which didn't work anyhow. -Cut the AC belt, removed the motor and pully. I made my way around removing the pipes to the fire wall, removing the AC radiator and AC fan. -Dropped in the near new radiator but not the hoses yet -Remove the thermostat housing, chuck the thermostat. not needed in these Australian conditions though some people gut and refit the thermostat to regulate coolant flow -Cut a new gasket, use the gasket glue both sides and refit the thermostat housing -Fit hoses and refill radiator -Important! Leave the heat sheild that covers the manifold in place as it prevents excess heating of the radiator which is situated quite close to the radiator. Now this is where things became interesting and it took me a few months and this website to figure out the extent. *Because I was missing the thermstat, the flow of coolant is faster, the removal of the AC components also allows more airflow through the radiator. The end result is the running temperature of the motor is substantually lower. This running temperature will directly effect the standard air induction system of the engine. NB: The thermofan sensor is situated in the AC piping near the firewall and once removed your fan will run while the ignition is turned to 'ON'. It doesn't matter because your usually driving when your 'ON'
-
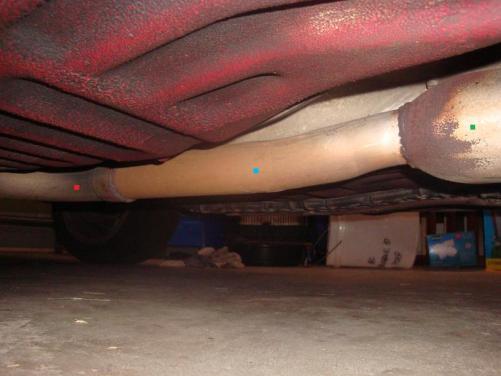
3)Exaust System As for the rest of the exaust i kept it standard from the manifold to the resonator and added the 2 inch pipe from there to the tip. I chose the Zetti 4inch cannon because it has a much better sound and doesn't sound tinny at the top end like some cheaper cannons you can get. I used to have a Lukey perfomance muffler which worked well but again sounded like a bee in the top rpm range. The cannon cost me $270 and the $130 to have it fitted with the 2 inch pipe. If you can get extractors or have a bigger budget by all means go out and spend the big $$$ on a stainless high flow cat, extractors and 2 1/2 inch pipe, but I think your wasting your money. We are dealing with a eco 90bhp motor here and that was 20 years ago. first image - exaust attachment (green dot- resonator, blue dot- standard pipe, red dot- 2inch pipe attached where the standard 1 1/4 inch pipe started) second image - Zetti 4inch cannon third image - standard cat forth image - my old lukey muffler


-
2)Exaust Manifold & Flange The aim of this is smooth flow. -The manifold can be difficult to separate from the flange so you may have the replace the studs. The nuts will have loc-tite because they vibrate loose. -Once spearated use the dremmel to clean the rough edges of the 2 pipes protruding from the flange. They are rough cut in manufacturing. -Use the new exaust manifold gasket as a template, dremmel the ports on the manifold out to suit. Get into the manifold as far as possible because the inside casting is extremely rough. You want to smooth it out as much as possible. If you can afford it, extractors would be a more suitable alterantive. -You can then use the manifold gasket as a template on the head and dremmel out the exaust ports on the head to suit. You don't need to go too far. The intake ports and valves are not too big so you don't want to expand the exaust ports to far. I left mine about 3mm diametre smaller than the gasket to avoid decreasing back pressure. Cleaning the carbon deposites in the ports helps a lot. -Use the wet and dry sand paper to polish up and blow out the ports and manifold really really well. You don't want alloy filings falling into the valve seats or cylinders. -While the manifold is off its easy to change your oil filter. -Reassemble the manifold and flange. You'll need your gasket rings, loc-tite on the studs and reattach to the head with your new manifold gasket. easy stage 1 port shine and manifold match :wink:


-
This is my first real thread so i'll do this slowly. Feel free to add input or correct me if needed. 1)Clear a Patheverything with a orange dot -remove the air intake pipes and air filter box. -remove the bash plates under the car -remove the heat shield -remove the exaust manifold from the head and the flange -drain oil

-
I'll start with a few parts and tools you will need to carry out your 3 hour overhaul. Also any extras you may have already or have the money to buy. Tools and Equipment timing light gasket glue dremel grinder wet and dry sand paper philips head screw drivers needle nose pliers spanners sockets rags Parts gasket paper flange ring gaskets exuast manifold gasket manifold studs and nuts to suit new air filter fuel filter oil filter engine oil (grade depending on wear of motor) coolant Extras alloy wheels low profile tyres extractors 2 inch exaust muffler or cannon sports steering wheel high energy coil heavy duty leads and plugs ...will edit too add anything I have missed as i go.


