All Activity
- Past hour
-

4k/5k head (Thermostat housing compatibility)
Banjo replied to Thomas Dillon's topic in General Discussion
When engines are "this olde", I always strip every down to clean & inspect. Particular in the sump area, as it is a place, You rarely get to inspect, whilst the engine is in the engine bay. Oil sludge build up on passage ways etc, is also a good reason to clean every thoroughly, before reassembly. Cheers Banjo -
4k/5k head (Thermostat housing compatibility)
Banjo replied to Thomas Dillon's topic in General Discussion
Found this sump in my garage, not bolted to an engine. There appears to be a couple of sizes of sump drain nuts used by Toyota in those days. This one used a 14mm spanner, but I've got others that use a 12mm spanner. As in Thomas' photo, the threaded section, to accept the sump plug, is threaded up inside, the sump; resulting in the last bit of oil being retained in the sump, when draining it. I can see why someone; would create that little hole, in the threaded section; to drain the very last bit of "olde" oil out. Probably a better way, would be to carefully grind/file/cut out that threaded tube, & weld a new threaded section, to the outside of the sump. These threaded sections with threaded plug, are commonly available, in different sizes; at places like EFI here on the Gold Coast, in Qld. However, some may look at that picture & say; hold on, that plug is on the side of the sump; & not the bottom. Remember, the K series motors are installed; tilted to one side; so that sump drain point, is the lowest point on the sump, when installed in the engine bay. However, what caught my eye on this 5K sump, that I acquired some years ago, from a guy in Gympie, who had it in a dirt circular track midget speed car; was this other fitting on the side of the sump. It has an electrical fitting, with two pins. My first thought was maybe Toyota put some sort of heater in the sump, for models exported to very cold countries. However, the plug contacts were too small, to handle a large amount of current, so my next best guess; was that it was some sort of oil level monitor. There was a baffle inside the sump, directly above it, so I could not clearly see what it was. So out with the 4 off 8mm bolts; & a low oil level alarm contact device appeared. It appears the black rectangular piece of "plastic/bakelite" type of material, on the LHS of the picture above "floats up", & the circuit is "open circuit." It's travel is only 5-6mm, but when it drops to the bottom, the circuit is closed, & presumably lit a warning light on the dash. I did not clean this switch up, but it still works perfectly, as I put the multimeter across it, measuring ohms. This is not some aftermarket part, as the sump has a factory original flange for mounting it, & it looks like extra baffles around it, to keep the oil around it, from "sloushing" around. I dare say, it would not be used in the midget racing car; as there, the oil spends most it's time half way up the side of the sump, facing the outside of the track. So there is always something to learn; & K Series engines, are still revealing their magic ! Cheers Banjo


-

4k/5k head (Thermostat housing compatibility)
Thomas Dillon replied to Thomas Dillon's topic in General Discussion
that’s interesting, I just had a wee google and the power numbers are pretty close between the 4ku & 5k ay. Surprising, Makes me wonder why the previous owner choose to go with a 5k head, unless it was skimmed it would’ve dropped compression. Also unsure if it’s got a mild cam in it. Such an unknown motor ahaha. We’ll get some answers once it’s completely stripped down. whipped the base off the oil pump. From a first glance the spout and pump mating surfaces look in good order. Those wear marks you can see don’t catch a fingernail at all. would there be any need to remove the upper housing beyond the pump?

- Today
-
4k/5k head (Thermostat housing compatibility)
Banjo replied to Thomas Dillon's topic in General Discussion
Interesting ! I don't think I've ever seen that previously ? Have to go & have a look at a sump, in the shed, that's not bolted to a engine. I'd be taking that oil pump off & dismantling it, & having a good look/inspection inside. I actually have a 4K-U engine in my daily KE-30 2 door drive. If You look at the Toyota K Series engine "yellow" bible; the power out of the 4K-U, is considerably more than the standard 4K-C; & not too much less, than a 5K. Have fun ! Cheers Banjo
-
4k/5k head (Thermostat housing compatibility)
Thomas Dillon replied to Thomas Dillon's topic in General Discussion
Ahahaha, shit thats a big 5k! well fellas, sump is off, I’ll be on my third sump seal if I can’t get the goop off but that’s okay! Upon taking the sump off I noticed we’ve got a 4k crank… 4k timing cover & dished pistos so all fingers are pointing towards 4K-u correct? Do all k series run a 4k crank? I think I may have read this elsewhere or would they be stamped 2k,3k,4k etc? I’ll also whip those studs out shortly and get some new bolts from blacks. also see attached the photo of the sump where there’s a gap in the threads.. I’m guessing to allow oil to flow out of the lowest point. Somewhere along the line the sump steel has been pushed up into this gap. I’ve been looking at Aeroflow fittings and the plan is to loose the entire old bung set up and weld the new one on the exterior flush so we get a good flow out when doing oil changes thats all for now, touch base soon. cheers fellas


- Yesterday
-
4k/5k head (Thermostat housing compatibility)
Banjo replied to Thomas Dillon's topic in General Discussion
Hi Thomas, These are the studs, Altezzaclub, is referring to. Went through this ordeal recently on a 5K, in situ. Had to back two nuts onto each other; to be able to extract the 4 off studs from the engine, in a cramped & crowded position, before I could remove the camshaft sprocket front cover. Pain of a job, & impossibe, with the studs remaining in place. I replaced the studs with bolts, in case it has to come off again. P.S. Notice how the engine TDC timing marks on the 5K camshaft sprocket cover, are in a different position, to those on the 3K & 4K engines. A trap for those mixing & matching parts on K Series motors. I got caught years ago ! There are quite a few second hand parts for K Series engines, available on ebay. I came across the following one this morning, which has to be the smallest 5K engine Toyota ever produced, at 1.5cc capacity. Cheers Banjo


-

4k/5k head (Thermostat housing compatibility)
altezzaclub replied to Thomas Dillon's topic in General Discussion
Do it now! Otherwise the motor will run like a dream for years and leave oil patches every time you park! Does it still have the 4 studs under the crank pulley? Replace those with bolts, in case you ever want to remove the sump in the car...say, because you didn't fix the plug thread now and you're tired of oil leaks! Its difficult but not impossible to get the sump off without pulling the motor out, but only if those studs are gone. Only you can know if there is enough thread strength to hold the plug in, but it should take 15ft.lbs I'd say, a solid but not hard tighten with one hand on a ring-open spanner. -
4k/5k head (Thermostat housing compatibility)
Thomas Dillon replied to Thomas Dillon's topic in General Discussion
bloody magic, I’ll get onto that tomorrow. Fingers crossed it should be laid to rest on the subframe and back in the bay in 6 weeks ish for a run up. this arvo I hit another wee bump in the road. I hadn’t really noticed it when dropping the oil pre pulling the motor as I bought the car a few weeks prior… A combination of an uneven sump-to-plug surface & a couple dicey threads led to a leaky plug this arvo when filling with penrite. Option 1: We rip the sump off again and have a new female fitting welded on and plug fitted. Will have to get a new seal and razor the gasket maker off. Bloody faffs. Option 2: I try and find an 18m ID rubber flat washer that can deal with oil and high temp and try that first. The plug does tighten well in the sump threads, just feels a little wobbly on the way in but I’m guessing that’s to be expected with a 1.5mm thread pitch? Sump plug size is 18x1.5 Not the end of the world and if welding a new fitting in has to be the way forward we’ll come out the other side better for it. Just a bloooody faff -
4k/5k head (Thermostat housing compatibility)
Banjo replied to Thomas Dillon's topic in General Discussion
I've always used light sewing machine oil, like you get in those little household size tins. Like Altezzaclub says . . . spray it down towards the sides of the walls of the cylinders, so it get into the ring gaps etc. The real danger with old engines sitting around, is when the spark plugs are removed permanently for storage. Screw them back in. Plug exhaust & inlet manifold with wrag to stop air entering there, as there will always be some valves open, allowing outside moist air into the cylinder proper. If the head has been removed, smear grease into cylinder walls, & around the top edge of each piston. They can store sucessfully for years like that, as it prevents "moist air" acting on the cylinder walls. Cheers Banjo -
4k/5k head (Thermostat housing compatibility)
altezzaclub replied to Thomas Dillon's topic in General Discussion
I'd get some CRC 556, WD40 or Q20, whatever and squirt some in with the extension tube on the valve. If you spray the far wall it will run around the rings and coat the cylinder walls as you turn it over. Only needs it once every few months. The 90% kero spreads the oils around and then slowly evaporates, and it will burn out when you start the motor. -
4k/5k head (Thermostat housing compatibility)
Thomas Dillon replied to Thomas Dillon's topic in General Discussion
To be honest, I’ve only ever had starlets with k series motors in them and when I look back I wouldn’t have changed anything ay. They’re an epic package, simple, and a heap of fun as is with some noisy/peppy upgrades. At the moment I just wanna turn the key and have a tidy example starly with a few good supporting mods/updated tech where necessary. Take it hooning and keep things simple…famous last words hahah I’ll look into that YouTube channel, I’ve also got a donor 4 door flat front shell that has some rear roof corner rust that needs addressing but it’d make a good track/event platform someday. also re the thermostat top housing, I found one… a factory RHS shooting outlet with a facto sensor tapped in. will update with pics when it arrives from chch. also a little unrelated, I’ve got the motor on the stand (no oil in it). It’s got a new filter on etc and is waiting to go back in the car basically in a couple months. Should I dump the oil in and give it a wind over each week? I was gonna send some down the spark tubes but being dished pistos I wouldn’t reach the walls without dumping a good 100ml in hahah - Last week
-
4k/5k head (Thermostat housing compatibility)
Banjo replied to Thomas Dillon's topic in General Discussion
Hi Thomas, Have You ever watched this guy on utube, regarding his assessment of all Toyota engines. He has a few videos, & is widely followed. Toyota Engine Assessmets In one He talks about the incredible reliability of the 1NZ-FE & 2NZ-FE engines, fitted to Yaris, Echos, & Corollas. I once looked at the possibility of the 1NZ-FE transplant to a KE series Corolla, after I purchased an Echo, for my daughter. The big problem, is it is an east/west engine, & needs some serious mods to fabricate mounting points. The other problem, is the inability to mate an inline gearbox & clutch, to the 1NZ-FE, without an adaptor; which I don't think still does not exist. I did a couple of Google searches, & strangely came across a thread on RollaClub, back in 2017, where a number of us; weighed in on this subject. I'd forgotten, all about it. You might like to have a read, at this link. https://www.rollaclub.com/board/topic/73681-cheap-4ks-maybe-not-anymore/#comment-712069 Cheers Banjo -
4k/5k head (Thermostat housing compatibility)
altezzaclub replied to Thomas Dillon's topic in General Discussion
"What do we think about a beams 3sge swap? " Its been done plenty of times, but the Beams is a very tall motor so either a lot of work to get it low, or a hole in the bonnet. I'm working on putting one in an AE86 Sprinter for a guy right now, a gravel rally car, and it has a Kiwi-made shallow sump and custom mounts. A pair of brothers who rally a KE70 used the earlier Gen 4 version for exactly this reason. Anyway, that's a long way down the track, you can make that 5K go fast enough to get into trouble! If you're screwing a tapered brass fitting into an aluminium housing use some sealant and only go just above hand-tight. Those t'stat housing are fairly thin to start with and often corroded even thinner. I pulled the thread out of a 4AGE one and found it was made of unobtanium, but luckily could extend the thread further in. -
4k/5k head (Thermostat housing compatibility)
Banjo replied to Thomas Dillon's topic in General Discussion
Drill press is always the best. Centre punch, small drill then work your way up, with larger drills, until it's the right size for the tap, for your particular fan switch. Many of those brass switches & temp sensors, have a tapered thread. Never ever leaks ! That's why they are tapered, so they basically "jam tight", as You screw them in. Cheers Banjo -
4k/5k head (Thermostat housing compatibility)
Thomas Dillon replied to Thomas Dillon's topic in General Discussion
You fellas have got an answer for everything! Ahaha, I didn’t even think of that, did you drill with a press or just a hand drill? You ever had any issues with it leaking? I suppose a bitta thread tape would do the trick ay -
 SwagStar07 joined the community
 -
4k/5k head (Thermostat housing compatibility)
Banjo replied to Thomas Dillon's topic in General Discussion
I have seen a thermostat cover/spout, with a threaded hole right on the top, that is the perfect place to put a electric fan "high temp" switch. (95 deg C is a usual/common fan switch temp) Anyway, I could not get hold of one, so filed a small flat on the top of the thermostat cover/spout; drilled & threaded a hole & fitted a hi temp switch. It's been in my daily drive, for years, & works like a charm. P.S. My aluminium radiator & fan is out of a Toyota Echo. Works a treat. The fan rarely comes on, when driving, as the ram effect of the air is enough to reduce the coolant temp. However, when I pull up in the driveway, after a run; the fan cuts in; & about 5-7 minutes later shuts down. Works like a dream, so the position above the thermostat, is a perfect fan control point, in the coolant flow path. Don't use a T fitting for two temp sensor. The temperature guage sensor, is best fitted to the standard guage point, on the lower thermostat housing, on the LHS, viewed from the front of the car. Works perfectly there. Cheers Banjo
-
 mosehi55 joined the community
 -
4k/5k head (Thermostat housing compatibility)
Thomas Dillon replied to Thomas Dillon's topic in General Discussion
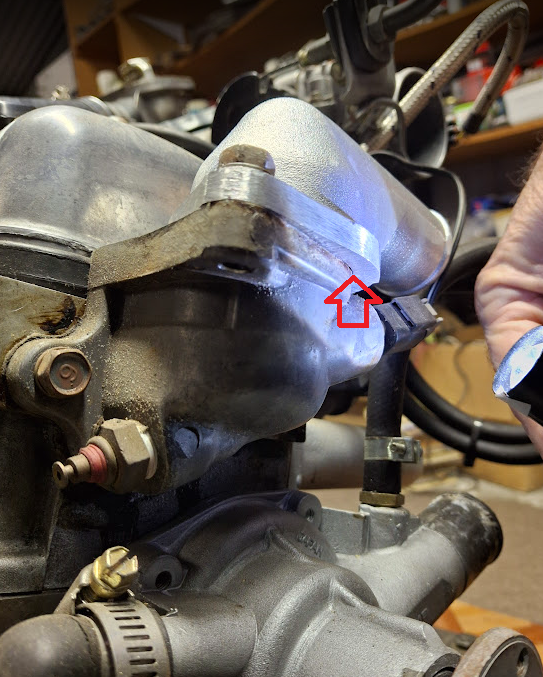
Hey fellas, tezza - A twin cam 4k?! The f*ck. Some people are too smart ahaha! They’re bloody epic cars, this is my 5th one. All the ones I’ve had in the past have been built by others. Good to go ham on this one myself (and try to do things properly hahah) What do we think about a beams 3sge swap? Banjo - your efforts are outstanding! It’s such bastard ay. However on a positive note I tracked one down in just over 24 hours and it on its way hahah. Pic attached. Hopefully this does the trick I just need to have a fiddle with temp gauge sensors, I also need a port for the fan switch, may need to run a twin T fitting if there’s only one tapped port on the bottom of the housing. shes pretty ugly but a good scrub up with some scotch bright and she’ll be brand new haha ill touch base when she arrives felllars, cheers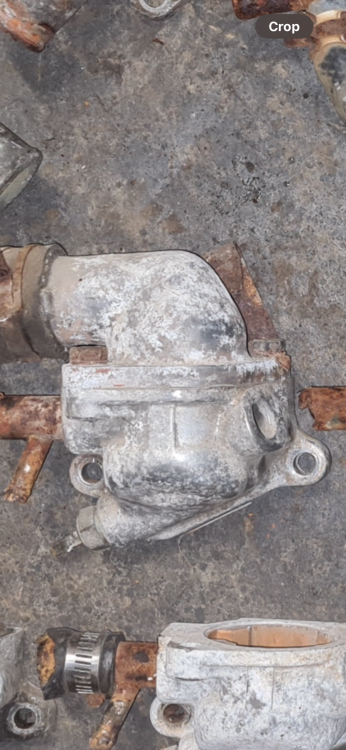
-
4k/5k head (Thermostat housing compatibility)
Banjo replied to Thomas Dillon's topic in General Discussion
Hi Thomas, As I expected; when You reverse the standard top hose spout cover over the thermostat, it leaves a small gap, for the coolant to pour out. However, on the opposite underside of the thermostat cover/spout; the gap is not very wide at all; but there still is a gap. Because the gaps are pretty small; You could possibily cut a piece of flat sheet metal, to cover these holes, with a big round hole in the middle. You'd also need to cut a appropriate gasket either side of the flat sheet metal plate, & use gasket cement, to make sure there are no leaks. Might be an easier solution, than trying to source one of those reverse spouts, that I didn't even know existed. Cheers Banjo
-
 Victor145 joined the community
 -
 taloday229 joined the community
 -
4k/5k head (Thermostat housing compatibility)
Banjo replied to Thomas Dillon's topic in General Discussion
Hi Thomas, Superb little project ! That last link, Attezzaclub posted goes back nearly a decade & a half. After reading it again, I'm starting to feel "olde" ! Keep up the good work; & keep posting pics thereof ! Cheers Banjo -
4k/5k head (Thermostat housing compatibility)
altezzaclub replied to Thomas Dillon's topic in General Discussion
Love it! Fenix, Superlites.. Money doesn't go far with those names! You know where you'll end up eventually! https://www.youtube.com/shorts/uU0uBJp09lc Wonderful little cars, garage 4AGE helped make them famous https://www.youtube.com/watch?v=kX4CAVEsdVA ..and the Europeans love them in rallying and hillclimbs. https://www.facebook.com/VHTRacing/videos/248299146008069/?s=100000342565571&v=e&sfns=mo ..and if you want to stick with a K motor but make it go faster you will need- https://www.rollaclub.com/board/topic/51097-4k-twin-cam/ have fun! -
4k/5k head (Thermostat housing compatibility)
Thomas Dillon replied to Thomas Dillon's topic in General Discussion
I haven’t had the head off on this motor yet, have be tidying up the body and everything else first as it was in dire need of some tlc. Once/if the motor kabooms itself then we’ll give it a good once over. I’ve had a peep down the spark tube on a very peculiar angle and have definitely seen dished pistos. Even just giving the motor a wee freshen; all gaskets/seals, main seal, twin row, filter, engine mounts, radiator/fan, etc etc I’ve ended up spending a handsome sum ay hahah. It adds up quick. carbs in good time, we just need to get out there rippin first. this is the pile of goodies waiting to go back in the car after paint, set a date to have it finished for early September so we’ll see 🤣🤣 had a wee mock up with the new wheels the other day and now I just want it finished


-
4k/5k head (Thermostat housing compatibility)
altezzaclub replied to Thomas Dillon's topic in General Discussion
You are right! I didn't look at the fine detail, although now I vaguely remember something about it from a decade or two back.
-
4k/5k head (Thermostat housing compatibility)
Banjo replied to Thomas Dillon's topic in General Discussion
The centre line between the two mounting holes, does not pass through the centre of the open area. It will probably bolt down OK, but will leave a slight gap on one or both sides, which will leak or blow, with minimal face to face, one or both sides. I'll try it tomorrow, & see. Cheers Banjo -
4k/5k head (Thermostat housing compatibility)
altezzaclub replied to Thomas Dillon's topic in General Discussion
"and it goes like a cut cat." Toss the downdraft and get a single 40DCOE Weber on there! If not bike quads! I don't suppose you measured the bore when you had the head off, or took a picture of the pistons? Dished pistons sound like 5K too, my 4K looked like this- That was digging the rusted gunk out from around #3 & 4 cylinders, a major reason they overheat and blow gaskets. I thought that t'stat top would rotate easily. it certainly does in Photoshop! Sounds like a fun build, any idea on the cam that's in it?

-
4k/5k head (Thermostat housing compatibility)
Thomas Dillon replied to Thomas Dillon's topic in General Discussion
I can confirm I have had this motor running and it goes like a cut cat. I haven’t had it running since I swapped out the single row chain to the double row. I think both you guys weighed in on this. I couldn’t get the locator dowel to line up and had to roll the crank back like a tooth to get it all on. The other finiky thing with this motor is its had the eg. 4k - ***** stamped on the block ground off hahah. are there any other ways of identifying the block? It goes way harder than any 4K I’ve owned, which makes me think it could be 5k. Although the rumour down the grape vine of previous owners say 4k-u block 5k head. I think I’ve found a ke70 thermo housing that should have us sorted to shoot water the other way. Thanks for your input fellas, both of you banjo & altezza always blow me away with your responses. I hope these forums pay you haha!! I’ve added photos of various angles of the motor for you guys to geek out on if you can figure if it’s 5/4k


