

altezzaclub
Regular Member
-
Joined
-
Last visited
-
Do 4K use the same kit? There's a gap between the ad part at the top saying it fits 4K, but the compatible engines don't list it. Should be fine! Be the guinea pig!
-
Ebay is quite strange, there must be things going on in the background, subsidies, factory seconds and such. There's usually a stack of sellers at the same low price, none of them have it in stock even if they say they have, and they must all buy from the same warehouse. Then a different brand with the same setup, and after that comes the real people with different brands and different prices. The final layer are the ones who are selling the same product for an outrageous price, i cannot see how anyone would buy it. It has certainly made it easier to buy parts when you're not in Sydney or Melb.
-
If the boxes had a different final drive it would be a constant ratio out, like 6kph at 60 and 10kph at 100, so if its varying I reckon the speedo might be dodgy. You could pull the instrument cluster out and take the speedo apart to put some light oil on the shaft and bearing in there, they are driven by a magnet working against a tiny copper spiral coil spring. Have the cable out at the same time and hang it up somewhere so you can drip engine oil into it every time you walk past, until it comes out the bottom. Also a good idea with that clutch cable you've just fitted! Same with the diffs, they would be a constant percentage out. They will change the speedo by 5%, as will tyre size and going to 14" rims, but in theory its all constant. I've run a 3.9, a 4.1 and it came with a 4.3 like yours, originally an auto car. Jap cars were well-known for their speedo over-reads, along with their pony-power figures.
-
Is fitting the G head an easy job? The block is the same but the crank/rods/pistons are different I think. Low compression and weak internals. However, I've run out of ideas if you've checked everything we've talked about. The head gasket could leak into the water jackets, that's common, so you get bubbles in the rad when the motor is cold and the motor loses the top inch or two of water each day, but then hardly loses more. The bubbles are the compression being forced into the water system and when the thermostat is closed they push down to to the bottom of the rad and push the water out. So if you have a full radiator and the cap off when you start it and watch for a minute or two, a bad head gasket will overflow the water then suddenly burp some bubbles out and the water level drops an inch or two as the thermostat opens, allowing the compression to escape. You can buy test kits that look for carbon monoxide in the rad water to check this. The other side is that at night after a run the motor cools and that cyl sucks a little water in, which condenses on the spark plug, and when you start the next morning that cyl doesn't fire. Eventually the warm-up drives the water off the plug and away it goes, so the motor runs on 3 cyl at first startup, then runs OK during the day, just short of power. You could try fitting a new spark plug to #1 before starting it in the morning and see if it starts up on 4 cyls. A warp in the head often leads to oil in the water and vice versa, but that is usually cyls 2 and 3. A bent valve or a burnt valve will drop the compression, especially at cranking speeds, but a leak-down test really shows that. A compressor hose on a drilled out spark plug should hold pressure against the rings but drop pressure passed a bad valve or a broken compression ring. That is a more positive test than the compression meter while cranking. So, let it idle with a full rad and no cap until the water suddenly heats up, or buy a test kit and check the rad coolant. that would eliminate the head gasket. Then drill the center electrode out of a spark plug and clamp a compressor hose on it. Even a tyre compressor with a gauge would do, just blow it up to 100psi and turn the compressor off, and watch the gauge. Do all the cyls and note how fast the pressure drops. The motor will turn over half a turn as you pressurise it, its a surprise the first time! I think this is the most likely reason for it not running now, everything else seems fine.
-
have you checked this one- '..and Cyl 1 will fire a spark plug in its lead resting on the head?' Just to make sure the plug does fire on the lead, which it probably does. So, has fuel, has spark and has compression.. The compression is the worry, a broken ring would drop that compression before stopping the plug firing. A head gasket might drop it enough to misfire but you would expect to see that in the compression test. Sort of 110psi for a dud cylinder, and your #1 is only 5psi down. No oil in water or water in oil?? They usually fail between 2 and 3 or 3 and 4 but maybe cyl 1 is leaking out somewhere... Which is what the Brave AI didn't specify.. "The Toyota 4AC engine is notably prone to head gasket failure even from minor overheating events, without necessarily reaching the red zone on the temperature gauge. " I didn't know they were prone too HG failure until I thought to check. So, check a definite visible sparking of a plug on #1 lead. No water in oil, oil in water or bubbles in the radiator on cold start... and list anything else you can think of. How did it start? Just one day never ran on that cyl, or were there oncoming signs of misfire?
-
Tricky... So is the cylinder ID from pulling a spark plug lead off when running? Number one didn't drop the idle speed? What were the compression readings? Is the spark plug black or clean? Colours of the other 3? ..and Cyl 1 will fire a spark plug in its lead resting on the head?
-
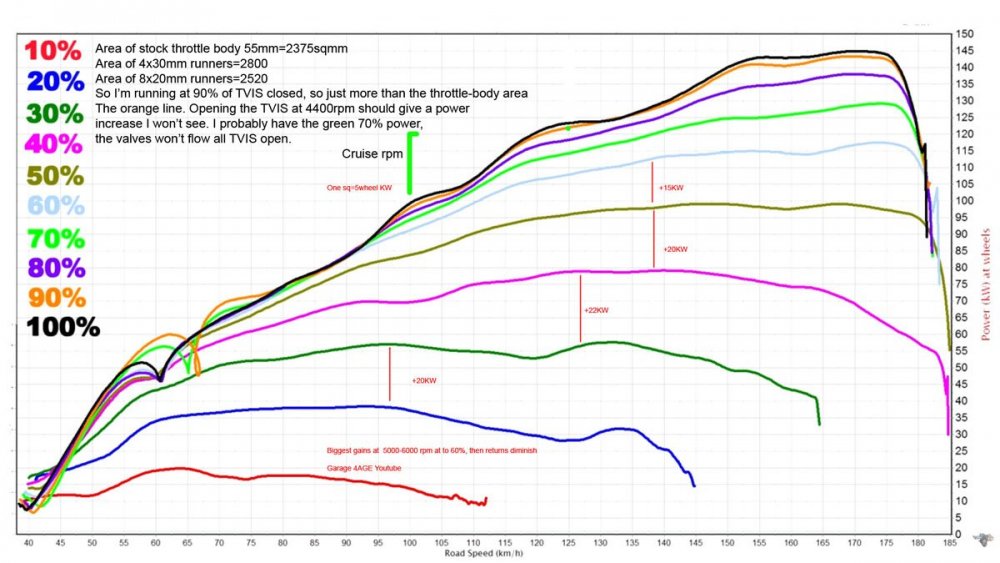
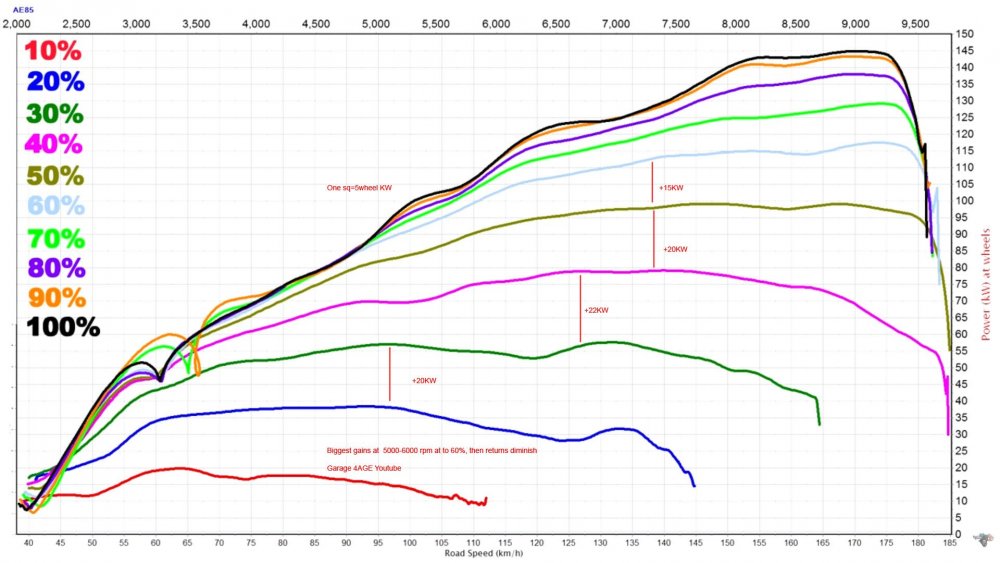
I added a bit as to how I see that dyno graph working-
-
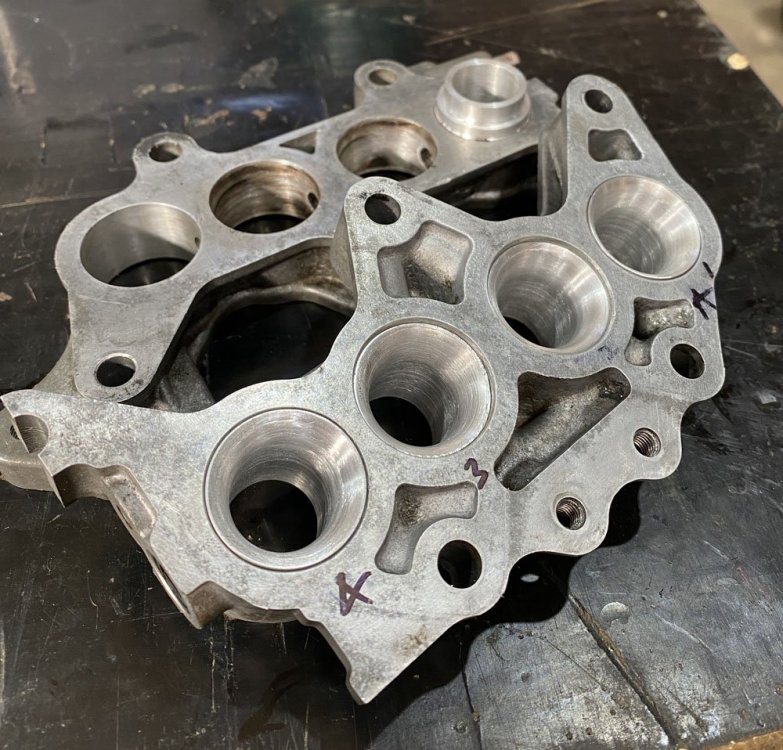
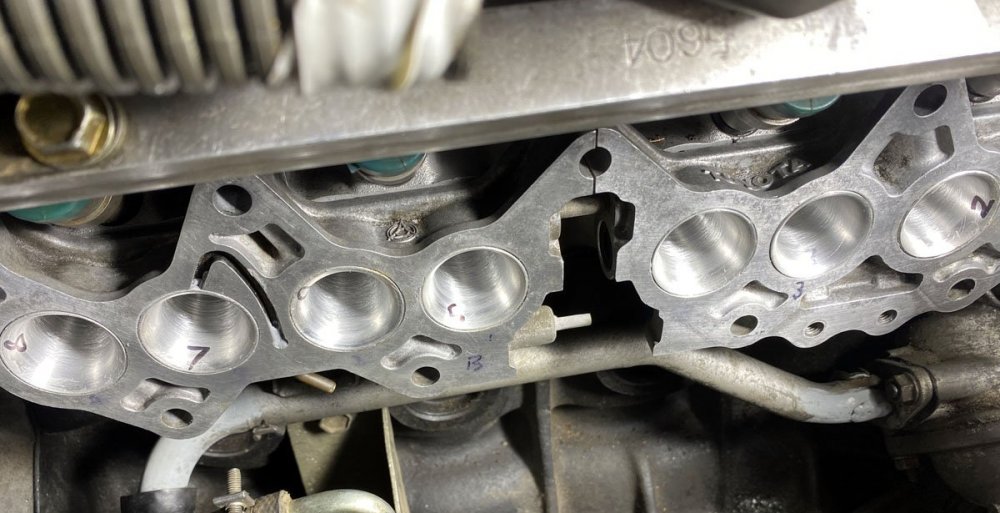
Ok, that is all changed now, and I thought I'd make a separate topic of it. It has eight alloy inserts in the TVIS plate, and the smaller diameter ports have made all the difference. This is why people say Toyota made the bigports too big! https://www.rollaclub.com/board/topic/85687-bigport-tvis-mod-to-all-8-ports/ I'll stick with that while I get the extractors moved, get some stone-chip spray on the sills and do some tidying up. Overall, its a big improvement around town and on the 40km cruise to Redhead Motorsport and back each day.
-
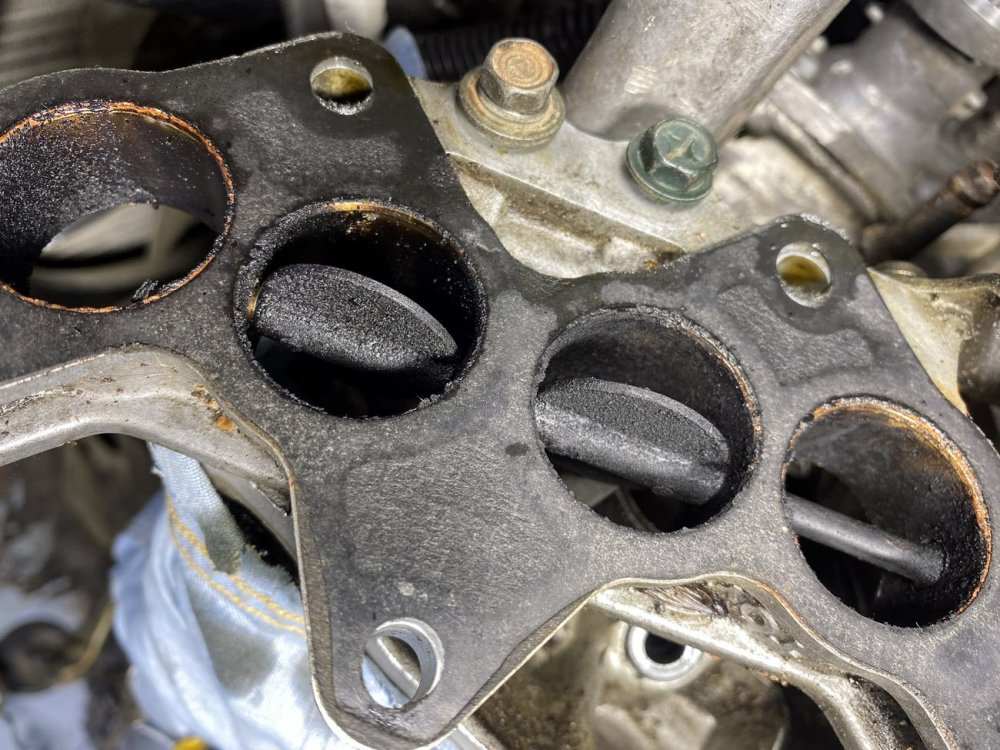
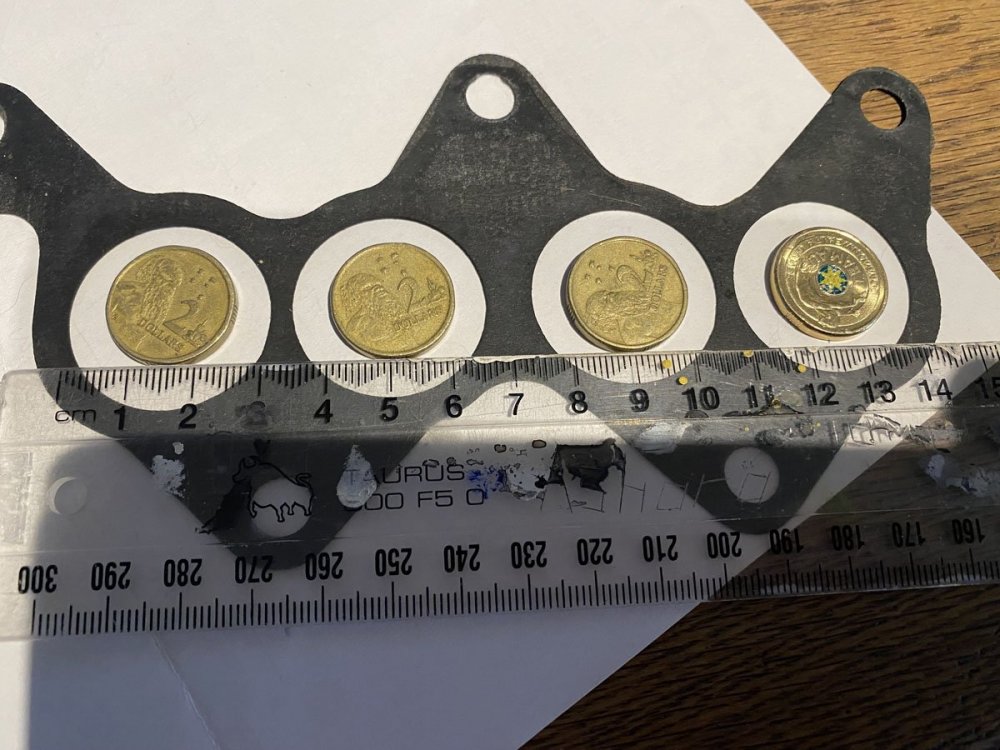
Well, the Girls KE70 has had the 4AGE for 5 or 6 years now, and more recently a Haltech running it. Behind that is the lightest flywheel I've ever seen, and a pair of Wade 267deg cams, extractors and a 2" exhaust, all on the stock inlet system... It has always been a dog low down, even with a stock ECU it couldn't hold an idle, and the last mods were Banjo making me a Hall Effect sensor setup for the distributor and a set of COPs. Then it died earlier this year and I found enough carbon under the valves to drop the compression at cranking speed, and the TVIS plates heavily carboned up. Having made some movies under the inlet system with an iphone I realised the Haltech told the TVIS to open up or close but in the wrong language! They had been open all the time! I found an output in the Haltech that worked like I wanted, but opening them was nothing great.. I could move the opening of the TVIS throttles anywhere in the rev range and nothing made a big difference. The 4 ports usually open can do what the motor needs. So I figured I'd get rid of them and run 8 throttle plates against the head and no throttle body, using the stock 8-runner inlet. First up was a look at Garage4AGE and his dyno runs. All the power increase is before 60% throttle, then you get diminishing returns. Then an excellent tuning page I came across, giving the max power per throttle body size. https://engineeredbydesign.co.uk/Pages/Calculators/ThrottleBody.php Stock is four 30mm runners in the TVIS system, with 4 closed. That is good for 220KW at 7500rpm Open the other 4 TVIS 30mm runners and its good for 440KW!! The stock 55mm throttle body can power the 220KW that takes 4 TVIS runners, although 60mm would be better. Which brings up a interesting question, does one throttle body of a certain area flow as much as 4 ITBs adding up to the same area?? Each ITB flows once in 4 strokes, then it flows nothing for the rest of the time. A single throttle body flows its max all the time, just dividing that air flow from one cylinder to the next. So in theory I think the 4 ITBs should be smaller than a big single.. Anyone know about this? OK, meanwhile, everything is waay too big for what I want. I put in a 1600cc V8 to get figures for 8 runners working, one for each valve. To get 125KW at 7500rpm needs eight 14.5mm runners!! Far too small to even engineer, so I worked on 20mm. In theory that is good for 200KW, matching the stock throttle body, and not many slightly modified 4AGEs are going to worry about more than that. These are 20mm coins in the 30mm holes of the TVIS gasket. So while Josh was away for the ARC round in Tassie I bought a 33mm round bar of alloy and got on the lathe. I made them 30mm long so they stick into the head close to the injector, stepping them from 30mm OD down to 25mm OD as the port reduces in the head. Then I put the inlet system back on. Did you know you can remove the stock inlet system and leave everything else like the injector rail on? Toyota were very neat with this design. Instantly the motor idles now, from cold even! Pulls up the driveway without lots of on-off-on throttle trying to work the revs up, and cruises easily around town at 50kph. I have nice long hill just of of town that I time 60-100kph in 3rd from a particular roadside sign, and its gone from 12.23sec to 11.8sec. That's 3000-5000rpm, the most useful range for daily driving. I haven't found any loss up to 6000rpm, I don't need more than that, and everything below is better. I've been changing the Haltech fuel cells all week as it suddenly ran lean, more air getting into each cylinder. I'm dying to see the fuel usage after a tank full. I can put the original TVIS throttles back in, or I can drill right through the lot, mount tiny 20mm throttle plates, put a cable in the middle where the TVIS actuator is and a TPS on the back by the firewall. Then it needs a vac system for the brake booster or unboosted brakes. Then you get instant throttle response. I'll see how enthusiastic I am in 6months!
-
How do you reckon that throttle disc transfers rotary motion into vertical motion? I haven't seen that before. An arm stuck out horizontally underneath, pulling on the usual ITB shaft arm and rotating it?
-
It does look like they are getting every horsepower out of the 3K that they can!
-
Knibusus's words reminded me- "I like to document things so that if anyone in the near future wants to do the same modification, there is documented information for them to refer to and may make it a bit more easier for them. " ..and I used to read Billzilla's pages a lot for 4AGE info. Now it shows- "Account Suspended. This Account has been suspended." www.billzilla.org/
-
-
No sweat, that is common. Measure the thicknesses exactly, find spring washers of that thickness and cut them in half. Glue or tackweld the half-washers onto the normal heavy washers and use them to even the flanges. I've had to slice the bigger washers to fit sometimes, or trim welds back. You could put bits of wire in the gap instead, I've seen that done. You can resurrect the other extractors with a little work.
-
Should be interesting when its done, those T3 coilovers will make a difference.


