

Papay
-
Posts
59 -
Joined
-
Last visited
-
Days Won
1
Content Type
Profiles
Forums
Events
Gallery
Blogs
Everything posted by Papay
-
Confirmed that with neither vac line attached, the pinging goes away. Driveability was decent too, so this is a fallback cure if I can't sort out the vacuum advance. I would like to get it dialed in as it was before, if possible. I ran a fresh line from port vacuum to the outer diaphragm on the distributor, and capped off manifold vac. This condition still gives a *slight* pinging, mainly on the tip-in transition. My gut says it has just a few degrees too much total advance, but backing off the base timing results in poor idle. I'm reminded that the only thing which seems to have changed is that secondary diaphragm....but if it were working, I'd have even more advance right....this had me stumped. Then it hit me. With a working secondary diaphragm, the manifold vacuum at idle would keep it advanced a few degrees until the throttle opened....meaning my base setting could be backed off a few degrees from where it sits now....meaning the total advance would be a few degrees less on the port vacuum side while driving. I'm going to dig around and see if I can find the old distributor and the single advance it had, to compare the total 'pull' with this replacement distributor. It seems there are a couple of solutions: 1) replace or fix the vacuum can, 2) mechanically limit the total advance of the contact plate, 3) reduce the amount of port vacuum signal somehow, 4) run with no vac advance and just be happy with the springs & weights. There are also tuning / maintenance steps that could improve the situation: 1) getting an actual timing light and vacuum gauge to tune with, 2) adjust any valves that may need it, since there are not many miles on this valvetrain still something could need a tweak, 3) drain the gas tank to be sure of what is in the bottom, and eliminate any possibility of water or bad gas.
-
Thanks for pointing me in the right direction. I popped off the dizzy cap this morning, and by sucking through the vac hose determined that the 'inner' diaphragm has a leak. According to what I have read, this should be the manifold vac attachment, possibly a high altitude or emissions advance on some Toyotas, good for an extra few degrees. The 'outer' diaphragm is working fine, and pulls the plunger through a reasonable degree arc (by eyeball). Just did a test run with both of them capped off, and the pinging was gone, so next I'm going to reattach port vacuum to the outer vac nipple and see how she does.
-
But the purpose of this post is to once again reach into the collected wisdom here, to see if I can sort out a pinging problem that has developed. I always run 95 octane, and after all the head work in this thread the van did run perfectly. At first I was blaming the bad gas, but that should be thoroughly run out by now. Symptoms are typical under-load rattling, even a touch on gear change. To recap the work done prior on this 5K: New valves, springs, and head machine work. Dual chamber exhaust mani, all new bolts. Cleaned the pistons and bores at that time. New (chinese) carb, new (chinese) electronic distributor with DUAL vacuum lines (more on that). No choke (tropical weather), no EGR, no vacuum leaks. Doesn't use oil, runs cool, very happy running overall, but has lost the torque it had before. My first idea was maybe the vacuum secondary stopped functioning. Difficult to determine while running, but not sure why it would cause pinging. Second thought was maybe I have got carbon buildup, just from sitting or whatever, making this pinging a case of detonation. Plan to get some SeaFoam or equivalent to run through the engine. Will do a closer visual inspection down the #1 spark plug hole, but lacking an actual borescope. My third idea centers around the vacuum advance. Never seen one with dual setup, and very little reference info. So far do not have difinitive info on which connection is for Port and which is for Manifold vacuum. Conflicting info on whether this is dual-advance, or possibly one advance and one retard. I did some experimenting on removing one vac. source, switching the sources, and tweaking the timing just a bit in both directions, but all of those ideas made it worse. Of course, it ran perfectly before and I didn't touch it until now, so its a bit of a mystery what changed. Next step is to verify if the vacuum is actually advancing (retarding?) the timing, to eliminate a leaky diaphragm. My third idea is about this van having a stock coil, which is maybe tired. Any advice welcome here, this is my first ever Toyota. Other ideas, a weak fuel pump? Although by visuals it seems to squirt fine, not exactly using the scientific method here.
-
Follow up report, 2+ years on. All the work discussed in this thread was pre-Covid mania. Van has mostly been perfect but during the lengthy lockdowns it often sat for a month or two at a time. Ran into either a batch of bad gas, or just sediment from the tank clogging up the works. There is a lesson to be learned there about making sure you run your equipment. I ended up tearing down the carb a couple of times to get it running right again.
-
Ran fine this morning on the way to work, just have to keep it alive with the gas pedal for the first minute or so. Interestingly, the cold behavior was better with the leaky secondary. I'm wondering if there could be a happy medium to be found, unfortunately the secondary is not really adjustable. Looking at it, the only thing controlling its position is a metal-to-metal cam profile in the linkage. Kind of cheesy. Maybe with some careful bending I might get it to open just a hair instead of fully closing. Another option would be drilling a small hole in the butterfly, but that's kinda permanent if I get it wrong.
-
We have taken a few trips that were 2-3 hours duration, and the van has been flawless. Plenty of passing power, and incredibly smooth pull at low RPM in 3rd or even 4th. Now I'm excited to move ahead with the dual electric fans and hopefully ditch the clutch fan. Combined with the future exhaust system I have in mind, I'm looking forward to actually being able to hear the engine instead of the fan. Today I re-torqued all the critical bolts, the manifolds had all loosened a bit. Reset the rocker clearance, which had all tightened a bit, wasn't expecting that. Plugs look really good except for #4 had oil on it (which has been ever since I've owned the van). Have enjoyed the cooler running temps, and have not added a drop of water after the initial run-in fill. I'm going to cleanse the system now and go back to coolant, and reinstall the thermostat. Before the new head, it was losing so much water there was no point wasting money on coolant, and the thermostat would get too much scale to function properly. Incidentally, the VLT ceramic paint is holding up really nicely on the manifolds. First time I have used the stuff. Wife wasn't thrilled about baking parts in the oven, think I may need to get my own oven in the shop....
-
May have solved this. I had the carb off today and found a little grain of something that was holding open the secondary just a crack. It had kind of glued itself to the wall of the throat right where the butterfly closes. After assembling and reinstalling, it was back to its normal low-low idle behavior. So I cranked in the idle stop and added a half-turn on the idle mixture screw (no choke remember).
-
Took a video, can't figure out how to make it a gif. Anyway here you can see all the new stuff. Ordered actual Toyota part numbers for all that stuff, but I feel it was worth it.

-
That's the 'before' photo haha, no I got all new bolts remember. There is no leak anywhere in that intake system, and since the mystery behavior also happened before my cylinder head swap, its gotta be in the carb somewhere. I had another thought while falling asleep last night: something sticking in the secondary. Both times this has occurred have been after heavier acceleration. Anyway this morning I'll poke a bit before heading out, and snap a recent pic!
-
On my carb that solenoid is in a threaded bore. About a week before I posted this, I had found the solenoid wasn't tight. So while I had the carb off for cleaning, I went ahead and tightened it. I just figured it being loose couldn't be good, but at the time there was no idle speed issue. Since posting this in early December, I have replaced the cylinder head, along with intake and exhaust manifolds. I checked over the carb while I had it off, and removed a couple of linkage pieces that were still in place from the choke mechanism. Just in case the little tooth cam was interfering with the throttle linkage. To be clear, I don't have a choke plate at all, the entire choke system is removed owing to the warm climate here. After getting her all back together with the new head, idle speed was normal. I figured it must have just been an air leak somewhere, and now everything is new and tight and fresh. Then today it happened again, exactly like before. Driving along, come to a stop and now the idle speed won't return to normal. I poked around to check for loose hoses and the like, but its all as it should be. Tomorrow I'm going to experiment with unplugging the idle solenoid, and bypassing the little bi-metal valve there on the side (the rectangular thing).

-
Mission accomplished! Engine is butter smooth, all the chuffing is gone, along with the random surges and hiccups. Quiet, powerful, wow I'm stoked! Huge thanks for the words of advice and recommendations.
-
Drove to the exhaust shop this morning with an open exhaust. Had tried unsuccessfully to get a downpipe made before the dual plane exhaust manifold was installed, but they had to use a good bit of guess work, resulting in the pipe pointing out to the side about 30 degrees haha. The chop jobs done here on exhausts are frightening to look at, so this particular setup is just temporary. Now I'm onto drawing up a flange to get it laser cut in stainless. Gonna order the proper sized stainless pipe sections and maybe weld it up myself for better results.
-
Def interesting how Toyota seems to have provided different combinations in different markets. These pistons have a slight concavity, so I wouldn't call them flat per-se. But as you say, seems to be designed to work with the dished head. Now other 5k's in the AU/NZ market seem to have been build with dished pistons and a flat top head I guess.
-
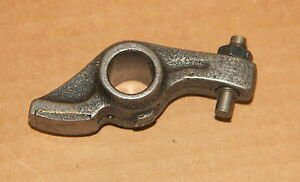
Listed as .2 for intake and .3 for exhaust (cold). I got them set yesterday with no trouble. I used a little bit different method to compress the lifters: since getting all 8 pushrods located on the rocker ball was a bit tricky, I dialed out the clearance before the rocker stands were fully seated, and before the head was fully torqued. My logic was to let the head bolts do the work. Then I went around one by one and backed them off to the proper clearance. My recollection of previous hydro engines though, is that there was zero lash adjustment. Then again, that was an Oldsmobile. In the pics you can see #1 with the exhaust valve compressed. Rocker geometry seems fine to me, but I'd like to get extra eyes on this. In the other pic you can see my pistons, which were not the dished type I was expecting. I cleaned most of the gunk off and ran a wire wheel through the top of the bores just checking for cracks and ridges. Didn't find any. Block seems to be in good shape, I gotta say Toyota impresses me (this being my first one).


-
Pulled the head again this morning, drilled the two offending holes oversize and re-tapped them. I was a little iffy about doing it with a hand drill, but it worked out fine. I had my old head to practice on to make sure I wasn't going to bugger up the new one. So now the rocker stands have 4 bolts and 4 studs. It is what it is. I'm torquing down the rocker stands right now and setting the initial rocker clearance. It occurs to me that all I have to do is check each rocker in the closed position, to make sure there is no clearance. Should be simple enough to rotate the engine through a few cycles until I can get each valve to close. The hydro lifters will pump up and do the rest. If I'm measuring right, the old head was 3MM thinner! Now I'm feeling nervous about these pushrods. They measure 186mm, I'll throw up a picture here in case it looks wildly off to some of you. This is my first K motor, so I don't have a comparison. EDIT: Ok there is a little sticker in the fender well specifying intake and exhaust clearance, so I will follow that.
-
Hit a snag. Two of the 8 rocker stand threads look like they had been previously stripped and maybe heli-coiled. Did not notice this on disassembly, and they tapped normally when I ran the taps into all the bosses. Now they will not hold the torque of the bolts. Went to all the normal parts shops here and no-one has even heard of heli-coils. So it looks like I'm going to be drilling these oversize unless I get a better suggestion. Fortunately, the old head I removed had 4 such oversize studs....maybe this is a common problem in these engines. Sucks though, I should have installed the rocker stands prior to installing the head.
-
I had the shop weld up 4 of the holes in the head where the new gasket had omitted the passages. But the block will have to wait until later. I'm planning to pick up a spare and rebuild it for when its needed. Regarding rocker adjustment, my engine is a 5K, but the rockers look like this. Actually both heads I have are like this. So I'm assuming there must at least be a zero-lash adjustment needed, even though the forum here seems to indicate that only mechanical lifters have adjustable rocker gear.
-
Bless you for posting the rocker stand and manifold torques. I couldn't find them anywhere! As far as the block, no it is still in the van, this is just a top end job only. Old head was totally FUBAR.... not only were most of the passages at the block stopped up with dirt and scale, the aluminum had corroded right up to the edge of the cylinder chamber in a couple of places. One corner of the casting itself around the front left head bolt (the exposed bolt) was either broken or corroded off as well down where it meets the block. Before I got started I procured the necessary taps and dies, so I have been re-tapping all the critical holes as I go. Its amazing how much crap is down there. Earlier we had discussed the 2-3mm step in the chambers of this cylinder head. The shop ended up shaving it twice, totaling about .75mm so I still have plenty of relief in there. Now here is what is interesting: Both this head and my old one have a casting mark '100'. The old head has been shaved much more, you can barely see the former step in a few places. This is interesting because of our discussion about the pushrods.....knowing the mechanics around here, I can almost guarantee whoever worked on this engine before just re-used the stock pushrods. So at least with this newer head, it should take me a step toward correcting the rocker geometry rather than making things worse. Gonna take some measurements today during install. I need to dig through here and find the rocker adjustment procedure.

-
Update, have the head ready to install. I went ahead and refurbished an intake manifold and dual plane exhaust mani, including all new hardware. Pulled the old head today, man what a mess. It was corroded between the water passages and the edge of the cylinder chamber in a couple of places. Right now I am searching for the torque spec for the head bolts. A word of advice regarding heads and intake manifolds. My ports in the head were at least 3-4mm smaller than the intake. Now, I did acquire them from different sources. They aligned perfectly to the bolt holes and guide pins, so its possible that Toyota used different port diameters in different years or markets. I took the time to make my own gasket and port match everything to ensure perfect alignment. The exhaust lined up rather well. But there again, the off-the-shelf gasket I originally bought was absolute rubbish, blocking at least 4mm of the exhaust ports. Hopefully the homemade gasket will hold up. I used the 'proper' material as recommended by everyone around town. Being Philippines, I'm keeping my fingers crossed.
-
Need some ideas here. My 5k has a fairly new Aisan type carb, which I run without a choke. Up until yesterday it was running smoothly. While driving, the idle speed suddenly shot up to at least double. After getting her home, I suspected the throttle cable may be hung, but it wasn't. The linkage is working normally, bolts and hoses are tight. I've backed out the idle speed screw, which only lowered it few hundred RPM. This car is equipped with some kind of a control solenoid, which the original Aisan did not have. Could this just be buggered? I'm thinking of just removing it to see if it makes a difference. What else could cause the sudden change in idle speed?

-
Check this out, for sale online. Anyone ever see one or get their hands on one? Kinda curious if any improvements.

-
Should I be concerned that milling 0.5mm or so from the head will affect the rocker geometry? Would the pushrods normally be shortened to match?
-
Have already purchased all the new bolts I could source for the head. Today I bought valves, valve stem seals, and valve guides at the local parts shop. They didn't have valve seats in stock, I figure I can get them from the machine shop. What else is recommended in a head rebuild? Springs, keepers, etc?
-
What's the recommended method for removing the whitish (calcium?) deposits all through the water passages? Should I expect the machine shop to have a process for this, or need to soak it in something first, etc? Also, I like the way they just welded up the holes around #2 there.
-
OK finally got around to removing the gasket and cleaning up the surface a bit. Head shows previous repairs, JB-weld type repairs, around the corroded water jacket holes on #4 and a little bit on #3. Surface seems to have never been skimmed. When I was at the machine shop they were adding weld material to another 5K head, so it seems to be pretty standard procedure. Its amazing how blocked the #4 passages were.


