

4AGEKE55
-
Posts
42 -
Joined
-
Last visited
-
Days Won
1
Content Type
Profiles
Forums
Events
Gallery
Blogs
Everything posted by 4AGEKE55
-
The pedal box doesn't look like that much work has been done but it took a long time to get it all aligned. I ended up cutting the tube out of the pedal and made a new pivot tube. The pedal was then welded to the new tube about 12mm to the left to get the pushrod inline with the cylinder. Drilled a new hole in the pedal arm to get, hopefully, the correct throw length. I then had to adjust the angle of the Cylinder against the firewall, spacing out the bottom 6mm to match the angle of the push rod. It is currently spaced out with washers yet will mill up an angled spacer plate once the concept has been proven. The adjusting rod I bought a piece of solid square steel and drilled and tapped for an approximate length to then give the correct adjustment. The stock banjo joint that came with the cylinder was about 15mm short of where the hole needed to be for the angles. I probably should have documented what I did more but it really just evolved until it worked. If I have to pull it out I will do measurements and backwards engineer it. Assuming it works. I still haven't actually tested it, so I hope I have enough throw. From measurements it should have around 90% travel on the pushrod. Turns out of the 2 different thrust bearing I have, I don't have the correct one so yet to check it all actually works. If it doesn't then I have a spare pedal box and will start again and move the pivot point up to increase the throw angle. As much work as that is I wouldn't have to mill a plate for the firewall angle.
-
This is still a work in progress. I have a Celica RA23 tacho on the way which will hopefully sit in nicely next to the speedo. Replacing the oil pressure light with a temp and pressure gauge and a new water temp gauge is in the process of being installed. Haven't worked out where to put a new fuel gauge yet where it doesn't look out of place. So far I have gutted a Speco boost meter I had lying about, bit of grinding to the facia surround that came with the boost gauge, 3 holes drilled, some double sided tape and a bit of silicon and the result so far.... The new gauge is held in by only the 3 screws that originally held the clock in with no cutting or changes to the dash assembly.


-

great to see there is still activity down here
4AGEKE55 replied to sweave65's topic in Rollaclub Rides
Nice clean rolla I feel your pain yet in some ways it might have turned out for the best. The people who never put any effort in to researching before asking a question that had been asked many times, pretty sure they are all on the facebook type sites together now and we can all be left in piece. Just jump over to the social media side when looking for parts or selling. I agree with hanging onto it. Some 70's cars just haven't moved in value while others have increased 10 fold. While the latest automatic everything is very comfy for day to day commutes, it just isn't really driving. I know a few friends who sold off cars when they could afford something better. Some have bought better versions of cars they used to own. Some are actively looking. A few things like Toyota probably winning LeMans this year, they don't really have any competition since Porsche and Audi have left, yet they were unlucky last year, and if the new Supra turns out to be any good, could increase interest in old Toyota's. And just imagine what will happen if Dom Torretto drives an old Rolla in the new movie, Fast and the Furious Cash Machine. -
Found some KE30 bumpers for $30 each. Better chrome than on the original bumpers plus they are KE30 without the rubber ends that I needed to replace 1 of anyway. Win Win

-
Installing the first line wasn't too bad. It is a significantly larger outside diameter yet still went in fairly easily once. Had to tweak a few of the bends. Glad I didn't start with stainless tube. Will be fairly easy to remake now out of stainless, but even though I had a very close copy of the original line, the extra diameter means it just won't fit back in the same way. I decided to use the first line as the return line, then worked out a new way to send fuel. That saved a lot of bending in the pump area. That is a Bosch 044 managing to just stay higher from the ground than the floor well of the front seat. I was thinking it would be easy to run the last section to the front since I had just done it once. Yet making one oversize line fit neatly where is doesn't is one thing, putting a second line in that was never there at the start becomes a much bigger challenge. Really wish I had a hoist for doing this. Yet the weather wasn't too bad so lying on the ground and thinking was periodically interrupted with standing around with a beer thinking. Took a lot longer than I thought and still isn't finished but is getting close.


-
What from 4 photos appears shouldn't take long at all, probably too 4-5 hours. Then I had the fun of making a 2nd one for the return line.


-
Waiting on some more fittings to turn up before I can go further in the boot. Used more than anticipated in other areas. The Fuel filter is out of a EB or ED? Falcon. I like to keep to Corolla parts where I can and if not to Toyota parts, yet that filter comes with 14mm threads on both ends so no hose clamps and being from a Falcon they are less than $10 each and available everywhere. The 2 new hard lines can be seen coming up heading no where. Swirl pot mounted to the right.

-
As the car was on LPG from the original owner, I had to find a decent fuel tank. I believe the KE55 tanks don't have the extra inlet on the right side of the tank which is needed to do this mod. This tank came out of a KE35 and just had a blanking plate which is perfect for using for a lift pump. I'm not sure what the differences are between all the different fuel tanks yet I also have a fuel gauge sender unit that came out of a KE30 sedan which goes where I have the lift pump. I was going to just suck the fuel from the drain plug at the bottom of the tank yet where is the fun in that. So instead I spent several months slowly tracking down parts to put an internal lift pump in. Apart from a very particular fuel tank, all you need are a bunch of Speedflow type fittings, yet buy them on eBay from China as even then they add up pretty quickly. The hard line is just a piece of 9.5mm hardline left over from running the new fuel lines, oh, spoiler alert! The lift pump is out of a 2006 Corolla sedan. Since it is there to feed a 600ml swirl pot it doesn't need to be anything special.


-
Picked up a dash pad for $15. Not perfect but easily fixed unlike my existing one.


-
Tracked down the different style of KE30 brake booster which a Pajero Master Cylinder will bolt up to. Very close on a couple of clearances. Have ordered a new banjo fitting for the rear brake line which will give a few more mm clearance.


-
So slow have I been doing work a snail has crawled into my engine bay :O

-
Haven't updated in a while. Been waiting on parts. Still a few to come but enough to make some progress.

-
Sigma LCA's in. The wheels are kind of in the guard. Time to track down some SR5 flares.


-
Picked up a cut and shut small port manifold. Also bought a KE30 fuel tank last week. Will be modifying it for internal lift pump soon. A few more Speedflow fittings to come first. New undercar 3/8" lines will go in soon. Still working out where to mount the surge tank, fuel pump and filters.

-
Inlet manifold removed to get cut and shut and to run the coolant hoses. Hyundai Excel X2 radiator mounted and main hoses run. Still need to make a bracket to mount the thermostat assembly yet I know where it needs to go now.


-
TA22 T50 comes with a 20 spline output so the original tail shaft fits straight in.

-
Test fitting the gearbox. The first model Celica TA22 T50 box. Has a different shifter position from all the later T50 from the corolla's which is further forward on the box. Fits perfectly into the KE55, shifter hole lining up in the middle of the factory cut out.

-
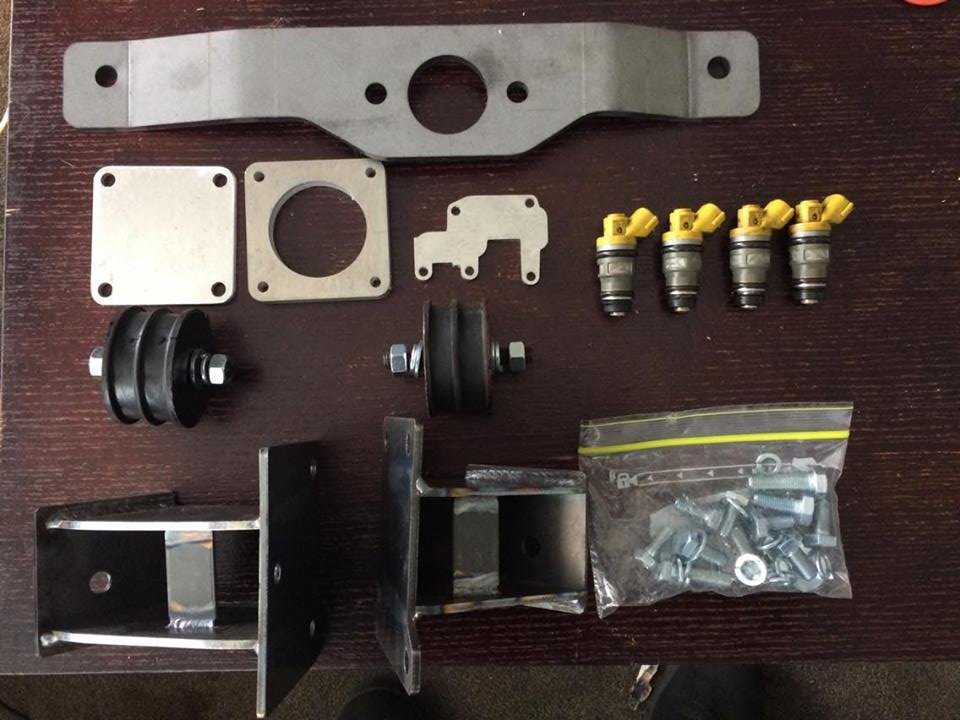
The engine mounts are 4mm mild steel FYI. Gearbox mount is 8mm. Yeah, is a lot neater than the early versions :)
-
Part of the issue with running the first wire was it also involved relocating the battery and installing a battery cut off switch. Yet I'm not including this in the 6 hours it took. This was a separate project that took most of 2 days. I got little things done along the way but the measuring to see if thing would fit before cutting and modifying took a long time. I had to cut a little bit of the radio mount off the inside of the dash to make clearance. Yet the mounting holes are still there should I ever want to put the factory radio back in. I used those mounting holes to secure the bracket for the cut off switch. Made several cardboard mock ups of potential brackets. Then made a couple from metal to discover mounting or wire routing issues before settling on this one. Also had some issues with the switch assembly interfering with parts so hit it with the grinder to make a couple of flats on the top and bottom then cut a slot to clear a piece of structural plastic on the dash assembly. I tried as much as possible not to modify the existing dash even though it isn't seen. The design probably could be a lot better as it was really annoying to tighten the mounting screws from the bracket to the dash given they screw in from the back. Several different short screwdrivers later however and is pretty solid and fits perfectly in the cigarette lighter position.


-
Engine bay getting cleaner. Most of the wiring has been redone or hidden. 1 Loom for the lights on the drivers side to go. Will redirect through the guard. ECU connected. Just need to finish off the fuse box installation to get power to the fuel pumps and fans. This is a temporary set up to get the engine running. Will end up with an aftermarket ECU in the end which will be hidden. The factory wiring made it that far once I made a hole through the firewall for the factory loom. You can see the entry point between the inlet manifold and engine on the firewall. That is the factory grommet from the AE92 I am using. That was the easy bit though. Connecting the rest of the wires becomes rather complex. I didn't realise how long this would take. Given I'm an electrical engineer and do this kind of thing all the time, plus I started this project 8 years ago and have been planning this for a long time. I went out to the car with 3 pages of AE92 wiring diagrams for the engine. 2 pages of AE82 wiring diagrams for the connection of the power. Couldn't find AE92 ones and they were close enough to work with. The whole KE55 wiring fits on 1 page. Then have 3 pages with details on pinouts, wire colours, the colour of the wire on the connecting loom etc..... Even with all this planning I wasn't expecting to go out to the car with everything in hand and after 6 hours finally having routed the first wire in a state I was happy with. The second wire only took a further 2 hours. 5 days later and the wiring is getting close to being able to start the engine yet still have a lot of work to go.


-
LOL Cheers guys. I somehow just found an old post here on rollaclub with the answer after spending all day looking on every Toyota board for the answer. Good memory LittleRed https://www.rollaclub.com/board/topic/55301-t50-bellhousing-bolts/
-
Hi, does anyone know how long the bolts are to bolt a T50 to a 4A? I have found they are M12 1.25pitch but can't find the length anywhere.
-
New engine mounts installed. Had to remove the Commodore master cylinder to make way for the inlet manifold. Will keep the MS just in case of future plans. With 20V throttle bodies and a custom tapered manifold the MS might just fit. Wiring still getting cleaned up. Needs a good wash in there also.

-
A few new parts have turned up. Engine mounts from Jordan of KE Conversions and new rear water housing from Sam at SQ Engineering. Also picked up some SARD 650cc Injectors.

-
Current work on progress. Rust cut out and welding in a new lip. Yeah, my welding sucks but I have a gasless welder with 2 settings I bought off ebay for $20. Will clean up fine and then be covered by a bolt on flare. Rust is all gone and inner guard is welded to the outer skin. Don't know why I didn't go buy a can of yellow paint. I had 3 cans of blue nearby. Will all get rubbed back anyway so.....


