

Ke70 Fan
-
Posts
37 -
Joined
-
Last visited
Ke70 Fan's Achievements
")
Newbie (1/14)
0
Reputation
-
Yea, I am too. I always wanted to learn drifting in a lower powered car before getting more powerful. hopefully it'll eventually get something that isn't so commonly put in a ke. No unfortunately lifes been in the way lately as I'm moving house, working crazy shifts that finish as late as 4am. But I've quit pancake parlour as I've got full time work at traction tyres and as of next week I'm free, haha. It's also my birthday next weekend, w00t. 18 finally!!!!! but once I get back to a routine I will definately start working on it again :)
-
Ok, not getting a 180 at the moment so it's back to work. I want it drift ready within the month :)
-
Time to let you know what's happening. Things have been put on hold with this project atm because I'm trying to sort out my first car. The main reason other than money that affects this is that I plan on buying a turbo 180sx and swapping the engines with the de so there's no point going any further with it. I can't wait. I'm going see one next week. hopefully it's the one. So then I'll have 2 projects :D I'll keep you informed Laterz
-
Yea, thanks I will be keeping an eye on them. Hopefully it doesn't have to last to long before I redesign the front end again :) Wow, must be old I haven't seen any old AO21R's coming through work anymore. Have you thought about switching to AO50's when you next need a set on the 1600? I cannot praise them enough it's like a miracle tyre it has grip when there really shouldn't be any :P Sweet, I plan on running some hillclimbs in my car too. I get what you mean, I was at one stage going to build a monster 5k to power it then decided I would want more power immediately, then looked at 4age's and eventually concluded that it wasn't much cheaper, if at all to put an sr20 in. I initially was looking for a turbo motor when this setup came up pretty cheap it always leaves the door open for a turbo anyway, as is the plan. I told myself to stick N/A for at least a year. We shall see, Things like ls1, rb25det and 2jz keep running through my head, lol :P Yes it one thing to be able to afford to build a car and another to be able to race it haha
-
Unfortunately I did heat them as I don't have the equipment to cold bend them. I did let them cool at their own rate rather than dipping them in water to cool which is ment to be better but oh well if it bends hopefully It doesn't cause me to crash and I'll just get my rose-jointed lca and tension rod kit sooner than expected and make new mounts :) I do on Saturday's and it's my dad's business. What events do you race in the ke-11? Are you on AO48 or AO50's? Thanks for the comments, it's always good to hear feedback. We pride ourselves on going the extra mile for our customers so it's good to know it's appreciated. Most of that knowledge comes from my dad's 30+ years of motorsport experience and properly training our staff to focus on the quality of the job rather than just getting cars out the door.
-
FINALLY AN UPDATE! Sorry I haven't updated this in ages. I spent the following week finishing and perfecting my castor rod mounts. Went scavenging and found nuts, bolts and crush rod tubes to use. I adopted a mounting design used to mount tow bars to cars. It is to drill a hole at the bottom of the chassis the size of the bolt to be used, drill a hole on the top of the chassis as big as the crush rod tubes, then slide the crush rod tubes in the chassis and cut the down to a eight making them flush with the rail. pics of that I cut a plate of steel to use as sort of a giant washer connecting all three mounting points and spreading the load along the chassis Loosely bolted up the brackets to check everything worked. They're made of two sections of 5mm thick 75x75mm Angle Iron fliped then welded all along the join. The other side done Found some good Federal's for drifting. Cleaned up the rust on the tow hooks as I'm going to re-use them Added some extra bracing to the brackets and trimmed off the corners to make it look a little nicer. Painted the rails and brackets black Test fit the castor rods and they would have worked but I wanted to get the geometry perfect so I took them out and bent them again to get them exactly the way i wanted, I hope they're strong enough and won't straighten out. Guess we'll see. Happy with it I painted all the bits and put it together All done and gave it a quick alignment and it's running 6"18' castor a side. Reduces steering angle a bit due to the angle of the lower control arms but I'm fine with that. It does get an alarming amount of toe change during suspension travel due to the angle of the tie rods but one of the next things on the list is to move the rack forward and down to perfectly align with the lca pivot point height and steering arm pivot point. Filled the car with Nulon trans oil and ordered in 20 litres of Martini Racing Sint50 Engine oil, all $300 worth :o Loaded the car on the trailer on Saturday and headed home. When we got home the dolley wheel finally gave up and exploded with a massive bang which had the neighbours wondering what happened :P Finally back in it's home And my Fave pic so far, looks tough :D And that's it for now, I spend the next week organising stuff for my new job at my old job at Pancake parlour where I quit about a year and a half ago :P So now I have a job to continue funding this project :D but muuuch less time to work on it. Anyway I hope to start finishing it off now. Wiring won't happen till absolutely last now due to family reasons meaning my cousin can't help me out for a while but I'll get everything else done it the meantime. Hopefully not so long to another update then :)


-
Ahh, well check this thread out then http://www.rollaclub.com/board/topic/22524-ke70-partsbumper-barsquadlightstail-lightsguards/page__st__285 ,he ships worldwide ;)
-
Alright this update should have been up Monday night but I've been a bit busy. So a lot of little bits and pieces have been done Mounted my overflow tank I made up a mount for my oil filter Everything to do with radiator mounts is now done but incase I have to remove it again I haven't bolted it up properly I used the lathe to turned down the factory crush tubes to fit it the new ones for the castor rod You can see how it sits inside The next one was better as It was a press fit Machined up a bolt to use as the pin to connect my clutch master the the pedal so now all three pedals work :) I totally didn't pretend to be drifting in it :P My new bushes Cut off the nut for mounting the tow hook as my castor rod mounts will be sitting flush against this seam. And here is the beginnings of my castor rod mounts Was going to weld them to the chassis and so it would have been done now, but it wasn't going to be strong enough so am now going to be bolting right through the chassis using crush tubes so they will be beef as so now stuff needs to be bought and there's more to do so it'll be longer. I've been busy since Monday and will be busy until next Monday so there goes a whole week :( I hoped to have it home by the weekend So there you have it. It's getting really close :D


-
Thanks mate, I can't wait either! :D They are awesome aren't they? :) I thought it was a bit different to most ke's with retro JDM wheels
-
Sorry for not updating Tuesday but it was the shittest day and basically nothing got done. Yesterday I just fell asleep before I could upload anything :P On Tuesday I put in my heater block off caps and then I spent hours testing sway bars we had upstairs then modifying my original only decide I'll just go without one for now and see how it goes. For drifting it should fine. I was doing this as I was going to try and encorperate the swaybar mount into the castor rod mount but with how the castor bars are modified I'm going to have to make a seperate mount. I then Swapped over to my Ke70 strut tops, I cleaned out the bearings and repacked them with grease, The bearings aren't flash but will do for a few months before I get camber tops. I fitted up the left hand side first but when I went to do the right hand side I discovered my shock had gone from a bit soft to completely f'd so I ended up ordering a pair of KYB Inserts. They were set to arrive tuesday at 2pm. Inserestingly The one that had leaked was a pedders insert and the other that was still good was the original toyota item; It was probably worth replacing both anyway to have an equally balanced front end. I checked my wheel bearings too and I think they've been replaced at some point judging by how great they are. So on to yesterday. I got to work around 1 as there wasn't much I could do except my shocks which would be there till later, as it turns out they arrived 10 mins before I got there so that was good timing. Now I have KYB's all round and the rears are only 2 motorkhana's old. In this pic stuts are back it and I'd cut off the tabs for the mudflaps on the body seam and painted the metal black. Then I got out the BFH and bashed the seam flush as I have cearance problems with it. Then I proceeded to check out how much lock I now have and am pretty imprest, It's more than I'll need and I have things hitting left right and centre :P The inner edge of the trailing wheel hits the arches so if I want any more lock I'd have to get longer lca's which I am getting as the next upgrade, I have now changed my mind again and decided to go with the battle version kit http://battleversion...lla-ae86-85-87/ From what I can find out they're great other than not having enough castor adjustment but as I'll have to make new mounts again this isn't an issue, anybody have any input on my choice or other ideas? The leading wheel hit the back of the arch but that's just because I have no castor rod mounts so it pulls back as I turn, I have just about a mm clearance with the tierod to lca as the inner tyre hits first but there's still more rack travel left, I'll have to check everything when I mount my castor rods. I might for now until my new lca's put in lock stops to stop the tyres rubbing on the inner guard. Today not much will get done as grants not in to help with the castor rod mounts and I'm working the rest of the week so looks like it'll be Monday before another major update but if I get anything done today I'll post it up.


-
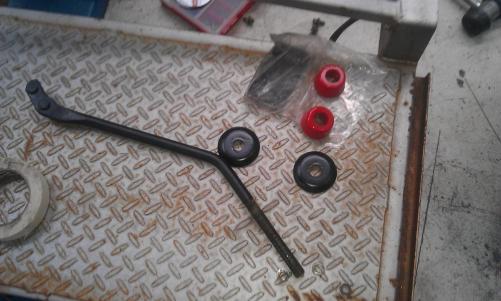
Hey guys, Well not really relevant to my build thread but on sunday I installed a set of HSD coilovers into a mates Autech S15, So an N/A sr20de like mine. Also fixed his side skirts which had been fitted badly and rolled his rear guards. Factory lip Folded completely flat with not a single bit of paint cracking, I was pretty stoked :D Rockin with the coilys! Dropped It about 1 and a 1/2 inches from factory and dialed in some camber too, Can't go any lower due to his driveway and how low his exhaust sits would make it illigal. He's is getting some Phat 18's in about a months time :) Anyway, on to my project. Today I started with modifying my castor rods. Took some measurments, then heated them up with an oxy and bent them. This design allows the rods to pivot properly through travel rather than squish the bush. It'll be a massive improvement over factory. With rose-joints this wouldn't be necessary, but I can't afford them at the moment. I will design the bracket to allow more caster. It was then time for another rummage upstairs for some polyurethane bushes, Found some that were the right size and shape but the internal diameter is about a mill too big so i'll use a lathe to turn down the original sleeve to fit in the new one, will work fine :) Here is my adjustable 4-link :D All the TechnoToy tuning parts I've bought have been excellent quality and I'm very happy with them. My only problem was 2 bolts that were the wrong length, I think they sent the wrong ones though. All Installed and looking sexy! I bled the brakes too so now they work ;) Brakes are always a good idea. Tomorrow I will hopefully get more done on my castor brackets, and a few other things. I don't Think I mentioned this before but the heater hoses had been looped but had kinked causing them to balloon so I pulled them off and ordered block off caps, which I'll install tomorrow. I also just pulled off the ke70 strut tops off my standard struts to fit to the ae86 ones for more caster without destroying bushes so much. I will set it up with about 6-7 degrees castor which I think is about the max you'd want to run on these little corollas. I will also be installing a boost guage and bleed valve in Trent's R33 gts-t for more skids! :D


-
Time for an update, sorry it's been a while I've been lazy with the updating. So on thursday I came into work. This is how far trent got mounting the radiator. Tack welded to frame. Needed a bit of work. I cut the protruding oil cooler mount bolts as they were to close to the front of the radiator, grinded the welds on the lower support as it fouled on the bottom of the radiator and as he'd only used the bottom factory bushings and had it metal to metal fixed at the top I went rumaging upstairs to find something suitable and ended up using link pin bushes that I then sanded down on the belt sander. Cut the front down to the height of the support and sprayed it black just to stop it rusting Then Re-installed my headlight brackets, cutting the top bolt down so it fit. Put my castor rods in to see how the cleared everything, and had a talk to grant about mounting ideas. Drilled and bolted the crossmember to body, so if I have to remove it All I have to do it grind off tacks and unbolt it. I worked the first half of friday, But my adjustable 4-link and panhard rod arrived! Yay I installed the panhard rod then rolled the car outside. Trent had bought an r33 gts-t the night before and it needed a clutch, so it went on the hoist I was using. If anyone else has done this you'll know it has got to be one of the hardest F#%@!$ING clutch swaps do in a car, There is no clearance anywhere, but we worked after hours and got it done. I'll post a pick of his car on Monday if I remember. Anyway, as usual Saturday is just work, So you'll have to wait till Monday to get the next update which should be my castor rod brackets which will be the last thing to do in the workshop the back home it is to finish it :) I also have to strengthen the lower radiator mounts and then I'll bolt that in. My sister got a new car aswell and today we put some rims on it EDIT: I realised you can see the R33 behind My sister's Colt. Just.....


-
Sorry I didn't update yesterday, I was tired and didn't get much done anyway. The transmission crossmember was finished and painted. I have to thank Trent who works at Traction for doing the welds. Although I can weld I don't trust myself yet with structural pieces. All bolted up. My speedo drive was leaking and it was the gear not the seal so seeing as I'm not running a speedo I cut a plate and sealed it up. That was all I took pics of but I cut off the seam that mounted the front of the castor rod brackets, had trent weld the seam back together but it was a hard metal to weld as it's so thin and works welded isn't very good, especially with thin metals so he repeatedly spot welded which ment an age for me with the grinder and I cut the radiator support panel at both ends in such a way to bring it forward It'll need welding to finish it. Today I didn't go in as I was ment to be installing a sub and amp in a mates car but there were delays and problems so it never eventuated which seems a bit of a waste but I heard we were quiet today so trent actually finished off mounting the radiator for me which is great. I should be going in to work tomorrow so hopefully another update tomorrow night :)


-
UPDATE: Today got a lot of important stuff done. I mocked up the air filter assembly to make sure it cleared When in daytime i won't run a drivers light and will use this as a cold air induction Made an adapted exhaust bracked to go from the old 86 bracket to my factory bracket. Doesn't look that flash but is solid and isn't moving at all. once the cars up and running i'll probably re-fabricate the entire exhaust system. Put the fuel filler neck cover and exhaust heat shield back on to protect the fuel tank from getting too hot. Most importantly I got my transmission mount 99% done, I took so long becuse I had to get it exctly right becuse any tension when bolting it up would cause it to snap as it's solid mounted. The welds are really strong despiter it not looking to flash in the pics. the brown is a coating the metal had on it oxidizing as i only removed it where It was to be welded.. I drilled 2 holes in the lower part so I can put a socket through to the nuts. Tomorrow will be final welds and it's done To the displeasure of some, I cut back my driftpipes, In my car it actually sat out more than the allowed 100mm. I think I might have cut just about 20mm too much though :/ They're angled to match the bottom of the bodywork but I haven't finished grinding yet A good set of ADVAN AO50's came in a couple days ago so now I have a set, soft compound on the front, Medium on the rears. How it should look except with my new radiator. Using a catch can as an overflow bottle Dropped the caster rod mounts so I could see how my radiator would work Will just cut the tabs that stick out I cut my tubing to size for the rad support, radiator will be approx 20mm higher than in the pic. That's all today, more updates tomorrow ;) Progress shot FTW! EDIT: I also used pinch weld around the oil cooler lines, thanks to B.L.Z.BUB FOR THAT


-
Great, I'd like a road going ke70 like this. What happened to the chrome bumpers from the earlier pics?


