

20v4agteEL31
-
Posts
103 -
Joined
-
Last visited
Content Type
Profiles
Forums
Events
Gallery
Blogs
Posts posted by 20v4agteEL31
-
-
No i haven't sorted it yet Tom, nor do i have many ideas. Every wire i extended checked out alright continuity wise. I didn't touch anything else. It'll be something simple i've overlooked, just get the time with a fresh young fella. You know how it is. Its the original car loom, not the engine loom. I moved the engine bay fuse box to the glovebox.
-
Man. How you still have an undercarriage at all… If i was rocking half the width of an iPhone as a ride height, I would have been Fred Flintstone-ing years ago. Well played mate. I love it.
-
so much awesome man. want updates stat.
-
Lads, are there any websites you know of that have a good array of wiring diagrams and possibly pin-outs?? I've messed something up and need some diagrams. Any advice appreciated. cheers.
-
Anybody got any links to websites for toyota wiring diagrams and pin-outs and the like. I'm specifically looking for the passenger side kick panel fuses of my EL31. In spite of my best efforts to mark everything while moving the engine bay fuse box, i've missed something and now the car won't start. I've got the whole dash out now so nice and visible, any help from the electrical boffins out there would be greatly appreciated.
Cheers. Andrew
-
I'm digging the semi-rainbow brake calipers, different to the red/black/gold I usually see. :)
I'm loving the engine bay...soooo neat!
Cheers man. A fair few hours went into that engine bay. And I hate to disappoint you Luke, but those calipers are on the list of "things to paint black" lol.
-
gave the turbo a once over, according to the exhaust housing, it's made by precision turbos.


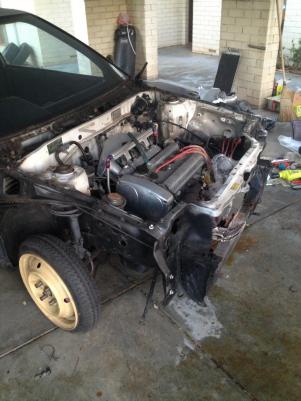
All back together and clean. The radiators look impressive with a coat of black and the intercooler polished up well. Made specifically for this car, but man, is it hard to get in there. no room to move at all.


so more wiring to do now before it bursts into life. Battery positioning and such. have to change two CV boots and a power steering boot, an exhaust with mufflers, rear shocks and springs, and some tires. that should be it hopefully. needs to be done before i go back to work. might be moving to Cairns.
-
On 4 weeks leave over christmas so might actually get some work done on this thing. Haven't really touched it in 6 months but feeling motivated to dust the cobwebs off and get things moving.
Repaired the rear of the thermostat/heater hose housing. A previous owner has drilled a large threaded hole for an autometer temp gauge. They must have changed temp sensors in the last few years as the one i bought recently would have easily fitted in one of the threaded holes provided by toyota.

Took the rocker cover off for a bit of a once over with some autosol. Pretty sexual head if you ask me. Good to see its been serviced regularly, nice and clean.

resprayed the radiators black and polished the water to air intercooler. Hopefully get it all in tomorrow. Fun times.
-
Can't wait to see pictures from this. My car WILL be ready next year.
-
Still 'plugging' away at this wiring.

Inside getting close to sorted. got 8 more wires to solder.
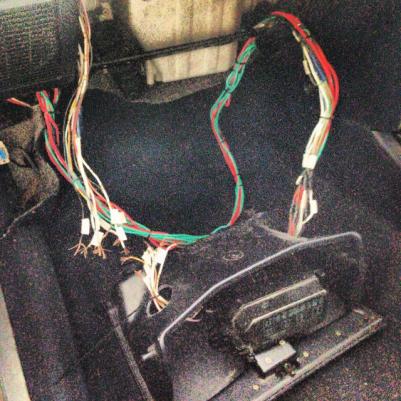
hopefully i haven't just created one massive electrical gremlin. every wire tested ok, i guess only time will tell.
-


just some updates of recent progress. Some primer, paint and wiring work done. Will do some more soldering tomorrow and get the fuse box functional in the glove box, making some room for a widow washer bottle and an oil catch can. The wife is about ready to pop with our first child so who knows when i'll get another chance to work on this. I have been lucky enough to score 4 weeks off over christmas, so hopefully then.


this is my wife's new daily that I picked up for 900 bucks. Not bad, minimal repairs needed, bit of a polish, came up alright.
-
i had one of these as my first car in 1999 in Brisbane. Was rare even then. Mine looked the same as the green one on here, but I did a 4age conversion. Loved it dearly.
Well played sir. Well played.
-
hi mate, i have one of these also. a little differently set up to yours, but none the less the same car. EP71 and EP82 starlet front struts are the same as ours. EP82 strut tops are slightly different, unsure about EP71. If you look through my thread or Tom's, theres a few details on a company that does coil overs out of NZ. fairly affordable too. Chuck 'el31' into the search on here.
I see you're in perth. When i pull my finger out and get mine registered, we'll have to get a drink and compare notes. Not many of these left these days. best of luck.
-
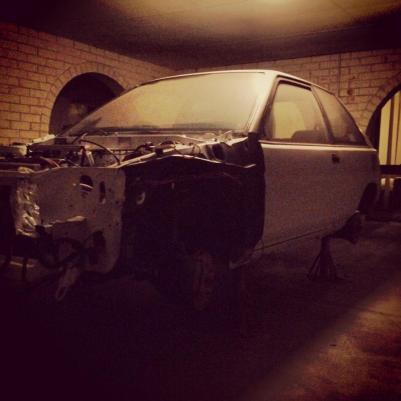
Removing heaps of stuff preparing for paint. Minimal hidden surprises under the panels and cooling systems. Start the sanding and priming of the engine bay next weekend. re-routing vacuum and cooling lines, lots of wiring changes just to tidy up and look less busy under the hood. Shouldn't be any visible wiring when its all back together. thanks for looking, lots of hours spent this weekend with little visible changes. Knackered. Also bought an orbital sander. Magical. Here i was sanding by hand like an idiot. never again.


-
Been working on the engine wiring loom today. Separated the headlight loom and engine bay fuse box to run it through the front guard and into the glovebox.


more pics tomorrow, got dark quick. I'm starting to see how the engine bay will look with a clean and fresh coat of white paint or two. An added bonus with the wire tuck is I'll now have space for a window washer bottle and an oil catch can.
-
toyota.epc-data.com/corolla_ii I'm yet to call toyota and try the numbers out but it looks hopeful. I reckon you could order pretty much anything.
-
My parents had a hot pink californian when i was a kid. Big delorto on a 1275 oversized to 1310. great car. Hope yours is alright and its not a car killing condition.
-
Great thread. Still plugging away at my EL31, bought it unfinished, and like others have said, just waited and waited for parts to come up. I have everything except coil overs now, but its taken over two years to get to this stage. Doesn't help that i now live on the other side of the country and the car sat in brisbane waiting for me for over a year.
A healthy combination of baby steps and genuine enthusiasm get a car done slowly but surely. I still get so excited on friday arvo to start work with plans I've daydreamed about all week at work.
-
nice red one mate. Lucky escape with the sump plug. Imagine if you'd lent it to someone that day… gives me shivers. I'm having the same issue with coil overs. lots of conflicting info. With my car, some say EP82/91, some say EP71. Best of luck mate.
-
Looks good Andrew, what colour are you going to go with? RE: Stickers, I was looking too, but couldn't find anything, you might have to get them custom made.
Not sure what colour yet. might do the two tone black and silver pictured above. I like the idea of white for the engine bay with a bit of a wire tuck and move a few things around to tidy it up. Not too Honda Civic style though, just make some room.
hi mate
if you get desperate
Andrew from Signs on Time in Toowoomba, did some up for mine.
he may still have the scans saved ?
http://www.signsontime.com.au/
ask for Andrew and tell him Zowie sent ya
Thanks mate, I'll have a red hot go at finding some originals first but I'll keep it in mind. I found a website with toyota part numbers for my model, might look into my local toyota parts department ordering some in amongst other things.
-
wow i really like those covers. might look into some for mine. I'd assume there is a silver top version around too?
-
More priming today. Lots of sanding. Rear and roof in primer, rear quarters next I think. Dent in left rear to have a bit of a bash at, learning as i go. Think the roof and rear look pretty good. Decided on the two tone idea, seems to make more sense logistically for some reason. Would love to find original GP Turbo side decals from somewhere. Been looking but no luck so far. Anyway my progress for today...


first time painting something this big… think I'm doing alright so far, going to do as much as i can myself. Any advice appreciated. Thanks for looking.
-
been doing some bogging and sanding on the overly nasty bits, not that bad considering the neglect. one more bit of visible rust to deal with then i'll start stripping it back and see what i find. Fun times.


was thinking of a factory 2 tone look. Not sure yet, might just leave it matte black.
definitely want to find a similar front lip to this though.

-
Yay! She's back in your possession! :D None of the transporters got sticky fingers did they?
not that i've noticed man. But it has been 18 months. The only thing i can't find is the turbo timer, but I'm pretty sure i threw that out anyway. Even the moderately expensive tools i left in there were untouched.
awesome news mate..!
looking forward to updates
cheers man, will be sooner rather than later. Busily sanding.
And now for some pics of my crazy russian counterparts….


and i want these wheels just quietly


El31. The Other Other '86 Corolla
in Rollaclub Rides
Posted
Hi Tom,
Not much has happened with the car, I've been at sea a fair bit these past few years.
I have moved to Cairns though, so sadly the EL31 is just gathering dust in the corner of the garage for now. I'll get to it one day.
I've been contemplating putting the running gear in something that was actually supposed to have a 4age in it from the factory, as I just happen to have an AE92 as a daily, but i can't justify the expense at this point with a second son due any day now. Like I said, I'll get to it one day.
Hope you're well mate. How's old Maxi travelling?