

wenisman
-
Posts
130 -
Joined
-
Last visited
-
Days Won
8
Content Type
Profiles
Forums
Events
Gallery
Blogs
Everything posted by wenisman
-
@pogopinsI didn’t see that mcm, but I’ll check it out. The 3rz fits without the scoop, nugget garage has the 3rz in a ke10. But the 2tr uses the same block so I’m hoping it will fit… I will need a new oil pan and to get the engine as low as possible but I guess time will tell. Worst case I’ll go back to a 3rz but I will post soon for the guard, I’m going through the motions of getting the brace out.
-
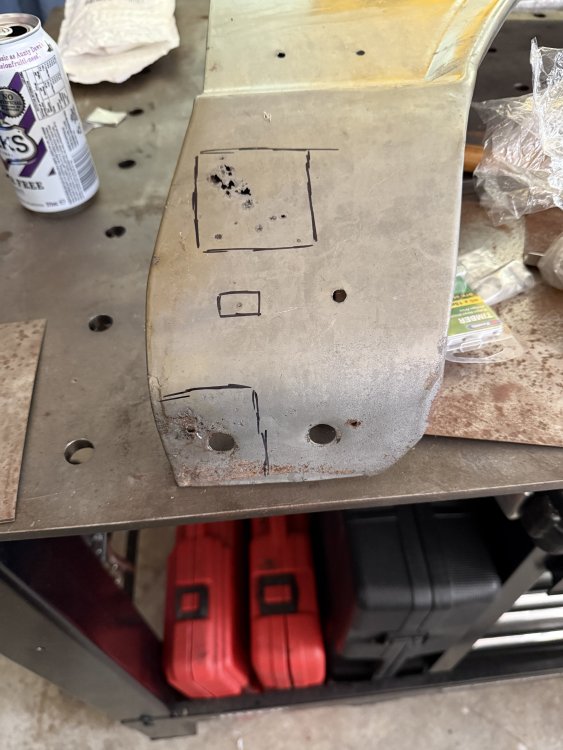
But then I started on a small task that is now snowballing. There was a rusty section on the drivers side guard and a little section on the base, I used the small English wheel to put a curve in a section and it seemed to match well but that’s where all my good intentions came undone. As I planned the cuts I realised I would cut through the support frame on the inside. So I started to part the seam of the metal so I could extract the frame support… except the outer skin started splitting and not coming off the frame So I have been sitting and thinking for a while. And if I need to remake the edge of the panel then so be it, will remove all the rust anyhow
-
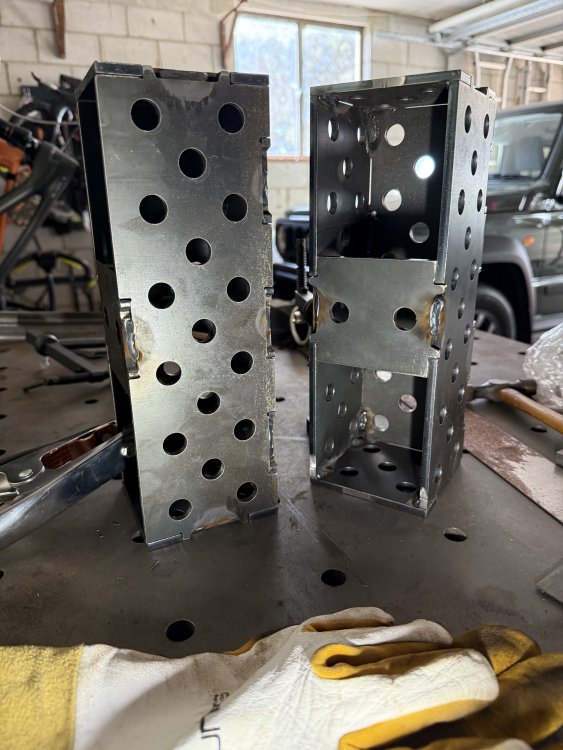
Sorry everyone following, life events took over and I didn’t find time to work on Kevin. But I’m back now, and to get back into the saddle I welded up some table blocks that will come in handy later i haven’t welded anything that thick before and so trying both inside and outside welds was an interesting experiment
-
So I had to keep moving the brace around to clear the lock, pushing it up higher in the frame seems to work. But I will still need to put a relief into the brace for the latch mechanism. It is tight in there But as they say, "clearance is clearance". So I have trimmed the ends of the brace, I will bend them over, weld and make a solid right angle. Then I can spot weld it onto the frame, but first, more repairs to the frame edge

-
My issue is that the brace is contacting the inner frame, I have started putting some shrinks on the edge to give it a curve. With the brace being straight you can see how curved the rear hatch is. So a little shrinking on the edge flange between the dimple die has put a nice curve on the brace and it matches the frame


-
Well my conundrums continue and my procrastination continues with it. I put the lock back in the rear hatch so I can take some measurements for locating this brace. there is plenty of room between the outer skin and one inner frame. The issue is the budget that holds the lever. I think I can modify the brace so that it ties into the same bolt holes for the brace. It would make it nice and strong and give me a place for he central locking mechanism. The idea for the central locking is to have a small latch rotate and then block the lever from being pressed.

-
Well I said I started on a few side projects over Xmas, so the first was tinkering to get myself an fuel flap. Whilst I'm not sure how it will actually function, I continued on in blind faith and ignorance. So a small square was cut, and put through my mini English wheel. Wheeling in one direction gives the curve in the panel. So I cut some 50mm discs from 1.5mm steel, I might need a slightly larger disc but I didn't have a bigger hole saw. The hole for the fuel flap is 60mm, so with the door skin I have a fuel flap of 52mm which leaves 4mm gap all round. I might weld a small wire around the edge of the disc if I want to reduce that gap. However one disc is for the base to hold it too the car, the second is to hold the flap skin. So I'll just the hole saw to cut the centre out. Right now id be happy to just have it held closed with magnets. It's really just to hide the fuel cap, as long as it looks online with the rest of the body on the car

-
The step fange die is great, just means I can do a dimple die at home with hand tools. It was funny even with the edges turned up there was a bit of flex, but with the dimple dies the brace is now rock solid. It might just be me, but I found using an impact wrench to tighten down made the dies slip and so the dimple works end up off center (by a lot). So I sprayed both sides of the metal with wd40 and manually wrenched down the dies to get good alignment. But you still need the impact for that last little bit just so you don't put pressure on the panel trying to hold it
-
But I picked up some stepped flange dies that use the draw stud. So I went about adding some more strength to the brace I'll bend up the ends when I'm convinced of it's placement as I needs to clear the center lock. I was thinking of putting a rear windscreen wiper in using the brace but I don't think it would work. From the few I tried they just wouldn't fit in the frame with the brace, motor for wiper, water lines etc

-
But I also started on a brace for the rear hatch, because there was so much damage and I have also repaired the frame I'm worried it might have lost some strength. So I used the workshop to cut a strip of steel and bend up some edges. At first I put a hole right in the middle for the lock to go through

-
Whilst I was busy cleaning up some of the storm damage a package arrived. I ordered the 3rz engine and transmission kit from ke conversions. So I started refitting some of the steering components and the sway bar to make sure things clear when I do get arround to fitting the engine. I think the 3rz might be too big for the little rolla. But the 2rz could be a better match, physically a bit smaller and so might package a little better. Apparently they use the same mounts, but I guess only time will tell

-
Hi parrot, They charged me $180 for the dip, clean and antitrust coat after for the apron. I wanted such a small panel dipped as I have seen sandblasting warp smaller/thinner panels. I also got the bonnet dipped at the same time as there was a lot of rust right above the battery and the braces. The bonnet was $450. But it's a delicate process to remove the bonnet skin as it's mostly in good condition. So I'll tackle that once the rear hatch is complete
-
So after some paint removal and a little time with the hammer and dolly the main damage is mostly repaired. I'll hit it with the body file and get it perfectly smooth. However before that I will need to weld up the tears in the edges of the metal


-
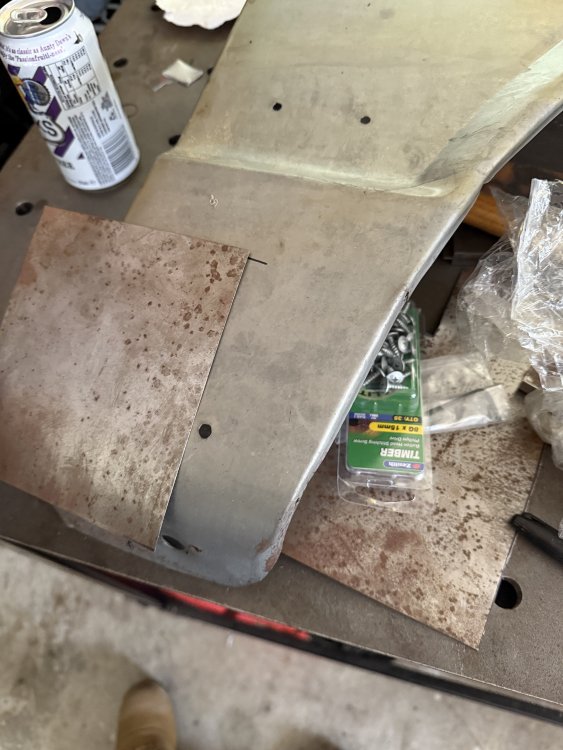
But I decided to take a small break from the rear hatch, so much time on it and I am struggling with the central lock. So I started on the front apron, I can see that it is also a victim of an accident There are some other tears in the edges of the metal where it has stretched. So I sent it to be dipped to remove the paint so I can at least make progress here.


-
Hi, Thanks for checking in, we have been busy with house renovations for the last few months so it's been slow progress on Kevin . I have been busy filling the box of shame with prototypes for a central locking system for this rear hatch. I'll post something soon, but it may not be for the rear hatch, just metal work on other panels
-
That's a beautiful build, always glad to see any old Toyota get a good resto mod I was previously interested in how he did his 2ar-fe rwd conversions. But it's a hard conversation, I'm going a slightly different route with a rwd engine. But Holley actually make 7" led headlights in a retro style. Even stedi make an homage light to use on resto mods.
-
Well I have come up with a semi-ingenious way to line up the tailgate when putting it back together. I have a small template of the few remaining spot weld holes on the frame, as I can use these holes to line up. Transferring these holes into a steel sheet means i can use this as a welding template of sorts. I have been playing in CAD and designed a weld on stud, it has a base of 12 mm so I can weld it on, a flange of 8mm the same width as the spot weld hole to line the panel up perfectly and an m7 thread so i can put a nut on and secure the last of the skin to the car. I'm just getting 8 machined from an online service, i will need 4 for the tail gate but ill need a few to practice welding on first. Fingers crossed this works out...

-
I started the final welds but then started running low on argon about half way through. So the color of the weld was a little off. But still had decent penetration and so I'll hit with Scotch Brite and see how it looks. And that marks the majority of the tailgate done. A few small rusted edge pieces to go and I'm making some braces to strengthen the frame.

-
I finished fabricating the replacement piece, it was a similar process to the other side using the old timber from before made the job a little quicker Then it was fettled, tacked in place and prepped for welding


-
Well with the temperature not in the single digits I returned to the garage to continue work. So I finished welding up the spot weld holes, but you have seen the previous holes and it's not much different, but all 36 holes are now filled. I have started filling the seams of the panels with rust converter before I go through and take the surface rust off. Using a syringe to inject the rust converter in the cracks I then started on the rest of the bottom, I was waiting on some metal and a new toy. I got a small English wheel so that now I can shape the bottom edge properly. This is because the bottom is convex in shape.


-
Well I'm half way, 18 holes filled and that leaves 18 to go. Had been some lessons in this but the results are ok, I will go back and touch up a few with the welder

-
The only thing is starting with a disc cutout little thicker than you need, just tap it down with a hammer and then keep hammering it until it's stretched to about the size you need. Bring you are using mig you need a little more room around the edges than I do as I'm on tig. Also use a copper backing, if you do have a hole close to the edge there is a good chance you'll just burn away the metal without it. Don't ask me how I found out... Thankfully it was on scrap metal
-
So it's been a little trial and error, mostly on scrap steel. But I have a way to fill the spot weld holes. I have a cheap metal hole punch, so using that I can punch out some 1mm steel to close to the size I need. Then I flatten it using a hammer, I also then stretch it and to fill the hole as much as possible. This should bring the thickness down close to the 0.8mm of the original metal. It makes filling the holes much easier. I'm still going on the holes, but I'm getting there...


-
Well I spent some time pulling the old window, it was a fight but I got it out keeping the seals mostly in tact. The new seals do seem to be a touch to small, but they just might need to be stretched. But as a contingency I will see if I can find a local slip to make up the seals from the originals as that's in one piece


-
Actually, if I find someone local I have a set of original window seals for the middle window where my rear passenger doors are. Yes any rubbers that came close to working I would hoover up I could have those made up into new seals for the panel can guys


