

Medicine_Man
-
Posts
3564 -
Joined
-
Last visited
-
Days Won
7
Content Type
Profiles
Forums
Events
Gallery
Blogs
Posts posted by Medicine_Man
-
-
Love it!
-
 1
1
-
-
Nice, just a bunch of small issues. Sounding much better.
-
Been a while scince I last updated this.
Gets hard to find time between work and looking after my daughter.
Got the shape back in to the rear window opening now and started filling the dents in the roof where it was vandalized. Think I might need some shrinking around the dent on the drivers side, keeps collapsing on itself when you apply a bit of pressure when filing..


-
1
-
-
Could use the Camry condensor if you want to, probably has the receiver dryer built in to it.
-
Boys at work have all the gear to make new lines if you need. Can gas it all up too.
Use ae86 condensor and evaporator and 2az compressor.
-
Best off grabbing the high beam trigger direct from the headlights and mount the relays close to the battery.
Basically you just use the 85 and 86 pins to control the relay turning on via high beam. interrupt it with a switch so you can also turn it off when you don't need them (how aftermarket spotlights are legally are required to be wired) -
Member Name - Medicine_Man (Justin)
Area - Bracken Ridge
Daily Drive - 2009 Toyota Hilux Dual Cab (V6) Projects - Yellow KE70 Corolla, Blue AE86 Sprinter
-
yeah, as long as it is 4mm 7 core you should be fine. Trailer plug should take the load fine!
-
 1
1
-
-
My old 4K in my KE70 had the tighe 104 grind, was very nice to drive!
-
Very much enjoyed driving your car the other week, makes me miss driving my corolla. The torque is just unbelievable and makes it so easy to drive, then when you feed it some throttle it just wants to go!
And yes, Next generation of rollaclub could not wait, my daughter decided to come 3 weeks early. I am sure you are in for a lot of changes just like us. If you need any tips on the baby we are already learning a lot so don't be afraid to call! -
You need a relay with 2 x 87 terminals, if it has 87 and 87a it is a change over relay with a normaly closed and normally open contact.
you can run a single pair of driving lights off one relay with no dramas. -
Congrats, when is the baby due? Casey is due June 14th.
-
1
-
-
As far as i am aware there are no issues with float bowl when upriting.. the intake manifolds are a copy from new zealand. sheldon on clubk.co.nz does a kit. though my engine mounts and adaptor plate were genuine items from yahoo auctions japan.
-
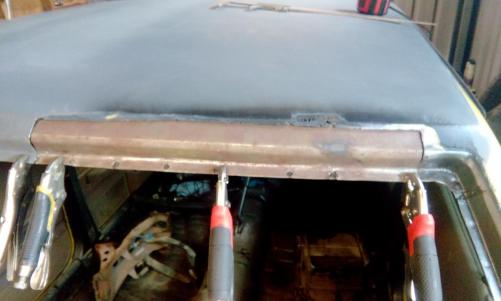
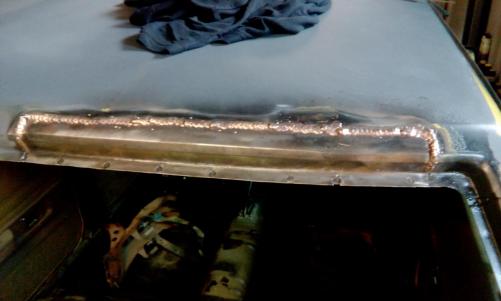
Today I got to cutting the rest of the rust out and welding in the big patch from the cut from teddys old roof..


-
The adaptor plate is not tapered, its just a flat plate. Kit gives you more clearance between the head and the strut tower.
Basics of it is new engine mounts, adaptor plate and manifolds..
-
Joys of fixing rust :)
Nice project by the way!
-
Must feel good to have a fresh coat of paint on it. Makes me a bit jealous.. So much work to do on mine :(
-
Today I made a patch for the big rust hole in the passenger rear window opening and welded it in. Yay for some progress! The silicone bronze welding wire makes it so much easier to grind back the welds..


-
Friday afternoon after work I managed to knock back the rest of the roof and gave it a quick hit of etch primer. Also finished tidying up around the window openings with some rust converter.


-
Due to the fact the Corolla sat outside in the weather at the last place it wasn't helping things much. I moved to a new house at the end of last year which now has a shed where I can work on the Corolla once again.
I started by knocking back the paint on the roof on one side when I had some spare afternoons. Just gave it a quick hit of etch primer till I can get a chance to repair all the damage the vandals did to it..
Over christmas I ripped out most of the interior and the rear window to expose the rust that I will have to tackle. Turns out there is also rust in the front window opening that needs to be fixed too.
Lucky I managed to get a corner roof cut from Teddys old white KE70 before it went to the dump so I can use it as a patch.
Archie the dog was keen to be a supervisor and make sure the interior was adequately removed ready to start repairs on the rear window opening..


-
So now I am in the process of getting some custom extractors made up by my mate at Gun Performance at Lawnton. We decided cut up my old Hurricane extractors and use the plate to make the new set. I didn't realise how much I had to modify them and also becaue one of the studs was drilled out larger and helicoiled in my old head I had to weld a bit back up.
At work today I got one of the welders to fill the hole in the plate that was redrilled larger previously, machined the plate as flat as i could and proceeded to re-align the exhaust plate with the adaptor plate. Marked and drilled the holes for the M10 studs to go through the plate (going to need some studs that are a bit longer too).
Looking at going to a 4-1 merge collector in to a 2 & 1/4" system.


-
Yes, I think someone needs to figure out where the missing threads have gone to? This page needs an update for sure!
-
Because of the uprite engine mounts it means the standard radiator hoses are no longer going to work. Ended up buying 3 x 90 degree alloy bends and a length of silicone hose.
Top one just needed to be chopped back a bit and silicon hose on the ends.
Bottom one needed a bit of love from my mate who cut and tig welded the bottom two bends to make it all line up with silicone hose on the ends.
I will eventually have the pipes powdercoated black when I get a few more bits together to get done.


-
1
-
-
Because I somehow managed to lose the gearbox crossmember i made previously, I had to make another one up. I think it probably turned out a bit better and I still have to cut it down a bit and get it powdercoated.


Teds Project Ke70 ~ The Blue Car
in Rollaclub Rides
Posted
It was stipped chemically with regular household paint stripper. Probably hit it with a 60 grit orbital sander disc after the paint was removed.