

chestikoph1
-
Posts
296 -
Joined
-
Last visited
-
Days Won
14
Content Type
Profiles
Forums
Events
Gallery
Blogs
Posts posted by chestikoph1
-
-
Remade the accelerator pedal and repositioned closer to the brake pedal, also drivers side heel plate done.

-
On 6 December 2018 at 5:24 AM, altezzaclub said:
Lovely work! I'm afraid our rally car will never look this good!
Thanks altezzclub, unfortunately I know it won't stay this clean even though it's only going to see tarmac.
Finally got around to re doing the exhaust, it had to remade due to the floor of the car now being lower and flatter, the resonator used to fit into a slight rise in the floor but that section was cut out. This system should flow better though it's a more direct path to the muffler which I swapped out to stainless on as well.
Couple more things to hook up in the engine bay, prime the oil system and it's ready to restart after a long hiatus.


-
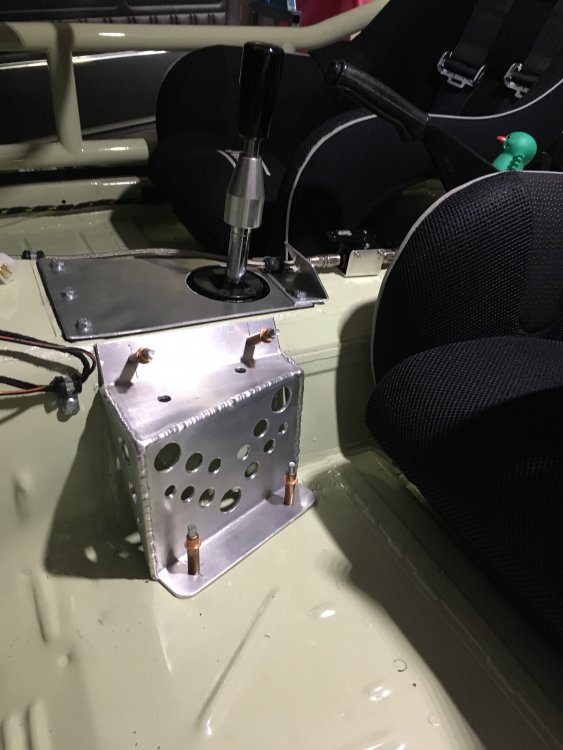
Just the small stuff left now, foot rest for clutch pedal made up and fire extinguishers mounted. Need to make up the heel plates next and mod the accelerator pedal so it's closer to the brake pedal.


-
Re positioned the hydraulic handbrake to the side of the tunnel, it's a more rigid area to mount it to. Having it bolted to two surfaces rather than one like before has made it a lot stiffer than before.
Loving owning a tig welder, I made up mount with some 3mm aluminium plate and drilled a few holes to access the mounting bolts and lighten it a bit, just need to plumb it up and remount remote reservoir.


-
Looking shmick, good to see her getting driven. With the rear light surround I know you can get plastic chrome plated. I think they hit it with a special primer and then chrome plate it.
-
 1
1
-
-
2 hours ago, ke70dave said:
it looks rather professional. nicely done.
I should buy a tig.
Thanks Dave, yeah it's great having the Tig, I have knocked up a few bits and pieces with it now it's been so useful particularly for the aluminium fabrication side of things. Definitely worth grabbing an ac/dc model for the versatility of material capabilities.
I made a new catch can with it last week, it's not perfect but for a first attempt it turned out OK.


-
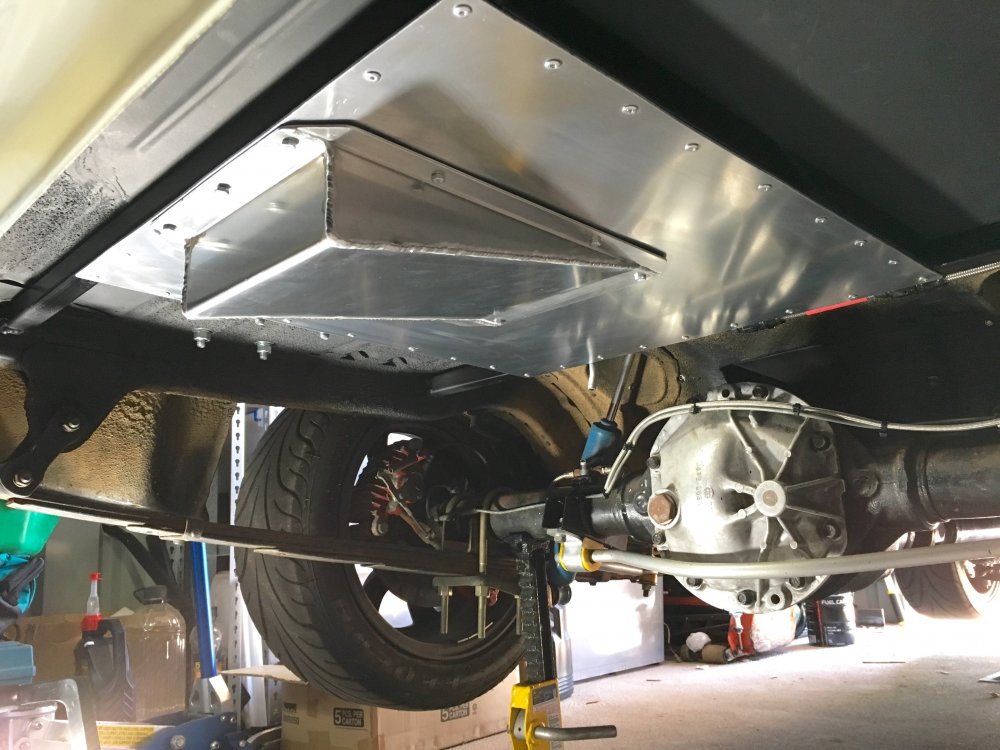
Another weekend and another task completed, this time the cover for the fuel tank under the car to stop crap hitting it and also to stop crap dirt getting into the boot. But I still needed to access the tank drain from under the car.
Anyway pictures tell a thousand words.....


-
13 hours ago, oh what a nissan feeling! said:
So cool, such an awesome build.
Thanks Matt.
Some of you may recall before I pulled this apart I had just fitted a thermostat and oil cooler to help with oil temps on the track.
I bought a thermostat from Improved Production and a Mocal 16 row oil cooler and mounted the cooler to the front bumper, there wasn't many other options where to mount it. Now this had a great effect and oil temps dropped significantly and it even helped with coolant temp as well. But the bad thing was if I ever needed to take the front bar off or beaver panel the oil cooler had to get disconnected. Not the most practical or the easiest of tasks, pretty messy as well.


So I for this rebuild I had to think of an alternate location for the cooler that was unobtrusive yet still functional and had good air flow. I settled on where I had the oil catch can, this area is out of the way and gets great air flow if you remove the headlight. So I reworked the oil lines and changed the thermostat to a thermostat and oil filter relocator unit in one.


-
1
-
-
12 hours ago, Mechanical Sympathy said:
Almost looks too good to be a racecar!
Thanks, trust me it won't stay this nice.
First round of the sprint series is on the 15th November, I am going to struggle to make it I think.
I have had trouble getting a new front windscreen, the original one broke in the process of taking it out for the cage install, there is not one single screen in WA, so I am having one shipped from South Australia.
Anyway some more pics of the interior which is almost done, still have to remount the hydro handbrake and make some aluminium heel plates.


-
Finished product polished up and installed with a small filter on the outlet.


-
One side completely welded.

I wanted 2 inlets initially but then ended up with needing 3, I bought some 1" mandrel bends to direct the oily fumes directly to the bottom of the tank and welded them in place.


Next I added a plate to help separate the oil from the air evacuating from the tank via 1.5" outlet, I have drilled a heap of holes in this plate and will also have some Stainless Steel Wool sitting on top to further help separation. It got super tricking getting the Tig torch inside the tank to weld this but I got some good welds in order to keep it in place. I only bought two 90 degree bends for the inlets, so I cut a piece of tube at a 45 for the last inlet, not ideal but it will do.
 I
I
welded the last side on, also the 3 -10 an inlet fittings and the outlet, all that left is the drain, brackets to attach it to the car and a quick clean up and polish.

-
Before i started the latest rebuild of the race car I bought myself a small AC/DC 180amp Tig welder, through out the build I knew I would requiring some Tig welding for some stainless and aluminium fabrication.
I was sick of paying I stupid money for even the smallest of welding jobs, it seems like anytime a fabricator whips out the welder its a minimum $100 even for a 2 minute job.
Anyway this post is about the fabrication of a custom catch can, now my Tig DC welding skills are average at best and my AC ally skills are crap, but after a bit of practice I was ready to try and fab myself a catch can.
I used 2mm ally sheet, cut out using a jigsaw and bent up with a pan brake.

I have found I got way better results when the fit up is perfect, you could almost fusion weld if there is no gap.

Tacked the main box and one side...

Once each side had a tack on it and I was happy with the positioning I started to weld it up, I welded about 3 inches at a time alternating sides. Ally gets hot really quickly and retains heat a lot more than steel and I don't have foot pedal to able to adjust the amps on the fly.

This is what happens when you dab you tungsten in your weld pool, I tend to do this a lot, a pain in the ass, you have to clean your work and resharpen the tungsten.

-
1
-
-
Center consol re-done with brake bias adjuster, shift light and new switches, I did have the hydraulic handbrake coming through the consol but I am going to mount it differently this time.

-
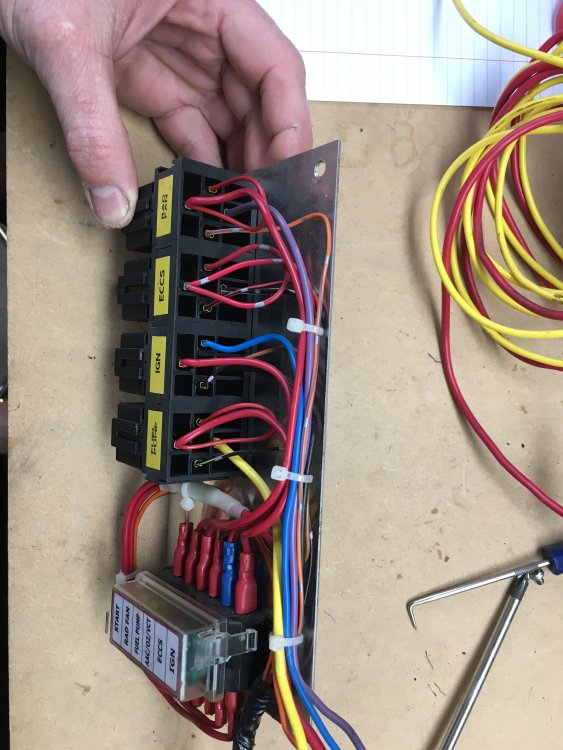
New power distribution/fuse board and gear shifter cover. Also added an inline brake pressure switch to activate brake lights, the Tilton pedal box doesn't have the facility to run a mechanical switch. Another issue I had was the roll cage section that went through the firewall to the strut tower used the original wiring loom hole, so more metal had to be removed to accomodate the loom.


-
On 22 August 2018 at 5:51 AM, LittleRedSpirit said:
So clean you could eat off it!
Thanks Matt, I don't know how long it will stay this clean though!!
I have done a heap in this last month, as I get a chance I will post up some more pics.
I wasn't entirely happy with the original pedal box mount i made, it had I bit too much movement for my liking, considering I am not using a booster there is going to be a lot more pedal effort required and I don't want any flex at all in the mount. So I re made it a lot beefier but still easy to remove a master cylinder or the pedal box with out stripping the whole dash. Ideally I should have incorporated it to the cage, oh well next rebuild. Also mounted the brake fluid reservoir where the booster used to sit.


-
Hey Nathan,
i fitted the same motor into my ke55 a few years ago now and did the wiring in the conversion, I have some notes I took at home, I will see if I can dig them out for you.
I have a couple of photos I took of the relay board that may help, this is just for the engine management side of the harness.
i am running the factory ECU with a Nistune daughter board
With the factory boost control system I wouldn't bother with it, just go after market

-
Been a while since my last post but I have been ripping into it. There is still so much to do and I some times regret going to this extent with the refresh.
Battery is now mounted and cable rerun, I have changed from an Odessey battery to an Optima, I went through 2 Odessey's which is pretty shit considering they did fuck all work I even had them on the trickle charger and they still died. The Optima is a fair bit bigger but much higher CCA, hopefully it last longer, does use a sweet solid billet mounting tray though.
Any way some more pics for those following...


-
On 20 June 2018 at 6:52 AM, boingk said:
Lovely fabrication work. Straight-forward, functional and structural. This will be super cool to see finished.
Thanks mate, I am trying to keep it as simple and functional as possible I am hanging to get this finished as well, this will be the 3rd time it has been through a rebuild.
Anyway update time fuel tank, surge tank, lines and pumps are done, it cost a small fortune in fittings and fuel line but it should outlast the car and its E85 ready should I go that way.
Battery system next.


-
 1
1
-
-
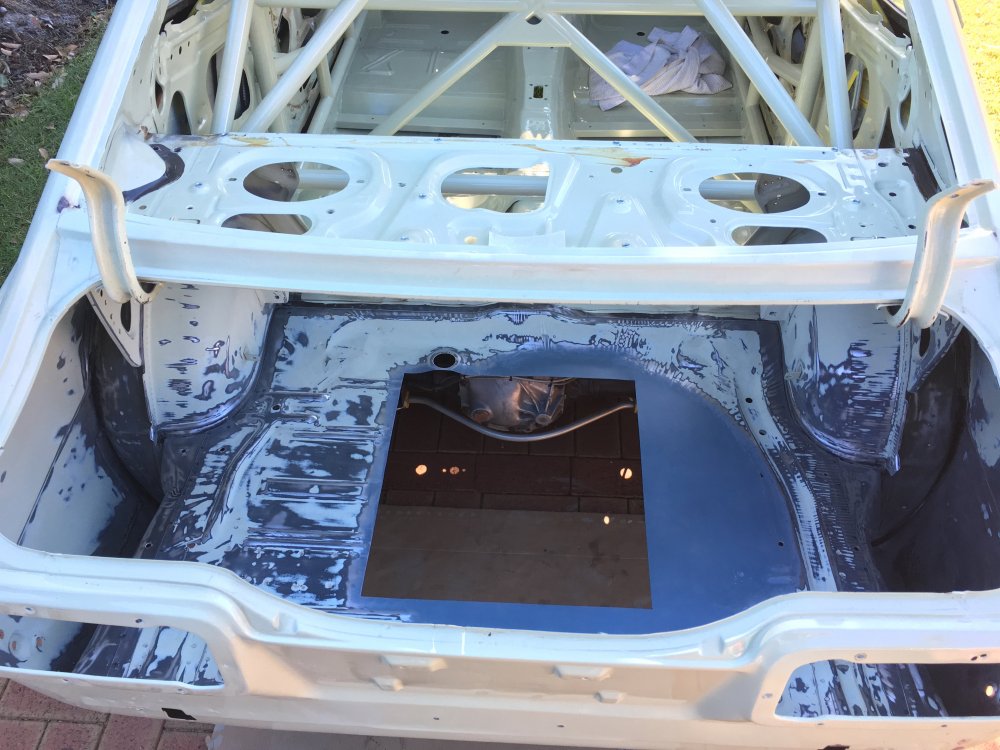
Fuel tank frame is welded in and floor riveted to the frame, also bent up some aluminium straps to hold the tank down, I may redo these in stainless steel I'll see how these ones go.


-
Yeah it would have to be the most popular 4 cyl turbo engine used for conversions, it's hard to think of any other that would be more common, world wide usage of SR's would be nuts.
Your car looks sweet, I would love to see it with a set of wider wheels and dropped an inch or so, it would change its attitude so much.
-
Looking great fellas, well done, it looked like a nice day to showcase your hard work.
We don't have enough of these types of events in Perth.
-
1
-
1
-
-
My 4 year old has small hands...
Just kidding! I used a scraper and heaps of turps on a rag to dissolve it, then some citrus cleaner, before the paint I re-sealed it with just one bead of shrinking seam sealer.
Finally got some colour on it.

-
On 30 May 2018 at 7:34 PM, caibs said:
you should beadroll some alloy diamond pattern door trims!
Funny you should say that, I actually have an idea with the door trims I might go half aluminium and half standard trims.
Anyway I made good use of the long weekend here in WA and got a heap done on the car, three days worth prep and almost ready for a colour it's just that the weather is shit, raining cats and dogs at the moment and not conducive to painting. ( I hate sanding and the amount of seam sealer in this thing was nuts)


-
Last nights efforts, made a start on the new sheet metal, had to use the Tig as I ran out of gas for the mig but it didn't like welding the new metal to the dirty existing floor. But it's the boot and it doesn't need to look 100%.


Chestikoph Sr20Det Ke55 Coupe
in Rollaclub Rides
Posted
Passenger side done, I have raised this side above the floor by about an inch to try and avoid the heat from the exhaust, it runs directly under the passenger footwell. Can't have the passenger burning their feet!!