

ollienewc
-
Posts
116 -
Joined
-
Last visited
-
Days Won
1


ollienewc's Achievements
")


-
So ahhh it's been a while.. Haven't forgotten about the old darlin, slowly ticking along after a fair while sitting untouched. Not much to show for three years though.. Welded a plate in to cover up the holes where the rear bumper poked in, as well as filling in a couple of other holes Roughly mounted the new front end up. Going from slannt to flat, I need to do some trimming of the rad panel to get the quadllight buckets to sit back far enough which is a bit shit as it's painted but ahh well. Will get touched up Got around to modifying the linkage for the quads to get rid of the push rod style setup. I bought a joiner/balancer/cable pull from Efi Hardware, but it required a bit of modification to fit. I had to flip and shorten one of the butterfly shafts so that I had the two round ends 1mm apart inbetween the two sets of throttles. Also had to drill and tap a hole into the side of one of the throttles for a modified bolt and spacer/bush to act as the idle stop adjustment and full throttle stop. Bit hard to explain but you might get the idea Old: mods Turns out i don't have a pic of it all together yet but it works a treat. Then had to make a new accelerator cable mount that hangs underneath the manifold. Bit overkill with 5mm steel plate but all I had at the time, shouldn't flex 😂 Bought an Aeroflow catch can/breather that was a bit bigger than I'd hoped, so had to make a bit of a nifty bracket to hang it behind the passenger strut tower. There's a flat spot and two holes on the rear of the tower so I just used those. Welded some studs on to make it a bit easier to install. Starting to think I wouldn't mind an ac/dc tig to make things a bit nicer but we'll see how we go with that one Waiting on a few things to tidy up the fuel system, running new 5/16" hardline with proper fittings either end to go to rubber hose. Almost went down the braided line and AN fittings road but it was just going to look bulky and cost a heap. So just getting a pair of proper hose barbs welded onto the rail to keep it nice and simple. Doesn't look like three years work but ya win some ya lose some I guess haha. Just stoked that I haven't caved and gotten rid of it tbh 🤘 Cheers, Ollie.


-
... I've still got a fair amount of body work to do, but it's nice to have this part of it done at least. Cheers, Ollie.


-
Hey cheers Oli! Wish i could find some inspiration myself! Really struggling for motivation in these colder months. I have been chipping away ever so slowly though. Here are the hinges with the new bushes pressed in and assembled. They came up alright but some are quite stiff as they got a bit bent out of shape pulling them apart. They should loosen up a bit after they're all bolted on. I've been working on patching the rust in the rear arches, I put it off for ages but didn't end up being too hard once I got stuck into it. I ended up cutting up a spare set of front guards I had, just using small sections of the arches to try match the basic shapes instead of starting from scratch. Basically just cut out the cancer, roughly cut out a replacement piece from the spare guard, placed it behind the hole and used black spray paint to trace the required outline. Photos are easier than words.. It's my first time doing any of this so it was never going to be too pretty haha. ...


-
Haha they look mad ugly! Definitely need more practice, but all good fun. Repairing the rusted out rear quarters will be interesting.. Oooooh I like the sound of that, I'll see what I can find. The youtube link doesn't work (takes me to my vids), but I found your thread and assume it's what's on there. Looks very neat indeed, nice work man. And thanks heaps for the info, nice to have something a bit different
-
Got the hinges primered and painted over the last few days, just going to wait for the paint to cure for a week or so then go about pressing in the new bushings and pins. While I was painting the hinges I thought I'd test out painting some instrument cluster trim the same colour as the car, turns out to be real similar to the plastic in the dash pad. Have to see how it all looks once the rest of the dash is in, but I reckon I'll run with it. So I bought a tacho dash a while ago that had the needles and the redline on the tach coloured in with texta, looked real average. Managed to take it off with thinners, but it also ate into the white markings below. Not too bad but I can see that it's now a bit fudged. Repainted the needles red, but I still need to repaint the centre circle matte black to match the rest. Anyone know of anywhere to get the backing made up? quite like the red, would be nice to replace the orange and the white 'redline'. Any input much appreciated. Although the clear plastic front also has a small crack.. so if anyone has a complete tacho dash they'd like to part with that'd be great too.


-
Hell yeah dude, nice one. Love the socket idea, was just thinking yesterday I've never touched the imperial ones either haha
-
Far out Mike, that's sweet. Keen to see more photos of the build
-
Ahhh yeah so been real slack with this, and the car too really.. Nice to hear people are still interested though haha Slowly chipping away at things here and there though, but trying to smash some out while I've got time off over Easter. Doors were coated in epoxy (above post), roughly blocked to find the highs and lows (turned out they were pretty average), then bogged, another coat of epoxy, primer filler, blocked again working through the grits, then another coat of primer to cover where I rubbed through. That was rubbed back lightly with scotchbrite, blown down and cleaned ready for colour. So first time round shooting the colour on the doors I ran out of thinners so couldn't lay the clear on, so after a few weeks I lightly rubbed it all back, sprayed another couple of coats of colour, then could put on a few coats of clear straight on top. Pretty happy with how they came out, and should finish up nicely with a cut and buff. Also refurbishing the worn out door hinges with new pins and bushes to stop the sag. I found cutting the pin in half and using a cold chisel to wedge one side out, followed by a punch back down the hole to push the other side out worked a treat. Then used a step drill to remove the old brass?/copper? bushes, and put a slight chamfer to hopefully help the new ones go in. Decided to weld up a few seams in the rear where I'd already tried to bog, but was worried it wouldn't take long to crack and ruin the paint. Not the prettiest by any means, but hopefully will do the job. Just coated them with etch primer for now, I'll be putting a skim of bog over them once I do the rest of the bodywork and have epoxy down first. Also just realised that I moved it under it's own power for the first time on christmas day, as a little present to myself haha. Realised all I needed to do was install the handbrake cables, so that was nice and easy. I also finally got around to modifying the rear of the exhaust to fit into my wagon, luckily I was just able to chop it up and use what I had to make it work. Fabricated up one hanger, and bought one off the shelf that I modified. Pretty stoked with how it sits, nice and solid with hardly any movement, but still using rubber mounts. Didn't get any photos making it, but I'll try grab some of it installed Few other things like installing the dash frame, deciding to go flat front/quads, treating rust in new guards and welding up the holes from where fender mirrors were installed. Need to get off my arse and buy the rest of the front end, but that ain't going to be cheap, as usual :( Probably take me another few months to do another update, but I'll try do smaller more regular ones or something. Well done if you've made it this far, Ollie.


-
Hey cheers Kurt! Legend, nice to hear others actually get something out of this haha. Been pretty slack as usual, but I've finally blasted the doors and have a coat of primer on them. I set up a blasting and spray booth in the corner of the carport that seems to work pretty well. Knocked up a frame and grabbed some curtain rail from the tip shop, and made some curtains out of clear builders plastic. I used washers every 200mm along the top and ran a strip of gaffer tape over that to reinforce, poked a cable tie through the tape and washer and looped it through the curtain rail sliders. Also made a floor with sides that come up about 700mm out of thicker black plastic, with ropes and velcro to suspend it all. The curtains hang inside this to catch all the blasting grit. I've got a supercheap extraction fan set up and a fluorescent light in there too. Stripped down all the doors, and that was not too fun at all, but got there in the end. I sanded the faces of the doors back with the orbital and 40grit, then moved them into the booth and blasted all door frames and edges making sure to get all the rust. Vacuumed and blew them out then wiped them all down. I then used rust converter, followed by a damp rag then metho to finish off. Also the door jambs in colour


-
Cheers mate! It's not there yet, but if you just stick at it you can surprise yourself. I got the brake lines and accelerator cable made up, lines are still on the bench but the cable is all hooked up and fits nicely. Also rang a car audio place and they said extra foam on the firewall won't really do anything so that's good enough for me not to worry about it. Finally got around to swapping over that dizzy/cam angle plug, but I'm worried I might have introduced some interference, I could be way off the mark, but it hesitates and stutters pretty bad now. Hoping it's something else. Apart from that it went well and tucks away nicely under the coilpack plate, probably not the best place for the plug but hope it'll be all sweet. Pulled off the doors to get at the rust and paint the jambs, but I sorta wish I did this later once the rest of the bodywork was done. It makes sense to strip and paint them now while they're off, but they'll no doubt get scratched and chipped once they go back on to seal the car back up.. Ahh well. Used a combo of sandpaper, wire wheels and strip discs to remove the rust I could get to, then treated everything with rust converter. Cleaned with wax and grease remover, wiped over with a tack rag and used etch primer in a can on the bare metal followed by a few coats of primer using the gun. Don't have photos yet but shot the colour on the next day. There's a few bad sanding marks that have come through but they're door jambs so I'll live with it. I'll try get photos of the colour soon. Ollie.


-
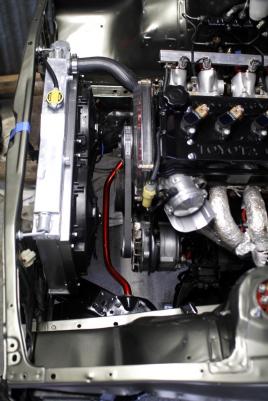
Been a while between updates but I've been getting a few things done. Finally painted my accelerator pulley and got that installed so I can measure the cable length and get that made this week. I also made up a little bracket for the cable that bolts to the engine mount too. Painted the sway bar in dupli-colour metalcast red (groundcoat then red), wasn't sure how it was going to turn out, but was stoked with the end result. I chipped the shit out of it when installing it which sucks, so I might get it powder coated down the track, but it's staying for now. After getting screwed around on ebay, I finally got my radiator overflow tank and installed that right next to the rad. A bracket is riveted to the body, and the tank bolts to that. Last weekend I ripped the dash to pieces so I could spray it satin black. I've been debating on colour for too long so just went with the safe option. I removed the blower controls, vents and all the little clips, then sprayed it down it with degreaser, hit it with the karcher, rubbed it with scotchbrite, blew it down with air then wiped down with wax and grease remever. I used septone plastic primer then acrylic black and it seemed to come up alright. Time will tell though. Same goes for the gearbox cover too. There's a whole heap of interior pieces left to paint though :( I've got my braided brake lines getting made up locally, costing around $240 for the two one-piece fronts and the one from the diff to the body. I'll get the accelerator cable made at the same place too. Tailshaft has finally gone in, as has the blower system, but I'm thinking of pulling it out to get some further sound deadening foam on the firewall, but not too sure about that just yet. Anyone had any experience with foam on top of dynamat and if its even worth it? Ollie.


-
If you think you'll be messing around with cars for a while, it might be worth looking into getting yourself a compressor and gun. I still paint most parts with rattle cans, but nothing beats the nice wide fan you get with a proper gun when doing panels etc. Even just having the blower attachment for general cleaning and dusting is reason enough to have one for me. Then you've got sandblasting cabinets too..
-
Cheers Gage :y: I'm not sure if if it's all technically correct, and I'm sure there are probably things that are a bit dodgy that I'm not even aware of, but it starts and runs so there's that at least. And man all you've gotta do is start! I had no clue about wiring before I started this, I didn't know what a relay was or how it worked for example. Just have a google, read up and jump on youtube and you'd be well on your way.
-
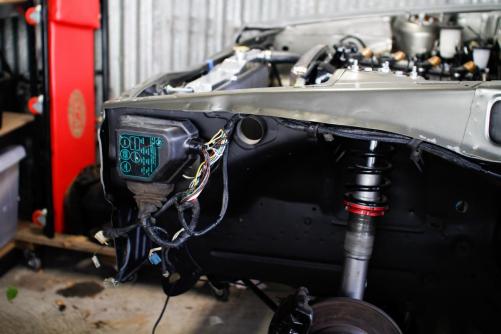
As I said I haven't been taking many shots as I've been doing things, but here's a few photos of the wiring as it stands. Main relay and fuse panel is in the passenger foot well behind the blower system, and other one is in the rear in the tool compartment. I'll have to make sure the rear window is well sealed, but it should be fine. The stock relay and fuse box that sits in the engine bay has been moved into the front left wheel well. I'm planning to make some form of shield to protect it from stones and excessive water too. I also notched out the coil pack plate for the wires too. Moving things about was a bit of a headache, especially tracing all the necessary wires from the key barrel to the various locations, but it was good fun learning how it all works and making all my own cables. I made a few mistakes and had to redo some wires/connections, but pretty stoked that it started up first pop without any electrical issues after doing this myself and learning from scratch. Big thanks to a good mate Tom who pointed me in the right direction :y: Tried to make it as neat as possible in the engine bay with new wiring for the alt and starter, with a circuit breaker in between, as well as new trigger and signal wires covered in sheathing. Also received the fuel reg, I modified the bracket and bolted it onto the brake line splitter thing. I took apart the blower system, cleaned it all out and replaced all the foam I could access, including that around the heater core. Probably a bit of overkill, but I'm trying to get as much of the musty old car smell outta there, and maybe even make it blow a bit harder :thumbsup:


-
So after spending basically all of today chasing down a grounding issue with it ending up being a faulty relay, it now finally turns over and starts. Only let it go for a few seconds, but shit I am so stoked. It's been four bloody years since I first got the car. I've been pretty slack with taking photos lately, but the wiring is basically done and just in need of tidying, fuel reg went in on the drivers strut tower as usual. I'll try get a video and some pictures of it tomorrow, need to get some radiator hoses before running it for too long, and a windows laptop so see how everything is going. Hopefully I can be a bit more on the ball with pictures and updates too


