

Pete-ke20
-
Posts
66 -
Joined
-
Last visited
Content Type
Profiles
Forums
Events
Gallery
Blogs
Everything posted by Pete-ke20
-
Thanks for the reply The springs are stocko to my knowledge, the struts are KE30 struts but, bought the car like that. I assume this as i have 114.3 pcd all round, and the rear end is wider than stock ke20 spec. But these wheels are listed in the performance wheels database as beeing good to fit a stock ke20. the top of the tyre sits lower than the spring seat.
-
I know all crash don't do ke20 panels, we have an account there, they only have a few lights if that for ke20
-
Yeh i am in Brisbane, on north side, any help would be greatly appreciated!
-
Yeh i have seen them on occasion too only i could afford them at the time i saw them, now that i have a job but i can, my main concern in the bonnet as it rooted, have never seen one of them on ebay :) Thanks for the reply guys!
-
Just to add to this for all those people that say they can't do it, i am 18 and have done ALL this work myself, apart from the milling of the brake parts and the CAS mount, however i did do 3d drawings of both (the CAS mount was cut from this drawing). I have done all the leg work myself and all the man hours, i occasionally picked my old mans brain but not often. I did all the work so far in my 6 month gap between quitting engineering at uni and starting my fitter and turner apprenticeship. Get in there give it ago ya-self!!!
-
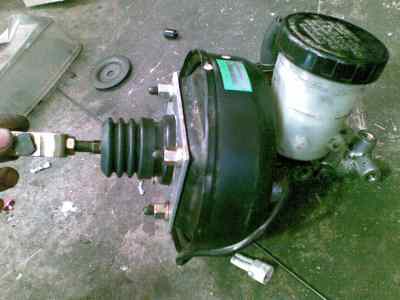
This is a rough guide to my project so far! Ok, so I wanted to do something different, and I have always wanted to have a gsr lancer or vr4 galant as they are fairly quick but having not much cash and wanting to work on the car myself I decided to put a 4g93t engine like that out of the gsr lancer into my ke20. I also chose to do this as it appeared to be just as much F*#king about to do the 4age conversion and that the 4age would be more expensive due to every man and his dog doing it and only soo many parts about. The engine is a 1.8 litre DOHC 16v engine, which is a Japanese block (very important when it come to bell housing and box selection). I used this engine as in QLD the law is that you multiply the cars GVM by 2.5 for boosted or 3 for natural and that gives the biggest engine you can put in (This makes no sense as a 1300kg vn commodore came out with a 5lt v8 when I went to school 1300*3 = 3900cc so its only just legal with its 3.8lt v6) Anyways with my ke20 two door its weight is 776 on the QLD register allowing me 1945cc of power and given the 4g63t (2lt) is 1985cc, this means I am very upset. In the Mitsubishi range all the Japanese blocks from about 78 till current (I think) all share the same bell housing, or similar enough for 4 bolts to align and the starter. To start with I sat a 4g94 engine I have in to the rolla it’s a 2.4 SOHC from a triton, but I figure I can see if it will fit etc. And well it did almost too well the mounts fell right into place with clearance everywhere. So armed with the knowledge that a gutless 4g94 will fit I took the leap and bought a jap gsr half cut. With in about 40 min of having the half cut I had the engine and gearbox out of it. Obviously I couldn’t use that box as it was an auto but also as it was a front wheel drive box with a 4wd transfer. (For sale BTW pm me) Unfortunately the 4g93 and 64 blocks differ enough for the 64 mounts not to bolt onto the 93. However a quick vist to my mates engineering workshops bin had be a big piece of 8mm flat steel. I simple hacked (neatly) the angled bits off of the 64 mount bracket and then got a mate with a tig to weld it to the steel plate. Drilled holes etc and then thanks to modern technology I had two beautiful mounts. And I was very lazy when tacking these for him I just kinda guessed and well as I’m a lucky person they were perfectly placed. Height and everything. I then had to find some rubbers the fill the gap (actually did this before I made the mounts wasn’t as guessed (dodgy) as perhaps thought). The rubber mounts are ford Cortina ones A1200 is the part number. These are rather stiff mounts but being out of a 6cyl ample in strength for the little 4 I have. A few issues encountered was the water housing on the rear of the head (similar to the issues with the fwd 4age) This was easily fixed by welding up a few outlets and relocating the unit to under the plenum. Sorry no pics of this. My next hurdle was the CAS (Crank angle sensor) as I wanted my engine back so far this had to be moved (same problem as 20v 4age on this engine is what we say superior as it uses Multi coil not a dizzy) Alas this was easily fixed by modifying the CAS unit and getting a mount made up and putting it on the front of the CAM. Ah to the fun bit GEARBOX = power to wheels. Very easy as I had a jap block all I had to do was get a jap box, I went with a GJ Narrow sigma one a KM132 (I think) this is a rather strong box and only cost me 150 with a tail shaft. The box was ment to be in a ke20 much like the engine, it fits nice and snug and the gear stick comes out in a perfect spot, only issue was due to me thinking handling I sat the engine about 5mm to low so now the bottom of the bell housing just hits the steering arm at full lock. Bell housing meet grinder. To Fuel, my car will need it to run so a surge tank from autobahn and two bosch pumps should help. Phone camera sucks (only one pump in at time too) So then comes the wiring, bored I decided to install my G-reddy turbo timer first. Easy to do. Then along came family holidays so I took my laptop and ke20 manual with me along with a few lancer manuals in pdf format. I produced this. (Insert wiring list and stuff 'ere) And when I returned home I had this all done in a day and everything worked, well except for one of the MFI relay earths was broken so I had to fix it but then everything else worked! I used a Narva fuse box and the relay box out of a R31 skyline just coz I had one in my wreck and it looks fair neat. I used a few extra relays here and there. And if one is doing this DO NOT neglect the start signal to the ecu as the ecu will only earth the MFI relay for the fuel pump when cranking or has a stable CAS signal so if you stall it in accident is safe. I used the MFI relay to trigger another relay for the fuel pumps as they are pulling about 35 amps and don’t wanna have to load up the MFI relay too much. I also ran a Starter relay poor old rolla ignition has had a hard life no doubt so figured it would be easier now then later. Also ran a relay to switch power the MFI relay when IGN is on again old Ignition switch and high current loads. Now to the brakes. I want my beast to stop so I decided I would use the larger GSR lancer calipers (makes it easier for mod plate, can say I have same stopping power as car that engine from. I used a Suzuki swift booster and master cyl, this is a very small unit and should work well, obviously I am using a one way valve in my vacuum line so I don’t boost my booster when on boost and can't stop. So I am using GSR calipers and pads Ke20 strut and what rotors?? Well I measured up the clearances and stuff and then sat and scrolled through 300 pages of DBA catalogue, I found that Passat Rotors will work on the back of the original hub, has same diameter as the GSR rotor and very close thickness’s (min and orig) so perfect I cryed, and you can get them in slotted!!! So I have calipers and rotors but not mounts, a pair or vernia calipers, some autocad skills and much patients along with paper models, allowed me to produce a 3D sketch of what I wanted for mounts, then some 25mm thick steel plate was sourced and my mate with a mill received a few six packs, a 3D drawing, dimensions and calipers. These brakes are so big that I had to cut the center out of my 13’s and weld them in backwards just so I could move the car around while I awaited my new wheels. Not even just bolting them on backwards would work! Turbo. The gsr being AWD and an early model, had the turbo on the wrong way around, compressor at rear and impellor at front. I thought about it and then decided to just spin it about on its own axis, all I had to do was slightly enlarge the whole in the manifold and turbo, which is good for flow anyways, and then just bolt it back up, then plumb the water and oil lines, easy as pie. Now I don’t have to go the effort of making some extreme exhaust bends and stuff. Wheels!!!! This was a challenge I want to stick with 15’s and keep a modest offset so that they wouldn’t be poking out of the guards a mile, and also keep them narrowish, so that they didn’t poke out too far. I found superlites to be about my only choice in the 15x6 with a 23p offset, so I ordered them and I don’t actually mind the look of them they suit the style of car quite well. Wrapped in RE001 195x50 15’s Front end. I got bored one day and went to town with nolathane bushes in the front end, lower control arms, sway bar links and chassis mounts, Z bars. I also made a one off sway bar for it, I utilized an r31 rear sway bar I had lying around that looked like it would fit just by eyeing it, turns out I had to bend it and get it re-sprung, but it was good as it cleared my sump which the original didn’t, it has the spurt where it normally would go around the diff. I ended up a little different to how it is pictured below, those ear bits ended up pointing up so the tyres wouldn’t scrub out on them at ½ lock, I can get full lock to lock and full travel in suspension with no worries, also its 2mm thicker than the stock plus the nolathane bushes they say add 2mm to the bar. Cooling. To cool this thing I had the original radiator modified to a 3 core system utilizing a 12inch thermo on the back of it, I had a mate do this up for my who runs a radiator shop. Here are a bunch of pictures unfortunatly i can't put them in the text in order etc Hope you all enjoyed the read, and i will post up more as i go (going really slow atm, just started new job)


-
Hi all, I given it a quick search, but i was wanting to know if there are any places around that would sell panels for the KE20's new or in good condition, I know wreckers would have older ones but i need them w/o rust and dents, chasing Bonnet and guards. I have heard of people getting after market guards, whats the go here? Any help would be awesome Cheers Pete
-
Bridgestone Potenza - adrenalins 195/50/15 Great tyre all round, Have em on the mothers sv6 as well, they grip well till the end, and are easy to control once the arse is right out. Directional tyre. for the 15's about 150 a tyre for 17's about 300 i think, that may be trade forget
-
I recently got some 15x6 23p offset superlites for my ke20 and i have put 195/50's on them and they only just stay inside the guard and give clearance to the strut, could probably go 7 wide but i don't think i would want to, especially once i lower it a bit. Once you up the offset more neg that pulls the wheels out towards the guard and there aint much clearance there on my ke20 anyways, not sure on how the 30's differ. Stretching is bad The best tyre for the job is the right tyre for the job!
-
 There was a susuki i think motor bike 750cc if i remem right that had every bolt drilled out from factory to save 10kgs i think... so all the bolts were like a banjo bolt! just bust out the pistol drill and do that , and add some speed holes while your at it! :POSTPICS!:
 -
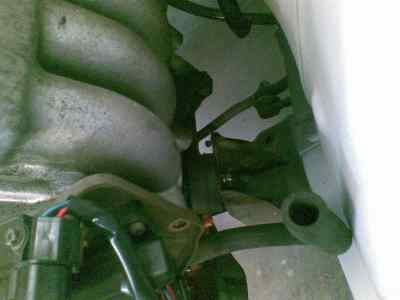
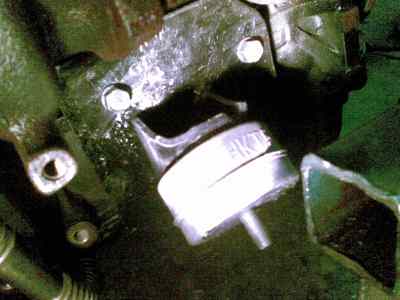
Hi there mate, if your using a 4g63 engine then the metal block mounts out of a Triton ute with a 4g64 engine will bolt right up to your block (can't remem if it hit turbo or not, but will only require a notch from memory if it does) and will sit perfect for allignment of the engine and everything, then just throw some cortina rubber mounts between the xmember mounts and your 4g64 mounts and it should sit about perfect, when i tested fitted a 63 in to mine it sat perfect (didnt have the cortina rubbers then but just sat it about an 1" up). The mounts i did for my engine the 4g93T all i did was cut the angled part off of the backing plate from a 4g64 triton and just welded it to an 8mm plate then drilled my holes where i needed them. The 93 block is a fair bit different to the 63 as they are different series hence the 4g9x and the 4g6x, however the 63 and 64 are pretty well the same block both being from the 4g6x family. Hope this helps!! sorry that i can't remember what model triton that engine is in, i just had a 64 engine sitting round from one that we fixed ages ago. This is an image of my mounts Well the exhaust side.


-
Ah ok, well it was a white ke20.... The front struts have the square bolt pattern for where the caliper mount bolts on and not the offset ones (i have a second pair of struts that came in boot of car) I am fairly sure Teddy knows the history of this car my mate works at toyota with him and i have talked to him about it abit
-
Yeh thats what i'm asking, its not stock so what other kex diff's would fit a 30? It's a banjo type diff and it is defently 114.3 PCD
-
Hi all. I have a Ke20 and the PCD on it is 114.3 all around, i was wondering how so. I know the front struts are from a ke30, as it had the bigger brakes (7 mm or somthing in OD). I am not concerned by this as its easier to find wheels but which diff does the car have in it then? Everything looks stocko in the rear, its a '73 KE20. Cheers
-
I have got some superlites coming for it, they are 15x6 with a 24p offset. Where did you get your coil overs from??
-
Yeh they wouldnt look too bad, depends on the offset and what not. From what i have found i need a 15x6 4/114.3 with 20p offset. Only wheel i can find in this is a superlite and that a 6 week wait. Does anyone know if ill get a 15x6.5 4/114.3 with 07p offset in there or will that scrub the guards? 15x6.5 seems a little easier to find and more styles
-
HI all, i have done search for result on this question but no luck. I have come to stage where i am looking for wheels for my ke20, but I'm struggling. I want to run 15's, well thats the smallest i can run due to brakes, and i would like to run 15's. Also my 20 has 4/114.3 stud pattern. so i would like 15inch wheels with a 4/114.3 stud pattern with an offset to clear my struts (stock). NO SPACERS thanks Any help would be awesome or if any one knows any one selling any pm or email me :P cheers pete ps. perhaps a FAQ should be made about what wheel fit and what not.
-
And the whole set up


-
Hi all, figured i should post up how my project is going at the moment. So the engine and gearbox are in as is the interior, it starts and runs. I have put my radiator in (modified the std one 3 core now) and a huge as thermo fan. everything is plumbed except my exhaust which has not be able to be done as ive been missing a strut for a while. So late last week i got my brake caliper mounts back from my mate who was milling them up for me, look schmick as and I'm pround of my measuring skills as they bolted right up no worries. So i got some rotors, volkwagon golf rotors (re-drilled) and my gsr lancer calipers and bolted it all up and everything tracks perfect nothing rubs and all is neat. The rotors are 256mm OD and are 20mm thick vented, clamped on but bendix pads in the gsr calipers, who's piston is pushed out by a susuki swift booster and a 13/16th's master. I have had no luck trying it all out yet as no drive shaft and i can't get my wheels on (original 13's) in fact they wont even bolt on over just the rotor, so for now i have them on backwards (super wide wheel base) and just the rotors. looks kinda funny actually. I have got all my interior work done, just need to put in my passengers seat, and when i get the money some kind of stereo. My interior is completely stock, except for gauges in dash and the center console which is from a honda prelude 3rd gen, my mate was wrecking it and i thought that will fit perfect, and well it does :P. So atm i am waiting on a drive shaft, which i hope to get tomorrow, then an exhaust and need to re-spray the whole car and finish body work off, and put the glass in and rubber up all the sealing points. ill throw up a few pics of my brakes, i went this route for brakes as it was cheap for me as i had the calipers already, knew someone that could mill them and did the 3d drawings and measuring up myself. They cost me; Steel for mounts 25mm thick - $40 Mounts Milled - bottle of jack $35.... better than the $640ish they would be if done by random workshop Calipers - off of half cut Pads - $45 Rotors - $40 each Bolts - $8 Booster and Master - $50 Time - too many hours to want to know so about $230 all up


-
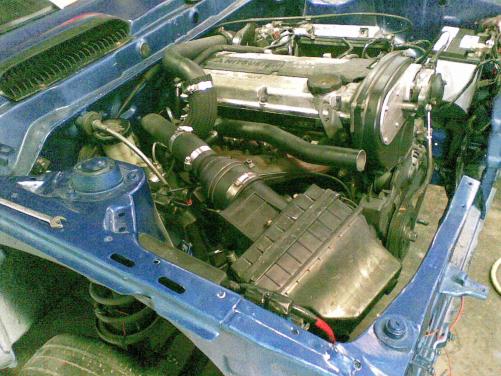
ok, so i've only managed to start my beast so far no driving yet, i still havnt got a radiator or at the time anything plumbed, i still need to sort out my gear box, the throw out bearing is not pushed out far enough to push on pressure plate, thus no clutch operation, i have no front struts at the moment as they are with the guy whom is doing my brakes, so still i bit to go yet, i do have a picture of the engine bay atm i have plumbed all my stuff now, oh and she still needs a tough zorst
-
Ah soo i started my beast today, she actually runs, not bad for an 18yr old kid huh. only had one problem, and that was that i missed a power wire somewhere in the engine loom which then ment the coil wasnt getting power, nothing an aligator clip couldnt fix to start it. my timing was off by about 50degrees too, not bad for a custom made bracket, and no idea on where it was ment to be ah good times.
-
sorry don't have any other pics, the bonnet is not painted yet neigther are the guards... it was just darker of the gun too ah well just gonna finish everything else then rub back and spray like i said... yeh i like the darker colour too was ment to be a neon blue like the boot but like the shell colour better... would look for the colour code, only am slightly under the weather atm, and off to bed, in hope that more sleep = less hang over cheers for the replys guys!!!!
-
Yeh, both days were similar, but the thing that confuses me is that i sprayed a practise panel on the same day and time as the shell and it cam out the boot colour also, i got my fan right on the panel then went to the shell, both shell and panel were same base to start and everything..... ah i have done the door blocks, so will rubb back with 1200 and just spray the outside again. just can't figure out why i can shoot two colour from the same mix
-
Hi all, So my little ke20 needed some paint, but that the same time i was doing engine conversion (still am) and its at my dads work shop. So i decided to paint the shell first put everything in it then paint the guards, doors, bonnet and boot, so they didnt get damaged when opening and closing, when wiring and rooting around. I used acrylic paint, metallic neon blue, actually off of a 95 bmw, now before i painted i practiced on a guard the paint looked great nice colour and everything, so i went to it and painted my shell but the colour came up alot darker, which i didnt mind as it looks fair good, but today when i painted my doors and boot the paint came up the original colour, or the colour that it should so nothing matches. I prepped everthing in the same manner, same primer, same guid coat same sandpaper, absolutly every thing, even paint mix's and stuff, even the heat of the day was similar. i can't figure out why i have two colours can any one help me?? its easy enough for me to paint my doors etc again as they are still off the car but the shell has almost everthing init. if all else fails ill just take out lights and mask it and spray all in one go, with doors on and stuff (as the doors are already blocked). this is a pic of the boot and rear end.... spot the difference any advice would be awesome!!!! ps. the white in between panels is cut and polish not undercoat, or old paint, very messy buffer

-
Hey all i have a 'read me' thingo but its 9Mb due to pics how do i get it onto the site? Pm or email me ill just email it to you


