

chrisfindlay
-
Posts
169 -
Joined
-
Last visited
Content Type
Profiles
Forums
Events
Gallery
Blogs
Everything posted by chrisfindlay
-
You don't have any photos do you, from when you did it? Also do I have to replace the entire unit or just the cog that winds the window up? Haha if your in qld I'd pay you to come help..
-
Car came without carpet so that's a no go, I live in toowong if your keen to come help I'll happily pay you..
-
Nah that was the right window, took about 2 hours and some crc to loosen up the seal, it's something to do with the winding mechanism on the left one.. Does anyone else have any ideas?
-
I wouldn't really bother too much about putting an exhaust on a 4k man, they don't really ever sound good, I had a 2 1/4" straight through with a hotdog and a 3" tip on the muffler and that's probably the best I've heard a 4k sound, and that's how it came when I bought it.. Keep your keto stock I've seen it on boost, looks overrated, just save your money for some decent wheels, better suspension and a 4 age conversion :)
-
Hey guys, just having some issues with my front left window. Basically my window winds down, and it also winds back up but it only goes about 4 5ths of the way up and then it just stops and when you wind it just makes odd noises slightly like its grinding or what ever. Has anyone had a similar issues? If so post below with how you fixed the issue.. Or if anyone in lives in Brisbane, and would like to come round and give us a hand to attempt to fix the issue, give me a call or text on 0402280709, or just leave a message below cheers :) Ill happily pay for any assistance..
-
Anyone want to assist me in installing the front half? I'll pay for assistance just want to get it done good and right..
-
30 Second update.. Made some purchases tonight!!

-
Thanks man, helps heaps, ill post a full update in my build thread when I do them, of how I went about it etc, so for future it can be of some use to anyone else.. Also I'm not using bolt on's to tuck tyres, or make the keto look lower, just simply need them as my guards are flaired as far as they will possibly go, and my wheels still don't sit inside the car.. Oops 15x10 will do that I suppose.. So when I put my bolt on's in my wheels will be exactly flat with the outer edge of the bolt on, :)
-
Thanks heaps guys, ill update you when ive finished the front, as i got the rear in perfect and it looks shmick, but i stuffed the front, cracked the shits, threw it outside, poured petrol onto and set it on fire.... BURN BABY BURN!
-
Hey guys I have bolt on guards or flairs as some people may call them, I'm just wandering if anyone had pictures from when they installed theirs as I want to do it right, but I've never met anyone with it done, or seen how anyone has done the job.. So I don't really know how to go about doing it, I've heard stories of some people cutting their old flair out completely, and others cutting it into strips! Please help! Any help, tips or pointers are greatly appreciated, cheers.
-
That would be my car..
-
Thanks heaps mate, appreciate the thoughts, I will do the engine eventually, I'm just waiting to get the engine in and running, so then there isnt any f*cking around with trying to fit my engine, and scratching up my freshly painted engine bay, but yeah as soon as the engine is in running, i will pull it out, and spray the engine bay the same colour as the car :) Also I think I will tub the wheel arches.. And Spencer - Will do man thanks heaps :)
-
All in all I would probably never do a carpet installation again, its just not worth the effort, I think next time, I shall just remove all the sound deadening from my car, pressure wash the floor, give it a nice black paint job, hit it with a clear coat, buy some nice floor matt's from Supercheap, and roll that way.. So here is how the corolla is looking at the moment.. I'm liking where my car is heading, I'm really keen to compete for Rolla Club car of the year, and would be so stoked if I won, but we shall see how I go, as there are some unbelievably nice cars out there.. Last night I an after market Ecu.. I also purchased 20v Silver top Quad Throttle Bodies, so now I just need the mount for 16v small port.. But to anyone who reads this thread - What is your opinion? Any criticism is good criticism, and I'd love to here what people think..


-
You can probably use this as a "How to for installation of carpet" as I had absolutely no idea how to install it, and I'm sure there are plenty of other people who would struggle to install it also.. So I cleaned the car out ready for the installation, I was using a product called Hi Tak, its about 30$ a can, its an adhesive spray, but boy is it amazing, holds carpet down like super glue! This is how the Hi-Tak comes out of the can.. Like spider webs.. Extremely sticky spider webs.. So when you do the carpet install, you have to remove your gear stick, I tried to avoid this but it just can't be done.. The mounts for your seat rails are a little shitty to get around but I just cut the exact shape of the mount out of the carpet, only cutting three sides, so what you cut out can be tucked in underneath the mount not leaving a hole.. it comes out like this. Sorry for the shitty pictures, iphones are the worst!! Also when you do your install make sure you remember not to try push your carpet to the very back of the car, as there is a half meter sized area where your seat is that you don't carpet, so it just looks like this when installed.. Also remember kido's that when your using a stanley knife be careful, as stupid as this sounds I'm 18 and still managed to cut myself.. I found it a heap easier to install the carpet if you bolted your seatbelts and stuff in, and like actually put the bolts in your seat rail mounts and stuff as it held the carpet in place which made moving over to the opposite side of the car a whole lot easier.. As when do the install your carpet comes in two pieces, you have to start with the back as the front piece has been sealed the entire way round the edge of the piece so that when it overlaps the back piece it looks really neat, where as the back piece is all frayed and carpet like.. Gay.. You also can't start at the back of the car and try install the carpet forwards, you have to sit the carpet exactly where you want it, weigh the opposite side down with stuff (for me it was the right side, i put bricks on the carpet to hold it in place while i installed the left hand side, then visa versa when i moved from the left to the right).. Once you have finished with one side of the car you can run the rubber door liner down and pin some of the carpet underneath it, then you can cut the carpet to fit under the plastic remember to cut off less, as you can always cut more!! Where as you can't cut to much off and then attempt to add more carpet back on!! BIG IMPORTANT RULE OF INSTALLATION THERE! So after completing the rear install I began on the front, little did I know, that the front was so much harder to install as you had to attempt to get the carpet to go up under your dash.. SO HARD! I ended up F*cking the front install out, I cracked the shits so badly, that I ripped the front carpet out of the car, walked outside, poured petrol every where and burnt that MotherF*cker... I smiled.. After that I ended up ordering a new front half from NoBullAccessories.com, where I ordered the carpet originally, it should arrive soon, and once it does I will do a front installation guide.. The last thing to do in the rear was to pop my handbrake back in, and install my back seats, they look unreal with the back carpet and I am extremely pleased.. Ignore the strange white dots all through out the pictures, My camera was just having a tantrum..


-
I soon began bolting in my Quad lights... Looking swish.. I also bolted on my 86 calipers, and brakes. Then I decided to put my front fenders back on.. After all of that I installed my freshly painted ae71 Cross member.. I then began installing my front and rear whiteline Sway bars, cusco front brace, and new rear AJPS suspension setup.. I don't have any pictures of the rear installation but here are some of the front.. (P.S if you ever install these, have fun getting your front D Bushes to sit the right way, and enjoy trying to bolt the clamps back onto them.. NOT FUN) During the install Vaughn and I got a tad hungry, we solved that issue the best way possible! I then had to start the install of my Carpet.. Never AGAIN!!!! First off I realized that doing the install would be very dangerous if I didnt make up some Chocks, as I would have to unbolt my hand brake, and my car was positioned like this.. So I cut up some scrap timber and made these little bad boys.. Problem Solved.. I then took the rear half of the pre-moulded carpet and shaped it out the best I could.. (WHEN SOMEONE OFFERS TO SELL YOU PRE-MOULDED CARPET SLAP THEM IN THE FACE AS IT DOES NOT EVER FIT LIKE THEY SAY IT DOES..I LEARNT THIS THE HARD WAY.) :oops:


-
Ok so towards the start of the week I decided that hard work was gay, and I didnt want a bar of it, so I just started off with the simple things, like respraying the front of my engine bay, this task was so simple, and yet it really gave the car a cleaner look.. From this: To this: Not a huge improvement but for 3$ worth of pressure pack paint, and clear coat, I'm satisfied.. After that was finished I began cleaning some of my other bits and pieces, such as my cam gear covers, hd exedy clutch, flywheel, t50 gear box, and other bits and pieces.. The parts started out like this.. And after 20 minutes looked alot better, something a little like this.. Then I began on the gearbox, little did I know it would take me 2 1/2 hours to clean.. Not happy :(( Dirty... (IGNORE THE TROLLING FINGER) Clean.. I then went out to run some erins, checking my post box on the way home, to find these bad boys! Cheers mum and dad, sick birthday present :rocknroll:


-
This is cool, love the progression!
-
Can someone please shed some light on his topic! Need my carpet installed ASAP! If anyon has photos or a guide from when thu installed theirs I would appreciate it heaps!!!
-
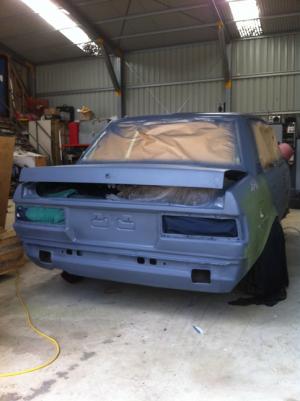
After a few months of working in Brisbane, I finally came home, and jumped straight into working on my car and here's how I went today, and yesterday.. So lately Ive picked up a few bits and pieces such as chrome bars from Kay Parts (FACEBOOK HIM), Coilovers, Adjustable Sway bars, Quad lights a full front ae86 steering and brake upgrade, strut brace, extra steering lock spacer, 86 power steering arms, gear box cross member, engine cross member, engine mounts and some other stuff.. I got all my stuff home from brisbane and began unpacking, I got a little too excited. But heres the goodies... Then I popped my coilovers in, I'm so happy with these, looking fresh as F*ck.. Then I test fitted my Quad Lights, looking snazzy.. Then the rolla, went through 13 hours of intense sanding, she didnt like it.. Then she got ready for primer, which was all sorts of fun! And then I gave her, 3 lovely coats of primer, and now she looks unreal... So tomorrow, I'm going to be painting the front of the engine bay black, and installing my quadlights, then I shall pop my fenders back on, and wet sand the entire car ready for her top coat on friday! Mean while I shall also fit all the little bits and pieces such as my entire interior etc..


-
That is a beautiful effort! Bit of an update to come, I'm doing my best to get as much done as possible!
-
Instant progress I like it! Good to see you have a plan aswell! Keep it up!
-
Looks the goods man, put something cool in it like a 4age, or a 3rz woul me awesome.. That same car featured inn the excitement shoot is my inspiration as well! Good stuff keep it up :)
-
Brand new ke70 chrome bumpers arrived today from kay parts, got my strut brace a week or two ago, and my suspension set up should be here Monday. Also ordered almost everything I need to install my 4age from ajps, and a few extras such as ae86 pwr steering knuckles, extra lock spacers, front and rear adjustable sway bar and a few extra bits, they should be here by the end of next week hopefully.. Lots of work to do when I go home in 27 days, hopefully I'll get everything installed in the first two days of being home, then she will be off to get painted, tinted, mod played and registered - don't hold me too that but :)
-
Putting A Turbo System On A 4Age 16V Small Port
chrisfindlay replied to chrisfindlay's topic in General Mechanical
So why link me if its stupid to buy one? -
Putting A Turbo System On A 4Age 16V Small Port
chrisfindlay replied to chrisfindlay's topic in General Mechanical
Oh awesome thanks heaps bud


