drift freak
-
Posts
265 -
Joined
-
Last visited
-
Days Won
4
Content Type
Profiles
Forums
Events
Gallery
Blogs
Everything posted by drift freak
-
Hey Stuart, Sorry mate but progress on the old girl has really slowed up lately. I have been swamped with work and study while trying to juggle family life. I have however had a chance to assess what needs to be finished so once I find some spare time hopefully things can start moving along nicely. Luke
-
Some more progress Engineer is booked for next week and dyno tuning should be sorted within the month :)


-
Just some more progress shots. Now to prime and paint the engine bay :)


-
Front suspension is in now, after everything I've been through I now need to get the fron sway bar remade as the mounting position is different - damn changing my mind on what works best with what!!! These aren't the wheels I will be running as they 15x7 +27 on the front and don't fit within the guard so I'm going some Work wheels instead :)


-
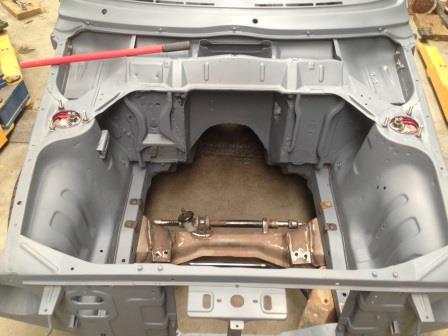
More progress :) Off the rotisserie and inside painted, engine xmember is now painted too so I'll be trial fitting the front suspension and making sure everything will fit inside the standard guards this weekend.


-
I used 3-3/4 cans in total Altezzaclub. A bit of a surprise as I only bought 2 to start with. Yeah it looks really good and I'm stoked with how its come up. So much inspiration to get the inner cabin painted along with the suspension sand blasted and painted. I'd like to have the motor and driveline dummy fitted again very soon to see where I am at with the engine bay as its been forever since the motor was in and I can't remember what exactly I had left to do. Plus I need to finalise the front end suspension to allow me to part out my spare gear to fund more of the build haha
-
Hey 67Rolla-Ken, It is a spray on under body sealer. I bought is from my local autobarn store. It is 'Motorspray - stone guard'. You use a special gun that screws to the lid of the can and sprays out through a 7mm nozzle, it gives a textured finish that protects against rust, stone chips and helps with road noise reduction. They use it on most new cars too.
-
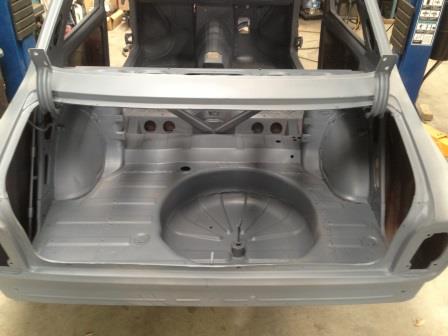
So its been way too long between updates on the old girl as I've been busy with other things. I have however been doing little bits and pieces over the last few weeks and this weekend presented a major milestone completed. I FINALLY sealed the underside of the old girl which will allow me to get her off the rotisserie and move ahead with the painting inside and reinstalling the driveline over the next few weeks. A few pics to show everyone what happened.


-
As far as I am aware the car is still in primer.
-
Cheers Glenn, how much $$$ are you looking for???? Not really needing one for now but might invest later on.
-
Got any photos autofill??? Not sure where your taking your measurement and if it will much help for me.
-
Just a word of advice Birksyy, make sure your seams are extremely clean before welding. On a couple of mine the sealer had melted between the panels and caused the welds to be less than desirable due to contamination this caused me to go back over a couple. Also it might be easier to drill extra spot weld holes on all the accessible areas and weld it up like that, I read an article about seam welding the other day and they were talking about the stresses on the steel from welding the edges like I have. Probably not a bad idea to stitch it instead of laying seams to, would make it much neater.
-
Cheers 67Rolla-Ken, I can finally see the end of the tunnel in regards to the bodywork and the whole project for that matter. I am just stoked to have the welding done and it nearly ready to be removed from the rotisserie. It will be nice to have some space back in the shed to have a clean up :)
-
So a few things have been going on lately with the new front suspensions setup and body work. Firstly I have mounted up the front suspension and had new camber plates made to suit the K-Mac tops I now have. This setup gives me around -3deg camber and more than enough castor. I also finally finished the shifter surround in the gearbox tunnel. It should look much neater once its got some sealer and carpet over it Now to just grind back a few welds and get the underside sealed up :) hopefully it will be back on her wheels and driving by next weekend


-
Guys, Dave is in the process of building a shed to work on his pride and joy at the moment and will hopefully have it sorted within the next few months. I suspect things will be on the boil once this all sorted, until then we wait :(
-
So tax time has been good me this year, along with the new front end set-up for the 11 I picked up from a mate I also managed to grab a bargain and buy a Datsun 1200 Sedan with 5 months rego. The car is totally stock with the original A12 and 3 speed auto. I needed a cruiser and this fits the bill perfectly. I will be giving her a coat of original white, some wheels, patch the interior up (no carpet and seats need re-trimming) and a manual conversion to make her a little more enjoyable to drive. Don't worry guys and girls I still have plans to have the 11 back on its wheels and ready to be tuned in the coming months. It just means the paint and interior will have to wait until next year haha

-
Just a quick update. Progress is happening, I have nearly finished the body work and will have it back on its wheels very soon. I have also acquired a new front strut/LCA/brake combo which allows me to get back to 4*114.3 stud pattern which I've been wanting for a while, this allows me a wider choice of rims in the suitable sizes. The new strut combo is out of my mates KE20 race car and consists of AE86 BC BR Series coilover mated to custom KE20 LCA's, wilwood rotors and wildwood 4 piston calipers :) More updates soon.

-
I'll grab some measurements this arvo for you decoop.
-

Front Brakes For 13B Turb Sr Coupe Conversion
drift freak replied to 35Frazz's topic in Automotive Discussion
Mate there are heaps to choose from, your best bet is to do a search on engine conversions for your model car and see what others are doing. I personally went with a hopper stoppers big brake kit on Ae 86 struts but am now looking at a different setup due to not having a lot of wheel choice fitting inside my ke11 guard. If you interested have a read through my build thread. http://www.rollaclub.com/board/topic/54478-ke11-beams/page__st__330# Sling me a PM if you have any questions. -
Both have their pros and cons. IMO 3sge due to it being Toyota and liking the purist theme but I suppose it comes down to your personal choice, price and service/performance options that you are interested in. I'd be interested to know how tall both are as the 3s is quite tall and only just fits under the bonnet.
-
I'm glad to hear I haven't dampened your enthusiasm :) Yeah its a big job but hopefully Jordain and I have done most of the R&D so you can get a clean run through the process haha. Yeah mine has consumed me at times but I can see the light at the end of the tunnel now, just trying to finish the bodywork and finalise the front end combo. Probably the biggest piece of advice I can give is don't unstitch the middle floor brace like I did, follow Jordains example and buy the LEEN shifter relocation kit and use that on the box. That will save you a mile of time and effort alone and look heaps neater. Good to hear you can spare the time and space for a build like this, I'll be looking forward to following your progress in your build thread (presuming you'll put one up for us all).
-
Hey -KE10-, Good to see another Corolla fan thinking of a engine conversion in a 10. Look to be totally honest going the 3SGE route is hard work, after 3yrs I still haven't gotten close to finishing mine haha. Some things to think about would be:- - Can you do most of the work myself?? (It will save you a bucket load in the long run) - How much do I want to spend on this car??? (I said 10k but will probably push 20k by the time I finish and I've done 99% of the work so far) - Do you have friends or know someone who will help you through it??? (Preferably someone who has done a few engine conversions before and is handy on the tools) - Do you have a suitable location to conduct such a conversion?? (This conversion could take quite a while to finish and leaving it in the driveway out the front of your house isn't ideal) Look even if you say no to some of these points don't let it turn you off doing a conversion on your car, I'm just trying to get you thinking about which is the best conversion for you, looking back on my build if I knew of the work that would go into this I probably would have gone the 4A route instead. The motor and box fit so much better (no cutting firewall/tunnel) and depending if you want turbo or not determines to overall legality of the project. If you have any questions either PM me or just post on my build thread :) Good Luck.
-
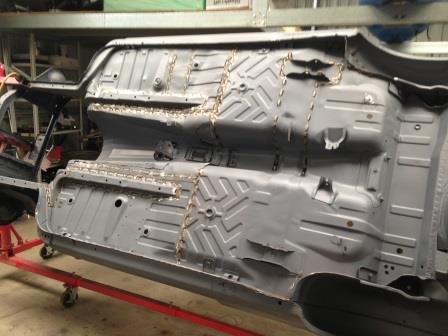
Thanks Dominicaneddy, Its been a while between updates as not a lot has been happening. I have sourced some S13 LCA's to remove the need to modify the stub axle angle on the AE86 struts and also completed some more seam welding on the rear of the car. Internally the seam welding is finished but I just need to finish the underside of the boot floor then fill in all the un-necessary holes in the floor pan before putting the stone guard down. Some more photos of the progress.


-
So things have been slow lately as I couldn't be bothered working on the car in this summer heat. I have however been able to make some progress on the cooler days in the way of seam welding the body as I'm not going to run a cage and wanted the whole car to feel a bit more stiffer especially with the amount of power I will be making :)


-
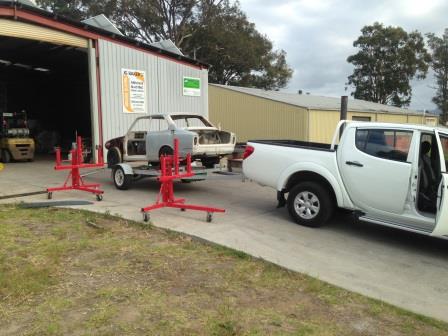
So just a quick update peeps. I finally got my s#%t organised and trailered the rolla out to the sandblasters last week. I had re-assembled the driveline so I can manoeuvre and transport the car a little easier and then used their forklift to put it back on the rotisserie. It has been a huge goal of mine to have the car blasted inside and out to ensure I was aware of any rusty areas before proceeding any further and to my surprise there was only two small areas that will need my attention. I am super stoked with the end result and this should allow me to finish the welding off with minimal fuss and effort due to the etch primer being able to be washed off with thinners before I weld anything now which should result in a really neat finish.