

drift freak
-
Posts
265 -
Joined
-
Last visited
-
Days Won
4
Content Type
Profiles
Forums
Events
Gallery
Blogs
Everything posted by drift freak
-
Upgrade??? The one out of the 11 you sold me is just as big if not bigger ( I think ) will be filling it up tomorrow arvo so I'll let you know
-
Yeah could be the problem. What diff ratio do you have??? Might be revving to high compared to standard too. I think standard Altezza ratio is 4.33:1
-
I don't think I'm gunna need it. My mates KE20 with the same Beams setup did about 50 laps of the Marulan track flat out and used about 25L. You have to remember that the Altezza is approx 1700kg while mine will come in around the 950kg plus myself (80kg),I think I will be fine :) but yes i did look at using a alloy fuel cell (check previous posts) but wanted boot space as I plan on doing some serious k's.
-
So I thought while i have some spare time I'll post up a few progress shots. I have nearly sorted all the wiring loom out and finally got my fuel tank and lines sorted in the boot. I'm running Aeroflow 200 series lines and fittings to reduce the chance of vapor entering the cabin. I'm stoked with how neat it has turned out and can't wait to organise the hard lines under the car. Once the fuel system is sorted in the next couple of days my mate who has wired the car up reckons it should be ready to go ahead and start!!! EXCITED MUCH :) LOL


-
Glenn - it will be difficult as there isn't alot of space under the car for both secondaries. I'm having trouble fitting the 2-1/2" pipe past the gearbox xmember at the moment. Plus I've been told to try and keep the catalytic converter as close to the motor as possible for best efficiency.
-
Autofill - yeah don't qoute me on it I'm no expert, he told me it was out of a Tarago so it maybe it is a f series???
-
Johnno c- thanks, they took a little bit of mukin round to get sorted but I'm pretty happy with them. The only down side is due to limited space I have to mod the gearbox xmember to get the exhaust past it. It might be ok I'll just have to check ground clearance. Altezzaclub- yeah it went really well, he had some minor scoring on the rear rotors after a few laps but we found some metal filings between the pads and rotors, so we cleaned them up and it was all good. He reckons the car handled really well apart from lifting the I side rear wheel under heavy braking/cornering but this will just take some time to nut out. His best lap time was a 46.2 sec so he was pretty stoked and the marshals were pretty impressed for it's first run. Yeah it's awesome how interchangeable parts are from different models. This centre isn't the best though for track duties as he still experienced some single tyre wheels spin. I'm pretty sure he is going to a locked centre to maximize drive :)
-
So I decided to start on the extractors the other night because I needed to be able to wire up the 02 sensor shortly. I had the original top section of the exhaust manifold already so I decided to cut the flange of where the the 4 runners merged to 2 and make it into a set of 4-2-1 extractors. The primaries are about 1-3/4 inch and the secondaries are 2 inch into 2-1/2 inch main pipe. I visited my local exhaust shop and picked up the bits i needed which included 1* 180deg 2 inch mandrel bend 200mm 2-1/2 inch straight pipe 1m 2 inch straight pipe While I was there I oxy cut the old flange off and the stock heat shield brackets. Once I got home I cleaned the 4-2 mergers up with a angle grinder, die grinder and round file. I then measured the length of the 4 primaries (390mm) and fitted them back on the car. I then lifted it on the hoist and began fabricating the rest from underneath. I decided to maintain the same length for both primary and secondaries just for simplicity. Heres a few photos of how they turned out.


-
You could also buy the gen 3 pump bracket and pump u it if that suited you better. I didn't bother as it was substantially more expensive and I'm not chasing massive HP.
-
Apparently the walbro 600hp pump is a direct replacement. I think the Bosch intank one would be too big but.
-
So I changed my mind about my fuel system. After talking with one of my mates about simplifying the overall setup and creating some space for the spare wheel he suggested I use a Castlemaine Auto Enterprises weld-in adapter ring on my original tank. It allows me to use a VT 5L in-tank pump with a surge tank and sender built in also a rollover check valve in the carbon canister line. Turns out heaps neater than external surge tanks and low + high pressure pumps. It will also cuts the cost down on associated hoses and fittings. This is the pump unit, when it is inserted into the tank it compresses down to ensure the surge tank is always hard on the bottom of the tank. It didn't fit into the tank so I had to shorten the stainless legs by about 2.5 inches, it then fitted perfectly. So this is the fuel tank with weld-in ring welded in So heres the pump installed So the fuel pump uses push on aeroflow fittings that convert to AN fittings and I will be using 200 series PTFE hose to eliminate the fuel vapour in the car. Now to finish the exhaust and install the O2 sensor so I can start the old girl when my fuel lines arrive :)


-
Sorry guys, won't let me upload any vids as it says they are too large. Can someone help with this??
-
Well not entirely related to my build but I headed out my mates house this afternonn to help him get his freshly built race car sorted before his first track day tomorrow (a bit of pay back for him wiring my car up LOL ). As you can see by the following pics and vids it runs a 3SGE Beams with 6 speed manual. He uses a 'T' series diff with the Altezza LSD centre. Up front is AE86 struts with Wilwood brakes and Wilwood pedal setup. He currently runs the stock ECU but is talking about upgrading to the Adaptronic 1280 and quads down the track. We are headed to Marulan motor comnplex tomorrow to see what shes got. Fingers crossed it all runs smoothly.


-
Rolla Beams, I am using 20V Blacktop quads on a manifold I bought from Celica RA45 on Toymods forum. The velocity stacks are Sam-Q engineering, he is in Sydney. As for front struts I've gone with AE86 struts using excel inserts and weld-on coil over to suit my KE11. All the info is contained within this thread, my advice take a read through the whole thing and also this thread, both similar conversions http://www.rollaclub.com/board/topic/43334-jordains-69-rolla/page__st__315 Good Luck :)
-
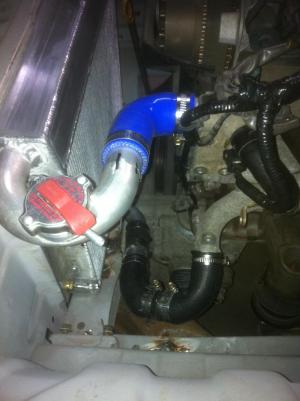
Well I tried to have the top outlet on the motor machined down to suit the new configuration today by a fitter at work, he told me it would take hours to set it up and I should see the welders instead. So of to the welders I went and we decided to cut the pipe shorter and reweld the end on. All up about 10 minutes of his time. This is the end result, we cut about 50mm out of the middle. I have now cut the top outlet on the radiator as it sat about 20mm higher than the motor outlet and angled it down so the 90deg bend mates up perfectly. Also as you can see by the following photo I have bodged a lower radiator pipe until my mate can get me another alloy 180deg bend that I will fabricate into a joining pipe.


-
Cheers Jordain, yeah its coming along well. The only down side is the top outlet on the motor needs to be machined back to allow the 90deg bend to fit in (will get some photos as I sort it out. Yeah there is plenty of room for the thermo fan too (even more in your considering how far back your motor sits :) Yeah the boot floor was just one of those things, live and learn. I'm not too annoyed as the floor was already hacked to pieces when I got the car so its probably for the best anyway lol. I makes the whole setup heaps neater and more compact too (now to get that angle grinder out and get started) BTW how is yours coming along??? Any more progress???
-
Cheers 67 Rolla-Ken the encouragement is much appreciated. Yeah it's finally getting to where it should be. The boot floor is next on the agenda, I've changed plans and have gone back to the original tank. This is so I can have a spare tire without storing it on the back seat lol now I have to cut one out of the spare car I have and repair the rust in it then reinstall it in my car. Agh the time this car is consuming!!!
-
Well I have finally got my radiator made and installed. It was a prety simple process in the end (much easier than I had imagined. I bought the core from PWR in QLD then bought the necessary material (50mm*50mm*3mm strip of ally & 20mm*50mm*3mm angle ally) to make the end tanks and mounting brackets. For the outlets a friend of mine had previously made a cusom radiator for his KE20 so I got him to source the ally bends. Once i had located the mounting brackets onto the car I then clamped the core in between them and started marking the bracket positions (it would be more suitable to leave the core in the car and tack it togeather but my mates welder isn't portable so we did it the long way. Once the radiator was fully welded I had it pressure tested at my local radiator shop to find any pinholes and had them plugged up. Once home I realised that my measurements weren't exact and now i need to modify the top outlet as it sits higheer than the outlet from the motor. To fix this i will cut the radiator outlet back toward the 180deg bend and angle it down toward the motor outlet and also machine the motors top housing back toward the motor for clearance. This way when i put the silicone 90deg bend on i will just twist it up to meet flush. For the bottom outlet i will get another 180deg bend and make a joining pipe connected by two silicone hoses. For now i'm pretty happy with it, the only thing left is to mount my thermo fan when it arrives in the mail.


-
So I got my velocity stacks yesterday in the mail from Sam-Q (toymods or Sam-q engineering). I am totally stoked with the fitment, perfect blend on the internal joins between stack and throttle body. Also the mounting brackets come press fitted to the stack for easy install. I decided to go with 70mm long stacks as it suited the configuration as seen in the photos. If I went any longer they would have fouled on the firewall and made more work for me. So things are moving along nicely with the ECU harness and body harness nearly sorted its onto making the dash panel so I can mount my LCD display and 02 sensor display. More pics soon :)


-
Jono C - I'm not 100% sure about colour and body work. I've tried to make everything fit without the need to flare guards etc. I wanted to keep it white with gold chasers (was this combo when I bought her) but my missus is super keen to go all out with a total colour change respray. I will be getting the car sandblasted inside and out to ensure all the rust is found and repaired along with stitch welding the entire car for some extra rigidity. I will more than likely go a nice light metallic green like the new Mazda 2's or Hyundai i20's but for now I'm not sure. That is the last thing I'm worrying about as I still have a mountain of things to get sorted before paint is a factor. Not really sure if that was an open invite for free test drives, maybe a substantial cash deposit will secure a drive LOL. In regards to 'This is looking like a seriously good piece of kit!' I have had a few older cars in my time and when I decided to build this one i told myself nothing less than brand new or perfection first time round. This will hopefully keep the long term costs down as everything will be brand new and it will just be turn key car with minimal maintenance. Hopefully some more pics in the next few days.
-
Jordain, Shortening the rack is quite simple in the end. I only need to shorten the actual rack not the housing. It is a matter of removing the rack piece that the rack ends screw into and machining the desired amount off and re-tapping the thread. It will allow the missus or anyone else to drive it without scrubbing :)
-
I've also made a fair dent in the wiring harness thanks to my mate Muzz :) The following is the plug arrangement between the ECU and body harness. We set the car up so that the motor can be removed by unplugging the motor harness from the ECU harness and out she comes. This will make maintenance a million times easier in the future. The red arrows show the ECU plugs, the light blue show the body harness plugs and the fluro green shows the starter solenoid wire. This photo is how the wiring is basically layed out throughout the front of the car. This is the fuse block re-mounted where the original fuse block was located.


-
So peeps heres some more photos of the rack setup. Hopefully these photos shed some light on the install. I am probably going to shorten the rack by about 30-40mm as full lock scrubs the rear of the inner guards. This will also help with the 3 full turns lock to lock. I'm hoping it will come down to about 2.5 full turns :)


-
Made some more progress today, pretty stoked with how things fell together. My mate Muzz came round and we got the steering rack in and tie rods pretty well sorted. I used the intermediate rod from the Altezza along with the column. I had to shorten the intermediate rod to 70mm extending from the main body. So we cut the splined end off and tapped a thread in it, then screwed it out using a bolt and series of nuts that the shaft slid up the middle of and BAM!!!! its was out. We then cut the remaining shaft down to a 100mm in length and inserted it into main part and welded. We then shortened the tie rod ends by cutting them down and tapping a thread into the tubed end. It probably need ends about 30-40mm shorter than KE70 but I can sort that out a bit later on. We managed to use the KE70 D/Side mounting bracket to ensure the pressed end doesn't come loose so pretty happy that fits. We followed Rob KE25 thread instructions (http://www.toymods.o...ell-my-car.html) So hopefully it all pans out well and suits the front geometry :) I've also decided to use Sam Q's velocity stacks in probably 70mm length. I would prefer to run 110mm stacks but they will fowl on the firewall. Also in the next few days I should have a tail shaft. After some thought and discussion with a few people I be going brand new 3inch steel tube and heavy duty uni's. :)


-
Cheers for props too seabiscuit


