

olskool
-
Posts
206 -
Joined
-
Last visited
Content Type
Profiles
Forums
Events
Gallery
Blogs
Everything posted by olskool
-
Awesome, my girlfriend and I figured it out. NO MORE SUSPENSE. :bash: Can't wait to see it on the day. I bet there are a gazzillion plans for this car. :y:
-
Well here is my pic as promised. Hope you all like. All I gotta do now is cut a hole out and put a filter in the box and that is yet another job done on the KE55. :bash: :y: I feel like I am making progress again and it makes me darn HAPPY ! ! ! ! ! ! !

-
Thanks heaps for the feedback. Yes that is exactly what I done with my suspension set up on the front. I tried and tried and tried to keep the RA65 lower arms but it was just causing too much trouble. At the end of the day, the way I did it was the easiest. As for keeping up the posts of my progress it has been a while. I have, painfully enough been flat out working on my other daily rolla, so there hasn't been much happening wih my KE55. Although just yesterday I completed a rather interesting part of my intake. I will post up some pics soon. :bash: Again thank you all for the positive feedback. :bash: :D
-
Don't get too excited over my car. It ain't anything superdooper, just a daily. :P But an olskool rolla to us is like gold in a daisy meadow. ;) :P Yep yep yep, I love them. ;) :y: I must agree, all this comotion about Andrews "Goldmember" has really got me in suspense.
-
Hey Mick. My girlfriend and I will be there. Painfully enough, won't be in the KE55 though. Its not finished yet. After the big kerfuffle with my KE70 I managed to find another old rolla which you will see on the day. :dance: See you guys there. I am really looking forward to it. :D :hmm:
-
We just used replacement panels. I cut the rear wheel arch section out of one of my cars for her, and then they just tacked them in with the mig. It is the easiest way to do it. Looks good though babe. Coming along slowly but surely. :D
-
You could use a stick welder if you really wanted to, but as you go into something like that or a gasless mig, you just really need to know how to use the machine. Heaps of people say that they can weld with a stick and a mig, but there is a huge difference from someone who is just self taught in the backyard and someone who has done some welding courses. Then again, you could just get a couple books out and just have a read or do a search on the internet. :cool: I am not saying that you are not capable but just say that a small section of the weld was not up to standard and later down the track a weld broke and your engine mount collapsed whilst you are driving. I am sure that you would not be happy. :cool: Another good thing to do is get lots of scrap and do some practice welds on that before you get to your engine mounts. Anyway, anybody is capable as long as the right amount of knowledge is acquired. Like I said, read up on the internet. Good luck man. :fuzz: :D
-
Man, as everyone else has been saying, your car is what everyone should use as the best example of a small olskool rolla, not only just a rolla but any car as a matter of fact. Always loving your car. So many photo's, and sure they're of the same car, but I am sure many will agree, that there is always something new to admire. :D Anyway, just keep up the proud ownership of the raddest rolla out Mick. :fuzz: :cool:
-
Hey, thanks Mick. Yeah I have been working on the car a lot lately but it is not very picture worthy. It's just a whole lot of wiring mubo jumbo. I finally got myself an ecu. It's the new Haltech Platinum series 1000. Anyway, I am doing the wiring myself and I can tell you now it is nothing short of 50 headaches in a row every night. Nah, its plenty of fun just time consuming. So yeah, I have most definitely not stopped working on the car. I also got a 12" thermo which I am in the process of mounting on the radiator. I will put up pics of that when I finish. And thanks agaian for all the comments.
-
Hey, this really good to see. You are doing a really proper job. Like everything when it comes to doing a proper job, it will all take a very long time, but it will all pay off. Keep up the good work. Any plans for engine swapping. What have you guys got available over there.
-
The only thing about the dragways is that they were the PERFECT offset and had a bit of width about them, and they were'nt a poxy pooooooooooey rim. I loved em. I think you can still buy them brand new but I am not expecting them to be cheap. Thanks heaps for the offer man, it truly is appreciated, but we just don't have any way of travel at the moment. So it reeeeeally sucks. :y: Anyway, gotta keep to it with the KE55. :D
-
Hey man, I seriously appreciate that hey. Its that kind of stuff that makes me want to finish the car quicker and quicker. Can't wait to have it on the road finally. :yes: Anyway, I can't wait to catch up with you guys on a cruise. My girlfriend and I won't be able to make it to the one this weekend cause our KE70 got stolen out near Hoxton Park just yesterday. So if anyone sees it let me know. The worst thing about it is that the dragways were still on the rear. The front ones were off though. I am telling you now that it truly sucks to find out news like that. :lol: :sob: But anyway, it ain't stopping me from finishing the KE55. Full steam ahead and trying to keep smiling. :D
-
Hey, things are coming together really well here dude. I am enjoying it wholeheartedly to watch the progress on your car. Like everyone else is saying, KEEP UP THE AWESOME WORK! ! ! ! ! :( :P !
-
The core, the filler neck and the cap including postage cost me $450 and then on top of that price it wasn't much because I did it myself. :lolcry:
-
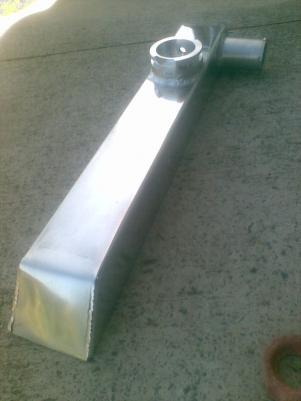
So, the radiator is all finished and ready to go. Just finished it over the weekend. Here are some pics. These are the tanks that I fabricated. This is the top tank. This is the bottom tank. And this is the complete product. And mounted in the car. Hope you guys like. :lolcry: :laff: :( :bash: :( :y: :y:


-
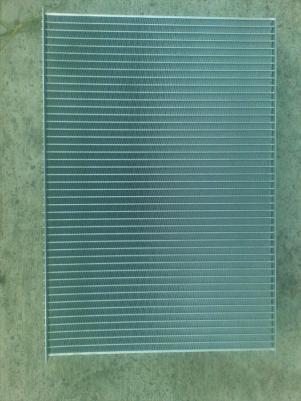
Hey guys, quick update on things that are happening with my car. So here is some pics. I couldn't wait for the radiator from JAR and I also got a bigger radiator than the one that JAR supplies, a more suitable size according to the opening in the corolla. I will be making my own tanks and all mounting to suit and I will be a happy man. So I got all the following from PWR Queensland AUSTRALIA, not CHINA! ! ! ! ! ! ! ! ! ! ! ! ! ! ! ! ! Here is a picture of the filler neck. And here is the actual core. I got a 2 core radiator which will be more than efficient enough to cool the 4age. I will keep you all updated as completion comes closer every day. :y:


-
1000 buks is way too much. Generally if someone quotes you that much they really have no interest in the job. Just shop around a bit, but what ever you do don't do it yourself if you aren't a confident welder. I have seen some pretty interesting mistakes because of a dodgy weld. :dance: :cool: And I am sure you would'nt want your engine falling out. :D
-
Yes of course mig welding is fine for such a purpose. Now in regards to making custom engine mounts I need the car and the motor. I can not just make them. It really aint that easy. But it also aint that hard. You do need patience and ofcourse time to do such a job. Where are you located.
-
Yeh I made them. Well I really couldn't tell you. The bottom plates are made from 4mm stainless steel, and I am pretty sure I used 316 grade which is in this application the best. I know that material itself is fairly costly. The 'U' Bolts are also 316 grade and the hardest part would've been bending it. I think the spacer brackets I used 304 grade 2mm thick. I really don't know but if you really want I could try and organise something.
-
Here are the stainless spacer brackets. And here are the brackets at the bottom of the leaf which have the shock mounts on it and where the 'U' bolts go through to hold everything together. All stainless steel, never ever rust. :dance: :y: :) :y:


-
The advantage of caster is a two way aspect. If adjusted one way it will increase responsiveness of turn in but decrease straight line stability, and the other way does the opposite. Better straight line stability but slower turn in. Here is a quick update on the car again aswell I hope you all like them. Custom made stainless 'U' Bolts and the spacer bracket ontop of leaf which locates the 'U' Bolts.


-
The K-MAC's are caster and camber adjustable and they do have increments on them but not very visible or anything. The other brand that I know of are T3 adjustable strut tops but they are only adjustable for camber. I am pretty sure that it is Techno Toy Tuning that have them for sale. They were very easy to change, all it took was about 15mins a side. You take the whole strut out, remove the original strut tops and replace them with your new ones and its all done.

-
Yeah they are K-Mac's. They do the job. Pretty happy with them. The radiator I am just waiting on from JAR. Hopefully in March I will get that. Oh and cuzzo, that funny thing that you may think about the engine would be the injector rail sitting ontop of the cam covers. Nothing special really. Can't wait to be driving this little beast with you guys.
-
I have finally sourced out adjustable strut tops and here are the results aswell as a few teaser photo's. Hope you guys like it. I am aiming to have the COMPLETE hopefully in April. The main thing that is holding me back is certain people supplying me with the parts I need and have ordered ages ago. Rather annoying!! But hey, I gotta be patient.


-
Yes there is something new for this year. I have finally got my tailshaft done but sadly there are no pics, but that is my fault, I got too excited when I recieved it and had to check if it fits and it does! :y: So that has made me mighty mighty happy. There will be more progress soon but I am just waiting on some more parts. But I must say myself, slowly but surely it is beginning to take shape. :P


