

Ruts
-
Posts
457 -
Joined
-
Last visited
Content Type
Profiles
Forums
Events
Gallery
Blogs
Everything posted by Ruts
-
Wooot!! Bought an upgrade kit for me - and retired the old pc to the arcade box quick swap of a few parts ....... (damn those bunny chairs are uncomfortable) and the whole thing is ready to go here it is being put through its paces by my girlfriend (she likes Galaga) ps. having the control panel did improve my gyruss score ...... 109k up to 176k


-
dude it's spray paint - remove - degrease - sand if necessary and paint - there you go - one quick walkthrough need pics ?? I have another rocker cover I am looking to repaint (not sure why)
-
Right - Lanyards Non Printed Lanyards: Anything other than a printed lanyard will be too expensive for the small numbers we want (ie under 1000) Printed Lanyards: Printed lanyards will be white rollaclub print in the style of the shirts and beanies etc on a dark/royal blue fabric. One company refuses to do a run of less than 500 as it is cost prohibitive - with setup costs to print them etc. Another has quoted ... Here are the price breaks for printed lanyards. Minimum is 50, local print with turnaround time of 15 working days. Quantites 50-99. Price is $5.10 ea + gst Quantites 100-199 Price is $3.68 ea+ gst. Quantities 200-299 Price is $2.55 ea + gst. Soooooooooooooooo..... EOI time .... reply with a YES and a QTY ie Yes - 4 That is all. No conversation, no discussion. We will get an idea of how many people want them before we go any further.
-
Finally finished the control panel today - yesterday I had to do family stuff (gahhhh) So I finished building the box for the control panel then fitted the encoder into a useful and accessable position. The challenge was to try and work out how to attache the circuitboard to timber - in the end I drilled some small holes and used spare mounting poles from my motherboard. Then the challenge was to wire in all the switches - notice the 'cheat sheet' I created so I didnt have to trace any wires back. and the loom actually looks tidy-ish Finally wired up player two and the two credit switches (below the main circuits on the back of the control box. Just tested it - and it all works - every switch detects properly and is wired into the right position !! Yay for me - now to fix my pc so I can get it all running together.


-
yeah nice gauges - can the passenger actually see out the side of the screen ??
-
So some bits turned up in the mail today ...... (insert happy dance here) :P So after some sitting and pondering; do i build the sides and base for my control panel or do i just jump in and wire it up I jumped in and started wiring Player 1 Controls Its not as neat as I'd like but as Nick said ... "only I will know" Having done side one (count the wires - friggin things) I realised it would make sense to wire player 2 in the same colours (it was only moments before that I had discovered both sets of wires were the same colours with one set having a black stripe.) So here is everything (except coin slot/credit button) wired and kinda neat - still contemplating heat shrink on the cables - but as this panel is only temporary I'll wait for now. Tomorrow its finish the timber assembly, add the credit buttons and strip ALL those wires to go into the keyboard encoder. THEN I will test my panel on my fave game ...... cracked 100k using the keyboard so I should do significantly better with a fully working control panel !!!!!!


-
yeah i used to be skinny (well what I thought was skinny - 67 kilos and 184cm/6 ft tall) One ankle reconstruction later and I was out to 95+kg Back down to 85ish - not happy with that but more not happy with shape than weight But hey I am an old man and should be allowed to bitch about my middle age spread.
-
Quotes have been sought. Waitout for prices and EOI for lanyards. These will be great for events - might have to design a Rollaclub Card for members too - to wear with your lanyard. Keep the ideas coming
-
I agree with Nick hate having bruises from where her hips jam into you.
-
With the can in front of me it is DupliºColor METALCAST Anodized Surface Color System MC201 BLUE ANODIZED I highly recommend the grey/silver GROUNDCOAT if you plan on painting anything that isnt chrome or bare shiney metal
-
and nicole ritchie lionel's little girl - very very little
-
That "Metalcast"® paint only comes in 1 shade of blue, and 1 of red and i think the other is purple. And the ground coat is the grey/alloy colour to give your colour an even base to work over. the paint is semi translucent so it will show up any grime under it
-
currently 2901 games will be in my mame cabinet - thinking about adding some Playstation ROMS as well - will need another harddrive for those. Possibly later I will add a semi-accessible cd tray to play pc games on it too - or add yet another harddrive and use daemon tools to mount images of the cds remember mame literally stands for MULTIPLE ARCADE Machine Emulator
-
nah - my cabinet setup will be two piece sides - like the images at the top - although the Lucid template is pretty good its not what I wanted. I did in fact PAY for my blueprints/templates
-
Guys - Nick is sending these out for love - maybe you should consider the Shop to buy some stickers or if you have them already pop over to the Donations page
-
mmmm ROMS regardless of the legality of ROMS (its a long protracted argument) anybody looking for a few roms for their favourite emulators should pop over to ROMNation.Net
-
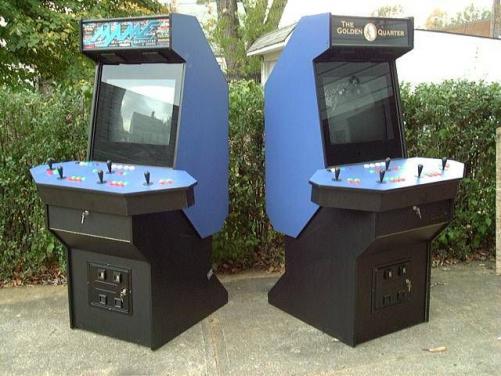
Car are an expensive hobby and once you have spent lots of $$ getting your hobby up to a useable standard you normally have to spend more $$ to keep it workable/running My other choice for spending $$ on is my arcade cabinet. I am slowly (very very slowly) gathering together all the bits for my arcade cabinet. I have a full set of blueprints from MameRoom for the Ultimate II cabinet (see pic below) I have all the software I need from Mame and a front end from mameWah I have designed a custom 'skin' for mamewah to suit the cabinet design I have in mind Note the number of playable games list at the bottom left 2900+!!! Last weekend I put together the layout for my control panel (joysticks and buttons) just to see how it felt. I wanted to make sure there was enough room between the joystick and buttons to be comfortable, also that the buttons were comfortably space and aligned and that if two players were at the machine that there was enough room between the two sets of controls. Being happy with the physical layout I then proceeded to make up some graphics to overlay the control panel with the same basic style as the 'skin' above. Just so I had an idea of how this will look with buttons and joysticks on it I created a mockup so I could identify how crowded it would look and if too much image/detail was obscured. So basically the cabinet will consist of the following parts: º Cabinet (using 16mm MDF as per the blueprint and example images above) º Control Panel (using an I-PAC keyboard encoder - allows the buttons to be wired into the computer via ps2 connection) º Monitor (19in flat CRT - needs readjusting tho) º PC (using a P3 with maybe 512mb ram and a spare 40gb hdd I have laying around) º Coin Slots (yes it will be coin operated to get credits - currently bidding on ebay) So ultimately when I have finished construction it should look something like this .....


-
OK so on the whole we are anti-rice, but I have a penchant for all things blue. This is acutely obvious if you look at my custom guage thread but I have taken it a step or two further. Take one shitty oil stained rocker cover : Soak in degreaser (50/50 mix of Supercheap degreaser/Kerosine) Rub with Wet'n'Dry to remove scuffs and hammer marks (it was hard to crack the seal) Spend $35 at Supercheap on pretty tins of shiny stuff Spray the blue on the cover Look in disgust cause it doesnt look right Read the cans Use the basecoat like you should have in the first place Respray the blue Seek assistance of Bajic brother to refit the cover (I told you it was hard to get out) Stand back and admire the blue Next: The strut braces Nick has provided to me.


-
I'd like a close up of the dash - who did the cluster work ??
-

Ke70 Cluster Upgrade - Quick Tutorial
Ruts replied to turbo_rolla's topic in KExx Corolla Discussion
you should be able to unsrew the existing odometer and put yours in to keep the original km on your speedo there is no simple way to wind them back - they are designed to wind forward only - hence the digits not clicking over as you reverse and popping the wheels to spin them usually causes minor damage that will make the digits stop or jam -
i want the silver to be dark - its the blockout - will be behind the guage to limit light only to the digits and arc
-
What not add your projects into the database as well ?? There is room for a number of pics and you can update them as the project evolves.
-
I am hoping to buy a sheet of Lexan and cut and bend it Then get the images printed to WHITE sticker/film. Then get nick to cut a mask in either black or silver for the rear of the lexan (the silver will block more light than black) ps. My plan will be if I can work out a basic price to cover printing and product I may consider selling custom face plates
-
Personally I think the nan spec stance was much more appealing than the lowered look - looks too falcadore stance now - fully sik lowering moite
-
I like the comment ".. the other car is out of the way..." hmmmm not by choice or by organisation


