

ollienewc
-
Posts
116 -
Joined
-
Last visited
-
Days Won
1
Content Type
Profiles
Forums
Events
Gallery
Blogs
Everything posted by ollienewc
-
Got the rest of the iron up, stops pretty much all the wind, but I think I will need another light, the iron obviously cuts out the light too. Mounted the fans to the shroud, just need a few more nuts and bolts. Also started on mounting the shroud to the rad, hopefully it'll all work out.


-
Finally got around to installing a proper light in the carport, just a cheap one from bunnings, does the job nicely. Might add another to get more even coverage. Also picked up some corrugated iron and started to put that up. A few sheets need patching, and it's going to look ugly as hell but at least it'll keep the wind and the rain out. Plan is to somehow have a hole in the roof for my extraction fan when spray painting, but then be able to seal it all up when not in use.

-
Picked up the radiator shroud, and its wrong. Looks as though the drawing was right, but it has all been bent the opposite way, as the top tabs don't line up.. But flip it around and they're all sweet.. So I was rather annoyed as it ended up costing more, and didn't even fit. But I've got an idea.. going to cut the tabs off, and just drill and bolt through the corners of the shroud and and the lip on the edge of the rad. Can fit a 5 or 6mm bolt so should be plenty. Hoping it will all turn out clean and simple. Getting real tempted to change the paint colour after the latest spraying set back.. I keep following newer cars, especially Toyotas, with a slightly darker grey, and can't help but think that's what I want instead. No point regretting it after it's all back together.. Still worried it looks too close to primer at the moment.


-
Got this update on the radiator shroud, turns out I forgot to tell my mate I wanted aluminium or stainless, got mild steal instead. So won't be exactly what I want, I'll probably paint it black or something. Little disappointed as I wanted it to match the rad, and as I could have gotten one delivered for cheaper including two fans, but ahh well. I'll probably end up getting an aluminium one at some point anyway.

-
Trying to make some progress where I can, in 10 degrees, the wind and the rain.


-
Been doing some more reading and it seems half say kinchrome is good, half say don't even bother, go warren & brown. Parents have asked me to do the head gasket on my sisters lancer, I need a torque wrench to do it, so they've agreed to buy me one as payment in a way. So I guess I'll see what they're prepared to pay and go from there. Shame we don't have aldi down here, for $25 I'd give that a go for sure, probably test it against a known good one first though. Yeah I quite like the look of the 4age, bit on the small side but you can make them look pretty nice and tidy. One of my main goals is to have a clean engine bay, we'll see how it looks once all the wiring, fuel hoses,etc, etc are in. After changing away from the 4k with the webers, I always wanted either a carb'd or quad throttled 4age. At least a bit different to the norm. People will say carbs are a downgrade, but I think it'd be cool as fck.
-
Finally got the engine bay sprayed yesterday...buut theres still a bit of over spray in the tight spots, and some parts were missed on the rear of the radiator panel with primer still showing. Bit of a setback but I'll give those spots a wet sand with 1500, then have another crack painting it myself. Debating whether or not to clear the engine bay, it is just a gloss grey, no metallics or pearls, does anyone have any suggestions? More just going for a deeper look to the paint I guess
-
They're a Techno Toy Tuning (t3) part out of the states. I have the same ones. https://technotoytuning.com/toyota/ke70/ke70-corollalevin-camber-plates And these are the needle bearing spring perches/camber plate upper hats that LittleRedSpirit is talking about I believe, correct me if I'm wrong. https://technotoytuning.com/toyota/ke70/camber-plate-upper-hat-system-ke70-corolla
-
That's a real nice looking engine bay you've got there mate :y: Had a look back at your thread, such a sweet twenty. Would love to see some updates
-
So the plan is to have the engine bay sprayed tomorrow, hopefully the weather holds out and can finally get it done. Also bought two 10" thermofans the other day, and I'm getting a shroud for those made up by a mate at the moment. Could and maybe should have gotten a shroud + two fans to suit my rad for $168 off ebay, but it is nice to support local. Won't end up being too much more anyway. Struggling to make up my mind how I want the interior too, originally wanted a contrasting colour to the grey, but now I'm leaning towards something darker. Anyone have any input on a torque wrench? are supercheap/bunnings/kingchrome ones fine or is it worth spending more? I do want something that'll last, but don't need to go overboard with it.
-
One thing that was bugging me was how to secure the air temp sensor in place, previous owner had tigged a metal plate and tapped a thread, but I wasn't so much a fan of that. Original plan was to clamp it either side of the trumpet with two slim nuts, but had no luck tracing any down. Decided to try just bore a hole and let it tap itself a thread in one of the old purple ones, and worked a charm. Was solid enough, especially once I sealed it all up. So I went ahead and just eyeballed where I wanted it to go and marked it on the new red trumpet, punched, drilled a pilot hole then used a step drill to take it out to 12mm.


-
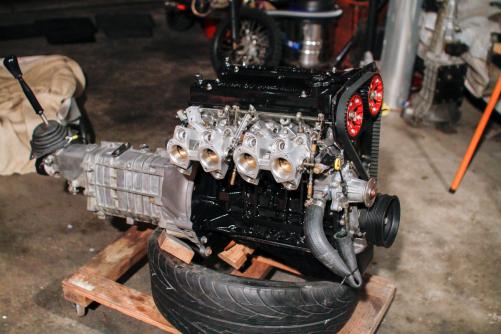
Cleaned a few more things and started bolting things together. Installed the trumpets/ram tubes/air horns/whatever, starter and the alternator. Thinking about getting the alt mount from sam-q as its an all around nicer, cleaner unit. $168 so might have to wait a little but you never know. Also got some nicer new allen bolts to replace the mismatched and dirty standard ones for the timing cover and installed that too, trying to pay attention to the details.


-
So not too much has happened lately, weather has been pretty terrible so there's still been no progress with the bay. Just been cleaning things up and painting them ready to install. Painted the block in dupli-color high temp gloss black too, was bugging me being a bit scrappy. I've now got a tub full of parts incl engine mounts, lca's, alt mount etc that have been painted in high temp and wrapped in glad wrap, seems to never end. Got a few more little bits and pieces to go too, just keep finding more and more. Also got a set of these and matching injector retaining and blanking plates. Going for a grey/black/red theme, hopefully It'll all turn out. Thinking a thin red pin on the tyres too, we'll see. Ollie.


-
I love it, personally I think it looks much better without
-
I'm also in need of a torque wrench, does anyone have any recommendations..? Got vouchers for bunnings and they have a couple of kincrome ones, unsure of the torque range and quality though.. Also learning to buy right the first time, so after something semi decent that will last a while
-
Got the jack last week, used it installing new discs and pads in my uncle's forester, bloody loved it. So glad I have one now. Also got my rotors last week too, pretty happy with them and should look nice on the coilovers. Need to tidy up the rear drums and sort out if anything needs replacing there too. Started to clean a few things up on the 4age, primed engine mounts and dizzy heat shield to be painted, also need to clean up the alternator and mount, dizzy body, itb's and manifold, and give the head and block as much of a clean as I can. Still haven't gotten around to my brake or fuel lines yet, not too sure what I'm doing there. Braided stainless for the brakes hopefully from Hel Performance, maybe custom braided for fuel but will probably use one of the stock metal fuel lines to keep it simple. And upgrade the rest to efi.. We'll see what happens. Just waiting on some decent weather to rub back the bay and get the colour on too.


-
Thanks Reed, wanted a way to be able to adjust the rad to be as close as possible to the front panel without hitting, as well as keep it clean. Real test will be once it's driving I guess
-
Finally got around to making the rad mounts, ended up basically doing as I said above. Think it should be fine, seemed pretty solid, but might put a split pin through the bottom radiator mount to make sure it doesn't pop up and out, can't see that it will, but better to be safe than sorry I guess. Just need to make a tighter fitting top grommet out of harder rubber too, just using fuel hose at the moment. Had a mate come over tonight and layed down a coat of primer on the engine bay once again, bloody hope its the last time for that before the colour goes on. Nice to have it back to the one colour at least. Also ordered myself an Arcan 1800kg low profile aluminium trolley jack, so pretty keen to get that after using the wind up ones all this time. Will certainly make life a bit easier


-
Oh yes. I can't wait to see a video of this moving
-
yeah I'm getting there slowly, cheers man. A mate came over and we think we've come up with a nice and easy way to mount the rad whilst hopefully looking clean. Bit hard to explain, but want threaded rod or bolt to to pass through a hole in the front headlight panel (secured with nuts and washers either side) then bend at a right angle horizontally and fit into a custom grommet inside the arched stock mounts on either side of the top of the radiator. Then for the bottom just have a simple bracket with a hole and grommet for the bottom pins to sit into. Yeah I didn't even think of an ae71 one for some reason :/ still thinking about sticking this on gumtree and trying to get my money back, then get the 3row ae71 rad..we'll see though..
-
Realised I needed to grind away some of the clutch cable mount on the firewall for the master cyl to clear, so I decided to just remove it all. Probably could have ground off the leftover ring too, but didn't want to run the risk of putting any more holes in the firewall. Also finished spraying the front wheel well with sound deadener, just gave it a quick once over with scotch-brite and lay it on. Not sure how much it'll do at suppressing noise, but it's all clean and black so I'm happy Had a mate and his dad round today to have a look at the engine bay, his dad's going to spray it for me for a coupla of cartons. I got heaps of overspray and am just generally over it, I want the motor in and it rolling to keep me motivated. Driving my girlfriends auto kio rio is getting a little boring... So that should happen real soon. But before that I have to make mounts for my new alloy rad, and to do that I need to put the bonnet back on to check for clearance.. fun. Anyone got any detail pics of how you mounted a bigger rad to a ke70? I just got one of those 4age alloy ones that are all over ebay. Under $140 posted, cheers :y:


-
Ahh sweet, at least I know it should work then. Could only find a picture of the tank itself in your thread, but I'm sure I'll figure it out. Might even cut both of them off and make a metal strap to hold it or something. As far as I'm aware wagons and sedans aren't the same due to different fuel tanks and rear suspension setups, Never really stuck my head under a sedan.. was hoping it'd just bolt up in front of the main tank or near the fuel filler, but cubes aren't the easiest shape to get under there nicely..reckon I will need to grind at least one of the mounts off to get it to tuck up neatly. Debating whether to go braided fuel lines or not, I like the look but fittings add up quick..
-
I got my pedal box, new slave, master and braided line thanks to jordanrolla the other day so I'm pretty stoked on that. I reckon I'll blast it and give it a coat of paint to stop any rust before it goes in though. I've cleaned up all the blower gear and ducting, also replaced all the crumbling foam in the seals. Drilled the firewall and scraped all the old cracked sound deadening off and scrubbed it all clean with wire wheels and scotch-brite, best shit ever. So it's basically ready for the dynamat to go in that I got last week :y: Also this is the surge tank I bought, think I've found a spot at the rear, behind where the bumper will go


-
Any more info on that? Wanting to do this for my ke70 wagon, but not sure how to go about it..
-
Yeah no this thing is sweet! Funny how your tastes can change hey


