


altezzaclub
-
Posts
6825 -
Joined
-
Last visited
-
Days Won
134
Content Type
Profiles
Forums
Events
Gallery
Blogs
Everything posted by altezzaclub
-
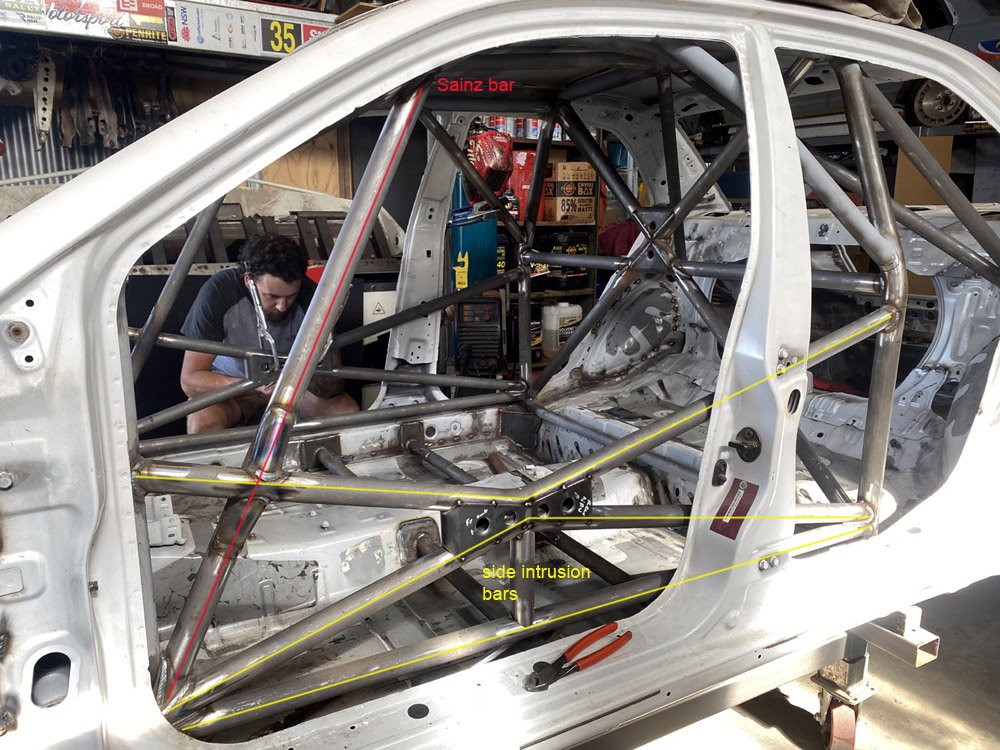
Here's a full set of side intrusion bars, more than the Stanza will get, and the Sainz bar, named after a massive roll Carlos Sainz had a couple of decades back that collapsed the A pillar.
-
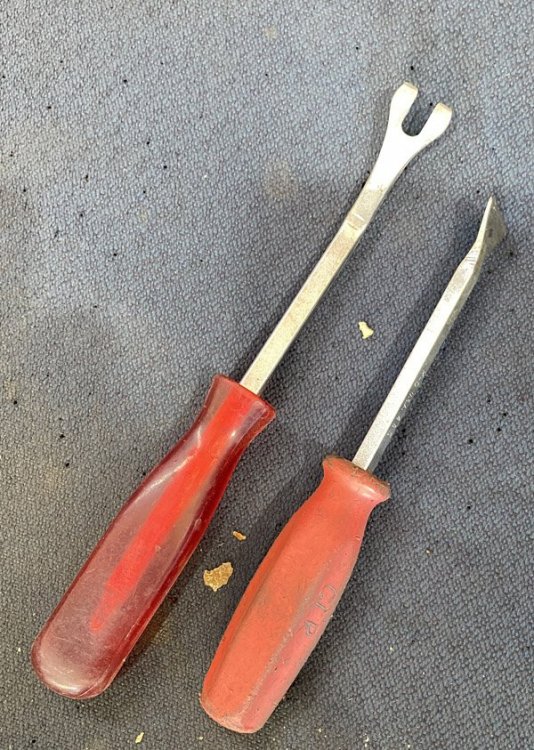
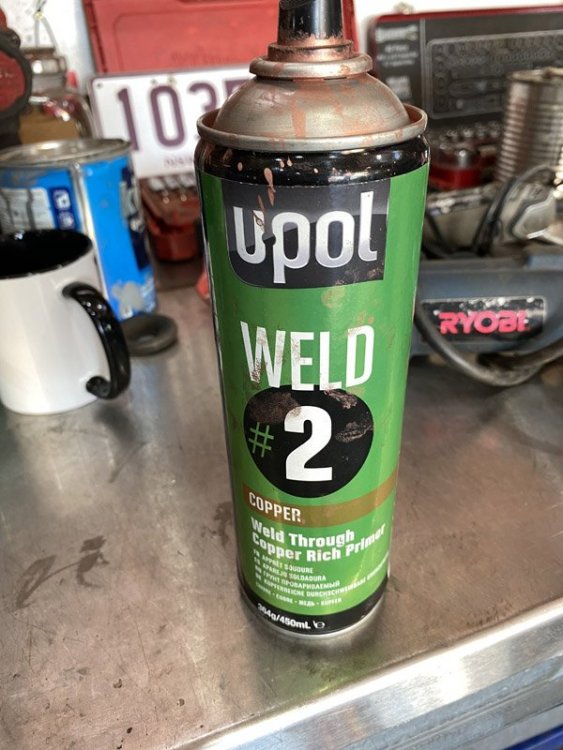
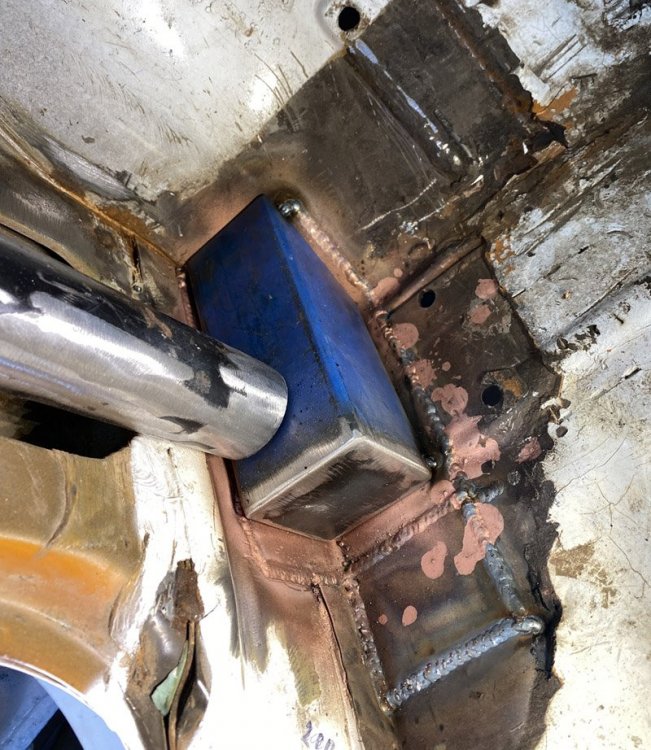
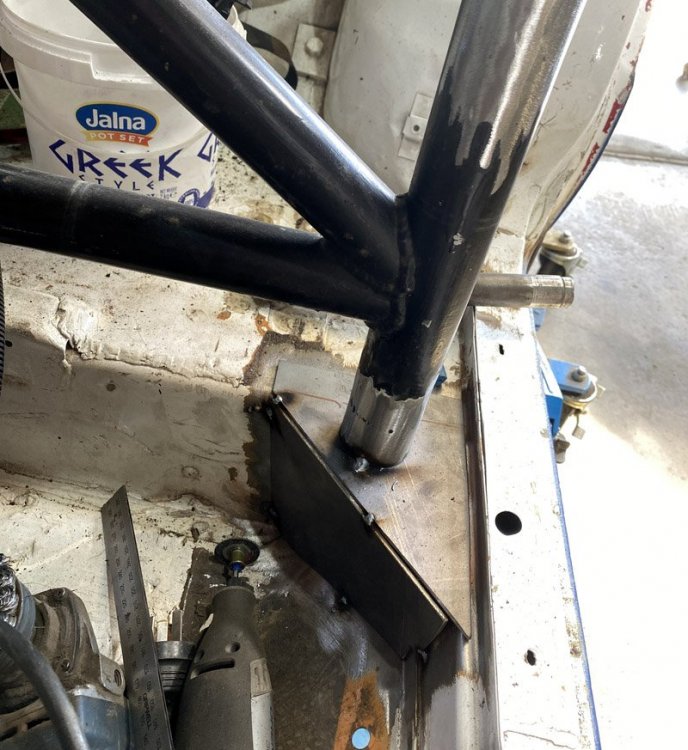
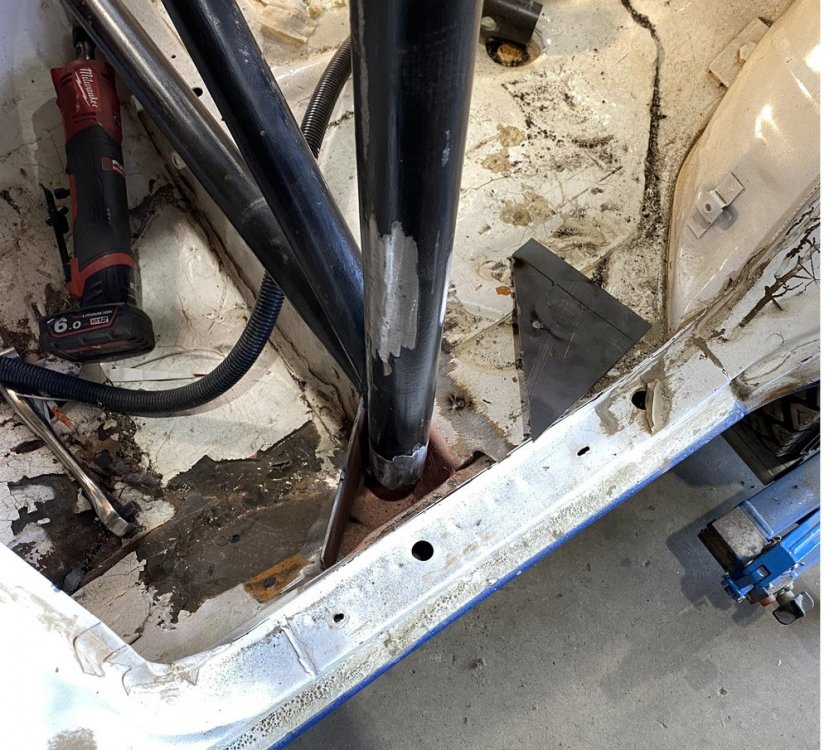
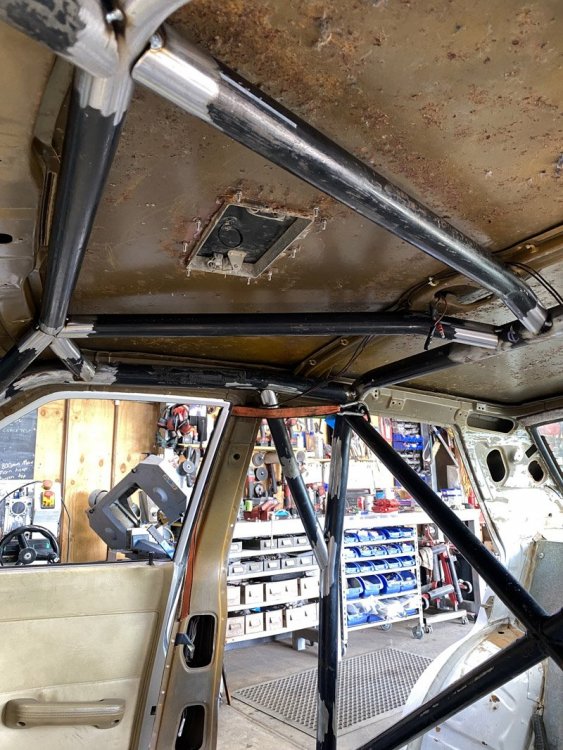
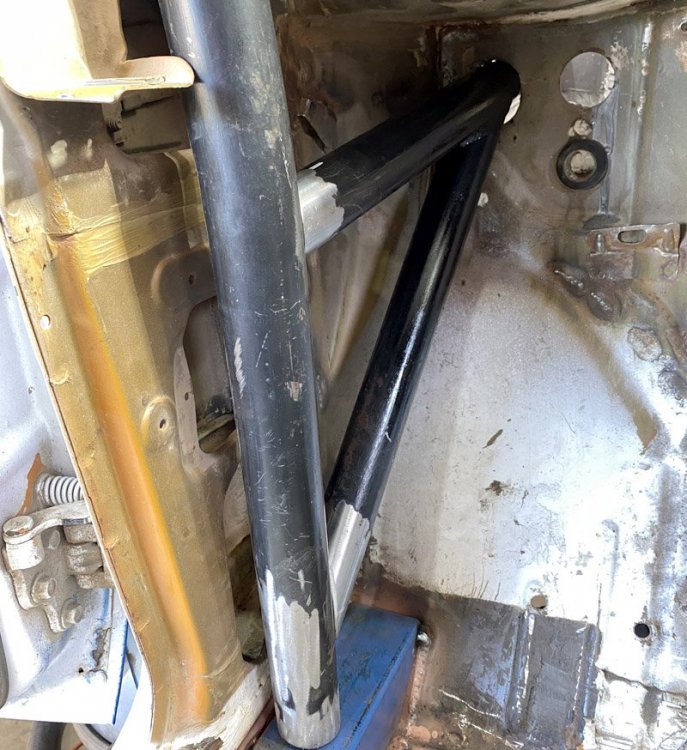
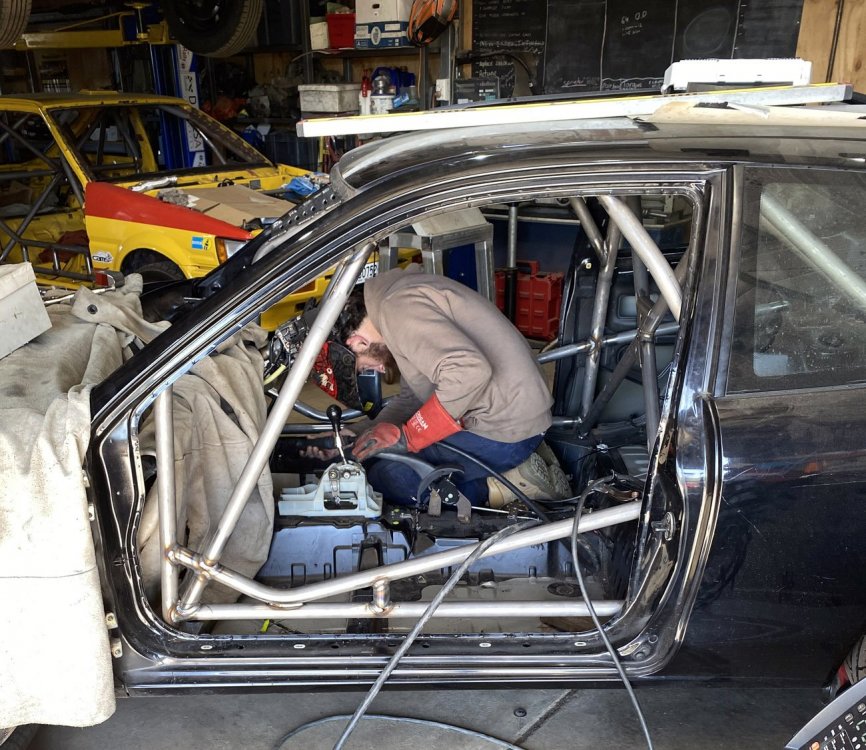
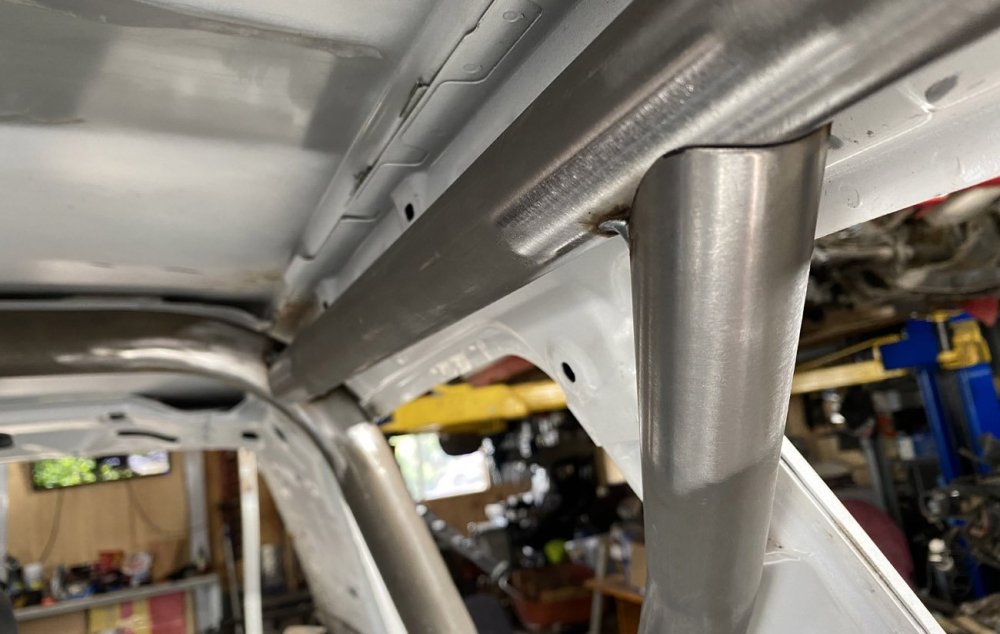
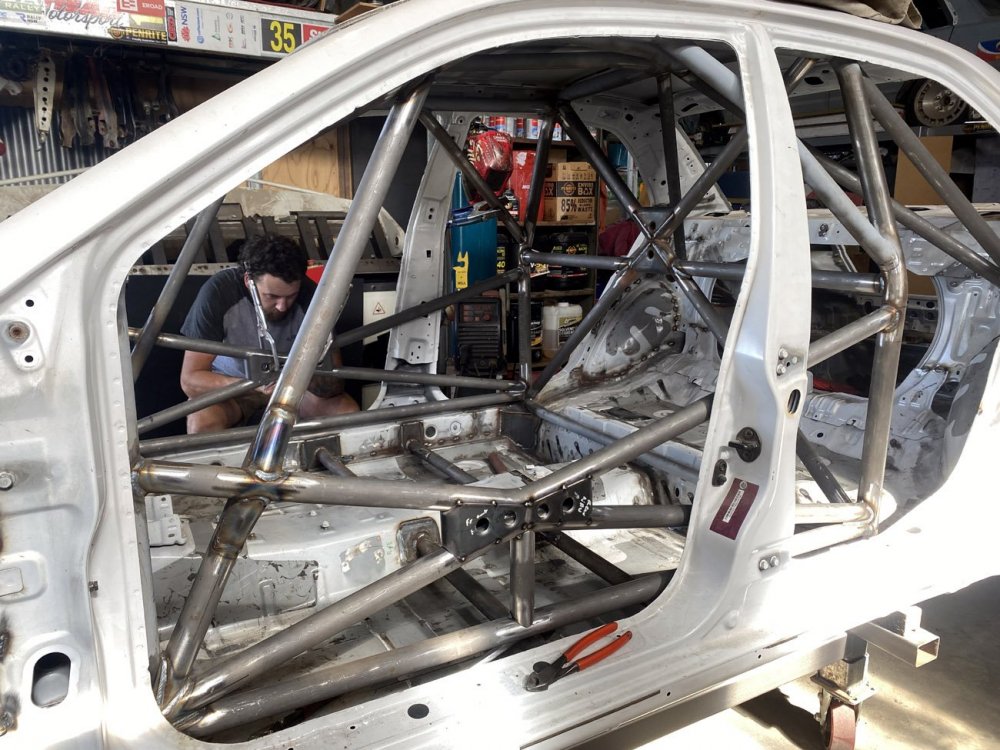
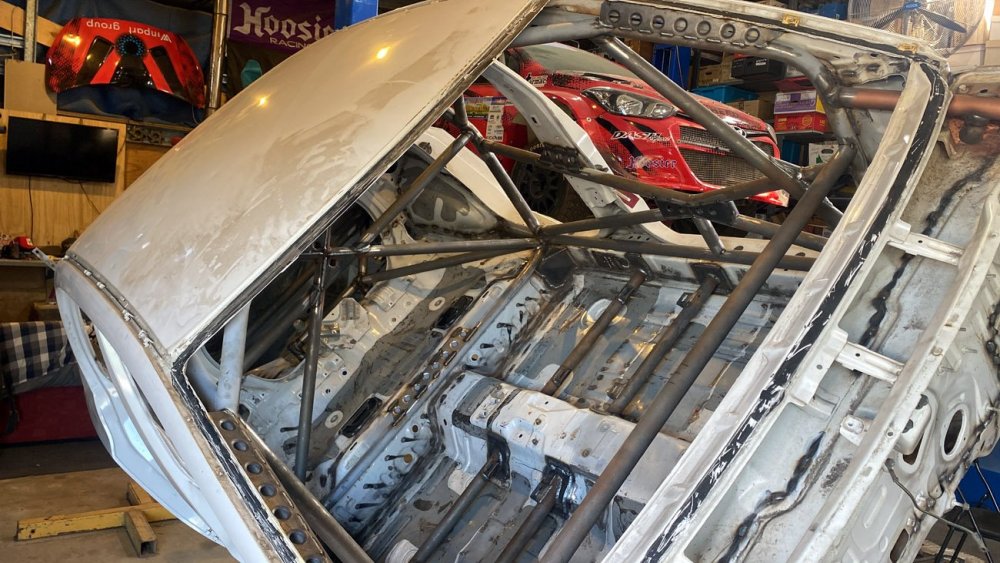
Ok- Here's the scraper you need, and the handy bent tool for removing plastic trim. If you have clean steel to weld, use this copper weld-though spray only. Every zinc one we tried, including the same brand in zinc, were rubbish! When I arrived this morning, Josh had spent the weekend cutting a cage out of the spare Stanza shell and adding bars to it- The rust in the front corners had been plated and he'd made the two feet for the lateral bars. Note its not welded to the floor yet. He'd made the rear feet too, and this is where you want yours- That's just tacked together while we make the tower bars. Then you take out the front feet, cut the tacks off the top plate of the rear feet and drop the cage down to floor level. This gives you enough room to just weld the top of every join in the roof. Once we welded the main cage and put it back up on the feet we fitted the tower bars. These join the front suspension to the cage and it goes all the way back to the rear suspension. It won't be cracking the transmission tunnel again! Now everything gets welded up, and a dash bar is already in place and tomorrow will be side-intrusion bars, maybe a sainz bar and the rear bars. That will be the cage done, the next massive job will be replacing the dash and doing all the wiring. The block is assembled, correctly this time, last time they had the wrong main bearing in #5, and that is an oil feed to the head, so not much oil got up there... Now we find the head has been skimmed where it meets the block, as usual, but not on top, so the cam doesn't want to turn in the towers because they are not aligned. Hopefully the head comes back tomorrow for motor assembly. Are you SURE you want to get involved in this sort of circus??
-
Excellent! That is a great start! ..and thank the heavens for having a boilermaker in the family too, that will be a great shortcut for you. So, fix all the rust and get a good shell out of it. Start seam-welding the turrets and suspension areas so they are stronger than factory. Look at building yourself a fuel tank that fits inside the boot, rather than under it. It doesn't have to be too big, rallies run with refuels, but get it out of the stone damage area. The sound deadening comes off with solid CO2, dry ice, which will give you frost-bite if you handle it with bare hands. Put it in a big plastic bag on the floor, leave it for a few minutes and then bang under the floor with a rubber mallet. It freezes the tar and makes it rigid. Buy it from BOC of one of the other industrial gas companies. We also use a small solid scraper that you can tap with a hammer to knock it off. The blade must be 2mm thick and totally non-flexible. Fold up some alloy sheet to make a firewall covering the rear seat frame, or use some galv steel if its cheaper. Only need to be 1mm or so,and a stack of rivets into it. Only ever weld clean steel, no paint, no rust, no dirt, its the one thing I've learnt working with Josh, and he doesn't get those immaculate welds by accident!
-
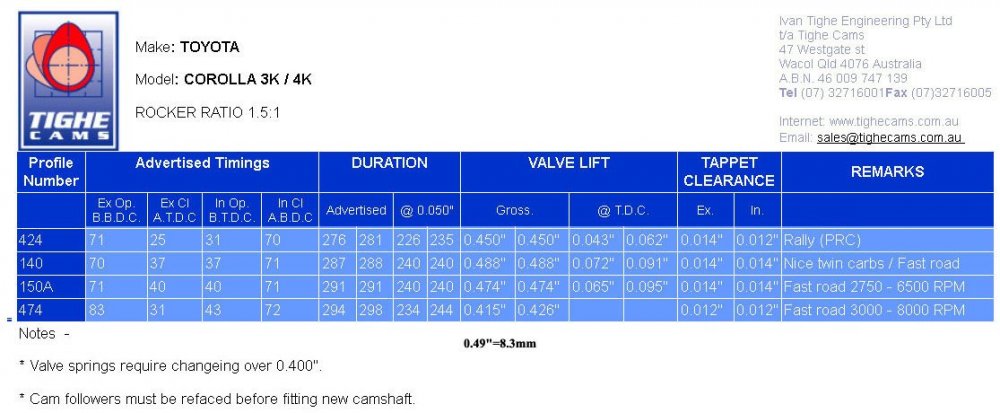
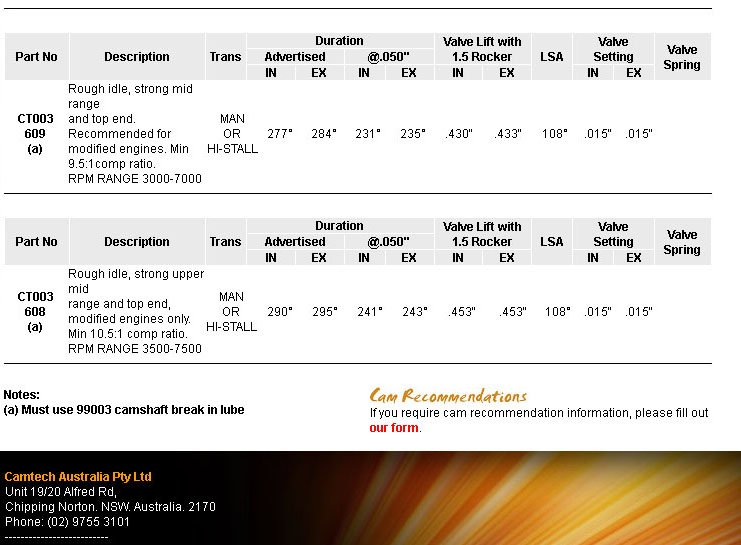
Well, Uni holidays! Strip the car, the more the better... you'll have the front guards off so go over every seam carefully, especially chassis rails and turrets. Ideally you would remove the paint in 30mm strips every 70mm or so and then weld along the seam, both sides if possible. Especially where the chassis rails join the firewall, seeing you have the motor and box out too... Clean the engine bay and paint it white, you will be thankful for that in years to come! With the struts off, turn the steering wheel most of one way, either left or right. Loosen the locknut on the adjusting screw on top of the steering box and use a flat-blade screwdriver to screw it in. When you feel it bottom out unscrew it 1/8th turn and cinch up the locknut. Go turn the steering wheel and see if it feels smooth right through the lock to lock. That adjuster pushes the gear down onto the spiral worm in the box and they wear, but because the wheel is straight ahead 90% of the time they wear most there, and if you tighten it down to remove all play straight ahead, it will jam when you turn the wheel. You can minimise the play but keep it smooth through the turning, no tight spots. If you're keen, top the box up with the thickest oil you can find, diff or proper steering box oil. If you're really keen, pull the box out, drain it, flush with petrol a few times then put in fresh oil. Your gearbox and diff will be the same, 40years of metal filings, dirt and degraded oil in there.. Check the oil you drain out for metal filings, if it looks like metal-flake paint you might have a gearbox or diff problem coming up. Go over each joint in the whole steering system, especially that idle arm on the other chassis leg, and make sure they are smooth and tight. There, steering done! Brakes are the same, get all four stripped and checked, look for diff oil getting past a seal, or dry wheel bearings in the front. Make sure the pads in the front are wearing the same, or you may have a sticky piston in a caliper. If the rear shoes are worn more in the front you can swap them around with some pain-in-the-ass work. If the rear drums are worn it will be a fight to back the shoes off as the adjusters are on a one-way ratchet, and once you get the drums off remove any lip on the edge. Crawl under the dash to see if any fluid is leaking out of the master cylinders, brake and clutch. Bleed the fluid right out of both of them and refresh with new fluid once everything else is checked and working. Cam grinds usually have a range they can cut, with comments like these- I doubt you'll be looking over 6000rpm really, if they can improve the power from 3500 to 6000 it would be great. You'll just have to talk to the cam guys. Castor- maximise what you can on the stock rods until you hit the guard, I don't remember it being a problem. More than anything you want the car to be predictable and forgiving, not fast but unstable with instant transitions from understeer to oversteer. Welding the spider gears won't affect the crown wheel and pinion directly, but bits of weld and broken spider gear teeth floating around in the oil is not good for them. If you get hold of a 4.6 or 4.8 C/W & pinion just put them aside until you have a limited slip setup in there. So, the big project these holidays it to strip the whole car, clean and repair, and plan the mods. Seats and interior out, cleaned and rust-proofed, motor and box out, radiator checked and all hose, and the connections where the hoses go into the motor.. they get corroded over the years. Suspension off, seams all checked and welded where possible. Do you weld yourself? What sort of welder?? It would be nice if it did up to 3mm steel as well as making a good job of 0.9mm panels. You'll need it for welding out the rust, and you can see some excellent work on here- https://www.rollaclub.com/board/topic/84545-ke26-restomod-project/page/8/#comment-738351 Don't forget alty and water-pump bearings, fan belt, clutch and flywheel, check it all without pulling the motor apart. Decide when you're going to cage it, and what events you can do without a cage. You can keep it a noisy rough road car for gymkhanas and khanacross, maybe the odd rallysprint, I can't remember what the regs are these days, but its worth getting the whole car checked and fixed before you start modifying it.
-
My RA60 diff bolted straight in, its in The Girls KE70, but as you say the driveshaft yoke needs a T-series coupling. The panhard rod needs lengthening, easy enough, and you gain a wider track. The bolts on the RA60 are bigger so I needed particular washers to centre the KE70 bolt in the RA60 arms. The brake are bigger, you'll probably need new slave cyls, but they run fine on the KE70 system. I put some notes on diffs in here- https://www.rollaclub.com/board/topic/42407-the-girls-ke70/page/5/#comments and here's the diff change- https://www.rollaclub.com/board/topic/65709-how-to-fit-a-celica-diff-to-a-ke70/
-
T-series yes,stock Borgie...meh! Of course any diff you buy is 40years old and probably needs rebuilding anyway. I had my T-series done earlier this year, but I can still hear a slight whine from it, everything else is worn as well as the bearings. Make sure you have the bearings in your hands before pulling the diff out if you need the car.
- 3 replies
-
- 1
-

-
- differential
- swap
- (and 1 more)
-
Wooo! The Yellow Submarine is absolutely gorgeous! Definitely a 4AGE candidate! "Would installing a manual brake setup be ideal? ' Ideal, yes, but not necessary. It involves two master cylinders, just like clutch ones, and a horizontal bar between them. The brake pedal pushes on the bar, and that junction can be wound along the bar towards one m'cyl or the other, so the pedal pushes harder on one or the other. A flexible cable to the dash winds the bias bar along, so you can select more rear brakes for tight stages and more fronts for faster sweeping corners. However, just buying larger rear slave cyls mean more rear brakes with the stock setup, and the amount of rear brakes is set by the adjustable bias screw you fit by the gear lever. That also means the brake line runs inside the car, does the hydraulic handbrake and doesn't get damaged by stones. Steering boxes were all they had in the 70s, racks came in with the KE70 in the 80s really. The rack might be a whisker more 'feely' than a box, but boxes work fine and often give more lock. Learn about the box and how to adjust it, and fix the various joints as you mentioned. You'll want about half a degree of negative camber on the front struts, and plenty of castor, and that turns into more feedback in the steering. Don't go overboard with camber, on gravel you never build up the lateral G-force that you do on tar so the tyre never uses the camber. Sydney Shocks are the Bilstein people, check with Stephen as he used to organise that. The front shock is a re-valved Commodore that is turned down a whisker to fit in a Celica strut, the rear is a re-valved Diahatsu I think. I don't know who else does them. "Probably easier nowadays to extend the stock LCAs myself" Yes, the Stanza in the top picture is Josh's latest toy, and we are looking at exactly the same things- Brakes, rack or box, LCA length... The usual one is to fit a rose joint in the end of the LCA, although if a Sigma will do it they are easier on the chassis. Jack it to the ride height you want and measure the LCA-strut triangle to see how much LCA length you need to get the camber you want. I'm using Celica LCAs in the Girls KE70 and it gives zero camber. "I was also keen on cutting and shutting the knuckles for quicker steering and a bit of extra lock. " Yes, we are talking that too, although I don't think we did it on The Big Girl. I do expect the Stanza will end up much quicker overall. " I believe 4.3 gear sets for T series are also quite rare?" Keep chasing... somewhere on the web is a list of all the Toyota diffs and ratios, I can't remember which forum it is on. No limited slip units for Borgies, that's the big attraction of the T-series. The diff gears get the tooth hollow filled up with weld on each side of their contact point, so each gear can tilt from touching a weld on one side to touching the weld on the other. I expect you could leave two teeth clean on each gear where they contact, or three if you want, Stephen's uncle did it and I wasn't there at the time. Its just to give you the initial bite on the front tyres before it locks to get rid of some of the terrible understeer you get from welding the teeth together. Have a play when you have the diff out sometime and see how many teeth each gear covers in say 1/6 turn of the axle, which would give you1/3 turn of a wheel. Its hard on the diff teeth, so collect spare diffs when you can. If you catch up with Stephen go & see BJ, he can tell you what he did at the time, both him and Steve's Dad were heavily into rallying back when I was. "How concerned should I be about the power loss of the electric fan and heater? Can I upgrade my alty so this isn't a problem?" Yes, but every amp out of that alty is a power loss to the rear wheels. I'd go for fan speed over heating, so I reckon a couple of Chinese 250watt units over one 500W. Divide that by 12V and you're pulling 40amps, over half a stock alty. Of course you'll only need them on a cold rainy night rally when the screen fogs up, just as you need another 40amps for the spotlights! You could just buy a bottle of silicon screen-clear and keep a rag by the gear lever! The famous Uni holidays! Right- strip every panel off the car, guards, boot, bonnet, doors and check each for rust and cracks in the chassis. Clean and paint everywhere to stop more rust coming. Silicon the frames of the bonnet and boot back onto the skin. Motor and box out for an engine bay inspection, and lie underneath looking for accident damage in the past and any spotwelds that are popping or distorted. If you're lucky its a clean straight shell, so start seam-welding the front turrets and engine bay, and around the rear spring and shock mounts. Are you back in BNE for this? I have a property out in Kingaroy and I haven't been to see Steve in 12months, so it sounds like I need a trip up there. Exciting times...
-
I haven't done it, but I'd get both wiring diagrams first. You will only need to take the 4AGE loom and ECU with it, and then power a few wires from the chassis to the ECU. Odd things will be coil power, alty, starter setup if the chassis is different, but it has to be easier than 4AGE to replace a 4K.
-
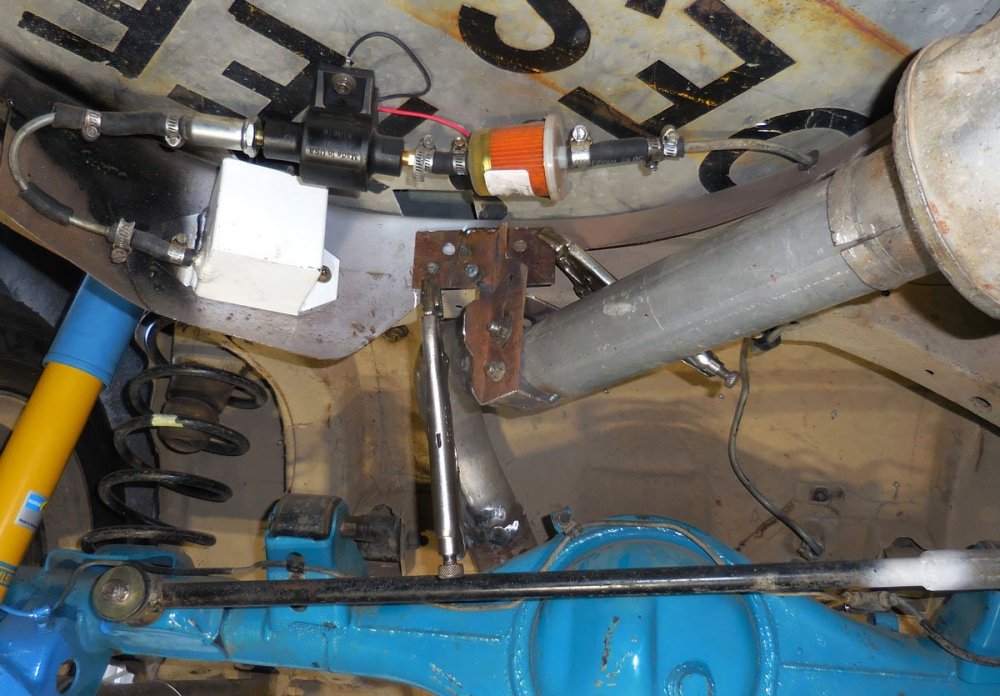
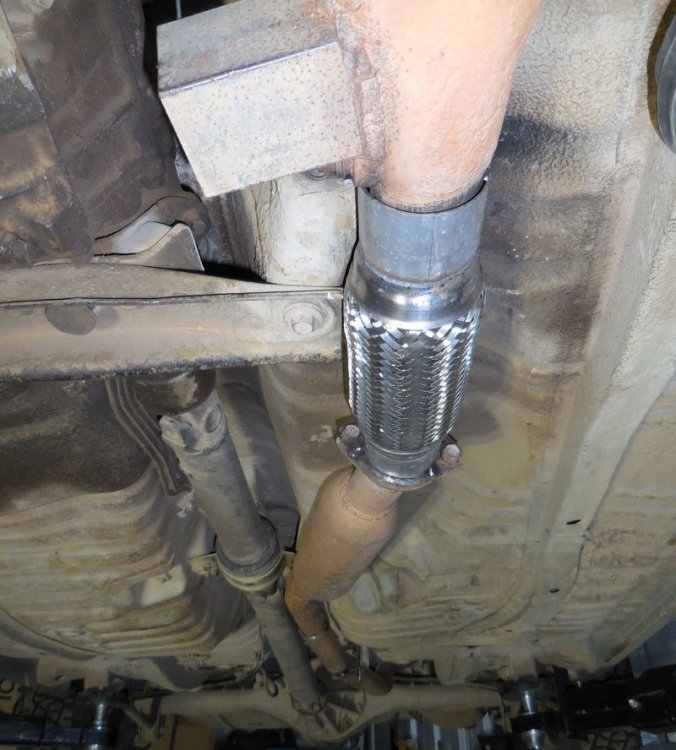
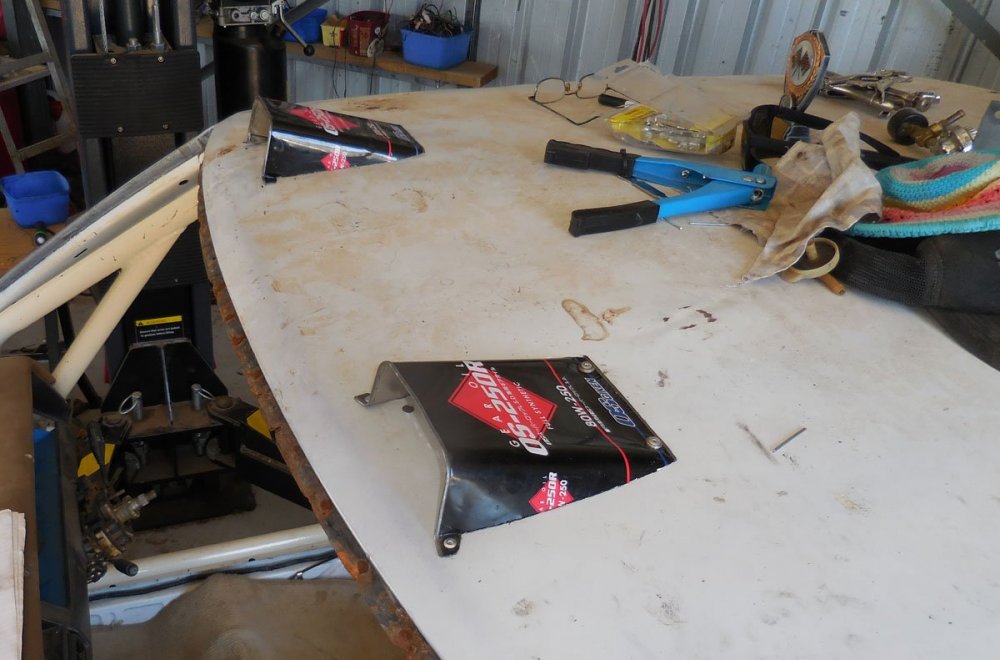
I'll just skim through my photos of The Big Girl and add any comments- We had a fuel tank made, but you could get a KE55 or whatever that goes in the boot under the parcel shelf. Then cut the boot floor out and just leave the front edge to protect anything if you're putting a pump under the floor. Maybe you can keep it all in the boot with its new floor. Tuck the exhaust right up under the floor and put a flexible joint in it jut after the extractors. Anything hanging down will get destroyed. The Big Girl exhaust was solid-mounted on the floor. Throw out the heater and buy an couple of cheap Chinese electric ones. Hook these up to the old screen vent system and cover the hole in the scuttle where the air used to go into the heater. You don't want a blown heater core to remove all the radiator water one day. Watch the wattage of the electric heater & fan, the alty has to supply that power and it takes power out of the motor. Run roof vents to pressurise the interior and stop dust coming in. Throw away the manual fan on the water pump and buy a good electric one with square blades. Run it on a temperature switch and a manual switch as well. https://daviescraig.com.au/category/thermatic-electric-fans Fit a good solid cross-strut bar in the engine bay, the turrets move a lot otherwise. Cut the rear bump stops until they hit just before something else hits, you want as much travel as you can get. Check it with a jack and no springs or shocks in, its amazing how the arms and diff hit at once. Also why the exhaust goes up as high as possible. Then try the shocks in only, no springs, they don't want to bottom out before the bump stops hit or you will bend the shafts. Then get the bump stops the right length. Softer long bump stops if you can find them, we used Falcon front ones in the Purple People Eater KE70. Check the shock mount holes in the body to make sure they're not worn oval. Get 3mm plastic sheet fitted underneath from the B-pillar back as the body gets smashed by rocks back there. Reinforcing plates over the arm mounts too. Ah, so much to do.... Oh- with the rear brakes, the hose on the diff probably split and pumped the fluid from the rear brake part of the master reservoir out, then it filled the front part only and you're running on fronts only. Make that a priority.
-
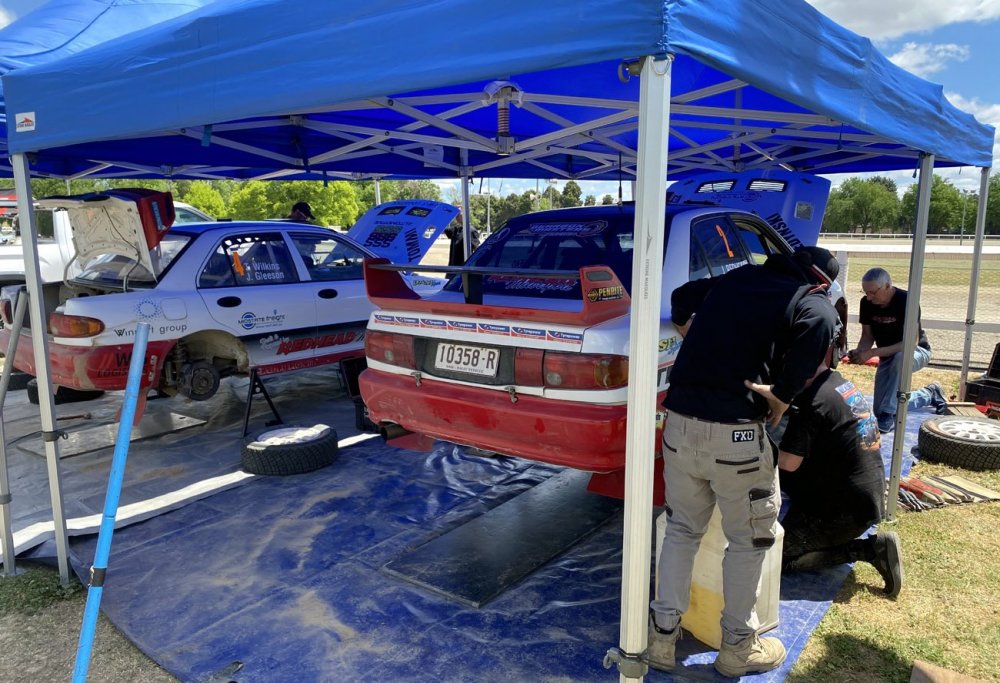
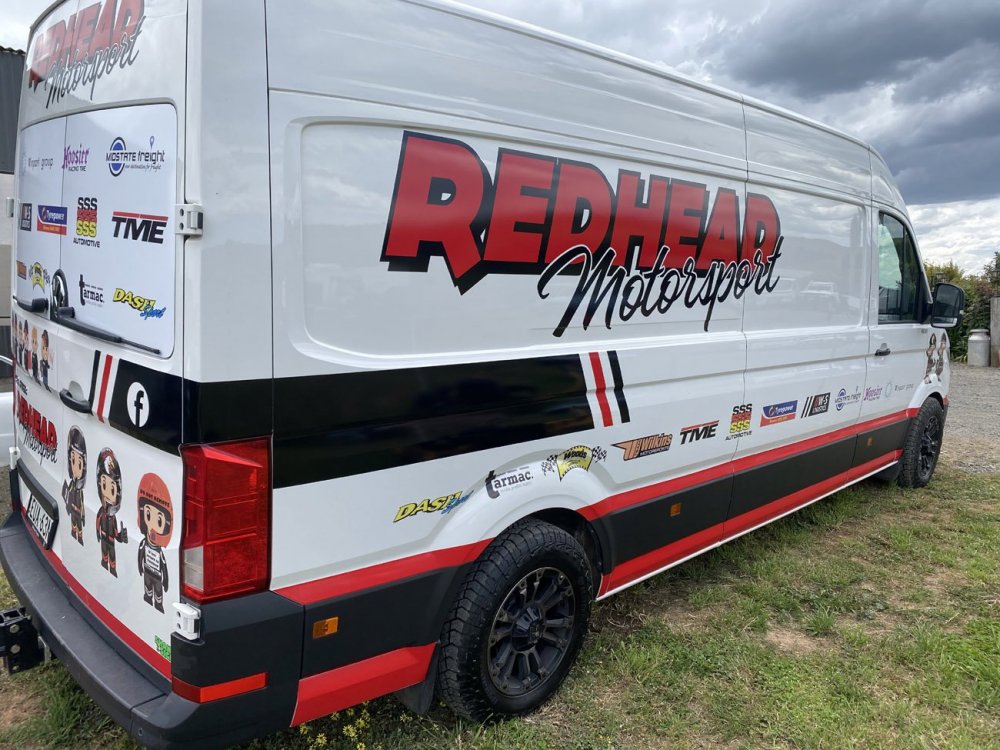
haha! I love it already! First up, you will have to divert to Walcha one day and meet Stephen, he doesn't get on here much but he still has a collection of KE70s, Tercels, Landcruisers and Celicas! We went to BNE and bought parts off someone up there who has stacks of Celicas too! "I went to bleed the brakes the other day and nothing came out of the breathers on the rear drums! I" Get this sorted out first, you need that system to be in tip-top shape. You can by-pass/disable the limiter on the firewall to feed full pressure to the rear drums, and then put an adjustable limiter by the gear lever. That way you can get the rear brakes to lock before the front ones on gravel. "Are re-valved Bilstein's my only real upgrade over stock shocks?" Yes, everything is aimed at tarmac driving and anyone with money throws out their Bilsteins for Murray Cootes handmade shocks. The difference from stock to Bilsteins is magical. Springs you can get from a few places, I think we used Kings at the time. Note the trick of raising the spring perch to get height, although now I'd convert the perch to a 65mm coilover one for a larger range of spring strengths and cambertops. "Stock standard open 4.1 diff. I'm thinking of welding the spider gears" Keep researching 4.3 diffs for cheap, but mainly don't welded the spider gears, fill in the teeth beside each one so you leave a little movement in the diff. Its about 1/3rd of a turn of a rear wheel, but important. You will break diffs by welding them, so try to amass more. " I'm wanting to install a weber carby, extractors, electronic dizzy " Yep, and a cam grind. Have the flywheel lightened if you can, it all helps and is noticeable in low gears. Later you can chase a 3SGE out of an Altezza or Celica with its J160 6-speed gearbox. I see no mention of a roll cage or seat mounts. These days I spend Mon-Fri building rally cars in a fully-equipped workshop at Redhead Motorsport, but Josh talks $10k for a cage, so its quite a commitment. The other side is that a tower-to-tower cage makes the shell much stronger and the car survives rallying better. The downside is that you're at the most likely time to crash it and the cages can't be transferred to another shell, they are welded to the windscreen pillars, the B pillar, through the firewall etc. Here's some photos just to get you going.. Any questions, shoot me a PM. Have fun!
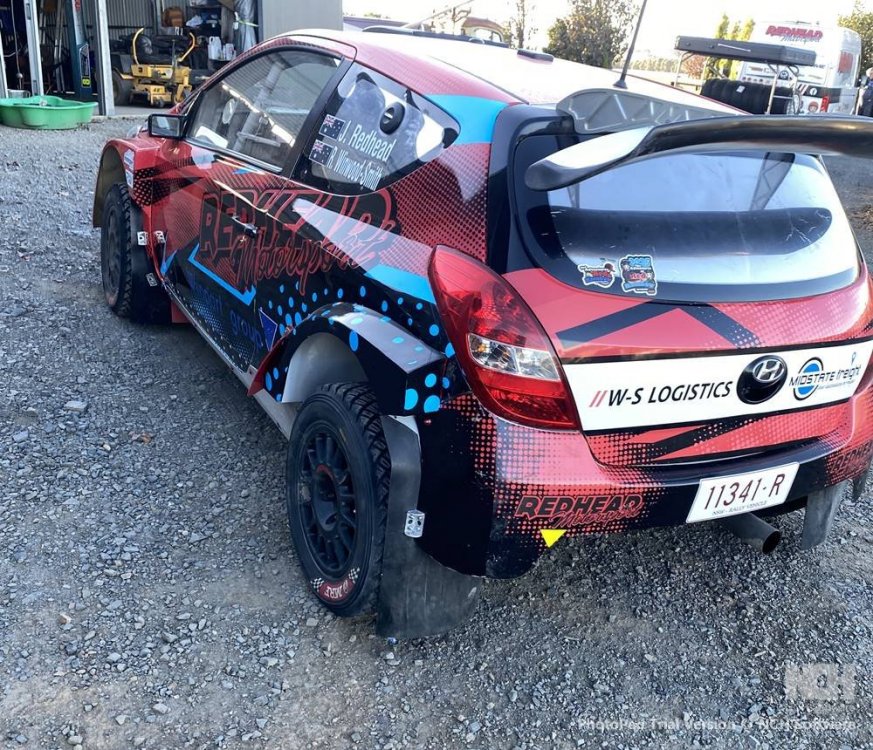
-
 Well, the 7K is a long-stroke engine so you don't need to be aiming for lots of rpm. Bluntly, any vertical carb manifold is crap, turning the air through 90deg is never a good idea, but without going to a side-draft system, its what you are stuck with. So widening the ports anywhere is not a big deal if you're stuck with that 90deg bend. That means smaller intake diameters are not as important as in building a 4K race motor. I'd say the thing to eliminate would be any steps in the intake system, from carb to valves. You can step up in diameter as the air moves in, but any step down needs to be turned into a cone. Ideally you would taper any steps in both directions. The turbulence may add power from swirl as it fills a cylinder, you'll never know. Make sure the carefully shaped ports you make actually line up when the manifold goes on the head, you may have to drill pins in to keep it in exactly the right place. I'd go for a 7K inlet and stock exhaust manifold myself. Don't get too fussed about smooth flow through the adapter plate, the air is about to get turned 90deg just after that. Make the manifold and adapter fit the carb throats and leave it at that. Cone the manifold out under the adapter plate so the air has a curve to follow rather than a square edge. Get a flappy disc drum and use an electric drill to smooth out any casting debris in the head ports and inlet, although now you're looking at taking the head off. You might find a bit of useful stuff in here-
 -
"Haven't been able to drive for the last 3 mths due to a health issue," I hope they sort it out, that would take all the fun out of life!
-
So you will be adding Banjo's water-line to the back of the head too? Can you get shorter rods?
-
Definitely sound like head off and a careful rebuild. Note the tension on the exhaust manifold studs/bolts as you undo them, the head goes off for a skim and a valve job while you make sure the manifold studs are all tight. A good idea would be to pull the block out while the head is off, tip it on its side and clean all the rust and debris out of the water jackets around #3 and #4 cyls, which is probably what gave the head gasket a hard time to start with. I did that to my K motor in here- https://www.rollaclub.com/board/topic/42407-the-girls-ke70/ Not a big job really, although its easy to get buried in it as you think "I'll just check the clutch and maybe replace it, and there's a bit of a ridge on the cylinders so I should rebore and do bearings and..."
-
"to answer your question kouki axles do fit into a zenki housing they just don't fit each others centres. I'm using kouki disc axles in my zenki disc housing because the lsd i bought was kouki. i just swapped axles and is all sweet the difference in diameter is just around the splines but doesnt really matter cause the teeth on the axles are different." https://www.ae86drivingclub.com.au/forums/archive/index.php/t-15848.html Also, drum and disc have different width bearing- Same axle shaft part number https://www.ae86drivingclub.com.au/dcimages/3/8/38159.jpg "but yes, drum bearings are single row, and disc bearings are double row (wider). there is no difference between zenki and kouki bearings, the difference lies in whether the diff is disc brake equipped, or drum brake equipped. which also explains why the Disc Brake bearings are almost double the price (because it is double the amount bearing)." Hmm.. he reckons spline as well- "zenki = 24mm kouki = 25.4mm. different diameter, number of splines and spline shape. check club4ag for tech reference..." and "If you have a T AE86 disc rear, you can swap the large/small centres without problem, as long as you have the matching axles." clutch pack:- 1 way, 1.5way, 2 way combo series of two of the above rebuild kits avaliable- toyota oem, trd, cusco, kaaz, tomei" https://www.rollaclub.com/board/topic/42058-zenki-t-series/
-
"the Zenki or the Kouki " Isn't the difference the number of splines on the axle? Not something I've had to worry about yet.
-
OS-Giken make LSDs for them, meant to be one of the best as they use more clutches than the cheap ones. Toyota run diffs in close sizes and things like the Tarago center won't fit a Celica, so check the sizes carefully before you buy something..
-
I would expect it will run out of puff sooner, but it should keep the mixture reasonably correct as it can only the flow the air that it can mix fuel with. So the air flow for 5000rpm on a 4K would be equivalent to 4300rpm on a 5K. It should allow you to sort out other problems while you decide on the carb situation. Jets can be drilled, but its a very precise operation with very small drills. You shouldn't need to drill them unless it leans out at the top.
-
"Assuming you still have recirculating ball steering, the exhaust may not fit anyway " Good catch! I never think of that, just in terms of KE70 racks. So it has the local AE85/AE71 gearbox with the clutch slave on the left, so you want the extractors as far to the left away from that, tucked right up beside the chassis rail... but KE55s have an idler arm there and you want the extractors as far to the right as you can so you don't cook that!
-
Hover your mouse over his name and you'll see he was last on here 10years ago. Probably married with kids now, but you could send him a message and if he has the same email as then he will read it. He probably won't see your post.
-
In NSW you are not allowed to register a car where you have stepped backwards from injection to carbs, for pollution law reasons. I don't know if the other States are like that, but you'll need an engineer for the project so now might be a good time to find one. The engineer will also tell you about what other upgrades he wants done to match the power of the new engine. Its a bit of a licence to print money for them, so you might chat to a couple if the first seems too expensive. The guy in Sydney I used was great, agreed the stock brakes were fine and charged me under $1000 for the 4AGE engineering. Other people have had to fit bigger brakes new struts etc for many thousands of dollars. Also- That's not a 20valve motor, just a 7-rib 16valve, probably the best one to fit. Also... "-distributor blanked off to be or as cas for standalone ecu " So you will need a coil-over-plug set-up (I bought mine from Manon Racing in NZ) and an aftermarket ECU (Mine is Haltech) and whatever needs to be done to make it work. From the photo I can't make out what he has in the valley where the plugs sit, maybe he has it all set up already. But wait, there's more! Show your engineer the picture and make sure he's OK with the air filter, as I think you have to have the air filter enclosed in a box. I'm not sure, I've never had to worry about that. Its a gamble buying a rebuilt motor that has never been run, you are very dependent on the guy who built it knowing what he was doing, and if it won't start you will be completely stumped. If you crank it over and bend the valves because the cam timing was wrong, do you get your money back?? The dizzy problem means its not actually finished, so it can't be run. See if the guy will give you a hand to fit it and get it running, that would be the best solution, pay him in beers or cash and its still worth it!
-
https://www.rslibertyclub.org/forum/deefa-s-horse-trading/cars/60243-ke55-corolla-beams-3sge-6mt-fs
-
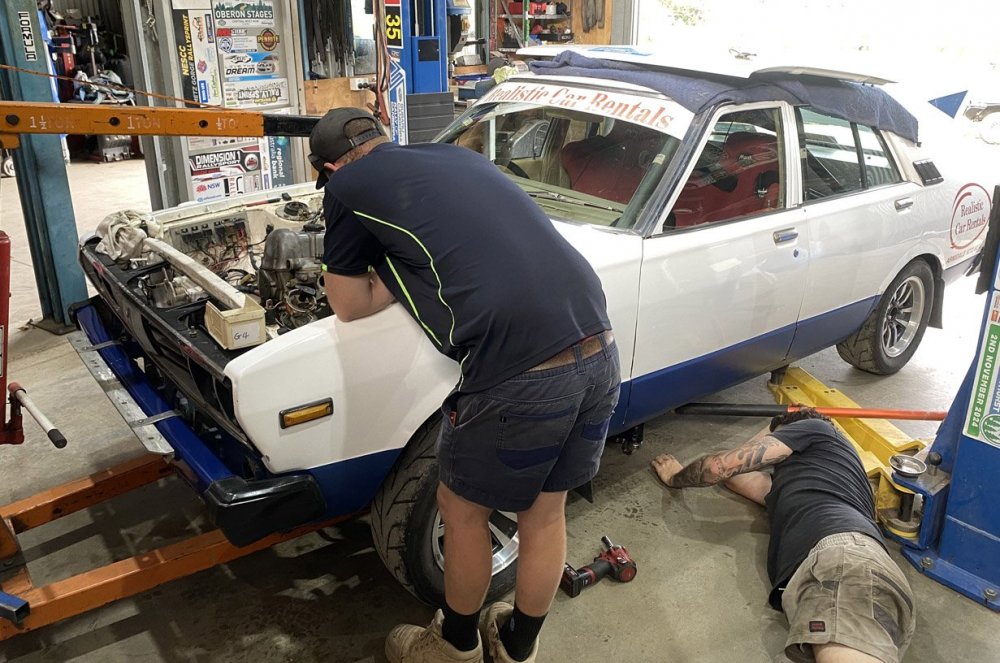
Sure, buy the Altezza engine, ECU, gearbox and driveshaft, or at least the yoke. The yoke may be on some other gearbox in the Toyota range, I don't know about that. However... the motor is very tall, taller than a 4AGE, but anything is taller than a K motor! To fit it in a Sprinter/Levin AE86 we're using a special sump from NZ, wide and shallow. The clutch master cyl needs to be moved on RHD cars, but no problem in the USA/Europe. Also, two J160s, one for the 4-cyl 3SGE Altezza motor in Japan, one for the 6-cyl IS200 Lexus with its 1GFE motor for export. Different bell housings and starter on other sides, just like T50s! The car;s owner bought a 3SGE-Sprinter engine mount kit, you might find those for KE55. It fits, but within 10mm front to anti-roll bar, both sides on the transmission tunnel and back of head on firewall. We've had to massage the transmission tunnel with a hammer, grind the top of the bell housing down to fit the J160 in, then cut the flanges off the sump at the back to fit over the steering rack, which we lowered on the cross-member.. A daunting job for a first conversion. I have become very good at using the engine crane to drop the cross-member plus engine and gearbox down onto a trolley, then lifting the car up on the hoist. It won't come out the top.
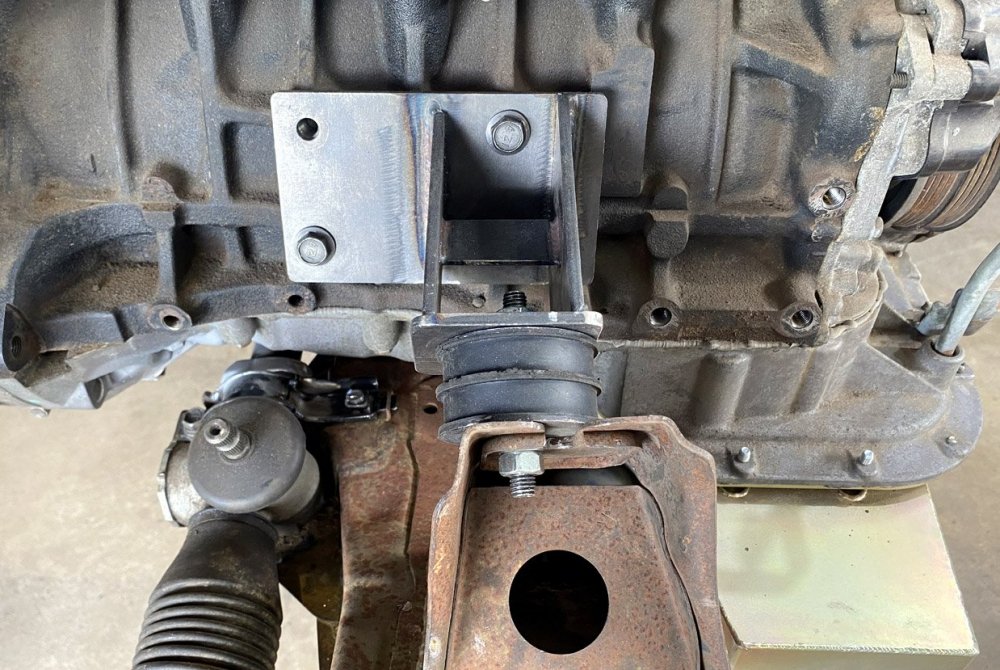
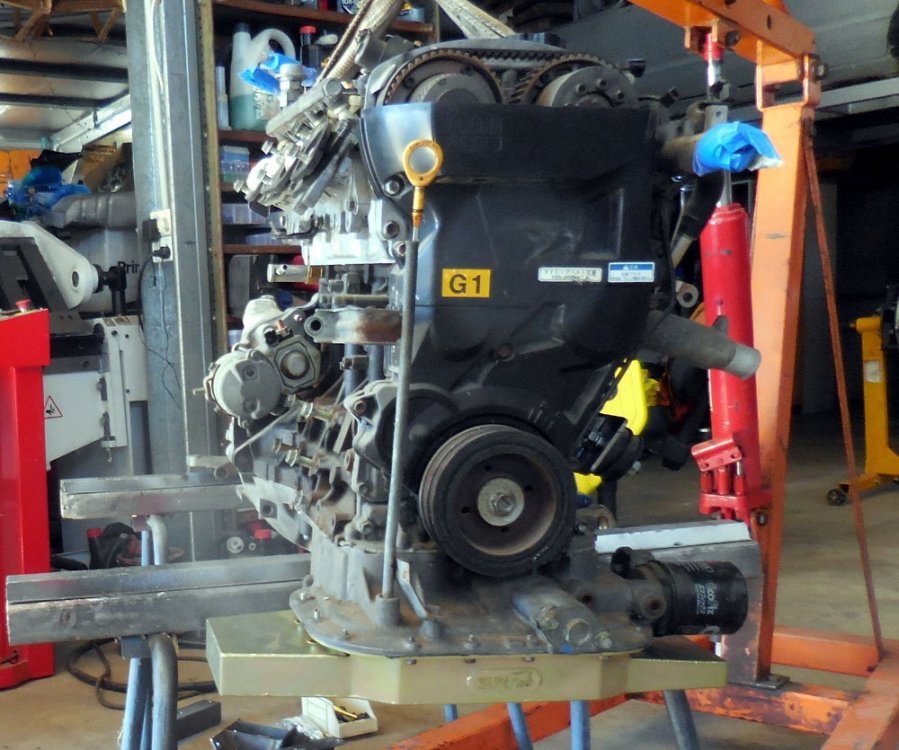
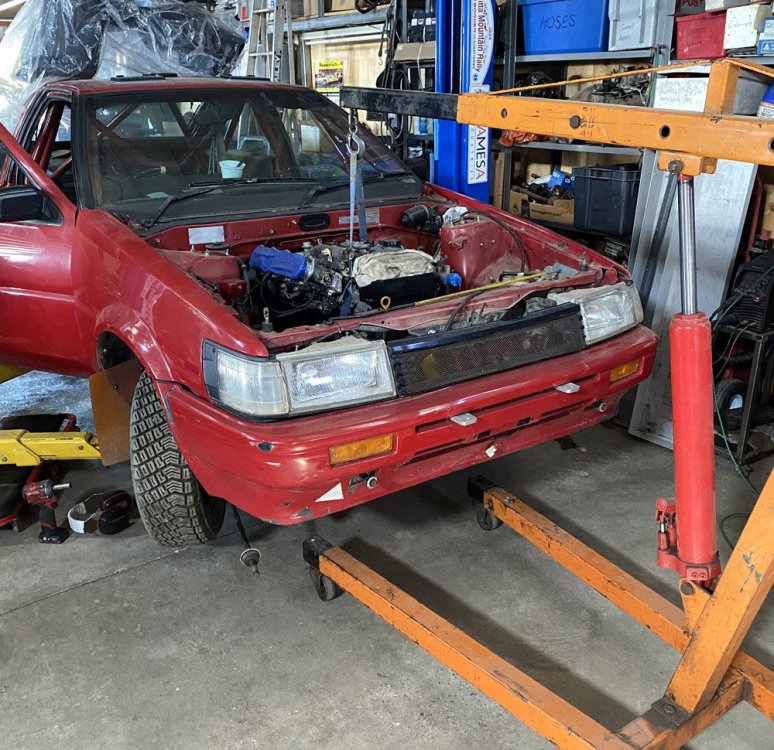
-
Straight out of Wiki- "The 4A-GZE was a supercharged version of the 4A-GE produced in various forms from August 1986 through 1995. All three generations shared forged and ceramic coated pistons, a SC12 Roots type supercharger, and a stronger 7-rib block and crankshaft, similar to the 1987–1989 "Late Bigport" second-generation 4A-GE.[28] Toyota Racing Development also developed supercharger kits for the 4A-GZE engines. The 4A-GZE is popular for turbo conversions, as many parts do not need to be modified to support the extra boost.' So yes, find the -ZE for the improvements, especially the oil spray onto the pistons. The torque improved over the time they made -ZEs, there were three generations, best NA 4AGE first- 103, 107KW, 121KW, 125KW 162, 190Nm, 208Nm, 208Nm Altezza 3SGE 154KW, 216NM. You're putting an extra 25% torque through it, so run it until the T50 blows up and then fit a J160 from an Altezza. Depending on where you use the extra power will determine how long it lasts. For me it would last forever, but I'm only accelerating when I'm already doing 90kph, while launches kill gearboxes faster..
-
..and those three different versions of the T50, make sure you know which one you have before ordering parts! The AE85 in Japan, in Aussie the domestic AE86 and AE71, all used the 4AC motor, which had the exhaust on the driver's side. Their T50 has the clutch slave on the passengers side, so putting that g'box on a 4AGE means the exhaust is jammed against the slave cylinder and heats up the rubber hose. Sadly those boxes are the usual one in Aussie of course.


