


altezzaclub
-
Posts
6825 -
Joined
-
Last visited
-
Days Won
134
Content Type
Profiles
Forums
Events
Gallery
Blogs
Everything posted by altezzaclub
-
Definitely have a driveshaft shop do it. I had mine done in Melbourne by Mr Knox, who does a lot of the Skylines Downunder club's. Yes, get the correct ends and they will weld it to any length you like, and balance it. I reckon Toyota were just lucky the 4AGE worked as well as it did, they lucked in on a small light motor that revs impressively. Its still got no more torque than any other 1600cc twin-cam, but Initial D made it a cult classic. There's no modern replacement unfortunately, although some lovely East-West motors with no mounting holes for North-South..
-
Even a single DCOE 45 Weber works well... and has the right noise! Finding the manifold is half the battle.
-
The conversion you're planning is the simplest for a KE70 as that motor/gearbox were in it from the factory. However... they are getting older and older, more worn out, and harder to find. I'm not sure if doing a KE55 is as simple as a KE70 and I wonder what else you have thought about. Something at least 20years younger would be good! The 2AZ would be one, and Littleredspirit on here has done that. I think an MX5 would be a replacement when I've ruined my 4AGE, a more modern, similar lightweight 4cyl that comes in RWD with a 6-speed on the back of it, and only 10years old. The 3SGE is getting popular, although that's another tall motor like the 2AZ. At least it takes the J160 6-speed from factory, although you'll be widening the transmission tunnel to fit it in. Really, I'd love an i30 N-line turbo'd 1.6L in mine, smooth power that blitzes a 4AGE, far more economical too, but turning it 90deg would be a killer. The diff you have currently will do, and the driveshaft will probably have to be custom made to length anyway. Wiring in the ECU will drive you mad, and ancillaries like radiators, exhaust systems and hydraulic clutches all add to the price. I don't know if the 4AGE will drop straight onto the motor mounts in a KE55 and if the sump has clearance, but you might have just as big a job to fit it as any motor. Read "How to tackle that engine conversion" and make a list, figure out the pitfalls and let us know what you reckon. You can wait for a T50, but buy the bearing kit first as they are even harder to get hold of! If not, buy an Altezza j160 6-speed and a conversion plate from NZ, and put that on a 4AGE. ..and we recently had to replace a V6 in an Isuzu ute, a GM/Commodore motor, and the brand new alloy 3.6L short block with pistons and everything assembled from factory was $800!! A pair of heads with cams, valves and everything was a similar price! So we get a factory-new motor for about $2500... imagine another trouble-free 200,00km in your KE55!
-
...and BCRacing cambertops?
-
I thought alty bearing too, but you've eliminated that, so clutch next. Which fuel and have you used a timing light on the ignition for the knock? I thought the 4Ks were pretty immune to pinking, but it may be the cam can increase the compression enough at higher rpm to cause it. Check the ignition advance doesn't hit over 40deg at 3500 rpm, and try 98 if you're using something less. If not the ignition timing, then how about it leaning out at higher rpm and causing knock. A plug check from a good 3rdf gear pull up to when it knocks, just push the clutch in immediately as you turn the motor off and cruise to a stop, then pull all 4 plugs out and check their colour. You don't want to see really white plugs or tiny ceramic balls on the insulator. Much harder to diagnose these days of lead-free fuel. Idle speed is from the idle speed screw and the idle mixture screw, and the ignition advance. Don't be afraid to give it 12deg ignition advance if that helps but watch your high rpm ignition after that. I'm not familiar enough with the 32/36 to know where the screws are. Have you had the top off the carb and looked inside? Was it running on a car when you bought it? If its sat around dry and dirty for years there's likely tar inside the jet drillings, dirt in the jets and odd ball-bearings stuck on their seats.
-
Looks good! KE70s are coil & 5-link, but the same factors apply. Measure how long a shock is at ride height, just like it is, so jack it up and put stands under the axle & measure top to bottom of a shock. Pop one shock off at the bottom, push it up by hand until its fully compressed and measure how long it is. You want the gap between the axle and the bump stop to be slightly less or at the most, the same, as that shock compression distance, so the bump stop does the work when the car bottoms out. Otherwise the foot valve at the bottom of the shaft inside the shock smacks the bottom of the tube and breaks itself. While you're there, measure the full extension length of the shock for future reference. I did it on a KE30 for a guy and it made a tremendous difference to the ride, we just hit the bump stop with a hacksaw and some WD40 until he could find something at the wreckers. Same in the front if the front bangs over bumps, measure how much strut shaft is sticking out of the top of the strut and that's how much movement you have. Struts usually have a softer bump stop than the rear, and its on that shaft under the dust cover. If you're keen, you take a strut off, use spring compressors to hold the coil spring while you take the top plate off. Look at the dust line on the shock shaft to see how much it compresses, push the shaft up and down to see how stiff the shocks still are, measure how much shaft you have at full compression and full droop. (extension). Ideally you run the shock with more compression room to soak up bumps than droop distance. Lowering the car reduces this distance before the shock bottoms out. Check the bump stop for how broken it is, replace it with a softer one if you can find one, or chop it down to half its length. You could put an O-ring on the shaft and reassemble it. The O-ring will remain at the most compressed distance after you've driven around for a while. If it ends up at the top of the shaft then your shocks are too soft or your springs are too soft. Look under the car from the front when its parked like the photo. If the lower control arms are pointing upwards at normal ride height from the car being lowered too much, the ratio between the steering arms and the LCAs gets upset and you get a lot of bump steer, making the car twitchy. The arms are meant to point downwards at rest, so the chassis is higher than the wheel hub. As the springs compress the arms move through horizontal to point upwards, your camber goes from slightly positive to slightly negative, and your toe-in changes too. That affects your roll center, which is why they sell roll center adjusters to lower the outer end of the LCA and make it horizontal or downwards sloping again. But first, just see if you can get more travel before the bump stops in the rear.... Have fun!
-
Air suspension, no, but the first thing I would look at would be the distance from the spring to the bump stop. You should have at least 50mm there, and if not either raise the car or cut the bump stop shorter. Naturally that might result in the shock absorber bottoming out and destroying itself, but they are crap anyway and its just the cost of a very lowered car! Other options would be stiffer springs so the car doesn't compress so easily, and/or decent adjustable shocks so you can control how far it moves and make sure the shocks can handle the stiffer springs. A 'smooth ride' for family cars involves shocks that allow compression easily and extension with more difficulty. This sucks the car down over a couple of bumps close together, so gravel rally cars are quite the opposite. I expect your 'rough ride' is from the bumps stops being worked, and they are much stiffer than a modern car would use. You could wander around a wreckers for an hour and find softer bump stops, we used a set out of the front of a Ford Falcon for the rear of a KE70 rally car. So, lots to learn about and sadly most people understand very little of it. Got a picture of the car showing how low it is?
-

3K engine - high compression in #4 cylinder
altezzaclub replied to Tonka500's topic in KExx Corolla Discussion
Do it again! But clean around the spark plugs with a rag on a thin screwdriver this time. Replace the alloy tubes that stop oil getting into the cylinders past the spark plugs if they are graunched where the plugs seat on them. You can get new ones for a couple of bucks from a Great Wall agent, off the 4Y or whatever the early Great Walls used. The oil leaks out past the rubber O-rings on the alloy tubes and sits around the spark plugs. When you pulled #4 out the oil ran into the cylinder and filled up some combustion chamber volume plus sealed the rings better. I expect they are all around 150, that's fine! If it stays at 230 again, you can pull the head off... -
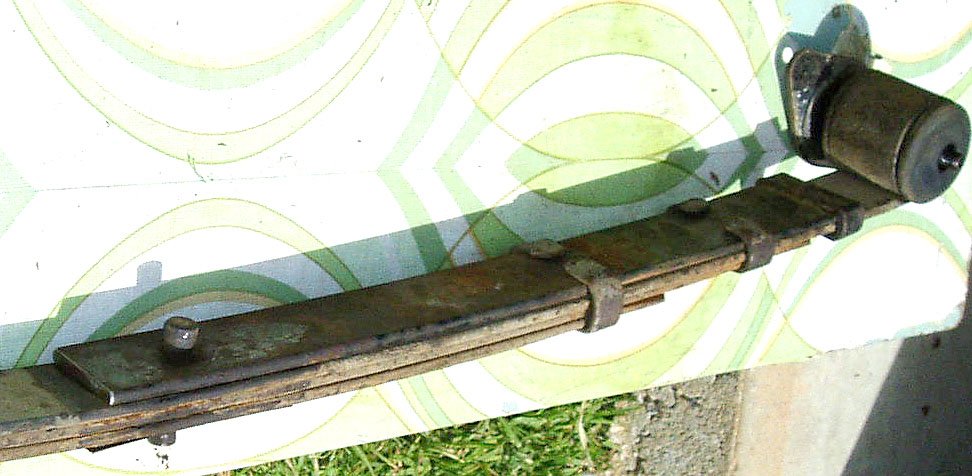
Add a leaf from another set of springs. You'll have to try it to find out which leaf does what you want it to, that will make it stiffer. You can mount a leaf upside-down so its curve pushes against the other leaves and makes the spring flatter rather than curve upwards. This lowers the car and means you don't need such a big lowering block. This is half a leaf mounted upside-down-
-
" size 13 x 7 offset" That's surprising, these are 14x6 with 185/60 tyres and they look smaller than those on the yellow Corolla above.

-
Some early 2000s FWD Corolla by now. They decrease in value for 20years, then the remaining ones go back up. Look on Gumtree, not Carsales.com... $2000 should get you one. https://www.gumtree.com.au/web/listing/cars-vans-utes/1334628803 RWD?? Well, KE70s goes for $10k and upwards... None on Gumtree today, and never on Carsales. Best RWD buy would be Coronas. still immaculate ones around town driven by old farts..
-
Anything you can find at a wrecker, or the Australian company that makes fans, Davies Craig. I used a Mazda 121 fan I ran the wiring into the original relay box by the battery and used an empty relay spot. Its controlled both manually and by a temperature switch. That's all in The Girls KE70 story somewhere.

-
4k/5k head (Thermostat housing compatibility)
altezzaclub replied to Thomas Dillon's topic in General Discussion
No, if you drill the larger diameter one you will find its only a few mm thick, nowhere near enough to carry a thread. Clean them both up with a wire brush and dig out all the corrosion holes and see how bad each one is. It wouldn't be the first time I've filled the craters with body filler and had them last for years. The bigger one is the ideal one obviously, but any temp fitting will have to go in the head, where the alloy is thicker. The best idea would be to buy an in-hose fitting, I've used them for years. https://www.ebay.com.au/itm/225253674996?chn=ps&_ul=AU&_trkparms=ispr%3D1&amdata=enc%3A1Im-dDrB5R7C86KkC0s-uAw42&norover=1&mkevt=1&mkrid=705-139619-5960-0&mkcid=2&mkscid=101&itemid=225253674996&targetid=2367800370202&device=c&mktype=pla&googleloc=1000339&poi=&campaignid=21776442415&mkgroupid=173963205248&rlsatarget=pla-2367800370202&abcId=10047386&merchantid=7667992&gad_source=5&gad_campaignid=21776442415&gclid=EAIaIQobChMIsPrt9KeWjgMV9yutBh11xhHNEAQYASABEgLGPPD_BwE -
That's right. You don't get a high beam blue light with the system like that, unless they've improved it, but I remember I had the blue light working if I put a bulb in the other headlight plug and let it hang there. The original wiring diagram had a resistor in that line to make the blue light work. These days I have a separate little LED on the dash that I wired into the circuit and it comes on with high beam.
-
That link is now here I think, the change from KE70.com to Rollaclub caused it- Try one of these kits, cheap enough and easy to do for what you gain, its what I now have on mine. https://www.ebay.com.au/itm/144043979533?chn=ps&_ul=AU&_trkparms=ispr%3D1&amdata=enc%3A1vZn3r5k9SwOXM01GB5d-7Q4&norover=1&mkevt=1&mkrid=705-139619-5960-0&mkcid=2&mkscid=101&itemid=144043979533&targetid=2370046502538&device=c&mktype=pla&googleloc=9071791&poi=&campaignid=21766134162&mkgroupid=175112620264&rlsatarget=pla-2370046502538&abcId=10047381&merchantid=115487535&gad_source=5&gad_campaignid=21766134162&gclid=EAIaIQobChMIsafEhaOHjgMVgx-tBh2EejSgEAQYBCABEgIiHfD_BwE The relays pick up off one headlight plug, that's the black male-pin plug in the image, that goes into a one stock headlight plug.
-
4k/5k head (Thermostat housing compatibility)
altezzaclub replied to Thomas Dillon's topic in General Discussion
That oil pump has seen some rubbish go through it! You should have a flat sheet of half inch thick steel in the workshop, maybe the size of an A5 sheet of paper. You wrap a sheet of 180grit wet 'n dry sandpaper on it, spray some CRC on it and wipe that oil pump base around and around until the grooves mostly vanish. If you're keen, take the pump off you can do the bottom of it and do the impeller too. Then clean them all really well! Anything that needs to be flat can be sanded, like a thermostat housing that has had the aluminium pulled out of shape by some guy with big spanners. There will be a gap listed in the 4K manual for the oil pump rotor tip clearance. A thou or two I expect. -
4k/5k head (Thermostat housing compatibility)
altezzaclub replied to Thomas Dillon's topic in General Discussion
Do it now! Otherwise the motor will run like a dream for years and leave oil patches every time you park! Does it still have the 4 studs under the crank pulley? Replace those with bolts, in case you ever want to remove the sump in the car...say, because you didn't fix the plug thread now and you're tired of oil leaks! Its difficult but not impossible to get the sump off without pulling the motor out, but only if those studs are gone. Only you can know if there is enough thread strength to hold the plug in, but it should take 15ft.lbs I'd say, a solid but not hard tighten with one hand on a ring-open spanner. -
4k/5k head (Thermostat housing compatibility)
altezzaclub replied to Thomas Dillon's topic in General Discussion
I'd get some CRC 556, WD40 or Q20, whatever and squirt some in with the extension tube on the valve. If you spray the far wall it will run around the rings and coat the cylinder walls as you turn it over. Only needs it once every few months. The 90% kero spreads the oils around and then slowly evaporates, and it will burn out when you start the motor. -
4k/5k head (Thermostat housing compatibility)
altezzaclub replied to Thomas Dillon's topic in General Discussion
"What do we think about a beams 3sge swap? " Its been done plenty of times, but the Beams is a very tall motor so either a lot of work to get it low, or a hole in the bonnet. I'm working on putting one in an AE86 Sprinter for a guy right now, a gravel rally car, and it has a Kiwi-made shallow sump and custom mounts. A pair of brothers who rally a KE70 used the earlier Gen 4 version for exactly this reason. Anyway, that's a long way down the track, you can make that 5K go fast enough to get into trouble! If you're screwing a tapered brass fitting into an aluminium housing use some sealant and only go just above hand-tight. Those t'stat housing are fairly thin to start with and often corroded even thinner. I pulled the thread out of a 4AGE one and found it was made of unobtanium, but luckily could extend the thread further in. -
4k/5k head (Thermostat housing compatibility)
altezzaclub replied to Thomas Dillon's topic in General Discussion
Love it! Fenix, Superlites.. Money doesn't go far with those names! You know where you'll end up eventually! https://www.youtube.com/shorts/uU0uBJp09lc Wonderful little cars, garage 4AGE helped make them famous https://www.youtube.com/watch?v=kX4CAVEsdVA ..and the Europeans love them in rallying and hillclimbs. https://www.facebook.com/VHTRacing/videos/248299146008069/?s=100000342565571&v=e&sfns=mo ..and if you want to stick with a K motor but make it go faster you will need- https://www.rollaclub.com/board/topic/51097-4k-twin-cam/ have fun! -
4k/5k head (Thermostat housing compatibility)
altezzaclub replied to Thomas Dillon's topic in General Discussion
You are right! I didn't look at the fine detail, although now I vaguely remember something about it from a decade or two back.
-
4k/5k head (Thermostat housing compatibility)
altezzaclub replied to Thomas Dillon's topic in General Discussion
"and it goes like a cut cat." Toss the downdraft and get a single 40DCOE Weber on there! If not bike quads! I don't suppose you measured the bore when you had the head off, or took a picture of the pistons? Dished pistons sound like 5K too, my 4K looked like this- That was digging the rusted gunk out from around #3 & 4 cylinders, a major reason they overheat and blow gaskets. I thought that t'stat top would rotate easily. it certainly does in Photoshop! Sounds like a fun build, any idea on the cam that's in it?

-
4k/5k head (Thermostat housing compatibility)
altezzaclub replied to Thomas Dillon's topic in General Discussion
Why don't you just turn the outlet around 180deg? Aren't they symmetrical? -
Well, the smaller the master cylinder, the further the pedal moves to brake, and the more leverage it has on the pads, so its easier to push. The larger the m'cyl the less it moves and the harder it is to push. An AE95 has a 14/16th" or 22mm master cyl. that's pretty much an average number. What bolt holes do you have in the booster for the KE10? That's another factor to sort out.
-
That depends on the caliper piston sizes. Find the area of front & rear caliper pistons, add them up, assume a cylinder of that area by 1mm and that is the volume of brake fluid you have to move. You only want the master cyl to move 5mm to do that, with a ratio of pedal between your foot and the m'cyl your foot will move four or five times as far. I expect you'll be looking at a 3/4" to 15/16th master cyl diameter. What size front discs are you looking at?? 270s?? 290s? ..or what motor are you using and is it street or competition use??


