


altezzaclub
-
Posts
6825 -
Joined
-
Last visited
-
Days Won
134
Content Type
Profiles
Forums
Events
Gallery
Blogs
Everything posted by altezzaclub
-
The standard BorgWarner diff used in Aussie has a steel plate on the back of it, where you lift the crownwheel out if you need to. The Japanese banjo style T-series have no plate on the back and the whole front of the diff unbolts. You will soon spot them, they are completely different in manufacture. Check the build plate too, it will have the diff designation on there. Find the topic where I swapped the Girls KE70 diff and check out the panhard changes etc. especially the washers needed for the different hole sizes in the arm mounts. Check out the vans in the wrecker too, take a tape to measure the widths and see what you can find. The Celica T-series diff brings larger diameter brakes, a wider diff but mind the ratios. Make sure you get all the bolts for the T-series too.


-
Is it the sort that springs back after the power makes it open? So the motor only turns forward then turns off, and it is normally closed without 12V to make it open? If it is closed when its in your hand, put it back on without wiring it up and you will know that air is not going in there. Are there only three options? Faulty ECU, faulty IAC valve, or an air leak somewhere? Does it have the old waxstat air control as well, to do the coarse cold-idle adjustment? Is your car also an auto? I don't know if there is a difference in the ECUs for manual and auto, but the auto needs a higher-powered idle than a manual. My 4AGE in the KE70 never idled with a stock ECU, either too low when in frost or too high when hot. Its only been solved with the Haltech where I have control of fuel and advance to keep it around 1000rpm..
-
" the ICV is stuck open and squirting carb cleaner into the throttle body hole alone will not always free it. Unplug the cable to the ICV, undo the screws holding the electronic device to the body. Once removed see if you can spin the electromagnetic actuator on the body back and forth freely, if not that is the problem. To sort it remove the middle hose below, not the water hoses, then place your finger over the hose outlet whilst filling the hole in the throttle body with carb cleaner, this will ensure it is flooded with cleaner and not simply draining down where the hose was connected. Keep the fluid in there for ten mins whilst trying to rotate the actuator until it is freely moving then reassemble. This problem not only occurs due to gunge but also if laid up for a long period when oxidisation can seize the shaft, could also by why used parts often do not solve the problem as they have been laying around unused." Give it a go... I found it on a Cressida a few years ago.
-
..and over the weekend I found that if you have a couple of 15-12mm bushes lying around you can fit the stock KE70 rubber strut tops to the BCRs instead of the camber-tops. That takes some of the harshness of bumps in the road out, although I'll have to machine up a pyramid-shaped bush to do it properly.
-
I'm using BCRacing coilovers from Justjap in Sydney, recently fitted them to my KE70. You cut the strut leg near the bottom and weld the coilovers onto it. so you get the large diameter shock tube with a stock hub. https://www.rollaclub.com/board/topic/42407-the-girls-ke70/page/16/#comments You might get weld-on adjustable spring bases too, but then you're limited to the stock tube diameter. Cheapest is to cut the spring base off and weld it back on 20mm lower.. but you're still stuck with the same diameter strut tube and hence crappy shock options.
-

Price Drop Need Her Gone :(
altezzaclub commented on delorean88's blog entry in Selling my rt80 corona
Hmm.. if you hover your mouse over his name it should bring up a menu that includes "message". If you click 'find content' in that menu it will also have a 'message' option on his content page. A slim chance, but its great to see cars come around again. They were a nice-looking car in their age. -
Price Drop Need Her Gone :(
altezzaclub commented on delorean88's blog entry in Selling my rt80 corona
He was last on here a decade back. Send him a message, you might get lucky. -
Thinking about putting extractors on my 4k
altezzaclub replied to ke55rolla.'s topic in KExx Corolla Discussion
Fair enough- Just make sure they line up with the ports and the nuts & bolts seat correctly. You need to check the thickness of the flanges on the extractors and the carb so they tighten up equally. Don't wrap right around the pipes where they join together, I melted my first set doing heavy haulage in a steep forest at low speed & then realised I was trapping the heat in from all 4 pipes, so they heated each other. Wrap the four of them individually so they don't heat the carb and leave that bit bare. -
AE86 Front/Rear Suspension in KE25
altezzaclub replied to GT3LovR's topic in KExx Corolla Discussion
Well, I just happen to have an AE86 Sprinter on the hoist being molested for a 3SGE, so what would you like to know? Have you come across the Mitsi Sigma LCAs for widening a KE70? Otherwise, put up a couple of diagrams of the front suspension with some numbers and how much you want to lower it. If you move the strut outwards at the bottom for the wheel track, you should move it out at the top too, so camber-tops on coilovers might be the answer. Don't forget you will run into steering axis problems along the way. Are you converting to rack & pinion with the 4AGE?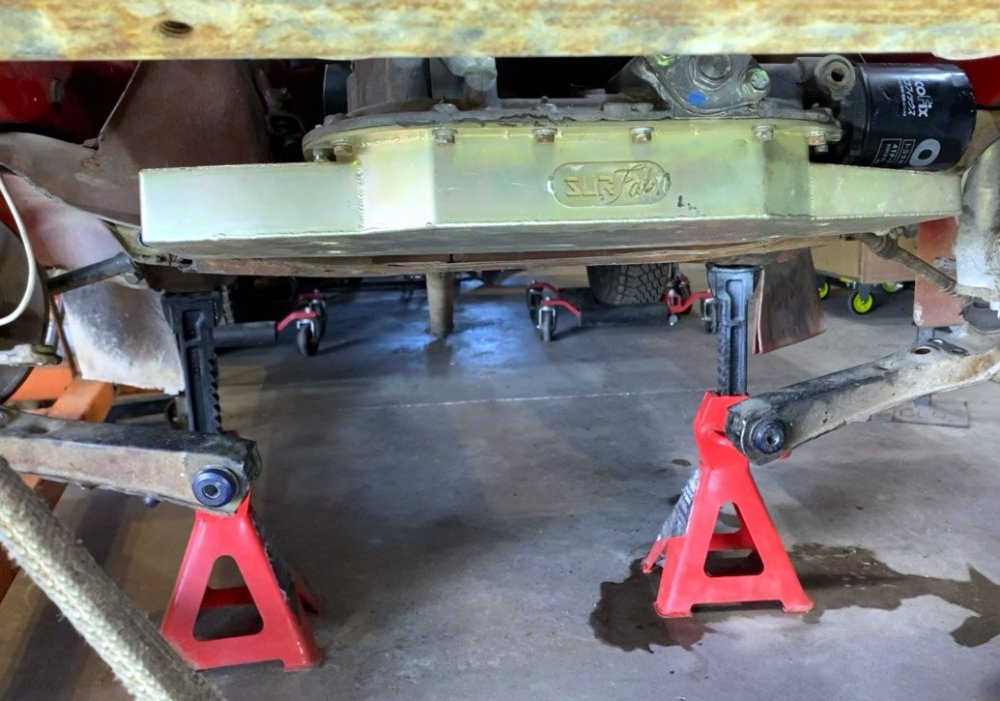

-
Thinking about putting extractors on my 4k
altezzaclub replied to ke55rolla.'s topic in KExx Corolla Discussion
Not very well.. https://www.rollaclub.com/board/topic/42407-the-girls-ke70/ But they work OK, just spend the time and make sure you use a one-piece gasket. 2" pipe into a resonator and 1.75" pipe back to a 3-chamber muffler. I've still got it on my car with the 4AGE in it. -
Is the choke hooked up?? If not, have someone hold it shut while you try to start it. If it starts, put a cable on it. How is the float level in the Weber? With the top off the fuel should be blah blah.... something mm below the top edge, but its decades since I had to do it. While it is off, hold the top of the carb vertical and when the float just touches the needle the clearance should be... blah blah blah.. use a drill bit to measure it. One is 11mm, I can't remember which. Anyway, its that fuel level that determines how much fuel goes through the jets. So long as you have seen a spark at a spark plug sitting on the head and checked the timing with a timing light, it has to be in the carb.
-
Good man! Keep it rollin'...
-
If you have a full swing of the arm going into the the gearbox and its not releasing, then it is gearbox out time.. When you start it up in 1st gear, does it creep? Will it start without jerking forward? If it starts in gear, where does the clutch pick up, as soon as it is lifted off the floor or further up? Sounds like a clutch plate or pressure plate problem. Even something simple like rust on the gearbox input shaft can cause the clutch to drag, or if the shaft is dry and dirty so the plate can't move a mm or two.
-
Just lie underneath and make sure the arm going into the bell housing- A- Starts off just touching the pressure plate. B-moves its full stroke when someone presses the clutch pedal. If it does, then its gearbox out time as the problem is in the clutch itself. That clutch plate with the broken finger was like that, or if I was in a gear it shuddered badly when the clutch took up.
-
The 'C' clips also chop the alloy stops out of the cable, the bits that hold the 'C' clip in a groove. The answer is to pack a spacer or a few washers against the firewall to push the cable out as far as you want it, usually by pulling on the outer cable. Then to keep it there screw a hose clamp hard up against the 'C' clip so it can't jump forward. As the inner cable stretches over the years you need more spacers, I had about 8mm behind mine. Another odd one was a finger in the clutch plate breaking and jamming behind the next finger around. That was only a few years old, hardly worn at all, but the only answer was a complete new kit.


-
Does the gauge go to 'Full' if you earth out the sender unit wire at the fuel tank with ign on? If it does, then the problem is in the sender unit. If it doesn't then the problem is not in the sender unit. Same with temp gauge, should go to 'Hot' with ign on and earthed out if the problem is in the sensor. If they don't go full then the problem is wiring, the instrument cluster, or the voltage reducer that gives them about 4V to use.
-
So, what was the problem, and how is the ignition timing?
-
Here's what you get in the box You cut the Toyota strut off 50-75mm up from the base and press the silver end of the BC strut over the Toyota stub. That's how they turn the KE70 48mm strut into a 52mm one. Find out how long the KE55 struts are, from the cup of the stub axle to the top of the tube, and the diameter. I expect they're pretty much the same as a KE70. I can measure the BC ones. Email Darren at Justjap Imports in Sydney and ask him if they fit a KE55, tell him the guy with the baby-blue KE70 said to ask him. Measure your rear shocks too, I can measure the BC ones for that too. Does the KE55 have the same attachments on the rear shocks, or is the bottom a pin type??

-
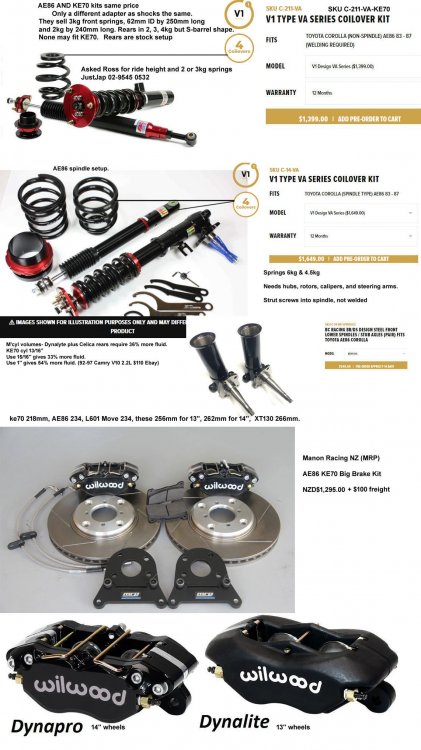
Well, you're in luck, I've just fitted BCR coilovers, their V1/VA setup, on The Girls KE70.. What would you like to know? First up, what sort of roads do you drive on, smooth as silk city roads or bumpy broken country roads? ...and what do you want to do with the car? Track days? I looked at the 5 or 6 different options available and BC came out on top. I listed- BCRacing- seem good value, stiff springs, adjustable shocks with camber tops. 6kg/mm front 4kg rear with adjustable height springs. Darren fitted 5kg/mm fronts instead of their 6kg/mm. Stock AE86/Ke70 springs are 1.8kg/mm in the front, no doubt KE30-55 are very similar. ----------------- Emotion Racing Taiwan https://www.ebay.com.au/itm/232503341811 Full set with 8Kg front on AE86 spindle and 6kg rear as stock, $1840 incl freight plus taxes One-way adj, both bump and extn together, 24 clicks.or $1430 on Ebay free postage. Cheapest of all. Has RCA on, so very low. Rear separate springs for normal ride height, coilover for low. ---------------- PSR suspension AE86 XYZ welded front, c/over rear $1800 7kg & 5kg, in BNE. Need to make adapter to KE70 48mm strut. Many spring options down to 3.8kg $135/ They have rear non-coilover XYZ adjustable shocks for $450 on sale Front weld-on sleeves & springs to make KE70 into coilover $350/pair. So no tube, just sleeve, wind-up base, spring and plain spring top. ---------------------- Titan Suspension KE70 SP-3 coilover, no spindle, stock rear, $1950 No spring rates either, single adjustment for both at once. Street-Performance with in-house shocks. 999racing Sydney DGR coilovers, full set, unknown front mount, stock rear, no spring info, Ebay $1330 Godspeed Maxx with spindles from USA stock rear $2300incl post plus customs
-
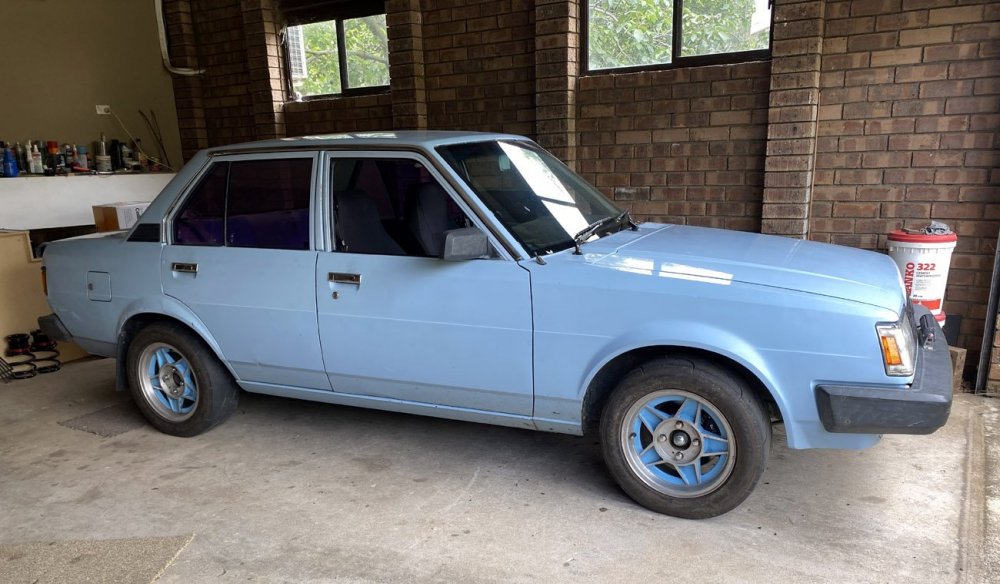
So, what's it like..? The brakes are fine, less outstanding than I thought initially, but now I realise you can stand on them and they stop, especially with the tyres. The pedal is still where it was, very high, and the booster is still in place. I thought I might need a larger master cyl, but the 4 pistons don't move as far as the swinging single piston and its fine as it is. The coilovers are stiff, fine on smooth road but too harsh on the broken up stuff trucks leave and Govts refuse to fix. The dash cracks and bangs over the worst stuff, but I'm working on it. All 4 corners are set at their highest and all 4 shocks on softest, with the springs just captive at full droop.. Some of the road feel will be from the tyres, they have very stiff sidewalls for trackdays, and the rims are passed their best. We have balanced them since fitting, but 50 or 60gm of weights means the tyres are not made for road use. The rear shocks were topping out initially, so I fitted a rubber bush on the top of the shock and below the boot floor, which pushed the shock shaft down in the tube, but I didn't want to lower the car to do it. It was 10mm or so droop with 130mm compression, and I took it to 25mm droop and 115 compression. Last weekend I took the rear springs out and measured them and the stock springs on scales, sure enough the BCR were 4kg/mm and the stockies 1.8kg. I fitted the stockies back and measured guard max height, but it was touch too much. A grinder took half a coil off the bottom and it is back to the 620mm it has been for years. That gave me 40mm to max droop and 100mm to max compression, about normal. Now it looks like this- With the corona LCAs I've had for years, the camber is within 10minutes of vertical, so the camber-adjusting tops aren't doing anything. The next job is to see if I can fit stock rubber tops back on and hopefully take the harshness out of the front suspension. There is always the option of PSR coils at 4kg/mm or even 3.8, or adapting the stock spring base to the coilover and using stock front springs! Last week Josh had a windscreen guy coming for a customer's car, so I took the opportunity of spending $480 on a new windscreen! It was quite strange to drive with for a few days! Next... While I chase that and also pursue the drive-away problems of the Haltech, which starts without throttle and idles beautifully, but won't drive away when cold!, Banjo has my old distributor for fitting Hall effect sensors, and the next piece of the puzzle will be fitting that distributor with a new oilseal kit, and Barry Manon's COP kit. So eventually the wiring will be finalised, the brakes upgraded, the suspension sorted... and then there's the diff.... and Josh keeps telling me it needs a Garrett on an intercooler...
-
Of course while this was all going on we were also fitting the BCRacing coilovers. I'd driven down to Sydney to pick them up and meet Darren, he organised to replace their standard 6kg/mm front springs with 5kg/mm. They were an absolute work of art, and it allowed me to keep the KE70 stub axles while getting a 52mm strut tube and adjustable shocks. The coilovers are a press fit over the KE70 tube, then welded on- Eventually we got there- ..and it looked like this-


-
I chased Corona XT130 struts and calipers too, but they are quite heavy and hard to find these days. With the wife saying "This is the rainy day you've scrimped and saved for all you life, spend it before you die.." I figured I'd just pay Barry Manon for a complete kit, choosing the 13" wheel size with Wilwood Dynalite calipers. That lovely package arrived and you can see the rotor size difference. that Daihatsu Move rotor is already bigger than a KE70 stock one, from 218mm to 234mm, same as AE86, to 256mm.. Fitting them was as normal, nothing ever goes a smooth as planned. The LCA touches the rotor by a mm , which came with the instructions, so the end of the LCA gets flattened slightly. This photo doesn't show it well, and iphones turn the damm things sideways! The kit came with very smart braided stainless lines, but of course we couldn't get one nut undone and cut it off, then made a new flare on the line. ...and the final insult was when we put the wheels back on, and the 13" stockies don't fit over the calipers! The rim fits OK, but where the wheel centre is welded in the rim, the extra 4mm of steel makes the diam too small.


-
Well, the Evo7 went back and that cleared some space for a Volvo 144 rally car. Suspension bushes and odd tuning, and fitting an electric power steering column, the first one I'd seen. Now I'm an expert of course, although still not a fan of lying upside-down under a dashboard for a couple of days. There's another one to do already.. Meanwhile, on The Girls KE70, Steve had said I could use any of the 4AGE gear he no longer needed from the AE86, so Josh & I fitted the extractors. An interesting point I then noticed is that they had been cut and re-welded in #1 pipe, it was bent down at a sharper angle than the rest. I realised they probably came off a 20valve and you had to cut #1 to bend it out of the way of the distributor. The giant job of fitting the new Haltech ECU was part of sorting out the old dizzy cap with the hole in. Sadly the Mk2 version dizzy from the 4AGE smallport in the AE86 bought its own problems.. The heat-shield acts as a little dam for the oil, but the inside of the engine bay is getting very dirty. I've bought a rebuild kit for the 4AGE distributors, but it just hasn't been fitted yet. Finally we got some more work done on Steve's AE86 Sprinter, but having it there was handy when I was researching brakes. The Diahatsu Move 601 brakes I put on years ago were swinging caliper vented discs, and I wanted to upgrade them again. A lot of talk was on AE86 brakes for KE70s, so I had the opportunity to measure both. They turned out to be the same size and almost identical in design! A week of research gave me no surprises, this Excel sheet was bigger than shown here.


-
"Ok so I'm only getting 5v out of ballast resistor and 11v in ballast resistor. " That's a bit low for running the car, although it starts on that 11V by bypassing the ballast resistor, so it should fire when cranking. Try what Banjo suggested, coil positive straight to battery +ve, and run it on the 11V to see. That cuts out a lot of possible problem areas and just deals with coil and distributor. Keep the other wires on the coil +ve, you'll need them for cranking ignition.
-
About 9V, that's what it runs on after the 12V has been through the ballast resistor. So Ignition key puts out 12V, ballast gets 12V, ballast gives out 9V, coil gets 9V. However 'Start' part of key gives out 12V, bypasses ballast resistor and sends 12V straight to coil, but starter motor sucking 300amps drops the 12V to 9V for the 9V coil while cranking.


