


altezzaclub
-
Posts
6825 -
Joined
-
Last visited
-
Days Won
134
Content Type
Profiles
Forums
Events
Gallery
Blogs
Everything posted by altezzaclub
-

Thought I was screwed (or maybe I still am). 2 questions
altezzaclub replied to oldpops's topic in AExx Corolla Discussion
Thinking about it today, is it flooding into the carb making it hard to start and running rich? Did they change a fuel filter? A bit of dirt under the needle and seat, something to chase after checking the ignition stuff. -
Thought I was screwed (or maybe I still am). 2 questions
altezzaclub replied to oldpops's topic in AExx Corolla Discussion
It doesn't sound like something an oil change would cause, but then again I can't see why the timing would change either. All you can do is check the points gap & timing and see how it goes. Maybe a lot of extra oil would cause heavy breathing through the tappet cover and into the air cleaner to cause black plugs, but cleaning them up should cure that now you've dropped the oil level. If I was keen enough I'd fix the bulbs that are out in my own instrument cluster, but I have to pull the dash apart in a KE70 and its a frightful job. You're on your own there! -
Alternator issue with te31 2tc
altezzaclub replied to Bobbyfanatic's topic in KExx Corolla Discussion
'I'm used to calling connectors "pigtails". The multiwire plastic connectors.' Fair enough, I've seen any short bit of wire called a pigtail here and there. I did a search for a 6-wire alty and got a 6-phase, which I'd never heard of... "A standard alternator is generally 3 phase. This means that there are three “legs” of the stator that fire in succession as the alternator spins, A-B-C-A-B-C-A-B-C producing alternating current. 6 phase alternators have two 3 phase stators inside the alternator that are slightly out of phase of one another. The two stators fire in succession like this: A-a-B-b-C-c (the second stator is in lower case) Because they are slightly out of phase with one another, there is a cancellation of electromagnetic harmonics that makes the alternator run more smoothly and more efficiently. This allows for cooler operation, more output from a smaller overall housing, and MUCH better durability. The rectifiers turns the AC current coming out of the stator into DC current. DC current is what is used in an automobile. By passing trough the diodes, half of the AC current is burned off in the form of heat as it is “rectified” into DC current. That heat is what eventually kills alternators. By having (2) rectifier plates, there is much more surface area to dissipate the heat. This is especially important in a high output alternator- as the more amperage the alternator makes, the more heat is generated. Also, by having (12) or (16) diodes (depending on which 6 phase alternator you are talking about) the heat and electrical load can be distributed more evenly throughout the rear of the alternator housing." That's from guys who put 160db sound systems in their 'trucks'. The other 6-wire answers were the little 6-pole altys in scooters that have 6 windings at 90deg to a usual alty. -
Alternator issue with te31 2tc
altezzaclub replied to Bobbyfanatic's topic in KExx Corolla Discussion
They look like typical 4-wires altys, the layout is the same, F N B E. So F is WG or R N is L or WL B is W on all E is WB on all. Anything else is not needed in theory. What do you mean when you say a 'pigtail'? Are you referring to the power-out terminal B with the white wire that powers the whole circuit? ..and motors like mine have another 6 wires piled on top of it! -
Alternator issue with te31 2tc
altezzaclub replied to Bobbyfanatic's topic in KExx Corolla Discussion
Do the contact labels bear any resemblance to these? Are the wire colours similar? Does it have an external regulator? I can't imagine why they need so many wires to an alty, three or four will do it.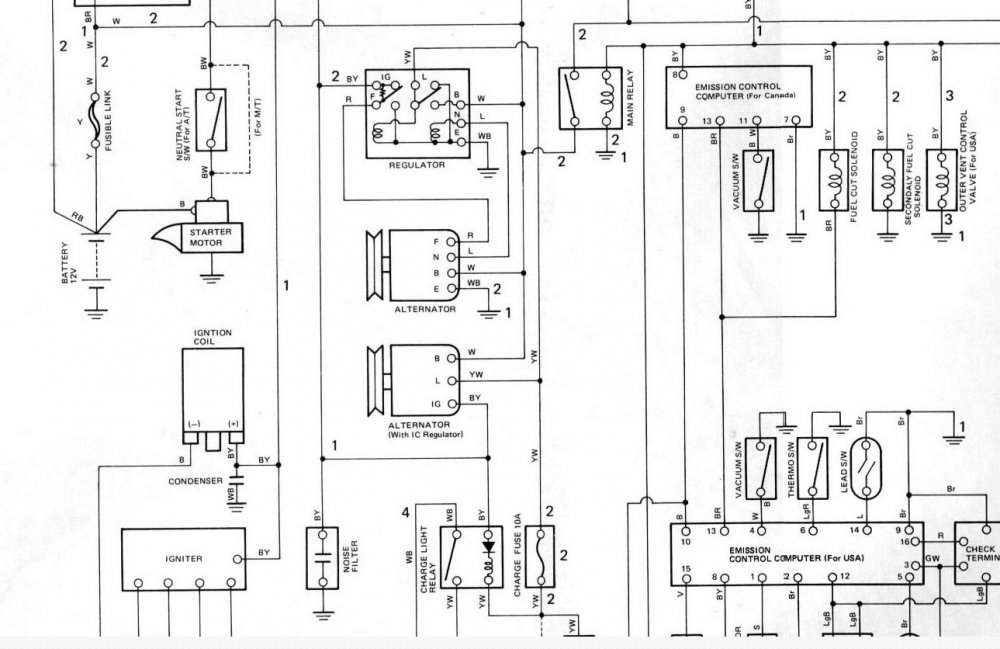
-
This sounds like your sort of problem- https://www.rollaclub.com/board/topic/73556-ke70-stock-air-filter-replacement/ Find a KE70 air cleaner housing. They will be at the wreckers if you're lucky, our local one has them I expect.
-
'Awesome so red dot blocked off on the vacuum diagram ? ' Yep, I cut a 5-8mm length of nail that jammed inside the hoses and left the hoses in place. Not that any cop ever looks at pollution gear in Aussie.. I don't know about the air cleaner, there must be some differences in the models, but I can't see aircon would make that much difference. There's just meant to be an 'L'-section rubber O-ring on the carb to seal the air cleaner, I'm sure you've got that somewhere. Does the air cleaner hit the choke cable in the top picture?
-
This is the factory diagram for the vac lines, I marked the ones I blocked off (with a short bit of 4" nail inside the hose..) and the others I kept hooked up. and here's a strip-down of the Aisin carb, might be handy for you.


-
Well, the 3-wire reckons it lean under power and rich at idle, which is quite likely- The N15 Pulsar I took it out of must have been running well, the sensor was a light grey colour in the exhaust. This is turning right at an intersection, you can see the beige throttle blip up as I pop it into 2nd then accelerate and the green RPM climbs. They both drop as I grab 3rd, accelerate and grab 4th, then cruise. The yellow oxy sensor says lean, but rich as the throttle hits idle, then lean under acceleration. The odd one in the middle of the cruise is typical, a tiny throttle adjustment and the oxy suddenly goes from lean to just-rich, then back again as the throttle comes off slightly. Anyway, there is so much data gathered by the Haltech its amazing! This is just three channels of a dozen, 3 ignition channels, 3 fuel, 2 each for water and air temp, volts, MAP... I'm going to bite the bullet and buy a cheap (for wideband!) $120 wide-band gauge and sensor, and see how that reads.

-
Well, I've had it running for a couple of weeks, odd trips around town with the laptop recording data and the 40km trip to the workshop on weekdays. The original 4AGE oxy sensor was on there, but gave readings like this- In the top graph, the yellow trace line is the RPM, the skinny beige one the throttle. The heavy beige line on the trace below is the oxy sensor, a one-wire narrow-band. So down the bottom is lean, and it shoots up past the middle which would be 14.7, and goes to rich at the top. On the bottom Data Navigator trace is the whole recorded run, and you can see it was spending more time being rich just before this. So we tossed the stock manifold and fitted a set of extractors with a new two-wire narrow-band sensor. This gave the sort of trace I'd been expecting, the yellow line in the top graph alongside the TPS and RPM, on a constant throttle cruise. However that didn't last and it soon gave just flat line in the middle with spikes occasionally, as shown in the lower graph. So I hit the wreckers and grabbed a heated narrow-band, a 3-wire, and tried that. I'll just download the graph and transfer it here-


-
Could be a few things- what wiring diagrams have you got? Bigport or smallport?? There are two ignition setups on the 4AGEs, VAST and something else I've forgotten. Everyone wires their car individually, but I used a Diahatsu COR relay box- So I used the stock B/O wire that goes to the passenger side for ignition, but ran a relay off it and that powered the coil. There's another wire in the chassis loom there to take the tacho reading back to the dash. and I used these pinouts on my Bigport- IGF and IGt are the igniter wires. Here's a diagram I used a lot, but none of this can be relied on unless you really know what engine you have and what the diagrams actually reference to. On top of that these engines are really old now and everyone has had a play with changing the wiring, so the colours can't be relied on either! I'm just as bad, I'd hate to buy my car and try to trace wiring! See what you can trace and let us know.


-
I'm not that keen to pull mine out to photograph it, but as I remember it the plugs in there are carefully shaped to only go in one place. Some plugs are not used at all and just hang there. "I can hear my fuel pump going but no starter click or crank at all - definitely not a dead starter. " That circuit is purely KE70 chassis, so it should be as it was with the 4K. One wire from the key to the solenoid. Was it an auto KE70 that you put a 4AGE into? That's the most likely issue, the 'neutral position' cutout on the tunnel must be bridged.
-
Sigh... 2009 he posted that, 15years ago.. Do you still own the car you had 15years ago? If you hover your mouse over his name it tells you he last visited in August 2009, so I don't think he'll see your post. Start a new topic Mathewg, let us know what happened to leave you in the predicament you are in & we will try to help.
-
Yeah, I looked at adapting FWD Corolla struts a few years back, it would be great for a wide track and control of camber. Unfortunately nearly all the FWD cars went to a 100mm PCD so the wheels would all have to be changed as well. The struts would have bigger (and ventilated) discs. They would need longer lower control arms too. A nice idea, but not worth the trouble. Using a FWD strut wouldn't gain much, the springs are usually larger in diameter then our style and wouldn't fit in the tower. The FWDs are nose-heavy so the springs would be stronger too. Its likely the springs, being larger in diameter, would be shorter than ours, so you would weld a long FWD strut tube onto a KE70 tube and then a FWD shock absorber would be too short. It would take a lot of research, I haven't heard of anyone doing it.


-
I've been researching this for a couple of months, I'm doing the same project over the rest of the year, and I'm looking at BCRacing coilovers with Manon racing brakes. BCR make a coilover tube with adjustable shock and ride height, and camber tops if wanted. They sell two style of bottom cup for welding onto your own strut, a KE70 one at 48mm and a AE86 one at 51mm. I'm happy to go with the KE70 one, there is no gain in the AE86 one and I'd have to get AE86 hubs. I'm buying the V1-VA set, more road use and lighter springs than their semi-race BR-BA version, and I'm negotiating lighter springs than their 6-4kg/mm as AE86 and KE70 are less than 2kg/mm stock. Another option would be find a complete strut off a Corona XT130, something we've done in the past, you get 52mm strut tubes and big, but non-vented, brakes. You'll still need to buy an adjustable shock and weld-on coil-over thread kit, but just the threaded tube with spring base and top. I was going to do this but the 'Rona struts are hard to find and its all very heavy. Other companies that have weld-on kits include- Titan suspension, PSR suspension, Godspeed Max, Emotion Racing Taiwan, and Group D in Ireland. Any company that didn't list spring rates I figured was crap, and anything from overseas means Customs Duty/Excise tax & postage on top. BCR seemed the best overall. Manon Racing have been easy to talk with for brakes, they offer a 13" wheel kit using Wilwood Dynalite calipers and vented disc, or 14" kits using WIlwood Dynapro calipers and disc. This setup gives you an adjustable shock and bigger brakes while using your stock hub and steering arms. You can buy the whole AE86 setup from FLOS in Ireland if you're keen, coilovers, strut tubes, hubs, brakes, rotors and steering arms. I'm budgeting on $1500 each, so $3k for coil-overs and brakes. You can easily spend $4k on coilovers alone.

-
Where abouts are you? See if anyone close to you has one, if not I can always see if the wrecker still has a motor down there.
-
Everything is the same except the K50 has an extra gear in the rear part of the gearbox. So the clutch will be the same, & most of the gearbox the same too.
-
You can see the pickup here, the vertical strip of metal in the plastic electronics unit. It triggers as the apex of the rotor goes past.

-
Not so much the coilovers as the adjustable shocks. I put new Monroes in the front a decade back and they felt absolutely no different to the leaky ones I took out. Now 3 of the 4 on the car are seeping oil, so its shock time again. I thought the range was larger once you got out of the KE70 48mm diameter strut and into the bigger series that Toyota made in 51mm. However last night I found a suggestion that the shocks are the same in BCR, so they use a shock that fits 48 and 51. Brakes.. obviously better on the XT130 with rotors at 266mm compared to the KE70s 218mm, but I'm already using those L601 Move brakes that are 234mm, the same as an AE86. The XT130 setup is very cheap compared to new AE86 hubs, brakes and steering arms. Right now I'm leaning towards keeping it KE70 with a BCR KE70 weld-on kit and a Manon Racing brake kit from NZ. Either a Wilwood Dynalite kit for 13" wheels or their Dynapro kit for 14" wheels. I buy things very slowly with lots of researching, so it may change yet. What have you found?
-
After I get the Girls KE70 going with its new Haltech, I'm thinking of doing up the suspension. Nothing for racing or lowering it, just better than stock for country driving. All four corners, probably stick with stock style in the rear and coilovers in the front. There are three options for full kits- Coilovers from BCRacing at 48mm, they weld onto the KE70 strut foot. Four adjustable shocks. Coilovers from BCRacing that are 51mm diameter, so AE86 or XT130/RA40 or RA60. Full spindle coilovers from BCRacing that still need hubs and bearings, rotors, calipers, and steering arms. The first is the cheapest, but limited in shocks for it and runs KE70 brakes. If I have to I'll do it and see if the lower unsprung weight makes up for some losses. Under $2k The second needs the complete struts from Coronas or Celicas, adds unsprung weight and means moving to 14" wheels. But bigger shocks and bigger brakes. Maybe $2-$2.5K The third needs a stack of money, $4 or $5k, as some of that comes from Ireland or Japan, and the Govt will make it even more expensive. Over $4k So if you come across any let me know, and if you've done this conversion tell me what the difference in handling is, and what spring rates you're running. Cheers https://bcracing.com.au/collections/toyota-corolla-spindle-type-ae86-83-87
-
Local Autobarn has timing lights on sale for $50 instead of $80, I thought about buying a new one... I never thought about Cash Converters though. https://www.cashconverters.com.au/shop/tools-motor-hardware/hand-tools/jumper-leads/timing-light/036800350524 Get yourself one somewhere, you'll use it a lot,especially if you start improving that dizzy advance curve. https://www.ebay.com.au/itm/144677303073?itmmeta=01J3729Y5SCZXDPPEHW3SR0291&hash=item21af707321:g:D10AAOSwUa1i9KE2&itmprp=enc%3AAQAJAAAA4Do6O0MpInp25mq43h1iBIBaj2CkFt%2FBdtsh0iY3Ss6%2BGQjoCjMYWGYk2ks0Et0q8%2BpmK29RMODpp%2BunbfnFWQehAS954L4Xam68zR9RiSu3jpx3kQOluNHssz7UIPbgL0GknlMk27BadarFvIC0Ci9fyDi00duIVrivK3dBNd5FCVTlm5dwbofVQXZe5pcuYeA5vV%2BTodeGRpp4z1nPxFhZNmB7l7NmVsJTmiAK1LViEfR%2BsuaLtPCkSb%2FnGHWVYqWOdwqjmCm5FabS%2Bn6w%2FApPCGO44I4GIaL%2BO3saBTE8|tkp%3ABk9SR_rip-KZZA ------------------------------ Ok, in a show of solidarity I've just bought the one on Ebay, my old one isn't even battery powered and I have a 4AGE sitting in the engine bay that will need timing in a day or two.
-
"So turning the dizzy to the right advances it it is currently sitting all the way right atm so something is not quite right because lining it up with 10 degrees is all the way in the left position " OK, which way does the rotor turn? Turning the dizzy the same way as the rotor retards it, turning the dizzy opposite to the rotor advances it. You can tell instantly by looking at the plug leads and the firing order, 1-3-4-2, so following lead 1 to lead 3 will tell you which way it turns. It should look like this, usually with #1 in that 1pm position- So turning it clockwise retards it, turning it anti-clockwise advances it. Have a re-think on that and re-set the timing just as you did, which is how I did it for decades before I had a timing light. Don't be afraid to stick 15deg on it, these motors handle a lot of advance without a problem. Remember, advance will raise your isle speed, retarding will slow it down, so factor that into your carb work too. Lack of fuel from blocked filters or low fuel level will obviously affect the motor at high fuel demands, ie foot hard down accelerating or top speed. Idle uses extremely little fuel, so a blocked filter is unlikely to affect it. Do some reading about pulling a carb top off and getting the jets out, its fiddly and a pain, but not hard.

-
Beautiful! If you paid under $10k you got a bargain! Lovely colour too, the best! Timing is not related to dizzy position overall, it depends on where the teeth on the dizzy were when the last person put it in the block. So it the dizzy is jammed hard against one end of its travel you pull it out and move it back to the middle. Not quite so simple as you will have to turn the oil pump slot a whisker to line up with it. Do you have a timing light? If not, you can only look inside the4 dizzy at where the arm is as it passes the sensor, just not as accurate. https://www.rollaclub.com/board/topic/49927-how-to-fix-your-brand-new-ke-motorsport-electronic-distributor/#comment-511594 So you can set the crank to 10deg BTDC and align the corner of the dizzy shaft with that little sensor strip, which is probably what you have done. Those dizzys were pretty crap just out of the box, the advance curve is very flat, so if its the same as mine you have a lot of performance to get out of it. Second question, does turning the dizzy clockwise advance the ignition or retard it? OK, I think you idle jet is blocked, or the float level is way out, as Parrot says. You could pull the top off the carb and look inside for dirt in the bottom or signs of corrosion from a dried carb. Measure where the fuel sits from the top and put a photo up on here for others to compare. The tar in the petrol makes jets smaller if a car is left for a couple of years without running. You might have to take the carb off and strip out all the jets, hose them out with carb cleaner, hose carb cleaner through the drillings where the jets sit and then reassemble. You should give it a jab of throttle when you're downshifting anyway, rev matching is much easier on a gearbox and the bearings for these gearboxes are no longer obtainable. So, a clean-out of carb jets, a check of ignition timing, and let us know how you go. here is what I've learnt and the mistakes I've made with mine-
-
Looks like fun! Start up a new thread so we can follow along.
-
Well, I couldn't find a way to measure the noise reliably, but it is quieter. Meanwhile, the no-throttle to low-throttle stumble was moving up the rev range, so last month I took the plugs out- An odd combination I thought, what connects cyls 1 and 3... So I looked in the dizzy, and found the cap was burnt underneath, something to do with the heatshield I was always going to fit but never did! The area was so soft it was easy to put my thumb through it. I bought a new one with a rotor online, its rather hard to find the old type that these are, but after spending a day or two farting around under the bonnet I decided it was time for the Haltech computer, which uses the later distributor, and other odd jobs like a lightweight flywheel, new crank seals front & rear, a look inside the sump and beat the dent out of it, new clutch master & slave cyls... and when its running again, a set of extractors! The Haltech requires a complete rewire, but this time I know a lot more about it! Inside the sump looks clean and tidy, I didn't have the balls to take a bearing cap or two off, and no pleasant surprises like forged rods or pistons.. its all quite stock. With it being off the road for a while the T50 is getting new synchros and forks, and a new input bearing at the local gearbox shop. The bearings are mainly still available, but a nightmare to try and get a set organised. The gearbox man said the bearing very rarely give out. Kickn5K might be right about cheap Ebay rads, from 8years ago when I bought it. I found it weeping at the top of the cores under the cap corner, so its had a cleanup and some epoxy dribbled in there. If it remains a problem I'll toss it out and replace it. ..and if you want to see desperate machining, look at the pressure plate holes in the flywheel! They drill & tap the holes then reduce the flywheel on a lathe to take out a good 1/3 of the hole! This is to take a 215mm clutch plate instead of the stock 200mm. At the moment it looks like this- but if I can get the gearbox back next week it should be much better in a couple of weeks time!


