

camerondownunder88
-
Posts
1683 -
Joined
-
Last visited
-
Days Won
1
Content Type
Profiles
Forums
Events
Gallery
Blogs
Everything posted by camerondownunder88
-
Kelly wrecking there KE2X are all butchered and not many parts left really full of rust and the total rear end of a KE25 there has been jsut cut off by a saw so sad :cool: The dash was also missing from that 25 I suspect it had factory tacho. That front window fan jip looks awesome was a find when we noticed it..lol all you need now is ROOF RACKS...lol Cameron
-

Ke15 Sl Sprinter Thread...
camerondownunder88 replied to camerondownunder88's topic in Rollaclub Rides
Updates: Today I went to pick up some parts I had bought previous in the week to add to the sprinter. I collected: 4X mazda 110X4 stud pattern rims 13 inches diameter 1X KE20 radiator which will fit into the 15. NEW core to :yes: I also got confirmation 8 datto A12 push rods are in the post on Wednesday to me so I can get the 5K on the road in the 15. As the plans for this car now are KE70 brakes 5K. So all I need for the 5K now is lifters and it is running :) As the hydro lifters failed when the cam shaft in this 5K snapped a while back :) But below are the photos of what the Mazda rims look like that I purchased. I recon there a good looking rima nd with my chrome KE3X trim rings will look the part. Pitty the stock KE3X metal centre cap wont fit them :) There also wider wheels than stock sprinter ones so safer on the road and 13inches so they will fit over my KE70 brakes when I install them. I will take photos of the radiator at a later date as it is out side and it is to late to go take pictures. Cheers Cameron


-
Ke15 Sl Sprinter Thread...
camerondownunder88 replied to camerondownunder88's topic in Rollaclub Rides
MORE UPDATES: Well today I drove around Ipswich for a while collecting parts for my KE15. I bought: 1X 2K extractor gasket 1X extractor paint 3m of vacuum gauge hose The gasket I chose because it is the 1 piece one so easier to get on the car and the twin carbies run the big port size ports so the normal gasket wont fit and restrict the ports if used. I did however had some trouble getting the extractor gasket today. Super cheap didn't have one on the shelf and had to order one in so I said don't as it would take a while and be a $11 shipping fee, AutoBarn in town said they don't exist so I didn't even try convincing them and left then went to walkers A1 auto. They had 3 on the shelf so I got one. So just for reference the ACL part number for this gasket is: DSF24 and a picture of it is below: Also on my last post you can see the before of the extractors. Well after a bead blast and clean today and a paint I had these: Look like there new apart from the pitting corrosion and thats it. Tomorrow ill give them a slight clean up the flange where it bolts to the head nicer and then install them :yes: I also found my KE25 throttle cable holder for twin carbies I had laying around that uses the ball and bell crank style linkages I need the small part that is lose and is clamped to the main bracket. Why? You say, Well KE15 have a flat piece of metal that bolts to the rocker cover and the small clamp on this bracket that holds the throttle and choke cable is the same as a KE25 twin setup clamp. So this KE25 part of the clamp will bolt to my KE15 part and make a complete assembly. As the original KE15 one I have is missing the clamp part :) Here is a picture of the KE25 mount: Cheers Cameron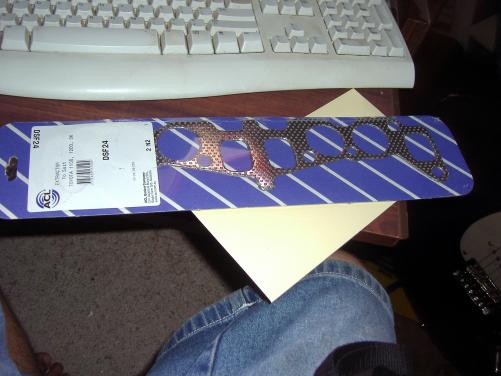


-
Ke15 Sl Sprinter Thread...
camerondownunder88 replied to camerondownunder88's topic in Rollaclub Rides
UPDATE TIME: Well today in the post I received extractors for the car :) There KE20 ones but I have a feeling they might fit or can make them fit. If they don't fit ill trade them for a set of KE1X ones. So this weekends work on the car will be to try to blast the extractors clean them up and get the die grinder out and clean up the ports on it and heat wrap them and install them and the twin carbies so ill up date as that happens. But pictures below of the extractors I recived: Ill post up pics of final extractor finish when I'm done. But the interesting part will be bead blasting them...lol They fractionaly to big to fit in the blaster so ill play a bit..lol But another interesting note they kinda look home made :yes: Cheers Cameron


-
HI, SWEET ride. Id make it look stock as..lol But tuner_till_death do you happen to know Simon in Ippy that drives a green gemmini and do you happen to live near the raceview Yamanto area :y: As I know of a few hundred 4age dyno car hidding there so :P never seen it but is this yours? Cameron
-
Hi, My clock I was OK on time then it started slowing up so played with it. then it sped up. So played with it again and it went slow. So gave up and installed a tacho. So a much better use of the hole..lol Cameron
-
Do a compression test this will give you an exact figure on your motor. Also shave the head easiest way abotu free to $50 if you remove the head and take it to a shop so pretty cheap. BUT if thee motor is worn and the rings are well used shall we say a shaved head will kiss the motor good buy after a short time seen it happen so just play safe don't try to pass 10:1 you will only do more damage. Cameron
-
Ke15 Sl Sprinter Thread...
camerondownunder88 replied to camerondownunder88's topic in Rollaclub Rides
OOO black roof looks good. And I like those cars Felix :S And spot on Raven RUST magnet I wont run vinyl roof as prone to rust big time. Also the fire wall plate says KE15 and I think it has printed on the same plate 1970 made. Ill go out adn look a bit more tomorrow to see what I can find on it. To confim the year date. Cheers Cameron -
Ke15 Sl Sprinter Thread...
camerondownunder88 replied to camerondownunder88's topic in Rollaclub Rides
Ok now updating the thread. Extractors are days away in the post so well see how well I did on the carby setup I did when we fuel it up :S Also I have now tracked down a KE20 radiator n top nick that will be on the car soon and a set of 4 Mazda 13 inch rims to suit the brake up grade the rims and radiator are arriving Monday next week so only 6 sleeps. Also ROL-110 The car is a 1969 KE15 Sprinter. So the front apron is weird and has some damage that has been bog fixed. So the whole front setup is a bit odd as it has later gear on it compared to Felix's KE15 and a few other minor details. Also the RACQ color scheme has grown on me even the white roof and I used to hate them..LOL But I will repaint it one day when cash lets me so it can go one whole color and fix a few minor flaws in the paint and panel work. But I do like the current orange a bit but I think a nice metallic will suit one day. Also discovered today my car doesn't have the optional KE1X bed arrangement in the cabin like some had so that confirms that people. But I will up date more when parts come. Cheers Cameron -
Yeah phatke30 that coupe should look familiar to you. Had to get rid of it as I now own a sprinter.. MM KE15/17 what condition was it in john?
-
How To Fit A W50 To A K Series Motor
camerondownunder88 replied to Taz_Rx's topic in General Mechanical
True K boxes had a cast bell on the front of them. This car also had the 2U motor so most likely K to W as well. as a T box is different on the front. Also can I get the vin number of the car this is from at all? If I could I can tell you EVERYTHING that car had factory with the EPC and more..lol So that will confirm if not what motor did this van have and also what year is it then i can do a deeper search. Cameron -
How To Fit A W50 To A K Series Motor
camerondownunder88 replied to Taz_Rx's topic in General Mechanical
Hi, Just looked in the EPC for you and all I could see was that car only got the starlet K box only so prob a K to K. But ill have more of an in depth search later. Cameron -
Ke15 Sl Sprinter Thread...
camerondownunder88 replied to camerondownunder88's topic in Rollaclub Rides
what this is very off topic but now I'll need 13 inch rims..lol DANG. Wont that throw the speedo out? Well I just want the car on the road so fingers crossed it is soon. But extractors anyone??lol Cameron -
Ke15 Sl Sprinter Thread...
camerondownunder88 replied to camerondownunder88's topic in Rollaclub Rides
HAHAHA Id fall out my window to if I saw one of these bad boys on the road..LOL Planning to get a set of extractors for the exhaust system and go a full straight through system. To many ideas not enough cash...LOL Progress so far...NONE...LOL -
INTRO Hi. The other day I scored a cheap as pretty neat condition KE15 and a few have been asking about it so I decided to start my ride thread for its journey from back shed to the road and beyond. The car was purchased off an old guy who lived close to me and he could no longer drive so had no use for it and sold it. He was part way through restoring it as he wanted to drive it again and he was the original owner which made it all the better. Over the cars history from what he told me he: Killed a dog in it. His daughter used it to learn in and be a daily. He liked doing a few races in it. Blew up an original K-B motor. As he got old it was to fast for him so he removed the twin carbies. After he lost license he started restoring it. But he decided it would sit in the shed un driven so he sold it to me :) The car its self is a genuine 1969 KE15 SL sprinter with all "sport" options like disc brakes tacho dash sports wheel better clutch, lighter fly wheel, bigger cam shaft. The engine it originally had was a K-B motor. After he blew this up ( he had cylinder head fail, this is common in old K motors) He replaced it with a NEW JDM 3K-C. When he replaced the engine de down graded to a single carby as he felt he couldn't handle the power of the twin carbies. He tried non stop to tell me they were twin "Holley's"..LOL Below is a picture of the engine bay as it sits after being dropped at my yard. Interior: He has left this largely untouched. It is stock but sports the factory tacho dash, JDM seat belts in front only, glove box with map holder inside, MPH speedo, brand new black carpet, red vinaly seats with adjustable head rests and the better back adjuster. The changes he made to the interior while he was restoring it was he put in new carpet, new DIY door cards to match the seats, re done parcel shelf again red matching seats, installed a aftermarket tape deck. Picture below of the seats. Body: Has had quite a life..LOL He has resprayed the car Taxi orange at home so the job is ok but not well..well done..LOL and as you can see in the picture below is sporting a white roof. As I said above he killed a dog once as he was going fast and couldnt stop in time. The dog hit the lower front valance and broke the drivers side front indicator then dinted the side guard. He has repaired this with bog and after so many years it is coming out and needs attention. A few other stone chips are also in the front valance and the rear of the car has the common problem this car had with the rear panel below the boot pulling away. This will also be fixed along with some rust in lower passenger door, front passenger guard, rear drivers side wheel guard. Running gear: This remains mostly untouched apart from the engine. He blew up the original K-B motor after the cylinder head let go which is common in this early K motor due to lack of valve stem seals and the water cooling tot he inlet manifold corroded up. So when fixing it he installed a new 3K-C motor he told me he bought from Toyota him self. He did how ever keep the original K-B flywheel clutch cover and twin carbies. Rest of the rare specific K-B parts were thrown out :( The Transmission back is still stock. When being restored he had the transmission rebuilt :sob: and the diff rebuilt :yes: So this is all new and shifts VERY nice. no noise :( can't complain. Wheels: Still sports the factory rims with a very weird jap branded tires look like there original..LOL but there not all 4 are different not one single Australian marking on them all Jap and cracking hard as and leaking air and in a bad way. But in the days this car was driven around Ipswich he said he would lose a hub cap here and there. He would hear tehm fall off and never collect them :( So I only have 1 original hub cap sitting on the spare tire in the boot. So if anyone finds these hub caps PM me..LOL Plans: I want it restored to its former glory so I can enjoy one of the coolest classic Jap cars around. I will put a re-coed 5K in it original equipment will be reinstalled and it will be made to be enjoyed. Things to do: There are a few areas of attention this car needs before it can see the road again. Those things are listed below. 1. Fix all paint areas that need attention (front valance, drivers side guard, passengers side guard rear wheel arch passenger door). 2. Install 5K 3. Rebuild twin carbies and tune 4. Install whole new exhaust system as it is missing the original system. 5. Clean up interior (new seat belts, original radio, fix small tears in seats). 5. New front brakes prob a KE70 up grade. 6. New front wheel bearings. 7. Fix broken front lower indicator. 8. New bulbs all around. 9. new brake master cyclinder. 10. New door and boot rubber seals. 11. new door locks 12.fix cracked dash pad. 13. find an original KE15 air filter box. During the build Ill probably get ideas change stuff etc. So keep watching folks. That is all I can think of off the top of my head then it is REGO time :( Cameron


-
Ke15 Engine Intake Issues
camerondownunder88 replied to camerondownunder88's topic in General Mechanical
Hi, Well SUCSUESS. Today I finished assembling my K-B intake assembly. After just going off the pics you guy's supplied and a few cingle carby setups I had at home I was able to assemble the carbies again. They all work and I decided to totally strip the carbies down clean and reassemble bead blast and paint a few parts also as the cad plating on some parts from Toyota was gone and corrosion was setting in. So Below are some before pics of what I had when I started: And below don't let eh neatness in this pic of the carby box I had fool you. Linkages missing, stuff bent, rusty, full of dirt, missing parts etc.... Now end of todays finished item. A fully bead blasted adn painted and clean K-B setup on a GENUINE BIG PORT manifold ready to live life again. I also included some close up linkage photos for you to see. Also I like this notice my stainless steel lock wire holding linkages together. Had no split pins left and I had this wire from my place of study at BAC (Brisbane international airport) where I am studding so I though if it breaks about now planes will be falling out of the sky everywhere..lol Also wont corrode :) Also one more thing, coln72 where did you get toyota's parts number book for KE1X cars? I have the lates EPC on all 18 Cd roms but it goes back to KE3X only so I am trying to find the earlier version so I can get KE1X numbers for parts adn pictures. So jsut curious as to where you got your parts catalouge for KE1X? Well enjoy the pics Cheers Cameron


-
Needle And Seat Issues Ahahahah
camerondownunder88 replied to camerondownunder88's topic in General Mechanical
Hi, A few days ago now (been to busy to post this update) I ended up going for a hunt for a ke15 3k-b carby new needle and seat. Well first I went to Supercheap near me first and bad news :yes: they can't get any in and they didn't have any in store. So I decided to go to walkers1 on the other side of town as they usually stock rare stuff and if they don't have it no one would. So I tripped there and was in luck they had 1 left :) but it was well forgotten as it took 2 guys 15min just to find it. And this is it below: As you can see it was well forgotten in there shop. Then below is a picture of the seat next to a ke30 and newer Asian carby seat. This will just show the size difference. One good thing about this needle and seat but is the internal diameter of the seat hole where the needle sits is larger than stock so you can fit a newer KE3X and upwards Asian carby needle to it and don't have to get a special early K-B needle. But after putting this new seat and needle in to the carby I found a problem :( The seat bolted in fine no problems. I then put in the needle valve that came with this new unit, then I proceeded to put in the float and the needle is to long :( This caused the float to be sitting in the low fuel position and the valve to be shut. Picture below: This pic shows the new needle is sitting WAY to high as it is a solid needle so the float will be all wrong. So I tried bending the tab to fix this problem, no luck :( The low limit float stopper tabs and the tab that pushes on the needle didn't have enough bend in them to work right. So I decided to try and use a needle from another carby I had with a spring in it. I figured these were a bit longer for the KE3X and newer carbies but the spring in it might compress more taking up that length difference. Well it did :sob: So in short if you buy a new needle and seat for a KE15 sprinter. The part the shop will give you will be correct but the modern needle is to long and a spring loaded newer type will need to be installed. As the new solid one they will give you will be to long. I am now yet to try this carby needle arrangement with fuel pressure but fingers crossed it wont leak. But I am just curious as to if my needle leaks how can I tell and where will i see excess fuel coming from? Also by having say different needle and seat's in my twin carbies how could this cause tuning issues? And one more note I measured the original needle that was sitting in the no pulled apart carby I got in the parts box with the car and compared it to a new needle I bough that should be a direct replacement which isn't. The picture of that is below. Cheers Cameron


-
If the 7K is higher nothing a pipe bender and a weld can't fix..lol Also where did you pick the 7K up from? How are you modifying the X-member to fit the motor as you will have sump issues with a 7K? Cameron
-
NOT 100% interchangeable........ Ok it will fit on but pending on the car model the extractors can hit the floor so if you keeping the same car yes if not no. Cameron.... But he still owes u beer..
-
Needle And Seat Issues Ahahahah
camerondownunder88 replied to camerondownunder88's topic in General Mechanical
Felix that would BE VERY APPRECIATED. Ill owe you if you have some rod. Also thing is I'm missing the original rod out of it so length I'm not sure of..lol But for more info it is out of the second carby not the primary carby. And I call the secondary carby the one that drives cylinder 3,4. Cheers Cameron -
Ke15 Engine Intake Issues
camerondownunder88 replied to camerondownunder88's topic in General Mechanical
Hi, Thanks for that link. But if possible coln72 could I get some close up shots. As yours as on the car so it will show me the cable link up better etc. But I have one more issues with my setup. I have the manual for my car it doesn't show the linkages. Also the pictures supplied above and in the link don't have the same linkages my corolla has.... I have supplied a photo below of what my linkage looks like. From that part of the linkages there are clip on control rods that then by the looks of it clip onto the carbies. As my carbies don't have cable pull primary jets but a bell crank on an arm that the control rods clip to. So I am curious does anyone have photos of a similar K setup or know how to rig it up? Cheers Cameron
-
Hi, After spending most of the day cleaning and fixing my carby on the new sprinter one of the carbies (original asian) had been disassembled. So spent all day getting it micky mouse clean as a whistle. Just then tonight about to put the needle and seat in the lid of the carby ice burgs hit. The needle and seat had fallen out and been lost in the 3 boxes of parts I was given with the car. These were a mess all I was able to find after 40yrs of these boxes sitting there was the small spring and that was it for the needle and seat. So all I was missing was the little straight rod that goes in the end of the needle and holds the spring in and touches the float. So I decided to get 2 of my other aisans out from a KE30 and a KE70 to get a needle and seat complete and put it it. can't The needle and seat are all slightly larger and longer in a KE30 and upwards carby. Or just pollution carbies. So I was wondering does anyone have a needle and seat from a KE10 carby or a 3K-B carby I could have. Just pop it in the post as this is the last part holding me up from getting my twin carbies back on the car. Cameron
-
Factory K Motor Oil Coolers
camerondownunder88 replied to camerondownunder88's topic in General Mechanical
Hi, Just after more looking I noticed the oil cooler also came on the KE74 sedan. So it isnt just a van part. It was on corollas factory. The KE74 was sporting a 5K motor and was JDM only I believe but some did make it here so hey anyone ever seen one of these oil coolers in person and have a photo of one? Cheers Cameron -
Hi, This morning mucking around with my Toyota EPC to further work out how to set up my 3K-B carbies properly I stumbled over this FIND. OIL COOLERS for a K motor FACTORY :jamie: Couldn't believe it. So I got a copy of the EPC screens for you all to see so you don't think I'm nuts. And for those of you at home this was found using the general CD's out of the epc. Below are the screen shots. But there is one small problem with these oil coolers. It seems Toyota has no part number for it :wub: So could make sourcing one hard. Cheers Cameron


-
Ke15 Engine Intake Issues
camerondownunder88 replied to camerondownunder88's topic in General Mechanical
Hi, Felix thanks HEAPS for those pictures will be a big help. Also coln72 you don't happen to have pictures of your setup by any chance? I will get pics up soon on what I have and as you will see it is in a few parts..lol Cheers Cameron


