

Banjo
Regular Member
-
Joined
-
Last visited
Everything posted by Banjo
-
Nope Si. Should have ! Last time I looked you said they were all gone. That was about 4 odd years ago. Have you done a rerun of the copper ones, or intend to do one again ? https://www.rollaclub.com/board/topic/64563-grouy-buy-copper-em30-all-gone/ Cheers Banjo
-
-
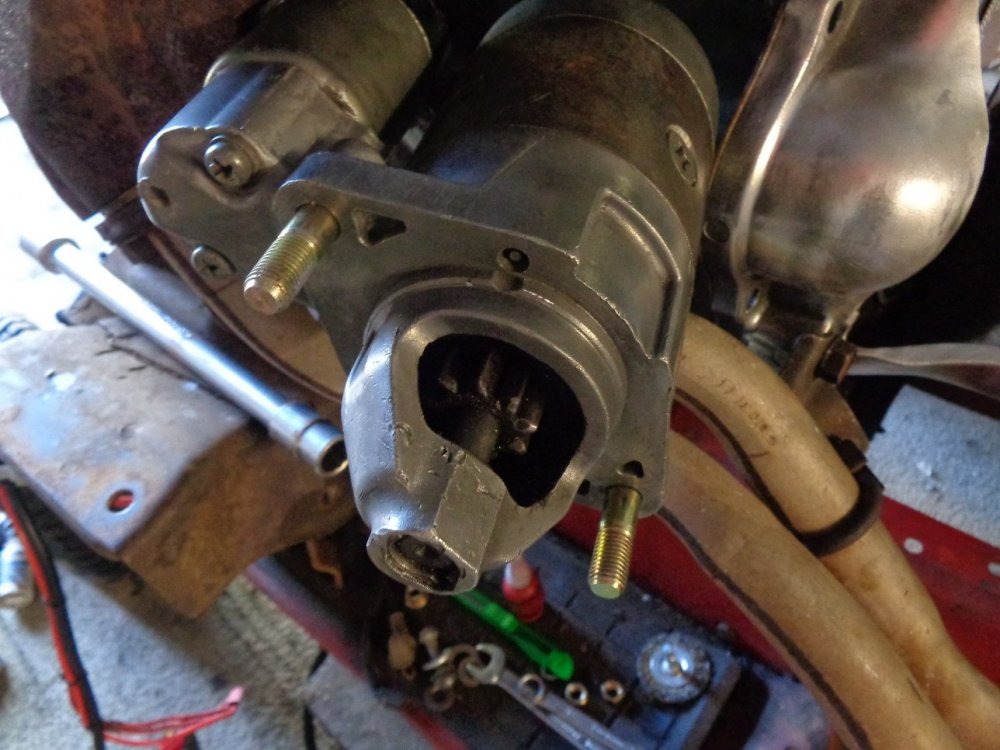
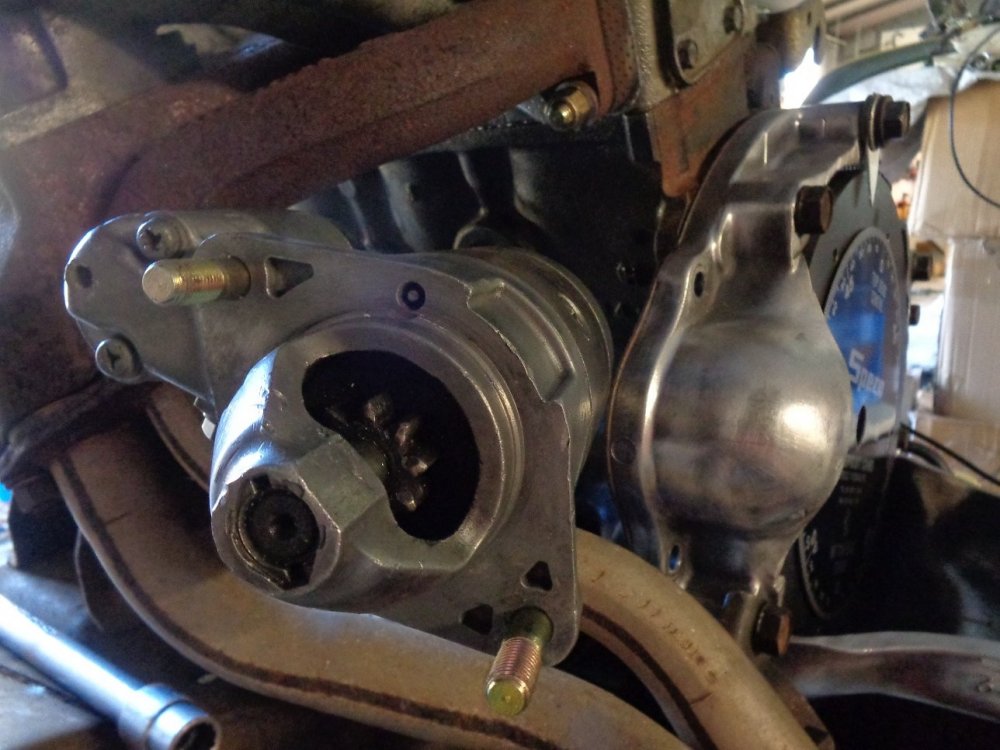
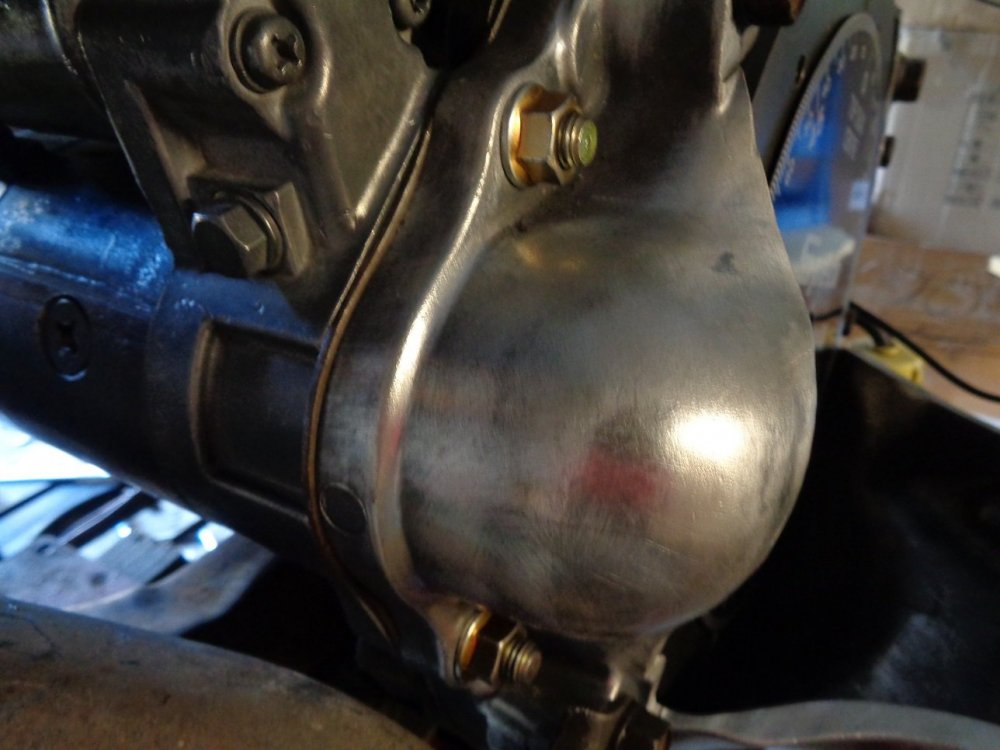
One of the difficult items to work on, in a K series motor is the starter motor, but with the manifolds off, it is easily accessible. The starter motor can pose an issue like the manifold bolts, as the rear flange section of the starter motor, that the holding bolts screw into, is aluminium. Now the starter motor produces high torque, so you certainly want these bolts never to come loose, & if you are like me, you make sure you tighten them up well & truly. Unfortunately, this can result is stripping the thread in the aluminium flange. Now if the bottom mount thread strips, it is not really a great issue, as you just drill the thread section out, & fit a longer bolt, with washers & nuts on the accessible rear of the flange. However, it is invariable the top thread that strips, & this technique cannot be used, so the only real option is to put in an oversized bolt & rethread it, which is a real pain, or another starter motor. While you've got the manifolds off, it is very easy to remove the starter motor & fit the same size manifold studs to the starter motor, just as I have described above with the head. This results in the uninstalling & installing of the starter motor, never causing any damage to the aluminium threads on the starter motor. Again, clean out the threads, & add some Locktite to the stud thread, & fit to the starter motor proper, as depicted below. Use some nice flanged 10mm x 1.25 nuts, again with some Loctite, & you can rest assured, you won't have starter motor mount issues in the future. Cheers Banjo
-
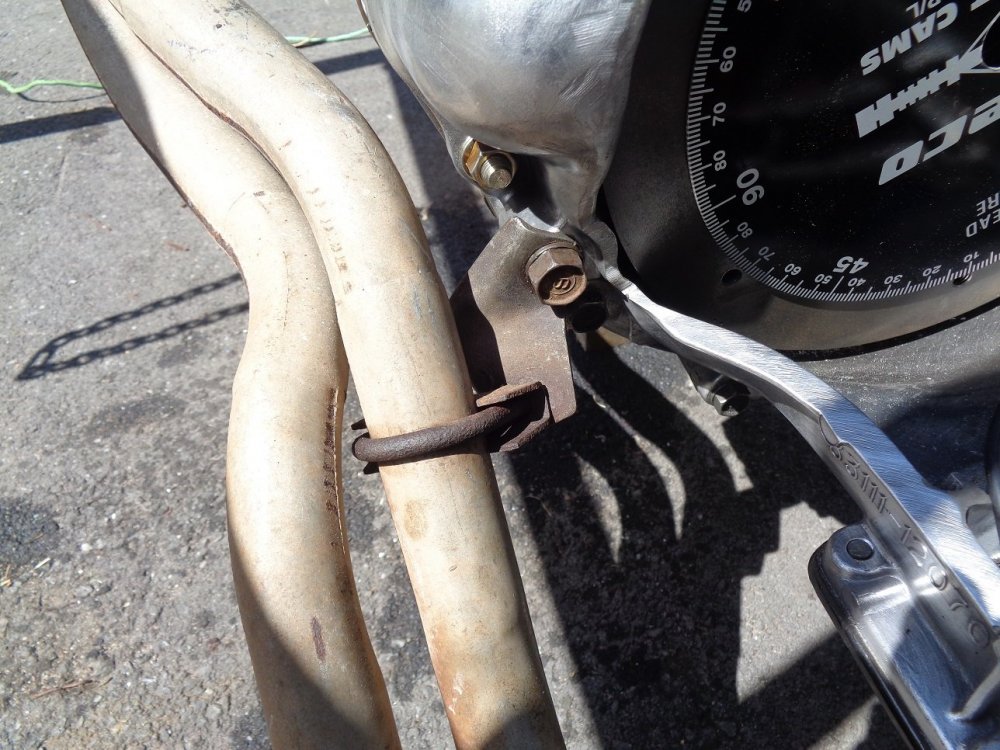
I do recall once reading a post on here by Altezzaclub, quite a few years ago, where he came across this issue, & described it in great disgust ! If I can find it, I'll put the link here. It was beautiful ! Almost as good as his comment about the cow treading on his bonnet, or eating a K series engine. It is a bummer of a design, but once you've done this mod, with care, the issue is eliminated. I'm sure it is exacerbated, in some instances, by some leaving the exhaust pipe support bracket off, which bolts onto the bellhousing, about where the starter motor sits. The omission, would create potential movement of the manifold flange. I posted this for new timers to Rollas, & hopes it saves a few headaches for some. Cheers Banjo
-
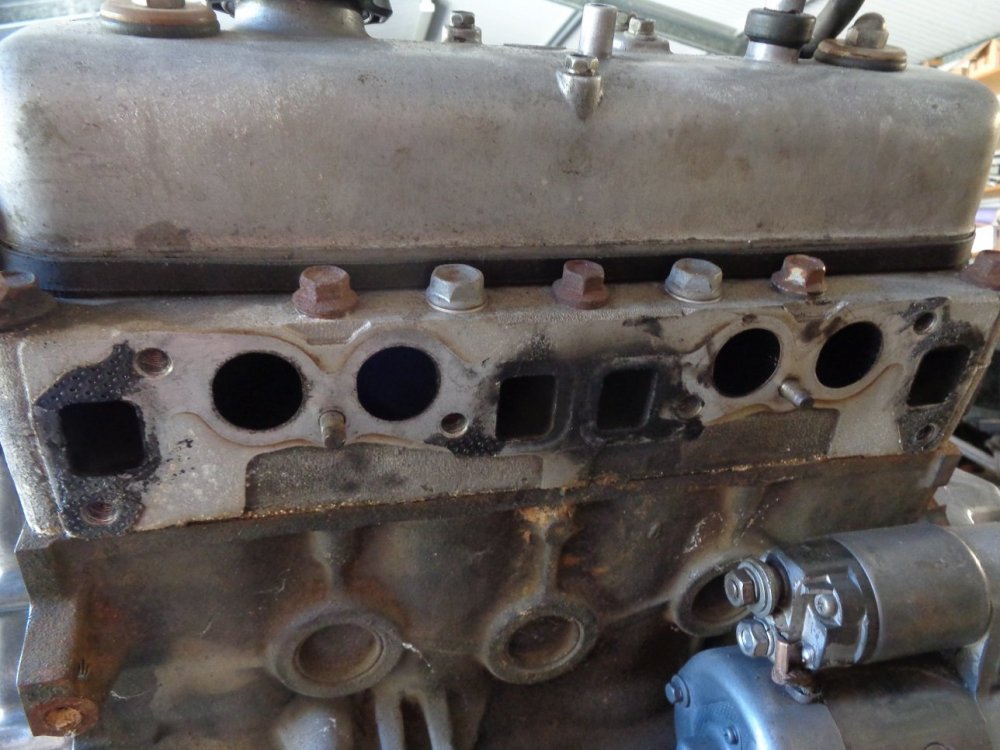
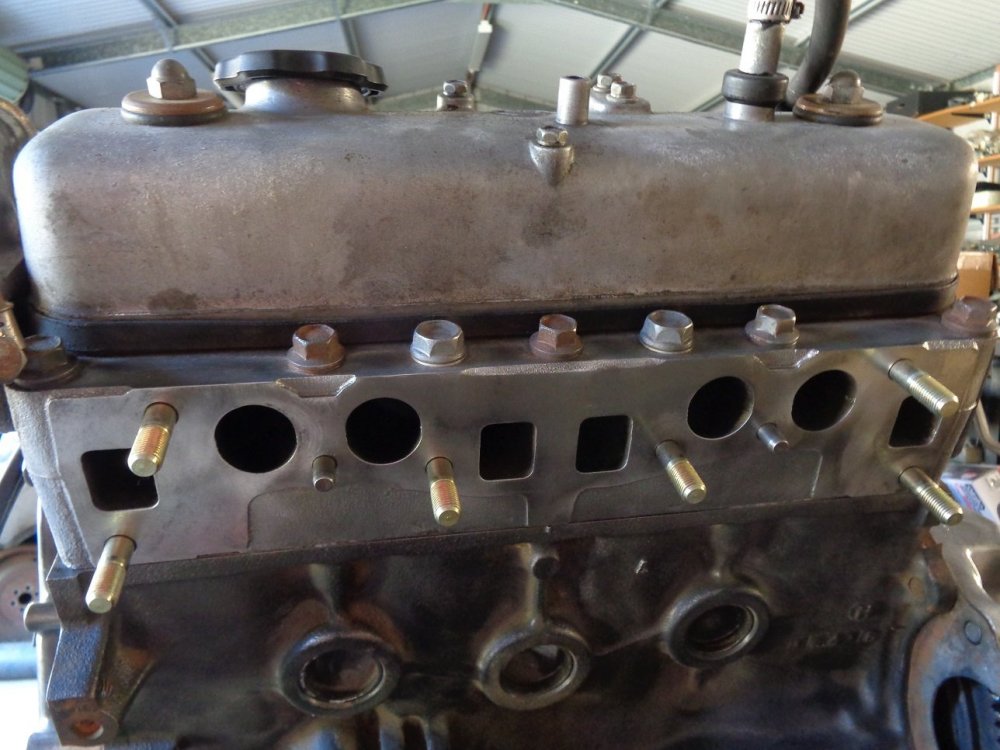
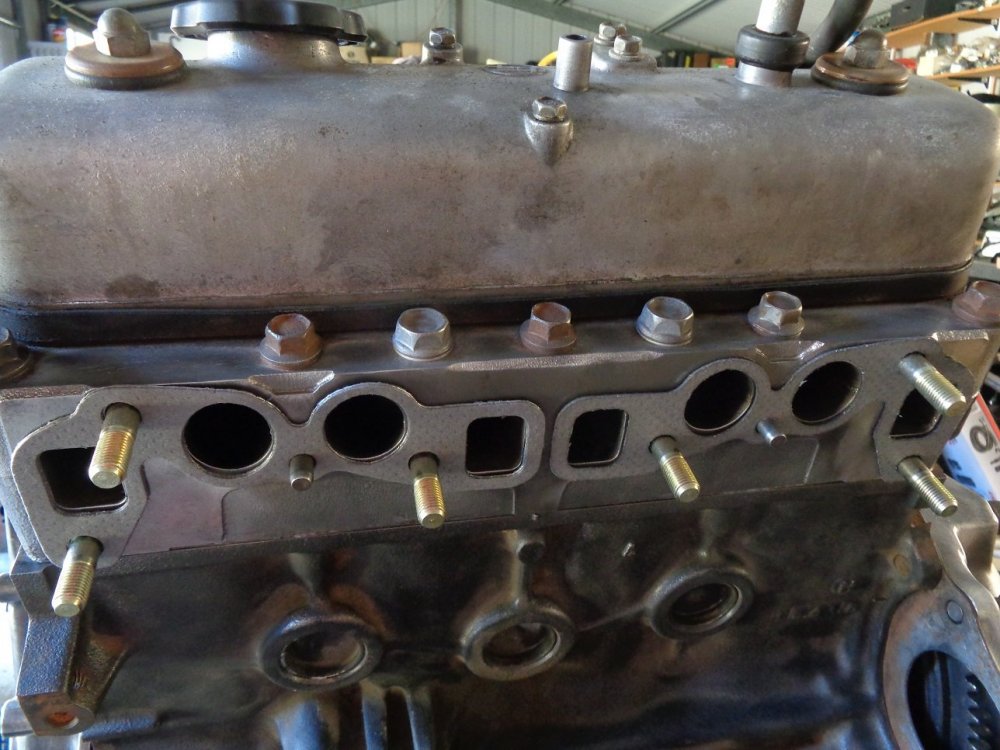
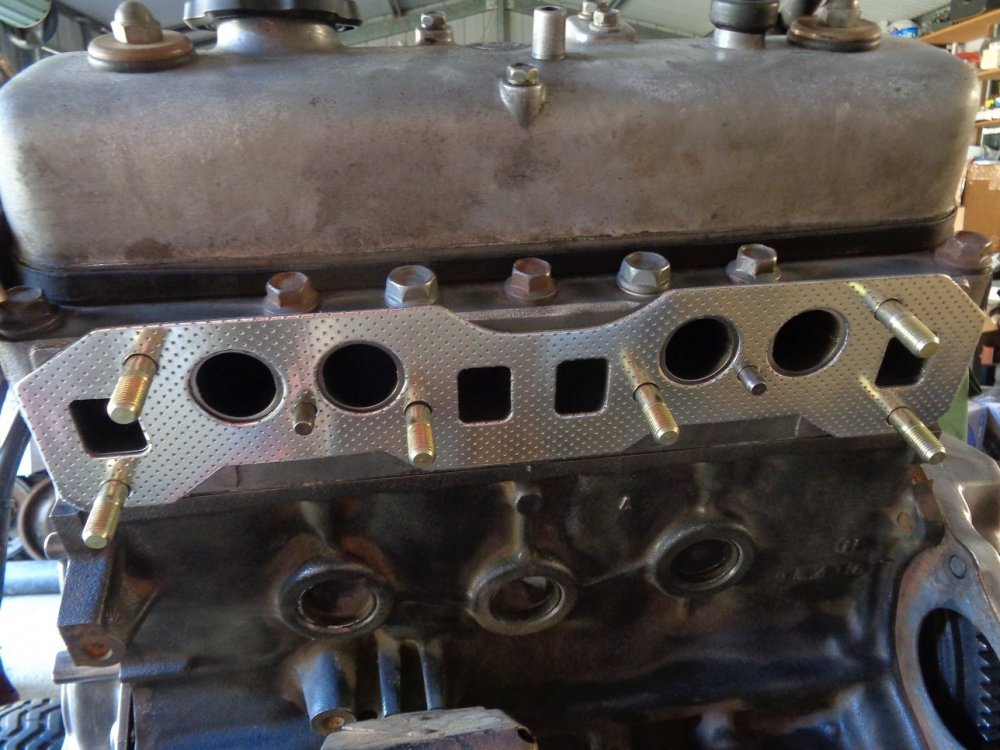
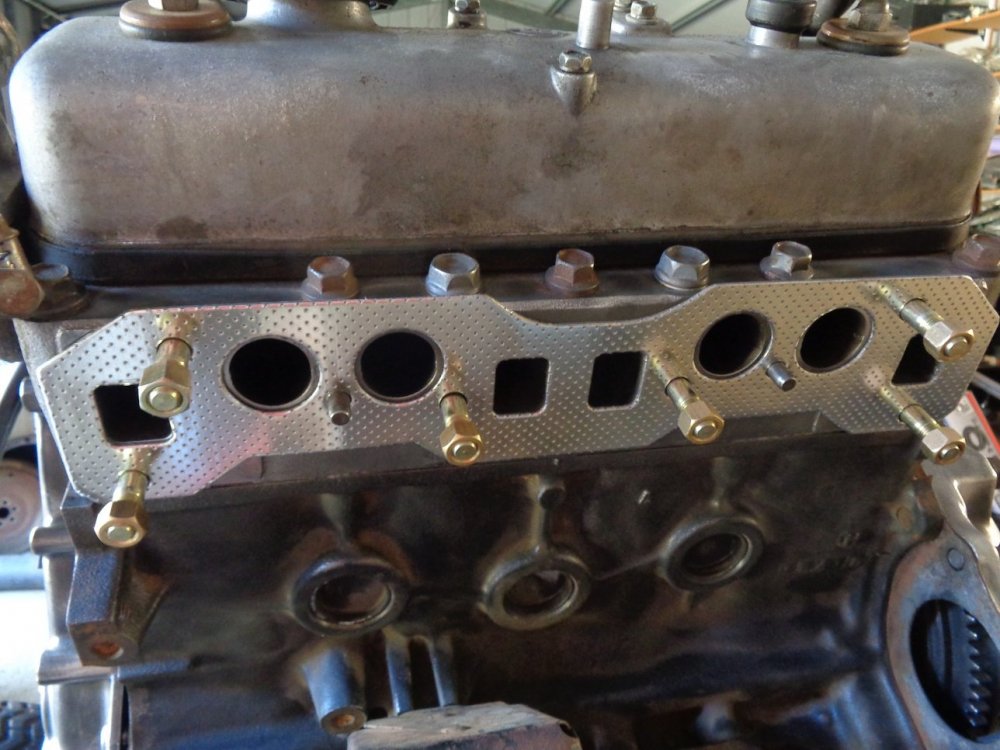
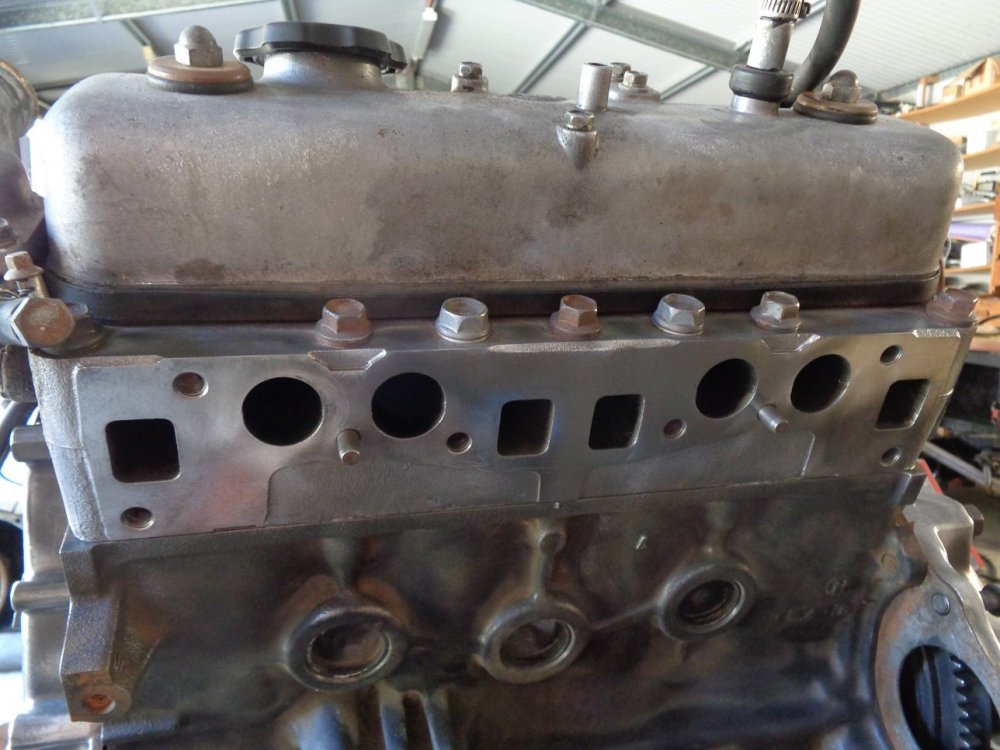
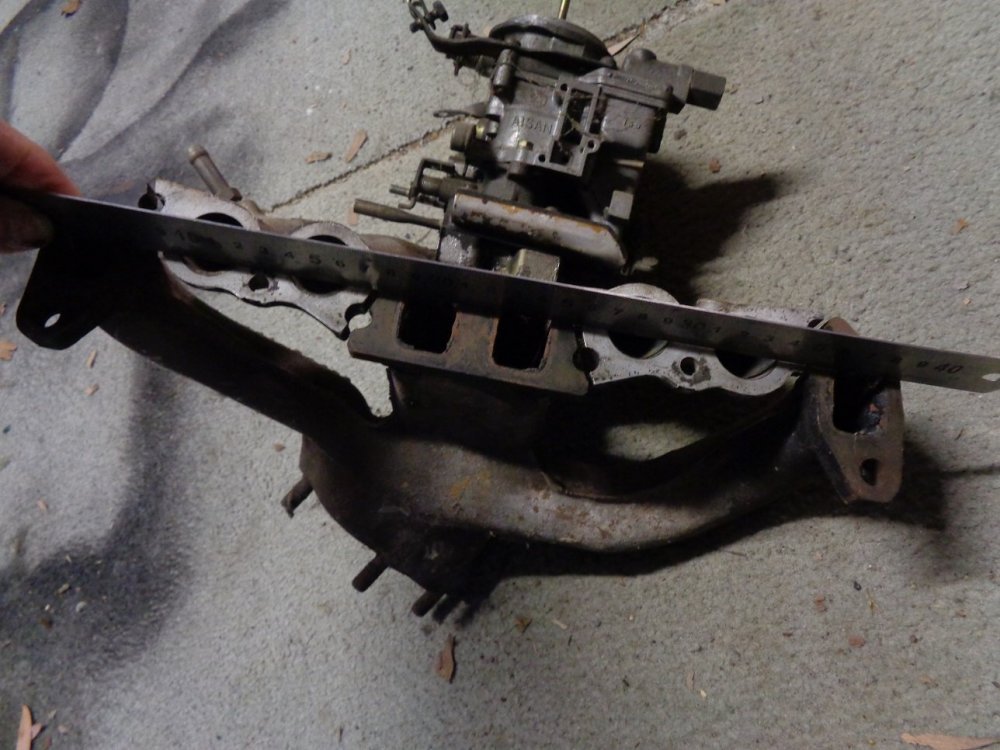
While waiting for some paint to dry at the weekend, I thought I'd better replace the manifold gasket on my 5K engine, currently on the engine stand, for my distributorless project. I've not had this engine apart before, but like almost everyone who has worked on a K series engine, I know this is a weak point in the design. So off with the manifold, & "sure as eggs", those tell tale black sooty marks on the head facing, at the centre, indicate it has been blowing by. Twenty minutes with a sharp knife edge & a soft wire rotary wheel, on the hand drill, & the result looked like this. Now most; if not all K Series engines, were fitted with manifold "bolts", to tighten the manifold to the head. These are well known for coming loose. Most people tighten them up a couple of times a year. However, as the steel bolt, is screwing into an aluminium head, and that head becomes "softer" over the years, the danger of stripping the threaded holes in the head, becomes more likely. For that reason, I always replace the bolts with steel manifold studs, which results in the steel stud only ever being screwed into the head once. The manifold studs are a generic stud 10mm dia. x 1.25 by 40-41mm long. I saw some of these exact size, on a rack in an auto store, labelled as suitable for a Gemini. Available pretty much anywhere. I picked up a set, complete with nuts for under $ 20. Clean the threads out in the head, with a final tap, or an old 10mm x 1.25mm bolt with a hacksaw cut down the length of one side. Put a bit of Loctite, or similar, on the thread, and screw into the head. If it is a bit tight, & you haven't got a stud remover/insertion tool, then two (2) nuts, tightened back to back, on the outer end of the stud, will do the trick. Your head should then look like this. The original Toyota two (2) piece gasket is not the way to go. This is what, they look like. The one (1) piece gasket is thicker & better made for this arduous application, and are made by several gasket manufacturers, like Durapro, Permatex etc. They are often described as an "extractor gasket". All have the identication EMS30 in their part number somewhere. The current price is around the $20 mark +/- a $ 1 or so. It will be the best $ 20 investment you do for your K Series engine. The manifold nuts are most commonly, deep, heavy duty, & of brass construction, so they don't bind & rust onto the manifold threaded steel studs, with all that intense heat. Before you refit the manifolds, run a straight edge across their mating faces, & make sure the mating surfaces of both manifolds have no air gaps between manifold & the straight edge. (A 200mm S.S. ruler is usually pretty good tool for this application) You will also need some heavy very thick washers, with a 10mm hole, to clamp across the gaps between the aluminium inlet manifold, & cast steel exhaust manifold. Do not fit the manifold without these, or be tempted to use ordinary washers. If you do have issues sourcing some, you could always recover the capitive washers, fitted to the bolts you removed, or I think once, I used some head bolt washers, which were the correct size, which were really nice & thick. Once you refit the manifold & tighten them up, run the engine until it reaches operating temperature, then after it has cooled down a bit, retighten them. Some people like to put a bit of loctite on the outer thread for the nuts, but I've never found it necessary to do this. Retighten the nuts after a week or so, & you should never have another manifold gasket issue. Cheers Banjo
-
Hi Dion, Put Pajero into the search field on this website, & you will find numerous posts regarding this mod. This link should help you. https://www.rollaclub.com/board/topic/72497-master-cylinder/?tab=comments#comment-703071 Cheers Banjo
-
Hi Edward, You are doing well ! You will get there. Almost certain that the issue is electrical, so head off in that direction. Once you receive these bits, & fit, your problems may be over. It's always nice to know what it was that caused the problem, so change one part at a time, plugs, cap, & leads in that order, & test the engine inbetween each replacement. That may not fix it, but if not, there are two other items that could be an issue. If it is a points distributor, I would be changing the points & condensor also. Notorious for breaking down. If all that fails; & I'm still placing my bets on it being electrical, I would be checking all the electrical connections in the ignition system, from fuse, starter key barrel, coil, ballast resistor, fuel cutoff solenoid etc. Let us know how you go. Cheers Banjo
-
Hi Edward, Pretty common compression readings. If you are going to have a cylinder that is down on compression, it will always be no: 4, as the back of the K Series head runs hotter than the front cylinders, as a result of poor coolant flow around the back of the head. You could have a broken or worn rings in no: 4, or maybe even a burnt valve seat. Not sure what you mean by . . . " it was going amazing after removing the vac". Leaks into the induction system, can cause all sorts of air/fuel ratio issues, with variable & erratic performance. There are lots of places on the induction system where air leaks can occur. Manifold gasket (common), gasket under carby, loose vac hoses (common), diaphram in dizzy vac unit broken, faulty PCV valve, or hose fittings (common), vaccum brake booster & its hose. Did you manage to get hold of a timing light, & check whether the centifugal advance mechanism in the dissy, it working properly ? The good thing is, your compression test, indicates your motor probably hasn't suffered a blown head gasket. After you have fitted new leads, dissy cap, & spark plugs shortly, if that doesn't fix it, you can bet it's an air leak somewhere, on the induction system. Erratic performance due to an ignition component failure usually results in very sudden & sharp changes in the engine behaviour, whereas, air fuel ratio issues, don't normally have the very sharp & sudden changes. Does the engine feel, or sound like it is starving for fuel ? The fuel system can easily be checked by removing all plugs; removing inlet pipe to carby, & feeding the line into a container. Turn the engine over, & check that the pump & fuel filter are not impeding fuel delivery. Cheers Banjo
-
Hi Graeme, No one could ever accuse you of bragging, after you read this article ! https://www.propertyobserver.com.au/forward-planning/adding-value/32096-best-garages-on-the-market-design-bat-caves.html Enjoy ! Cheers Banjo
-
Rule No: 1 No shed is ever big enough ! Maybe we should get Kevin McCloud around to do a TV special on your "shed", once it has the kitchen & bathroom fitted out ? Cheers Banjo

-
Hi Graeme, Wow ! Well done ! All we need is a bowser outside; a pit in bay No: 1, & a hoist in bay No: 2, & . . . . . Rollaclub Headquarters of the future ! We could even build a box at the end for Irokin to put his servers in. P.S. Have you got NBN there yet ? Cheers Banjo
-
Thanks Dave ! Noted. Don't usually buy seals, as I have had a habit of buying up K Series NOS parts, when I see them on-line cheap; including full gasket sets, which include front & rear crankshaft seals. In this case, I grabbed a seal from my "shelf gasket kit", only to find the 3K/4K seals are several mm wider than the seal for the 5K. I just fitted a new Rollmaster duplex timing chain & sprockets, which I must have purchased 2-3 years ago, for a rainy day. Cheers Banjo
-
Well that good idea, did not work well, as it was too tight in the area I proposed. Finished up making a little additional mod to mount a magnet, that required no drilling or changing the engine, except a hole in the timing chain cover. It worked perfectly, & I now have a reliable & steady sync pulse (1 pulse every 720 degrees of engine rotation). The little magnet mounting plate can be fitted in any one of 10 positions on the sprocket, so that a perfect spot can be assigned. Just got to build a little fixed logic decoder, to get the timing pulses I need for the ECU, so the ECU only has to worry about all the engine sensor inputs & calculations. P.S. The hole in the centre is for a crankcase ventilation inlet, so that filtered air takes a much longer scavenging path, through the engine. You might have noticed that the Hall Effect sensor I used, has a little red LED built into the back of it, which makes it very quick & easy in real life, to ensure that the sensors are producing pulses. Should be good for trouble shooting. Cheers Banjo


-
Thanks Pete, Actually, 90311038022 was the number I had obtained from a Japanese website, but after spending 30 mins at my local Bursons store, with no luck, I was starting to believe I had the wrong part number. Research last night, found that 90311-38022 is a discontinued item, to be replaced by 90311-38053, with same OD & ID, but 7.00mm width, rather than 8.5mm. Then I found that the 90311-38053 was also discontinued, replaced with 90311-38086, with the exact same dimensions as the 90311-38053. So back to Bursons to get a hold of a 90311-38086. To cut a long story short, a supplier was rung, & advised he didn't have the 7.0mm wide seal, but did have 2 off the same seal, but a bit wider, at 8.5mm wide. As that was the original seal I was after, I ordered both of them, & they will be here in the morning. Oh the joys of obtaining olde spare parts ! Thanks for your help. Cheers Banjo
-
Does anyone have the original Toyota P/N, for this seal ? It is slightly narrower than the same seal, fitted to 3K & 4K engines. The OD is 58.0mm, ID is 38.5mm, Width is 8.5mm The 3K & 4K seal is 11mm in width, & cannot be substituted, as they would stick out proud, from the timing chain cover, & possibly rub up against the back of the crankshaft pulley. Cheers Banjo
-
https://www.youtube.com/watch?v=_6x_EGrDook P.S. The only reason Rollaclub being down, didn't make the mainstream media recently, was that some PM got ousted around the same time !
-
Hi Edward, The real question is what do the other 3 off spark plugs look like ? I'd remove all four (4), & clean them all. Then put them back, & drive it as normal, then remove & review again. If it is just no: 1 spark plug, each time, that is "carboning up", it can only be something wrong with no: 1 cylinder, or the control of it. Directly after removing the plugs, whilst the engine is still hot, you need to do a compression test, on each cylinder & record the max reading. If they are all around 150 PSI, and within say 10 PSI of each other, then the bores, rings & valves probably acceptable. If no: 1 cylinder has a low reading, then it could be burnt valves, broken or worn rings, or even a blown head gasket; or heaven forbid, a cracked piston. Alternatively, if all cylinder readings look OK, then it is probably a HT lead between dizzy cap & spark plug no: 1. Hope so, as that is an easy fix. You might want to run the engine in the dark tonight, & have a look under the bonnet, & see if you can see any obvious arcs or glows, around the dizzy leads. Another HV arcing area is down the inside of the dizzy cap. You can sometimes see these in the dark, through the dizzy cap. Really hope it is as simple as replacing a lead or dizzy cap, because if not, then it might just require the head to come off, for a "look see". Best of luck, & let us know how you go, or what you find. Cheers Banjo
-
I got around to fitting the gutted K40 gearbox, & attaching the flywheel ring gear Honda crank Hall Effect sensor in its final position. Was able to run the engine up to 3K - 4K rpm, & view the output of the Honda crank sensor switching perfectly off the flywheel teeth. Currently got the front of the engine off, fitting a new Rollamaster dual timing chain & new sprockets & chain tensioner. The camshaft sprocket will be fitted with a rare earth magnet, to switch a "sync" Hall sensor, that will mount off the back of the timing chain backing plate, near the side/back of the mechanical fuel pump, which will eventually disappear, when the 5K goes full EFI. Also received my Speeduino kit this week, which is already assembled & communicating with the TunerStudio software. i did find a great place to mount the strobe light permanently on the back hump of the gearbox frame. Lines up perfectly with the timing arrow. Soon the fun will begin ! Cheers Banjo


-
Hi Christopher, Glad it all worked out OK in the end ! Would be nice to find out what was the wiring error. If you ever talk to your DR mate again, please find out, what it exactly was, & let us know here. You're welcome ! We all here like a happy ending, & another Rolla keeps on rollin ! Cheers Banjo
-
Yeah ! 1.01 & 1.03. The 3K was screaming. The V8 was hardly raising a sweat. Surprisingly, the 5.665 ltr Rolla had amazing traction. I don't think John Tyson could afford to break it, as I think he drove it to the meet, with wife. The 3K KE20 came on a trailer me thinks. I never get over the enthusiasm of some of these "old racers". One driver, (who was giving it everything on the track), that I was talking to in the pits, told me he was 80 years olde ! Results are now on the Leyburn Sprints website. http://www.leyburnmotorsprints.com.au/ Cheers Banjo
-
Another great Leyburn Sprints. Fantastic weekend, of great fun ! My very favourite was the 73 Rolla of John Tyson, immaculately prepared, & sporting a 5665 cc V8, somehow shoe-horned into into the engine bay, with great precision ! The Shannons Show n Shine was also excellent. This was my standout of the classics. My guess at first sight from a distance, was a very early Alvis. Turned out to be something much rarer. Any guesses ? https://www.tradeuniquecars.com.au/feature-cars/1709/jaguar-ss1-review And how about this pit crew, who travelled & lived in style ! Cheers Banjo


-
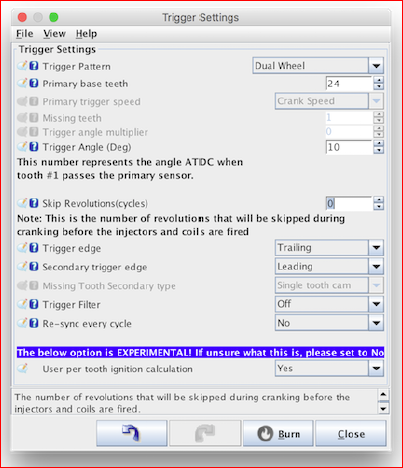
Hi Dave, The problem with using a missing tooth system is, that my teeth are the flywheel ring gear, & I don't think the starter motor pinion, would take too kindly, to all of a sudden encountering 2 off teeth missing. However, the Speeduino system does cater for what I am envisaging, with a trigger system call Dual Wheel, as described below, in the extract from their manual. This allows the Speeduino to simply continuously count the full complement of teeth of the flywheel, & reset it with an external signal from the camshaft line somewhere. Currently, just building a "convertible open top K40 gutted gearbox", so I can run the engine on the test rig, at 3K - 4K rpm, and have a look at the pulses on the CRO again, & be able to strobe the degree wheel on the flywheel. An hours work with a hand held grinder, with a metal cutting disc & grinder ! Cheers Banjo


-
True ! https://www.justcars.com.au/cars-for-sale/search?p=2&make[0]=ford&model[0]=escort Cheers Banjo
-
Bloody hell Pete ! You should put this story down, & get it printed in a paperback. It would become a best seller. I'm trying to think of a suitable title. How about, the car telling the story. How about "My Life as an Escort" . That should get an initial kick off in sales. Actually, talking about paperbacks; I was given a paperback 10 days ago, called The Cockoo's Egg, which is a true story by Clifford Stoll. The paperback was first published in the late 1980s, & recounts how the initial hacking of computers took place in the USA, and how they detected it. Sounds boring I know, but the writing style, & true substance was intriguing, and I couldn't put the book down for about 5-6 hours. Unbelievably good read. Cheers Banjo
-
I had a good weekend experimenting with the Honda crankshaft sensor, on the 5K engine, with the engine rotating. I was delighted to find it worked perfectly, & that my concerns that the teeth on the flywheel ring gear were possibly too close, to effectively prevent the Hall Effect device/sensor from turning off, were not realised. This is the area, where I mounted crankshaft trigger sensor. It is accessible from the underside of the engine. ' The Hall Effect sensor fitted through the engine backing plate, with air gap circled. On the RHS of pic is the Hall Effect sensor & its cable. On the LHS of pic is the remains of a previous experiment, where the radial inserted rare earth magnets, let go after a few months operation. I'm still find little bits of smashed rare earth magnet, attached to various items at the back of the engine ! Before fitting the two (2) rare earth magnets to the flywheel, I used the pilot hole to drill the hole in the engine backing plate so the centre of the magnet & the centre of the Hall Effect sensor lined up perfectly. The flywheel bolts onto the crankshaft in six (6) different positions, (60 deg apart) so you will always be able to find a point suitable for the trigger point position range required for any particular ECU requirements. '' The trigger sensor accessablity from under the rear of the engine. The CRO traces of the ring gear teeth sensor, & flywheel trigger sensor, indicated they were both working well. All these tests were done with the spark plugs removed, & the starter motor used to crank the motor. 12 Volt flywheel ring gear teeth clean square wave pulses. Crankshaft trigger pulses. Next test is the fit the Honda sensor permanently in a cut-out of the bell housing, a little bit higher than its temporary position, so it is easily accessible from within the engine bay, behind the oil filter area. Honda Crankshaft sensor in temporary position for tests. (It's almost like it was physically designed for this K Series engine application ! My design criteria is, that all sensors must be accessible, & easily replaced from the outside of the engine, without any major “removals”. I’ll then refit the bellhousing & rear engine mount, & run the engine at operating revs up to say 3K-4K rpm, and check that the pulsed outputs from both sensors, still remain stable & clean. Only the non critical synch pulse to do now, somewhere off the camshaft train, & I’m then ready to do some tests on an external ecu & ignition system connected to these sensors, but not actually running the engine. Lots of fun, & a good learning experience. The timing & the absolute accuracy & reliability of these sensor signals are critical to whether the ecu works well on not. Doesn’t matter how good the ecu is, if the signals are poor, the results will be less than ideal. What do they say . . . “rubbish in, then rubbish out” Cheers Banjo


