

Banjo
-
Posts
1933 -
Joined
-
Last visited
-
Days Won
95
Content Type
Profiles
Forums
Events
Gallery
Blogs
Everything posted by Banjo
-

Needed 4K water pump pulley (KE55 style)
Banjo replied to billyballer's topic in KExx Corolla Discussion
Hi Pete, I liked the bug eye Sprite, as when you remove the whole front grill/guards/bonnet piece, you have easy access to the engine bay. Cheers Banjo
-
Needed 4K water pump pulley (KE55 style)
Banjo replied to billyballer's topic in KExx Corolla Discussion
Hi Bill, Have compared the pics of your water pump & mounting boss, with my posted ones, & they appear to be different. The water pump shaft on our water pump is 16mm in dia., as is the centre hole of the pulley. The four (4) mounting holes for the pulley are each 31mm apart. C/P to C/P. The distance between the front face of the mounting boss & the centre line of the fan belt is 36.5mm. The pulley, weighs 500g, so packed would be about 1kg. If it it is suitable, let me know, give me your full name & address details, & I will post it over. Cheers Banjo -
Over heating when the cap is on but not when off.
Banjo replied to Jorm's topic in KExx Corolla Discussion
I totally agree with Big G. Take out all four spark plugs & compare colour, and you will probably find one is very clean & white. That will confirm, its time for the head to come off. Cheers Banjo -
Needed 4K water pump pulley (KE55 style)
Banjo replied to billyballer's topic in KExx Corolla Discussion
OK, the gearbox measurement mentioned above is 55cm or 21.5 inches. the water pump snout looks pretty much the same. Here are a few pics. The measurement of the gearbox, mentioned above, on our 4 speed is 55cm, or 21.5 inches approx. Cheers Banjo


-
Needed 4K water pump pulley (KE55 style)
Banjo replied to billyballer's topic in KExx Corolla Discussion
Hi Bill, Thanks for the pics. Gives us a clear idea. The letter after the 4K, never appears in the engine S/N on the block. It is usually on a sticker attached to the side of the rocker cover, just above no: 4 spark plug. From your pics, looks like that sticker has long since gone. I don't know if it is an optical illusion, but it appears that the point the gear stick comes out of the gearbox rear extension, is much further back than normal, for a 4 speed. Have you worked out where it will "appear" on the Healey's floor tunnel ? What is the measurement between the centre point of the gear stick pivot ball, to the front edge of the bell housing mating point to the block ? I'll go & measure a 4 speed box I've got on the garage floor, & post it here. Our 5 speed gearboxes, had the gear stick further back. The water pump pulley I have will fit your pump OK. I'll go & take a pic, & post here with hole dimensions. Can't imagine they would be different in the USA, but you never know. Cheers Banjo . -
Needed 4K water pump pulley (KE55 style)
Banjo replied to billyballer's topic in KExx Corolla Discussion
Hi Bill, Welcome aboard ! Do you have the plastic fan blades already ? Can you post a pic of this "water pump with the wider snout" , so we are not crossing paths here. Plenty of pulleys here, but would hate to send you one & then find it doesn't suit. Do you know what type of 4K engine you have. I'm presuming that it is a 4K-C, where C stands for "California". Lots of 4K-Cs here in Australia, as we adopted the same emissions regulations at the time. Is the transplant very complicated ? Have you got some pics of the 4K sitting in the engine bay ? What gearbox, have you got behind it ? I Googled it, but couldn't find anyone previously on the net that had done a 4K swap. Found someone who did a Toyota 20R motor swap, so I presume if it fits, then the 4K would also. http://autoweek.com/article/car-life/toyota-engined-austin-healey-sprite-will-haunt-me-forever Cheers Banjo -
Hi Keith, Did a bit of research, on suitable fan sizes that would suit the standard KE radiator, but the answer was right under my nose. I bought my daughter a 2004 Echo last year, & I went out and measured it's radiator & fan up this morning, & it is almost perfect. It's outside frame couling/shroud, is within a cm of the KE radiator core dimensions, in both directions. If anyone has utilised an Echo fan on a KE sucessfully, please give me a yell. I will get hold of one, & adapt it, using a spare radiator I have in the shed, then pop it in one weekend. On paper, it should be an easy & clean swap. I'll post a pic on here, when it is done, after which I'll do some temperature data logging exercises, with multiple temp points, to see exactly how well it performs. Cheers Banjo

-
Strangely enough, when I was digging around in all my bits & pieces the other day, looking for the box of old thermostats, I came across an old 3K thermostat cover/spout/outlet thingy, that actually had a hole right in the top of the housing. It was OEM, as the hole had a land around it, not just previously drilled out & threaded, by some enterprising individual. Just went out, & looked for it in the shed, so I could take a pic of it, but it is almost 40 deg C, so retreated to my office. Looked up the net & low & behold, someone in Thailand, is selling aftermarket ones. https://www.ebay.com/itm/THERMOSTAT-HOUSING-FOR-3K-ENGINE-TOYOTA-COROLLA-KE20-KE25-KE26-KE30-KE36-KE38/152473006588?hash=item23801971fc:g:cmoAAOSwax5YyQiY&vxp=mtr Have no idea what was fitted into this hole originally. Probable a temp sensor of some kind. There you are Jeremy. Get one, & fit a little tap or cock to it, & you've got a coolant bleeder, & you won't have to remove & reinstall the thermostat cover ever again. Cheers Banjo

-
Hi Jeremy, There should not be a necessity to do this, if everything is OK. Imagine if the Toyota manual used that instruction, you describe. It would indicate a design fault. Based on the picture of your head that you posted, & what the quality of your local water did, in terms of corrosion, I have a gut feeling, that there is something very wrong inside the coolant system of your engine. You are correct, that the water pump is needed to produce flow in a closed circular coolant system. Based on your statements, my first suspect would be the water pump itself. Have you had it off lately, & had a look inside. I wouldn't be surprised if the vanes on the impellor are all corroded away, & doing little more than cavitating the water in the local area. As you presently have the head off, I'd be removing some whelsh plugs on the block & having a look inside. You might be shocked. With the head off, it would also be a good idea to remove the plate on the very back of the head, which gives access to the head's water jacket. Again, you might be shocked. Cheers Banjo
-
Hi Keith, Will definitely be placing a probe in the back of the head area, as I know from previous tests, a couple of years ago, that water in the very back of the head suffers from poor circulation, & elevated temperatures. With the water pump at the front & the discharge of water through the front, its a case of the water flow taking the "path of least resistance". Cheers Banjo
-
Good One ! Did the threads indicate whether any of the penetration oil got through, or was it complete rusted on ? Cheers Banjo
-
That's exactly what I've always believed the little tear drop valve in the thermostat plate was designed to perform. Very well described, & a thoughtful explanation ! I pulled out a couple of old thermostats in a box on my shelf, from engines I have scavenged on. Here is an old brass one, where you can see the rivet shaped tag hanging through a hole in the valve plate. I don't really understand what the tag thing hanging there does, other than to wiggle around & keep the hole free of debri & build up. It can only function, or do anything, when the coolant is below operating temperature, as normally the valve would be opened either partially or fully. I have always assumed it was to bleed away air bubbles at the top of the head during filling, or allow the water coolant pressures either side of the thermostat to equalise, whist the thermostat is closed. There was another old thermostat in my box, that didn't have the tear drop thing in the hole in the valve plate, at all. As you can see, some enterprising person, has created there own bypass holes around the edge. If I have completely drained my cooling system, & refilled, I always let the car idle for 20 minutes with the radiator cap off, until any air is out of the system, then put the cap on, as the coolant starts to flow over the top of the cap neck. If you want to be really pandantic, you can run the front wheels up on some ramps, to ensure the radiator cap & front of the engine are at their highest. The biggest problem I have seen on Rollas, is leaks or cracks in the rubber or plastic pipe, between the top of the radiator, & the coolant over flow bottle. What happens then, is that the excess expanded coolant is forced into the overflow bottle OK, but when the engine cools overnight, the coolant in the overflow bottle does not all get sucked back into the radiator, as there are air leaks in the hose or connections between radiator & overflow bottle. If you look in your overflow bottle when the engine is cold, & find the coolant level higher than normal, then that is probably the cause. Thanks for the suggestions regarding suitable thermofans. I agree that the ideal situation, is to use the thermostat, to do it's job, of getting the engine temperature up to design levels, as quickly as possible, & set the thermofan switch a bit higher than the thermostat point, below which it starts to close. eg: If thermostat starting opening & closing temps are 80 & 90 deg C, then the thermofan switch should be set 5-8 deg C higher, at something like 95 deg C. Once I get it set up, a couple of weeks with the multi-channel temperature data logger probes at various points, should allow me to fine tune it perfectly. I'll put the results up here, for anyone who has an interest in this subject. Cheers Banjo


-
Hi Keith, So not wanting to "reinvent the wheel", what aftermarket, or other vehicle's thermofans, are suitable for bolting onto the back of a standard KE3X - KE5X radiator, with a stroud ? I don't really mind whether it is one big one, or two smaller ones side by side. Had a quick look on here, & generally Googling the net, but couldn't find any images of a conversion on a Rolla. Once you take the plastic fan blades off the water pump pulley, there is a heap of room, between the back of the radiator core & the front of the engine. Alternatively, it will be off to the wreckers, with a tape measure, to see what fits the best. Any suggestions, greatly appreciated. Cheers Banjo P.S. Just after posting this, I came across your thread, using a Mazda 121 thermofan. https://www.rollaclub.com/board/topic/68673-how-to-fit-an-electric-fan/ Would you still recommend that one ? As I've already got a solid metal stroud that bolts onto the radiator frame, I was thinking of just getting an electric fan with same diameter as the stroud opening round hole, & adapt the mountings to the metal stroud, which should be strong enough. What do you think ?
-
Hi James, Interested to know whether you were able to get that "pesky" broken front head bolt out, & how you did it. Cheers Banjo
-
I blew the picture of the head up, & rotated it 180 deg. The first number is definitely a 1. The second number is much harder to deduce, but 8 is probably a good guess. Yes, so maybe it is a no: 18 head. There is a no: 16 listed in the WiKi, but not an 18. Maybe it is a 16 ?
-
Hi Jeremy, I can assure you the probes were calibrated at 100 deg C, and are accurate. I can assure you the thermostat is within spec. & opens between 80-85 deg C. The "wiggly" temp line around 70 deg C, for 30 minutes, is not the thermostat opening & closing. This sort of test, is best done on a long hard run, in the country. This particular 1 hour trip was in the city & suburbs. That means, you are constantly stopping & starting at traffic lights. Every time you stop, the ram effect of air through the radiator stops, & you are left with the air drawn through by the fan only. The temperature always rises, then drops again, after you get moving again. That's what is causing the wiggly line. I've previously used an external O/S sensor in front of the grill, to clearly show, when the car has stopped, & it always aligns, as I describe. The problem with fixed fans like our Rollas, is that the fan is going all the time the engine is running, whether it is needed or not. A thermofan, only switches on, when needed, & would result in the temperature getting to optimum operating temperature more quickly, & stop sapping of power unnecessarily from the engine. That's the way I'm going ! Cheers Banjo
-
Hi Graeme, Did you get that pesky coolant hose sorted OK ? Cheers Banjo
-
Hi Dave, Any decent data logging software these days, allows you to create additional graphing lines, that are parameters, not directly measured, but are functions of the parameters that are measured. DeltaT = T1 - T2, or common arithmetic ones like Power = Amps x Volts Here is a section of the graph above, showing Delta T, for the temperatures at each extreme of the coolant system. They say, "what gets measured, gets managed", or "without data, it's just a matter of opinion". Once you see data graphically, you see all little things that actually do happen, but are unseen generally. eg: Where the journey ends, on the red trace of top engine coolant temperature, the temperature actually rises, after you turn the engine off, whereas, the bottom radiator hose water temperature just falls away, immediately. Logical, when you think about it, but that is why cars with turbos & thermostatic coolant fans, "run on" after the engine is switched off. You walk through a shopping centre car park, on a hot day, and you can tell the cars that have recently been vacated; all sitting there, with electric fans purring away. Cheers Banjo

-
Hi Andrew, Sam over at SQ Engineering, might be able to assist you. Loves his Toyotas, & has vast experience with mods. on olde skool Toyotas. Genuine great guy. Sam-Q SQ Engineering 0421 010 890 You can also contact Sam on their website at http://www.sq-engineering.com/ Cheers Banjo
-
Hi Jeremy, I know you live a bit closer to the equator that we do, and it is probably on average hotter where you are, than what we experience, here in Australia. However, it is quite possible for the thermostat to not open at all, if the temperature of the coolant, doesn't reach the cracking open preset temperature of the thermostat. Generally, thermostats made by all the major manufactures, start to open somewhere between 80-84 deg C, & are fully open by about 95 deg C. Over this temperature range, the thermostat opens usually 8-10mm. You can pop a thermostat in one of your lady's saucepans, on a gas stove, (a practise my wife always frowns on) & watch this clearly. A thermostat is not an on/off device. It will open proportionally, dependent, on the temperature. So if it starts to open at 80 deg C, & is fully open at 95 deg C, (15 deg C spread) if you held the temperature at 87.5 deg C, then theoretically, it should hold at half open. Thermostats do not usually fully cut off all water flow. Most engines, including your 4K, have thermostat bypass circuits, where a nominal amount of flow occurs all the time. Toyota Yellow Workshop K Series "Bible" Page 5-2 Even the thermostat you use, will have a little hole in it, to allow water to flow a little, & stabilise pressure across the thermostat itself. There is no rubber sealing point on a thermostat. It is a simple metal to metal immersed thermostic controlled water flow valve. There are other ways of cooling the engine coolant, besides the radiator. Airflow over the block, despite it having just removed some heat from the radiator fins, is still much cooler than the coolant & block temperature. In very cold climates, where it is difficult to get engine & coolant temperature up to ideal operating temperatures, they block off the radiators all together, during winter, so that the thermostat can open up, & water flow increase. Many big diesel tracks, have grills in front of the radiator, that are actually louvres/shutters, that open & close, manually, or under thermostatic control, to reduce airflow. In winter in some very cold countries, it is common, to add electrical heaters inside the car, as turning on the heater, & "pinching" some of the engines heat, to heat the cabin up, is very detrimental to the engines performance. Most cabin heater water, never passes through the thermostat, because the take off point is behind the thermostat. The first 15-20 minutes of driving a car, is the period when it is most inefficient. Most wear in your car's engine, occurs in the first 2 minutes of driving, after starting the car from a cold start. That's why taxis used on shift work, which barely stop all day, get such extremely high kilometers out of their engines. Sorry to be so verbose, but to answer your query, the engine will not get "hotter & hotter", because as soon as it reaches 80-84 deg C, the thermostat will open, more water will flow through the radiator, & the coolant temperature will stabilise, or ideally maintain a temperature below boiling point of the coolant. Cheers Banjo


-
You may well be right, that Toyota never produced a true flat top piston, and that the flat top piston, Cameron referred to in the WiKi note above, is actually the shallow circle dished type. Here's a picture Altezzaclub posted once, showing them side by side. However, that's not to say, that true flat top 5K pistons do not exist at all. A quick Google/images, indicates, aftermarket 5K pistons out of China, with all manner of piston top designs. The 5K engine I have acquired with this head ID no: 95, has shallow circle pistons, like the one depicted on the RHS above. However, at first glance with the build up of carbon on top of the my pistons, you'd excuse someone who suggested it was flat. I've actually got a set of brand new 5K deep dished, 40 thou oversized pistons, in a box on the shelf, that I picked up on-line, a couple of years ago. Might use them soon. I was surprised to find this 5K engine still had hydraulic lifters. I would have thought, that if used for speedway, that they might have converted them to solid. However, I've heard guys on Rollaclub, say, with hydraulic lifters they've run their 4K & 5Ks up to 8000 rpm, & never experienced pump up, in the lifters. Cheers Banjo


-
We've had a spot of very hot weather in the past week or so, so I thought it might be a good idea to check the health of the cooling system. I have two (2) coolant temperature sensors fitted to the engine. One is in a spare spot, in the thermostat housing, directly under the thermostat, which is the point in the engine, where the coolant is hottest, & controls the thermostat opening. The other is in the lower hose, where the coolant should be at lowest temperature after passing down through the radiator. The difference between these temperatures, indicates the efficiency of the radiator. By logging both temperatures, you can see everything changing. You can see the max temp is about 88 deg, which is when the thermostat opens, & the temperature drops. The difference between the readings, is the cooling effect of the radiator. These were short runs, so the wiggly bits at the top of the graph, could well be stopping at traffic lights. When you do a long run in the country, the wiggly bits are the thermostat opening & closing. Look how long it takes the block to cool down, even over night. I forgot to hook up an ambient temperature sensor, so you can relate these temperatures to the prevailing O/S air temps at the time. Next time ! Here is a shorter/zoomed section of the above graph, depicting just one early morning trip to the city, to drop my daughter off to work. Note that the coolant temp, only once reached 80 deg C, so it it is probable that the thermostat never really opened, because it was just after dawn. The lower temperature (blue), is a result of the ram effect of the air through the radiator. This is where a thermofan can assist, as the fan would be off, unless the temperature exceeded say 90 deg C. I am considering fitting a thermofan, as the engine is then not driving the fan constantly, and sucking a couple of HP, that could be better spent, going to the wheels. Cheers Banjo


-
I just had a quick look around my garage, at a few heads I have here, to see what head numbers are on them. Stock standard 4K-c, which was one of my early engines, that only came out, because it was emitting a bit too much smoke. Has ID no: 3. 4K engine which I've never had the head off. Has ID no: 59. Hmm ! This number does not appear in the WiKi, but all numbers starting with 24010, appear to be big port 3K heads, so might be very useful. This head also has the big round Welsh plug / bung, in the back of the head, which I believe is a signature feature of a "big port" head. Someone gave me this engine, which had a spun big end bearing, & had been left outside to rust. I think the engine had been done up before failure, so it was in fairly good condition, other than the crank journal issue. Block is currently being turned into a coffee table for my "man cave" (one day), with a glass top. Ah La Top Gear ! Here is another one I found, with no: 5 ID number, which is a stock 3K head. This next one, has ID no: 20, indicating a 4K head. So basically, out of all the 8 off heads floating around here, I can identify all, except this no: 95, which I will hopefully get to the bottom of. Cheers Banjo


-
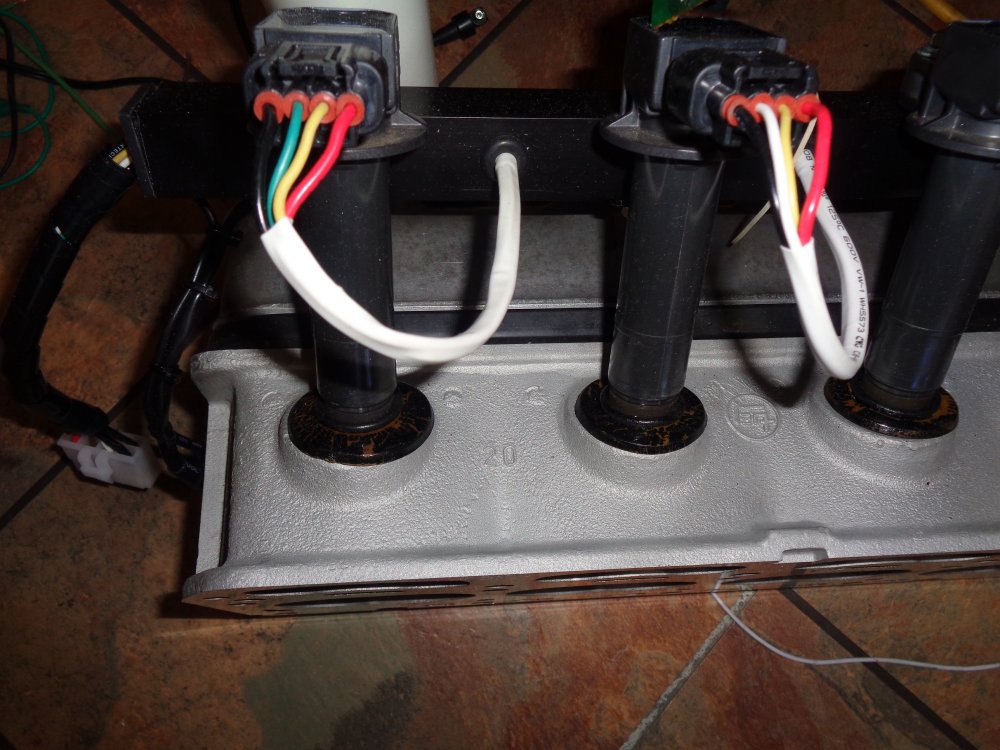
Hi Jeremy, The 5K heads do have a "lug" under the edge of the no: 1 & no: 4 spark plug recesses. This particular head, which is on a 5K, I am about to fit my experimental COP conversion,, has head identification no: 24. This number does appear in the Rollaclub WiKi. According to the WiKi, a head with number 24, should not have lugs under 1 & 4 spark plugs. Not sure whether this is a misprint, as the pic above definitely depicts lugs & no: 24. There were apparently 5Ks produced from the factory with dished pistons, & some with flat top pistons. Haven't had the head off this engine yet to see what it has got. Probably could pull a spark plug out, bring the piston to the top of the bore, & put an bright individual LED, soldered to two thin wires, down the hole, to throw some light on the subject. (no pun intended) P.S. So I'm not sure whether all 5K heads had the lug under no: 1 & no: 4 spark plugs, or whether there are 5K heads floating around, without the lugs in the casting. Maybe someone on this forum, can confirm this piece of info. Cheers Banjo


-
Hi Jeremy, I gather you are referring to these clearances ? The 3K & 4k engines shared the same cylinder bore diameter of 75mm. That's why heads could be so easily swapped between them. The 5K bore was 5.5mm greater in diameter, at 80.5mm. There was enough area there to fit 3K & 4K heads, to a 5K block, as long as there was not deteriation of the water jacket openings in the head, like yours, which had corroded almost under the area where the cylinder edge seal is, on the head gasket. Funny, I checked my 4K-U with dished pistons tonight, & the head on it, has identification no: 12. That number doesn't appear in the Wiki listings, either. Cheers Banjo


