

Banjo
Regular Member
-
Joined
-
Last visited
Everything posted by Banjo
-
Hi Jeremy, I read your post an hour ago, but have just stopped laughing long enough to respond, after reading the reference to the "4K Powered Mars Rover". Been there done that ! Not Mars, but in outback NSW (dirt roads), with a very sick engine, on the second day of a 10 day excursion. Low oil pressure; Summer; But worse than that, was the tick, tick, tick, tick, of a big end on the way out. Filled it up with the thickest oil I could get hold of, & finished the trip (3000 klms), & got the car back to Sydney. I remember contemplating what you are presently, & asking myself the same questions. What worked for me, was to drive which ever, which way, to put the lowest load on the engine. That meant lower speeds & light on the pedal on flat long straight roads, & revs & lower gears to lighten the load, when there was a hill. Lightly loaded engines don't run as hot. Never used one of those oil additive products, that increase the viscosity. Sounds good. Assembled an engine wet once, with a oil made up of 50% engine oil, & 50% molybdenum disulfide. Rubbed it into the bores, and all bearing surfaces. Worked a treat ! The MDS is very dark in colour, & 10 years later I dissembled the engine, & was washing the bearing shells & bore with a mixture of kero & petrol, & the cleaning fluid was going very dark, very quickly, until I realised the MDS was being flushed out of the grains of the metal. Cheers Banjo
-
Nice work place ! Wish I had that much room around my Rolla, under cover, to work on it. You've even got a lounge there in the background to sit on, when you need a break ? Cleaning back the underside for painting, can be a happy, or unhappy time, depending on what you find, when you strip away, back to bare metal, after 40+ years. Good luck ! Banjo
-
Is your KE35 a manual or auto gearbox ? The consoles are a bit different. Heaps of them here in Aussie. Off memory, there are only two basic colours. Black or Beige. They are bulky but quite light, so maybe posting one over to you in Portugal could be a better option, & give you more time to get on with other things. Have you had the engine running as yet ? Cheers Banjo
-
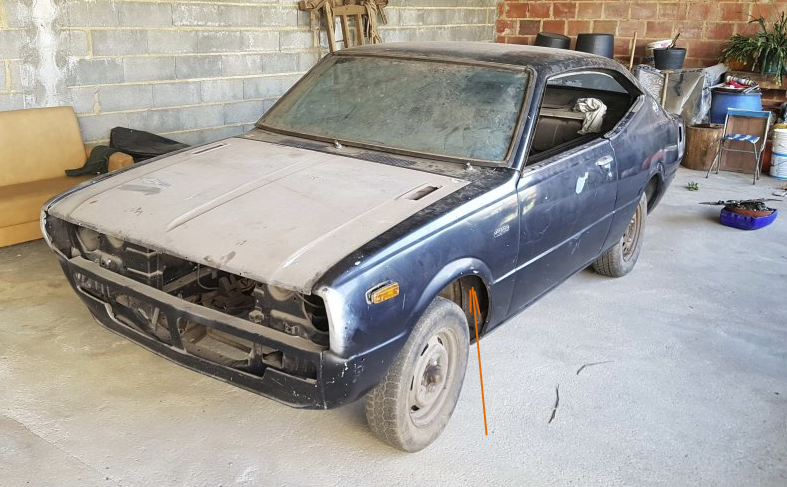
Rear of front mudguard, splash shield. Nice car ! Great starting point to have a basically rust free shell. Good luck ! where are you located ? Cheers Banjo
-
I've followed these guys from the start, & "the ride/s" has been quite amazing. Don't know whether you have ever watched this video, but there is another side to these guys. This one involves a Corolla, so check it out ! https://www.youtube.com/watch?v=Z7-ZTTqMW6M Brings a tear to my eyes, every time I watch it. Cheers Banjo
-
Not quite motor sport, but some could argue ? You've got to watch this video, from SCA, & our two friends Marty & Moog, from Mighty Car Mods. Watched it, & recognised the setting, as it's a road I use it quite often, as a short cut/scenic drive from Beaudesert to Grafton, via the Lyons/Lions Road just north of Kyogle in NSW. https://www.youtube.com/watch?v=1JPm23WpjqY&utm_source=edm&utm_medium=email&utm_campaign=MF_SCA01_2019_WK15_SW Cheers Banjo
-
Hi Rob, I first laid eyes on this particular little Morrie Minor tow truck, at the All British Car show in Sydney, back in September 2016, which is amazing. Nearly 2000 cars ! As I was looking at it again, in Queanbeyan, a Japanese man came up, & was looking at it. He asked me what it was for. I said for towing a broken down car. He was quite bewildered as to how it lifted a car with a hook. He thought all cars were put on tilt trays, or had clamps that went around the front wheels. I pointed out, that this is how it used to be done. He looked carefully at the capstan, & asked where is the motor. It had none, as it is hand wound, with a crank handle from the outside, which pokes through the hole "indicated" in the pic. below. I mimed how it was done, & he walked away laughing & shaking his head. Cheers Banjo

-
That's brilliant, but also daunting, when you consider how much time is involved. https://www.youtube.com/watch?reload=9&v=QBXT1sHP92w However, a simple engine swap, is not as big a job, as our two friends at Binky project undertook, with a "complete" electrics swap. An engine swap project can go very sour, if the electrics are wired in roughly, besides not looking professional. Unreliability is the result, & your NRMA or RACQ roadside man is not going to be a great help, if your car won't go, on the side of the road, in the middle of nowhere. Having done several wiring harnesses, where I have made them up from scratch, the secret is to do one bit at a time, & don't rush it. One of the big advantages of making up your own harness is, that you can increase the size of the wiring used, which reduces voltage drops in the system. Cheers Banjo
-
I can't believe a reputable company like Permatex would allow a video like that to get through. That is terrible ! Looks like they gave the instructions to a video marketing company, who didn't have a clue. The oil pump reassemble is incredible. I've never heard of putting a gasket on an oil pump. I've never ever done so, on any K series oil pump, I've reassembled. Here's a better video, although, I still believe he is a bit heavy handed, with the silicone. https://www.youtube.com/watch?v=UXN4FqQH-xM Thanks for your thoughts. I'll go get something generic this afternoon, & let you know how I go. Cheers Banjo
-
Had my 5K sump off at the weekend, so I could refit the timing chain cover, after fitting a dual timing chain. The sump gasket seal had no leaks at all. When I removed the sump & gasket, I noticed that the previous mechanic, who had replaced the sump & gasket, had used three little parallel narrow beads, of what looked like a "bright orange silicone sealant" on both sided of the one piece gasket. I was impressed how well the seal had worked ! I've never been a great fan of silicone sealants, as I've heard & read so many bad/sad stories of users, over doing the application of the silicone. When the two (2) surfaces are brought together, the sealant "squishes" out on both sides of the gasket. Any excess on the outside, can be easily wiped off, but the excess on the inside, can bead & drop off, over time, into the sump, & block off oil pump pickups, or worst still, get caught in oil ways, & starve the bearings. This is more common with "make a gasket" RTV (Room Temperature Vulcanising) sealants, where the sealant, is the gasket, so users become over generous with the sealant. Now most of the automotive silicone sealants are marked as, Make A Gasket. In my case I'm using a new sump gasket out a Permaseal gasket kit. It looks & feels like a rubber one, but I suspect it is made of a composite material, as it stretches a bit more than a pure rubber one. So what is the best silicone sealant I can use, to replicate three narrow beads of sealant on both sides of the gasket ? Can the "Make A Gasket" sealants also be used as a seal to the gasket, or do they have a different composition, because they are used as the gasket? I've always been an aviation gasket adhesive user, for a long time, & have never suffered an engine oil or water leak, but I will admit, it's a real pain cleaning off the old aviation goo sealant, before putting something back together, so I'm prepared to give my sump gasket the silicon seal treatment, so would like to hear other forum users thoughts & experience. Cheers Banjo
-
Love you work ! Always attention to detail. Never apologise about the use of zip ties. I never go anywhere without a resealable plastic bag, with a selection of different lengths therein. In the glove-box, in my briefcase, in my tool box. One of the most useful everyday inventions ever made. I recently was given a packet of special wide heavy duty ones for water hoses on automotive engines. I've used them on one engine. One size fits all size hoses ! Just zip it up & cut off the excess. I believe they are using them on the latest model Volvo cars as standard. Cheers Banjo
-
Thanks ! Is this the one ? They are under $ 100 on ebay, so if I need one permanently, & it is quieeeet, it might be the go,. Cheers Banjo

-
Drove a Toyota Echo from Brisbane down to Canberra at the end of the week, for my son, & spent the weekend in Canberra. The Victorian Morris Minor Car Club, had a rally, up & back from Melbourne, with the weekend in Canberra. Came across this beautiful collection, on show last Saturday, in a Queanbeyan park. https://1drv.ms/f/s!AhTw-QJW1b_6j0-3qwSBFTBR2OZ9 Enjoy ! Cheers Banjo
-
Tah All ! It's only for an experiment, so $ 16.00 incl. free postage, won't break the bank. Not too worried about the noise, but have noted the suggestion of an "isolated" mounting. How do they work ? Are they some sort of rotary type ? Looks like an electrical transformer ! My only experiences with electric fuel pumps, are with those early SU tick, tick, tick, ones, with a diaphram, that slowed down to a very slow tick, when you were idling. Cheers Banjo
-
Well it's the weekend, & I've some time to work on programming the crankshaft positional sensors, I've installed, to create a sequential ignition system, which is totally independent from the ecu, which does all the engine performance "timing calculations". So far, the results are exceeding my expectations, & electronically, it is not that difficult. I'm seriously thinking of implementing another form of "synchronisation sensor", rather than the Hall Effect sensor, I've detailed above, that is fitted to the camshaft timing chain sprocket. Don't get me wrong, the timing chain sprocket sensor works very well, but is time consuming & a bit difficult to implement. Because the synch signal has to produce a pulse once every two revolutions of the crankshaft, it must be produced from the camshaft timing. The easiest way is to simply use the existing dizzy points, or with an optical/Hall Effect sensor fitted therein. However, this project is about getting rid of the dizzy totally, so that's not my option. The other point on the camshaft, where a signal could be obtained is the fuel pump's eccentric "operating lobe", on the camshaft. This could be a very easy modification, if it works. Remove fuel pump. Make little plate to cover hole in the block. Drill hole in plate. Fit Hall Effect sensor that will detect the tip of the eccentric lobe. Hey presto ! Now I haven't got a fuel pump, so my idea is to just fit an electric one, so I can see on the road, in real-time, how reliable a signal would be from this source. What type & brand, of electric fuel pumps have Rollaclub members fitted, that have proved reliable ? Of those of you who have had fitted an electric pump; did you fit it in the engine bay, or down in the boot somewhere, so the whole fuel line from rear end to carby is under pressure, rather than suction ? Very interested to hear anyone's thoughts on electric fuel pumps fitted to N.A. Rollas. Cheers Banjo
-
Luv it ! Actually I've got a spare Corolla "honeycomb" grill in the shed, I could do that with. A great idea might be to suspend it from the ceiling, rather that mount it on the wall ? You might have just started something here ! Cheers Banjo
-
Hi Austin, Luv it ! "The Rolla Room" I tried to build one of them inside my house, in the family room, but not so much to work in, but to relax in. Even built a 3K Coffee Table, and planned on hanging a few olde head gaskets & things on the wall, as "art woks" to give it the right feel. Unfortunately, my wife, (who loves Rollas) deemed that a line crossed too far, & the coffee table now sits forlorn in the corner of my garage. P.S. Actually, she is interstate at the moment, visiting our son for a week, & will be back on Sunday. I might just sneak the coffee table in, & see what reaction I get when she gets home ? Cheers Banjo
-
-
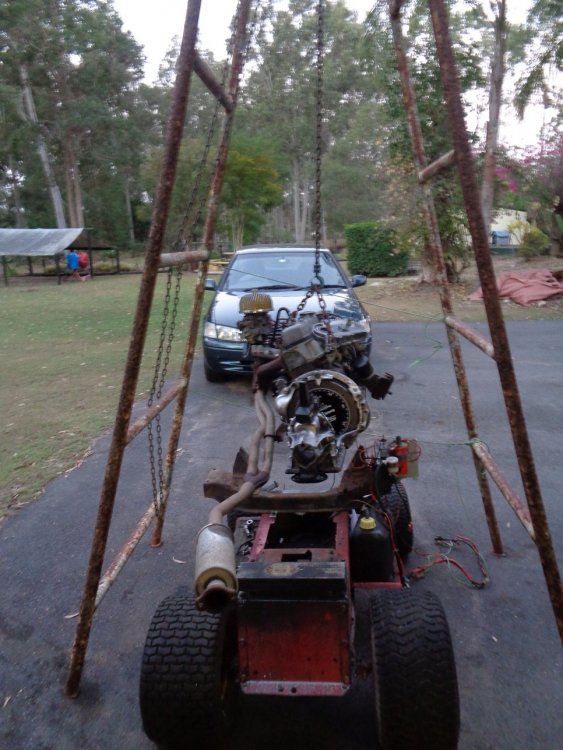
Whilst working on my distributorless 5K project recently, I needed to remove the front timing chain cover, from the engine, to gain access to the camshaft sprocket, to fit a rare earth magnet & Hall Effect sensor. The engine was on the test bed, & I didn’t want to remove the sump, so thought I’d just take the cover off, as I’ve done it previously on a 4K, whilst it was in the car. As it was on the test frame, with easy access, I thought it would not present any issues. I was wrong ! This particular 5K engine had studs for all sump attachment points, including the four (4) off studs (2 each side), on the bottom of the timing chain cover. I’d run into this problem previously, but 2 off 6mm nuts tightened back to back, on the bottom of the stud, soon had all four studs unscrewing outwards. However, the stud would not come out completely, as they had a little raise edge in the middle, to act as a stop, so the length of stud protruding from the block sump flange, or timing chain cover, is uniform. This little raised section would not pass through the holes in the sump flange. Not to be “snookered”, I inserted a hacksaw blade between sump flange & sump gasket, & cut them off, just above the little raised section, without damaging gasket or flanges. Bingo, I was now able to carefully prise out the cover, without damaging the sump gasket, which I intended to reuse. Whilst I was fitting the sensor, & magnet, I decided to upgrade the timing chain sprockets & chain to a new Rollmaster one, I had on the shelf. I also replaced the chain tensioner & chain guide. Fast forward a few days, & I’m ready to replace the timing chain cover. I did a trial run, before applying gasket goo, (always a good idea), only to find, that the timing chain cover would not go on, without damaging the sump gasket. Close inspection, revealed that the addition of the dual sprockets & chain, prevented the cover from being lined up properly, as the sump was in the way. I’d not had this problem, previously, on my 4K-U, in the car. The reason, is that the 3K motors were produced with dual chain camshaft drives, whereas the 4K & 5K models reverted to a single chain drive. I spent 30 minutes trying every which way to get the cover on, only to come to the conclusion, that the sump, just had to come off. Luckily, It was not too great an effort to disconnect all wires & hoses to the engine, & just lift it up off the test bed, so that I could remove the sump, as if the engine was in the car, & the car was up on a hoist, (which I have not got). So we live & learn, but I thought I might just pop this on here, in case anyone else gets caught, like I did. Cheers Banjo



-
Love a happy ending ! Good work Edward. Cheers Banjo
-
Hi Austin, Glad it all went so sweet, & that we could be of assistance. Hope your relationship from here on in, with both Rollas, will be a very happy one ! Cheers Banjo
-
Hi Austin, i had to look up where Burekup was on the map, just north east of Bundury. Now if you were a good Dad, you'd build your kid a minature Toyota, like this Australian Dad did. You'd never get the smile off his face ! https://www.autoevolution.com/news/australian-dad-builds-miniature-toyota-land-cruiser-for-his-son-84289.html Cheers Banjo

-
Nice story ! Looks like a great start, & lots of fun coming up ! Keep us updated with your progress. Looks like another future budding Rollaclub member there, in your first pic ? Suggest you edit your profile to indicate where in Oz you are located. You just never know, there maybe someone on here, who is close to you, who could assist, if necessary. I've got 3-4 others members close to me, that call around sometimes for a chatter, or support for each other. Collectively, we've all got a lot of spare parts ! Cheers Banjo
-
-
Hi Ausgoss & welcome aboard ! Very good advice above, from Pete & Graeme. When an engine has been sitting for a long time, it is completely dry inside. ie: the oil, if any, has drained all the way back to the sump. Cylinder walls are particularly dry, & those first turn overs, can cause damage, as you would expect. After taking out the plugs, as Pete has suggested, I would be putting a couple of teaspoons on "light oil" down each spark plug hole, & leave sit for 5 mins. It the pistons are flat top, the oil will run over the edge of the piston, & down to the top ring, and will provide some lubrication during those first critical starting attempts. Sewing machine oil is very light, but ordinary engine oil will work also, particularly, if you warm it up a bit. Once you have the engine started, & it is up to temperature, I would then shutdown, & immediately drain the sump; fit new oil filter, & then start it up again to get "fresh" lubricant, right through the system. Have fun, but let us know if you have any questions or queries. Cheers Banjo


