

CorollaNut68
Regular Member
-
Joined
-
Last visited
Everything posted by CorollaNut68
-
ahhh...I have a problem with the wire to the solenoid burning by the exhaust heat and coming off but then have NO start...I may be rigging a heat shield in there between the starter and the downpipe when I rebuild it soon. If it's a black plastic box relay I bet it melted and shorted inside...did it (starter) stop by taking the key out or did you have to unhook the battery?
-
Doh!...that does look better than mine...I hadn't even looked around for one..but creating a new file would also be like another restoration project for me...without the grease and bloody knuckles this time. After the car is all new and shiny I'll give it a shiny new manual for it's next 50 years. And being the poor cheap sunny beach that I am, I bet I can print 20 pages black and white and one full color page cheaper than $20.
-
I've just had the thought to scan, clean up, and reprint my owners manual. It's getting in pretty bad shape and has some scrawling on it from back when it's rarity wasn't appreciated. I will have to hunt up a scanner, I haven't had one in quite some time and they need to be really good captures. I have Photoshop and CorelDraw so I can set up a file for a print shop to use. Most should be able to use a Corel file even though my version is old, I'll do several different types. Two pages will fit a standard sheet, your 'standard' may be different, ours is 8 1/2 x 11 inches. The book is 8 1/4 x 5 1/8. I'd have two covers so might as well print two whole books. Does anyone think there would be any issues with reprinting? It's 50 years old, would Toyota or a print shop have a problem? It's for the old puppies, I think '66-'68 since they added the 1200 after that...so probably not that many need one and I don't know if the same one was used down there, if so I'll post the file here, anyone who wanted one could download the file and print their own. Once cut it just staples in the center and folds. The cover is thicker gloss paper/card stock with a kind of pebble grain to it. The pages are matte and a bit thicker than notebook paper. There are a couple of places where they actually just glued new type in instead of reprinting, one illustration done like this is missing so it won't be perfect but will look good in the glove box. Also I have never seen one of those original roof racks from the options list, I think one of those would be cool, may have to recreate one, I like the wood slats. I've done my Instrument cluster and other dash pieces in teak and working on a wood and vinyl design for the door panels.....it'll be as luxurious as a Rolls...haha...a Rolls Canardly....rolls down one hill ...canardly make it up the next. Fresh off the assembly line. If you want one be patient...I have little spare time, it will take a lot of work to clean up the photos but it will be done.


-
Just sit back for minute, have a smoke....... The Corolla is only doing this because you have that 'other' car and have been paying more attention to it. You should never make any disparaging remarks (or mention selling it) in the presence of your Corolla. Now you'll have to go out there and make nice with it, stroke it's fenders, maybe put a little air in the tires, tell it what a good car it is. Maybe read it a bedtime story out of the repair manual. Was it actually the starter, or the key sticking? I've never had one stay on unless the ignition switch was sticking. Tiny shot of WD40 or something in the keyhole? I've been through several of the cheesy (all I can find) aftermarket switches. They fit in the dash where they should but don't have the best mechanism.
-
Now I feel bad, I got mine done for free. It split the seam across the whole top endcap while doing about 95mph on the freeway (racing a Volvo...lol) I bet it looked cool from a distance, I couldn't see a damn thing. The parts stores couldn't get them anymore, the auto radiator shops said it was 'too old' and wouldn't guarantee anything (I looked around, they did messy work anyway. I took it to this guy I found, He works on humongous radiators (20ft tall or more, some of them ) from giant cranes and earth movers, I thought it wouldn't hurt to ask...he saw mine and laughed Did an excellent job on it, Threw it in his tank while we talked and smoked...(he has to have at least a 10 million insurance policy or bond for the stuff he works on).....took it completely apart, cleaned and re-soldered everything like new, hell, better than new ever was.... while I stood there watching and then wouldn't take any money.
-
Yup, take it to a shop and have it cleaned, I'm not running anything fancy but we do have 100f summers...it will climb a bit if stuck in traffic but my problem is getting heat in the winter. Rather than changing the 180 thermostat I just use a piece of cardboard to partially block the radiator...when it's 30f If I don't block it it wont get above 160f.
-
I hope you park while sorting it out, if you've only got about half the splines gripping. I had an aftermarket wheel lose it's splines, while driving...not fun, wasn't going fast and managed to stop. Pulled it off and got back home with my big visegrip pliers locked on the shaft ( which is a totally weird feeling with no wheel in front of you). Back to the original. There is quite a bit of force generated there to turn that shaft, which is why they have those huge steering wheels without power steering. It's a bad picture but you can see where it too only gripped about halfway on the splines.

-
Another random thought, I just came across a set of Konig 15x7 rims with the 4x110 bolt pattern $475 for the set...hmmm with 175/50-15's they would be virtually the same size as the 185/60-13....they would be taller by 0.7% and actually narrower by 5.4%........+0.45 mph @ 65 mph on the speedo (shows 65 real speed 65.45) Probably make my already harsh ride worse with less sidewall

-
There's certain ones that got popular enough that you can build a whole car out of a catalog if you have a frame to start with...original Bugs, Datsun Z's, Spitfires, MG's...the poor little Corolla never made that list. Before the innerweb it was nearly impossible, hunting every junkyard and field in the state for stuff that might still work. I still have to do a lot of hunting, I found a front windshield but they want $800. RockAuto.com has had a lot of the mechanical stuff. You guys have a lot of the know how and good advice which I appreciate but access to a lot more stuff. I can take your ideas sometimes and work them around what I have. Sometimes I just have to make things up. My throttle linkage is now a piece of thick coathanger wire bent to proper shape, still snaps on and off like normal, using a roller from a sliding door, I made a new piece for the bell crank behind the gas pedal, the roller gets worn and makes the pedal hard to push (the car itself probably has at least a million miles on it...I've put 755,000 on it myself and it was 20 years old when I got it. I've done the engine a few different ways and been through several transmissions and regular maintenance stuff but the rest of it ...is very old.
-
I like the 18R but yeah it would be a headache to swap on a budget. I haven't thought about an 18R in quite some time...They are some tuff lil motors....My buddy back in high school had a '74 Celica with an 18R and the 3 speed auto, we were racing a 6.6ltr Trans AM and a Chevy truck one day, doing 120 mph or better at times, we went a good 50 miles without seeing a cop...the 2 V8 powered cars were not outrunning us. What's so special about that you may ask...(go ahead, ask)...I'll tell you. He had a hitch on his Celica and we just happened to be pulling a 6" trailer with a big (too big) load of firewood...and this is with other traffic on the freeway, not really wide open road, lots of maneuvering for positions (hey, we were indestructible 18 year olds) He later converted it to a 302 Boss V8 /C4 auto mated to the original diff....it was what I can only call "a stupid fun tire eating machine"...it went down a steep embankment avoiding an old woman and kind of got folded in half.
-
Brand new, not rebuilt. A few minor differences, fittings and walls are thicker, we'll see how it works in a couple of days. I got this from ClassicGarage.com out of New York State. Gotta blow out the lines on the car and get the &^%#&$#^%$#&%^# stuck bleeder screw out of the rear left wheel cylinder. Then I have new rotors and calipers and new drums and shoes, kits for the cylinders. Could not find new original drums, I'm using I think they are '71 (KE20?). The brake surface is wider because it doesn't taper in like the 10's I took them to a tool making shop and they stuck em on their lathe for me. You have to bore out the center hole and shave the inner face a bit. After the hole is bored you can set it on the hub and see how much needs to come off the face to sit flush, it's only about a sixteenth of an inch, they are about twice the thickness of the 10's drums so the bit shaved shouldn't be a problem...if I die I'll let you know, I've been driving with them for the last 2 weeks...(well you don't HAVE to shave the face but the shoe will ride right to the edge if you don't.)


-
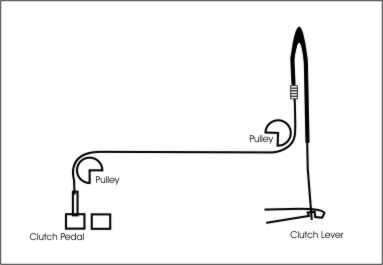
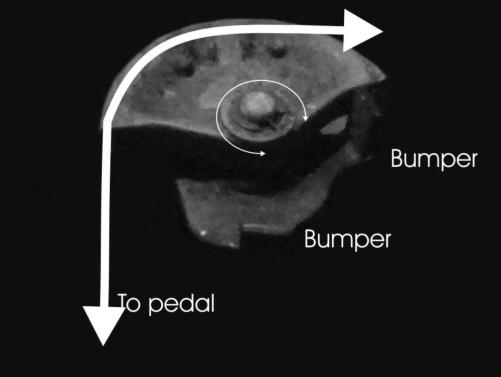
The LHD clutch cable is around 5 feet long (1.5m) and has those two pulleys to go around. I occasionally have to reach under the dash and twist the pulley back, if there's not enough tension to hold it fairly tight, when you release the pedal the cable goes back but the pulley will stay forward a bit and next time you won't get full travel. The pulleys have bump stops so they only turn so far. The plastic coated ones were better at gripping the pulley and I've just had the thought of maybe using some plastic dip on the part under the dash to give it better grip on my homemade cables.Here's another bad drawing of the route it has to take. And yeah dump some graphite in the sheath or something but the area under the dash where the pulleys are should stay clean. You do not want the cable sawing on the pulley.
-
Could one of these Pajero thingies be gotten in the states? I'm running out of kits and need something pretty soon. I'm thinking if it's a straight swap for a KE30 it won't fit my KE10. Just looked at one...nevermind. Editing my edit....just found and ordered a new original from classicgarage...
-
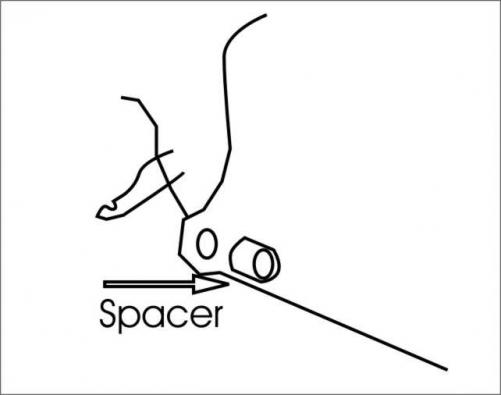
I found a spacer (metal tube) that the lower cable end will slip through. It almost looks like a metal guitar slide. It's the same inner diameter as the hole where the cable slips through the backplate at the bottom of the engine so the flared end butts against it normally. It's like you are just extending the depth of the hole When I needed a spacer I just unhook from the clutch lever pull the cable out and then put the spacer before the plate and slip it back through. It looks better than clamps on the top end as long as you still have grooves to work with...I tried to find it to take a picture but can't. I think it's in my toolbox out in the car in the rain so here's a really bad drawing I have also pulled the pulley off the passenger side (LHD only) and put spacers on the bolts that hold it in place...another "out of sight" option. The lower spacer will work for both LHD and RHD. I also rotate the sheath occasionally so it doesn't get cut through by the cable like in the photo above...just loosen the clip and twist the sheath...dump some graphite or something in there to lube the cable too.
-
There wouldn't be much shell left and a corrugated bed would be stronger than a flat floor pan...if all else fails, we'll just weld a couple of pieces of railroad track under there, strap some bungies over the roof....it'll be fine. Doors that close properly are for sissies anyway. I'm sure a true factory made rollatruck had they made one, would have taken these things into account and performed well above the call of duty, as my own little toy has all these years. You've got to be really really bad to it to break it. Lol, and I would think these tiny u-joints would break first but I've had the whole rear axle housing pop loose and twist out...heh..that was a good donut. Broke those bolts that go through the springs. I'm not sure, maybe some of you could tell me...It ran like crazy, quick as hell tire smoking 131 mph Honda eating good back when I had a fresh stock, standard bore, original carb 1.2 3K but with a 1.1 K head on it and my custom "4 into 2" extractors. It's a K40 and has 4:22 rear. I've heard maybe the 1.1 head on the 1.2 would be like shaving one to bump the compression up. Would that have been giving me 10-1 or better? Eventually the block and head both cracked nearly in half.
-
I don't know man...I put a tow hitch on and I have managed to tow several really big things with my little toy...the biggest probably being the 20,000 lb rollback tow truck, I only had to pull him about a block. I pulled a tilt trailer with a full sized long wheel base Chevy truck about 50 miles. I've helped people get their boats out of lakes. Nobody believes it's just a 70 hp tiny little 4 banger, they have to look. Add a couple of leafs maybe and I bet you could put another KE10 in back (sideways)
-
Well, there I am.
-
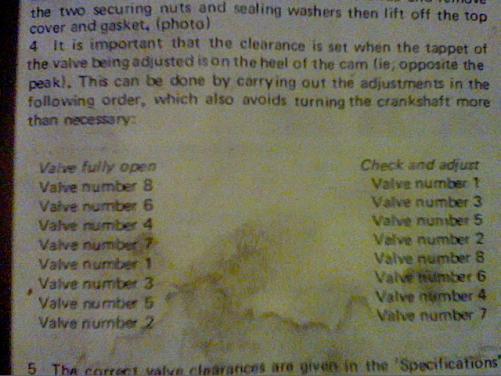
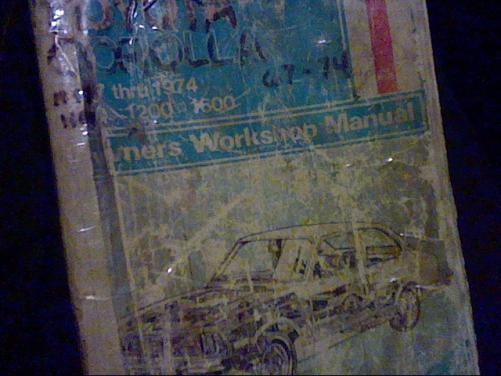
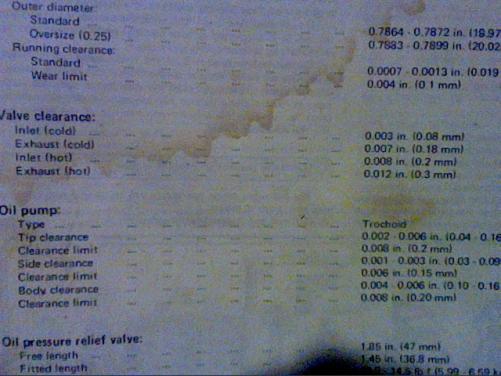
I've always done my 3k the way my Haynes manual showed, which sounds like the 9 thing. But it gives you the order in which they will open to make it easy. You just rotate the engine once, slowly, watching for the valves to open, adjusting as you go. Sorry...my book is 40 years old now and much used. It and this car were my introduction to mechanics. I haven't tried the factory method but It just seems like you would only be near to right, adjusting 4 at a time like that. I would be curious to do it that way and then go back and check individually to see how close it is. I have a rebuild coming up soon, I'll try it then. (Hahahah I also have a body shop wanting to paint my car for free because the owner had a 69 KE10 for his first car. After he paints it he said he will probably try to buy it because he wants one again....These have never been very "collectible" around here but interest is picking up in the last year or so....this should be an interesting spring
-
I was looking at philbey's pictures and saw this wagon at a great angle...hope he doesn't mind me chopping it up. They made a 2 door, a 4 door, a fastback and a wagon, ...I think it would have made a good looking truck too.

-
Hey folks I've been slowing using up what was left of the original downpipe on my 3K. It's all new pipe and original style muffler (my shop was kind enough to hold onto for 20 years)... but the last foot or so, where it bolts to the manifold, is the original, nearly 50 year old pipe, I'm amazed has lasted this long. After the last fix...old pipe keeps cracking...I had it all nice and quiet but on the way home it popped off, at 75 mph, like an open header, made me jump. Thought maybe it cracked at the joint like usual and I could clamp it together to get home but no....came apart at the flange, all that's left connected is the gasket and clamp. It was a very loud ride home at 1 in the morning...sorry about that neighbors. I may have had too much pressure on it...I have a slightly bigger pipe on the new part and it's difficult to keep it from touching and rattling where it goes through the tranz mount...I've tried both ways and I hate the look if you route under the mount and can see the pipe hanging under the car. I had just recently tightened up one of the clamps from the body to pull it a bit further to the center...I think I should have loosened the manifold clamp and let it settle into place. The vibrations along with the pressure made it crack. Years ago I had a header, the one I split for dual exhaust, don't know what brand it was but it eventually kept cracking too. Muffler guy said the pipe seemed too thin. I got it through JC Whitney but now I can't seem to find anything in the US. I looked at several places over there that sell the Hurricanes but they don't ship worldwide. It would probably cost an arm and a firstborn too. I've hunted around junkyards and can't even find Starlets or anything else with a K motor to get one off of. Which reminds me also...can a 45 amp alternator from a 80's model 4K be fitted to a 3K? I would like to have lights and heater at the same time at night, if it raining and I need my wipers too it's even worse. I haven't talked to them yet, they are closed and we are having a small ice storm right now but the last time I talked with my exhaust shop he thought maybe he had seen an original front section with the resonator somewhere in their warehouse. It will be a couple of days before I can check. I may have to try creating a new piece. It doesn't look terribly hard to do, I just don't do my own welding. Slim chance it may be able to be welded...again. Doesn't look likely Would like to stay original and will hope my shop came through, but if I have to and could find one that wouldn't kill my wallet getting here...I wouldn't mind going back to a header. I could take what was left of the old header and try to get someone to recreate it. Provided I get some kind of exhaust I'm planning on tearing it down this spring on my vacation time and I'm going to have everything balanced, all new bearings and seals, calipers, rotors, (I got rid of the front drums years ago) rear drums (have to rebore the center hole of later model to fit, originals not available), u-joints, rebuild heater blower and wiper motor, put some better wire in places...as much of a resto as I can find parts for...already have quite a bit gathered up. I wish I could do the suspension but can't find the right stuff and can't afford the conversions. Sorry for the rambling on... Sometimes it's cool to have the rarest car...sometimes it sucks.
-
I have no idea what I'm talking about for other engines but you can't align the dizzy (set to #1)and then drop it in on the 3K,. When you drop it in, it turns clockwise as it engages the gear, so you have to turn it back counterclockwise a few degrees so that as it drops in it ends up in the right place. You have to fiddle with the slot in the oil pump so it's in the right place too (long flathead screwdriver).
-
Guts and the tools to use them...this has turned into a "how to anything" a Corolla thread. I've always had the "I can do anything, there's just some things I haven't done yet" attitude too, I've just never had a shop to play in :( ...spring and summer I use my "shade tree" and hope it holds together through winter. Great job!
-
Good or bad, I've been using Castrol GTX 20/50 year round forever, Toyota filter, changed between 3-5k miles. .keep my radiator running well and adjust the airflow in the winter with a cover so it stays around 190f when running (and I have heat!). Had no sludge build-up or stickyness, a thin little baked on looking under the valve cover. My cam DID wear out after 40 years though, and I had to replace it, and the lifters, but I don't know what the previous owner did...it was 20 years old when I got it. I'm not trying to race it every day like I did when we were both in our 20's but it still has to work it's butt off just keeping up and getting there. Now I try to keep it below 6k RPM's and it seems I cruise best at about 4.5k on the freeway. We get more or less from 0f - 100f through the year, mostly 90-100 in the summer 30-40 in winter with periods of below 0f and there can be a 35-40 degree difference between day and night. (gotta carry a lot of crap with you if you're on a motorcycle, 45f morning, 85f afternoon) So the Castrol has been good for me through both extremes. Now days it seems all i do is go two blocks, hit the freeway, 80mph for about 15 minutes, two blocks off to work. Repeat in reverse order. sleep.
-
I have gotten a couple of different versions when ordering new clutch cables. Some have been bare cable, some have had a plastic coating on the cable and all have been too long because I think they were actually for later models. I made a spacer for the longer ones but would rather not have to use it. It's also getting hard to find them at all over here. So...as long as you still have a good sheath and the adjusting rings are useable.... This is how I make my own cables. I used a slightly thicker cable than what came stock, about as thick as stock plus the coating but still fits in the pulleys nicely. Getting the length right is important because just a little difference in the cable makes a big difference in the pedal and adjust-ability. This is where your patience will come into play. I would give you length but I didn't measure, I went by sight, sorry. (Edit: I forgot the right hand version doesn't have the pulleys and such a long cable so my measurements wouldn't help for the right hand drive anyway.) I bought 11.5 feet to make two cables and there will be a few inches left. You need a bit to make the loops on the end so you can't quite measure it like the stock ones with the molded ends. I take my old cable to my local hardware store so I can match sizes and buy a length of cable, two ferrules and a couple of wire thimbles. You will be cutting one of the ferrules in half and just using bits of the thimble (that's what they are called, don't know why). Cable Hammer Punch Wire cutter Needlenose (not pictured) Vise Grips (or actual vise if you have one) Hacksaw Ferrules (2) Thimble (1) File (not pictured) The curved thing is the thimble, the other two are ferrules. I start with the smaller end that goes to the pedal. First cut one ferrule in half. There isn't room for a whole one as you'll see. Then slip it on the cable and pull it to about as tight a turn as you can. I happen to have a spare set of pedals which makes it easier to make sure it fits. Needs a little tighter than that so once it's in there you have full travel of the pulley and no binds or bumps. Try to make sure it's good before you punch the ferrule tight. After cutting a small piece of the thimble to fit. This rides on the pedal and keeps it from sawing on the cable. Squeeze it up in there tight and centered with the needlenose. While holding it in place, crimp it on with another set of pliers. You get something like this. There seems to be slightly less space in my car than shows here when all is in place. Next make sure the end will fit through the hole in the firewall. After punching it, the sides will swell a bit. rather than hammering the sides which may loosen the grip, use a file or sandpaper and smooth the edges till it will slip in the hole. With that end done, go ahead and cut the old cable and slip it out of the sheath. This one had worked fine until I got some PB Blaster on it while trying to get my pedal to stop squeaking. Do not get PB Blaster on it and you should get several years out of it. You can lube the cable, just don't get anything on the ferrules. Anyway...Slip the new cable into the sheath, make sure it's the right way round. The end you just made goes to the pedal. Then you make your loop for the end that goes on the tranny. This too will need to be tight but not quite as much. I try it in the car before punching the last end. Hook it to the pedal like you're installing it but you're just making sure it will reach, not too long or too short. the only wiggle room you have is in the adjusting clip at the firewall. Make sure it reaches ok, try not to let the end pop out while fiddling with it since it's not punched yet. When you're reasonably sure it's good, go ahead and punch it and try it out. It will be tight getting through the bracket hole in the tranny too but it will fit if it's right. It's not expensive or terribly hard to do, there may be some cussing moments and you may get it too short or long on your first try but it's better than nothing and only takes about a half hour. I got enough stuff to do 2 of them for about $6.50 My better attempts have lasted years, they tend to get weak at the pedal if you get the loop too tight


-
One guy modified my right fender to match his front bumper. My first wife re-modified the right fender to match a boulder. One guy modified my left door to match his rear bumper. One guy modified my front end to match his rear bumper. An 80lb pitbull modified my roof into a nice bowl shaped lounging area. I once modified my steering geometry to match a ditch. A lady modified my left fender to match her left fender. I'm tired of modifications, it's been primer 10 years now. I'm going to try again this spring to make it shiny.


