

altezzaclub
-
Posts
6742 -
Joined
-
Last visited
-
Days Won
130
Content Type
Profiles
Forums
Events
Gallery
Blogs
Everything posted by altezzaclub
-
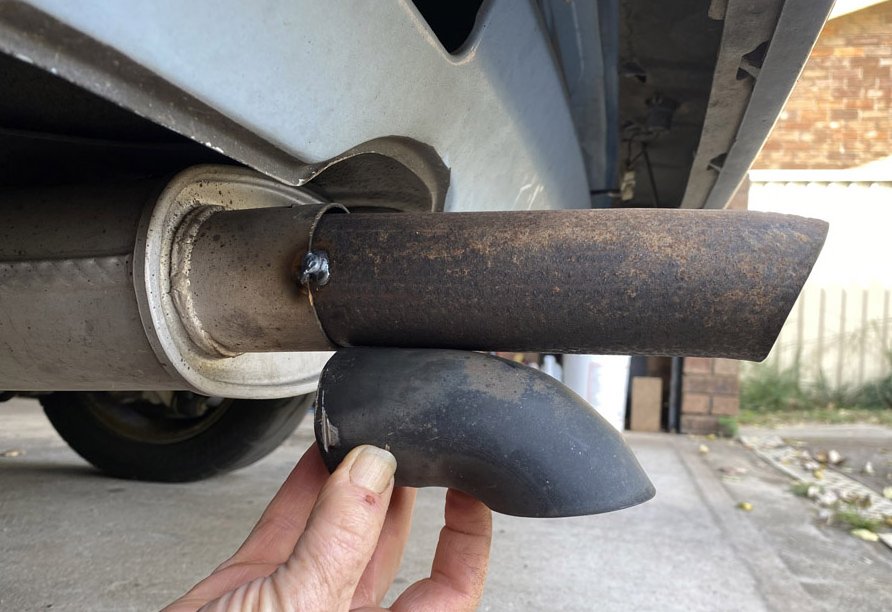
Well, the Melbourne trip didn't happen, so its back to Blaney each day. Suspension is good enough now, the shocks are decidedly firmer than what they sell for KE70s, and now the springs are firm but not hard. The whole car rattles over rough roads still! Front springs 3kg/mm, rears stock 2kg/mm, all shocks two clicks off minimum, with 28clicks still to use. Along the way last year we had to replace the rear muffler, a three-chamber one. I bought the same one and when fitting it Josh thought my nice water-pipe tip was too small, so he fitted the same shape over the outlet, instead of inside. While we were in there we coned the outlet of the Maxima catalytic converter instead of the flat wall I had where 3" went into 2". Of course that changed the sound completely and made it much louder, and after driving around for a few months and thinking about it, I changed the downwards-pointing tip to a longer straight one. Much quieter now, I don't know if it aiming it at the ground that makes it loud, or having it too short so the sound waves bounce back up into the rear panel. The difference is hearing me turn into our cul-de-sac or hearing me turn into the street a block away, and inside the car you can carry on a conversation. More tuning due, it has a dead spot just off idle where it doesn't inject any fuel at all, according to the wideband. Its a tiny movement of the throttle, so I only ever notice it when I'm reversing into the driveway or in a mall carpark, and coming off idling it stalls on 2 or 3% throttle. It drops through that OK to idle, lifts up past it with 10% throttle on, but dies trying to hold it there, so I'm hoping a rotate of the TPS eliminates it. The Haltech asks for an input of minimum throttle and then a max, so it assigns those voltages itself. I wouldn't be surprised if the well-used TPS has a bit of carbon track worn out.
-
I did a quick check today and the AE86 Sprinter and the slanty KE70 have the same width from sill to sill, the same width across the rear shock pins in the boot. As long as the panels bolt straight on you're fine, scuttle, bonnet, guards, stone tray... Then doors.. but after that its dismantle and weld on for the rear quarters. So when you go to buy a spot-weld removal drill bit, buy the ones that are a solid drill with a little spike in the end on a flat cutting face. You can pilot drill with a 2 or 2.5mm bit if needed, but usually I just use a center punch to dimple the middle of the spot weld. We have replaced corners on cars, or whole fronts, and a roof or two, and the AE86 Sprinter looks a difficult roof to do, it will certainly keep you busy. I haven't read of anyone doing it on AE86DC, Rollaclub or Toymods, or a couple of other Toyota forums I have visited. Start a new topic when you get going on it, we would love to see it happen.

-
That's an amazing conversion, just changing the A pillars for windscreen rake and the roof would be a big job. I haven't heard of anyone on Rollaclub doing a giant body conversion like that. So they kept the Charmant floor pan and replaced the whole body above it. I suppose they had two wrecked AE86s, one red & one black, and a Charmant for a clean VIN number. These diagrams exist, although I've never chased one for an AE86. I'll run a tape over the Sprinter tomorrow.


-
I thought they were based on the same chassis, but having prepared an AE86 Sprinter as a rally car I don't think any panels will fit. The boot floor may be the same, check say, bumper bracket width and shock bolt widths, but you'd need to measure under the cars from sill to sill and check the width in the passenger's compartment. The windscreens have different part numbers and prices, the AE86 lies down more on the car and the pillars are different, and I think the engine bay has a different width and certainly a different height.
-
https://www.rollaclub.com/board/topic/63524-ke-3055-brake-upgrade/#comment-636927 " As this KE30 is being prepared for a round Australia trip,"... Well, when you retire you might convince me to accompany you in a KE70.
-
I thought so, which suggests Haqim is using KE30 LCAs on KE70 struts, and there's a different stub axle angle on each strut.
-
Nah, camber bolts are for FWD-style front suspension, I don't think they fit a RWD KE70 or 30. That 16mm is what you'd get with camber-tops, but I'm sure there is something fundamental wrong here, something incompatible between KE70 and KE30. What is the difference in the LCA length between the two suspensions? Are you using the shortest of the two lower control arm pairs?

-
That is a lot of negative camber! The two factors would be the length of the lower control arm, and the stub axle angle on the bottom of the strut. I don't know enough about KE30 suspension to tell you which is wrong, but I'd be checking the stub angles with a KE70 strut and a KE30 strut beside one another on the edge of a bench. The solution might be complex, bending the stub cup on the strut with an oxy torch and welding the angle in, stealing what you can by slotting the turret top holes outwards, changing the mix of struts and arms so you can use the KE30 lower control arms...
-

AE92 4AGE fuel pump fuse location
altezzaclub replied to BoostBoy's topic in AExx Corolla Discussion
As far as I know you should hear the pump when you turn the ignition on, past acc. It should run for a second or two to prime the system then turn off, until you start the motor. Does it start OK like it is? -
Well, it was Sept 2017 when I put up that odo photo showing 188888km, and this week- So about a 1100km a month. In reality working with Josh takes a tank a week, so 550Km/week, but Covid knocked it back. Meanwhile, the stock strut tops do fit back on, although with some dodgy bushes until I can get enough time to sit on the lathe at Josh's. Smoother than the camber-adjusters, and I found a pair of 3kg/mm springs from Alderspeed in China. They may or may not be complete rubbish, but for $100 I don't mind trying them. Being longer, when I fitted them today the car kept the same ride height. They still take up less room than a stock KE70 spring- I'll take the car for a drive on Sunday and see how they go. Then oil & filter, a clean and a tidy-up, and I'm taking it to Melbourne next weekend and back a few days later. That will be close to 2000km, and if I drop the grandson back a week later it will be double that! The tuning is fine for driving now, starts without throttle hot or cold, runs when cold and runs when hot, the only downside is an extra litre/100km, 8.1 instead of 7.1. I'll see how the Melbourne trip goes. Cruises lean, 15:1 or almost 16:1 at 100kph, but richens uphill or accelerating. Hard to get it lean around town.


-
4ku/5k head (Twin row timing chain not lining up)
altezzaclub replied to Thomasdillon's topic in KExx Corolla Discussion
So, you have effectively turned the cam timing forward, when you turned the crank backwards. If you're keen you could work out how many degrees you have moved it by holding a protractor in front of it. This means the cam will open valves earlier and close them earlier, and the crucial one for power is closing the inlet valve as the piston comes up. With the protractor you could measure when the inlet valve opens and closes, the stock cam has a duration of 246deg on both inlet and exhaust, and they are symmetrical around TDC on the exhaust stroke. I haven't got stock cam figures, but this sort of thing- " Inlet opens 28BTDC closes 56ABDC, exhaust opens 56BBDC closes 28ATDC" for a hot Kelford cam. Closing the inlet later moves the power up the rev range, so you can look forward to more power up top and less down low, although I'm quite certain you won't notice the difference, especially if the cam is stock. Also with that, you needn't worry about damage to the valve/pistons with a few degrees on a stock motor. If the head had been skimmed for compression and a wild cam with giant overlap fitted, cam timing gets more important. Any wear in the chain, and fitting the tensioner, will pull the cam backwards and lessen the effect of the advance. You could carefully measure the cam wheel in relation to the teeth and drill a couple more holes in it, Datsun 1600s had a couple of holes 4deg apart relative to the locating pin, and we used to drill another so we had 4,8,12deg adjustment, and each chain tooth was 16deg. "Note: motor also turns freely with no resistance ' That is important and very good news for you.. -
"all the people who had to deal with my insane drunkeness. " Haha- the moderators must have done a good job, I never noticed it! I just thought you were one of the guys who knew stacks about Corollas and was in charge around here. Anyway, pretty quiet these days compared to pre-Covid, or pre-Facebook page or whatever took over from forums.
-
You might have to make one.... bit of steel plate and a couple of pipes. It goes through some horrible curves with the slanty engine though. Go buy a single DCOE Weber and a new manifold, or....


-
Well, you check out your mechanism and see if it retracts, I'll get photos of the KE70 setup, but it will all be 4-door stuff here in Oz. Likely that Toyota used the same mechanisms, but the belt length will be longer in yours.
-
ooh nice! I don't think I've seen a two-door here in Aussie. Do you want the seatbelt to work or just look good? A second-hand one will be 40years old, sun-damaged and wear-frazzled at the edges. If you have the mechanism, get new belts put on it. If you haven't got the mechanism, I can probably get one locally from the wrecker, although every time I go to buy something from the USA the freight costs a fortune!
-
The standard BorgWarner diff used in Aussie has a steel plate on the back of it, where you lift the crownwheel out if you need to. The Japanese banjo style T-series have no plate on the back and the whole front of the diff unbolts. You will soon spot them, they are completely different in manufacture. Check the build plate too, it will have the diff designation on there. Find the topic where I swapped the Girls KE70 diff and check out the panhard changes etc. especially the washers needed for the different hole sizes in the arm mounts. Check out the vans in the wrecker too, take a tape to measure the widths and see what you can find. The Celica T-series diff brings larger diameter brakes, a wider diff but mind the ratios. Make sure you get all the bolts for the T-series too.


-
Is it the sort that springs back after the power makes it open? So the motor only turns forward then turns off, and it is normally closed without 12V to make it open? If it is closed when its in your hand, put it back on without wiring it up and you will know that air is not going in there. Are there only three options? Faulty ECU, faulty IAC valve, or an air leak somewhere? Does it have the old waxstat air control as well, to do the coarse cold-idle adjustment? Is your car also an auto? I don't know if there is a difference in the ECUs for manual and auto, but the auto needs a higher-powered idle than a manual. My 4AGE in the KE70 never idled with a stock ECU, either too low when in frost or too high when hot. Its only been solved with the Haltech where I have control of fuel and advance to keep it around 1000rpm..
-
" the ICV is stuck open and squirting carb cleaner into the throttle body hole alone will not always free it. Unplug the cable to the ICV, undo the screws holding the electronic device to the body. Once removed see if you can spin the electromagnetic actuator on the body back and forth freely, if not that is the problem. To sort it remove the middle hose below, not the water hoses, then place your finger over the hose outlet whilst filling the hole in the throttle body with carb cleaner, this will ensure it is flooded with cleaner and not simply draining down where the hose was connected. Keep the fluid in there for ten mins whilst trying to rotate the actuator until it is freely moving then reassemble. This problem not only occurs due to gunge but also if laid up for a long period when oxidisation can seize the shaft, could also by why used parts often do not solve the problem as they have been laying around unused." Give it a go... I found it on a Cressida a few years ago.
-
..and over the weekend I found that if you have a couple of 15-12mm bushes lying around you can fit the stock KE70 rubber strut tops to the BCRs instead of the camber-tops. That takes some of the harshness of bumps in the road out, although I'll have to machine up a pyramid-shaped bush to do it properly.
-
I'm using BCRacing coilovers from Justjap in Sydney, recently fitted them to my KE70. You cut the strut leg near the bottom and weld the coilovers onto it. so you get the large diameter shock tube with a stock hub. https://www.rollaclub.com/board/topic/42407-the-girls-ke70/page/16/#comments You might get weld-on adjustable spring bases too, but then you're limited to the stock tube diameter. Cheapest is to cut the spring base off and weld it back on 20mm lower.. but you're still stuck with the same diameter strut tube and hence crappy shock options.
-
Price Drop Need Her Gone :(
altezzaclub commented on delorean88's blog entry in Selling my rt80 corona
Hmm.. if you hover your mouse over his name it should bring up a menu that includes "message". If you click 'find content' in that menu it will also have a 'message' option on his content page. A slim chance, but its great to see cars come around again. They were a nice-looking car in their age. -
Price Drop Need Her Gone :(
altezzaclub commented on delorean88's blog entry in Selling my rt80 corona
He was last on here a decade back. Send him a message, you might get lucky. -
Thinking about putting extractors on my 4k
altezzaclub replied to ke55rolla.'s topic in KExx Corolla Discussion
Fair enough- Just make sure they line up with the ports and the nuts & bolts seat correctly. You need to check the thickness of the flanges on the extractors and the carb so they tighten up equally. Don't wrap right around the pipes where they join together, I melted my first set doing heavy haulage in a steep forest at low speed & then realised I was trapping the heat in from all 4 pipes, so they heated each other. Wrap the four of them individually so they don't heat the carb and leave that bit bare. -
AE86 Front/Rear Suspension in KE25
altezzaclub replied to GT3LovR's topic in KExx Corolla Discussion
Well, I just happen to have an AE86 Sprinter on the hoist being molested for a 3SGE, so what would you like to know? Have you come across the Mitsi Sigma LCAs for widening a KE70? Otherwise, put up a couple of diagrams of the front suspension with some numbers and how much you want to lower it. If you move the strut outwards at the bottom for the wheel track, you should move it out at the top too, so camber-tops on coilovers might be the answer. Don't forget you will run into steering axis problems along the way. Are you converting to rack & pinion with the 4AGE?

-
Thinking about putting extractors on my 4k
altezzaclub replied to ke55rolla.'s topic in KExx Corolla Discussion
Not very well.. https://www.rollaclub.com/board/topic/42407-the-girls-ke70/ But they work OK, just spend the time and make sure you use a one-piece gasket. 2" pipe into a resonator and 1.75" pipe back to a 3-chamber muffler. I've still got it on my car with the 4AGE in it.


