

Banjo
Regular Member
-
Joined
-
Last visited
Everything posted by Banjo
-
Excellent ! There is an olde saying that says; "a workman is as good as his tools". Always makes it easier when you have the right tools for the job. Good work ! I gather the exercise, has given you a lot of interest in the trade. My guess is; that as you've "I took a few tafe courses . . . . ", You might move to this field untimately ? What a dream job, working for a company restoring olde cars professionally, would be ! Cheers Banjo
-
Hi Geoff, That is awesome ! All cudos to you, as many of us would not have the skills or inclination, to tackle what you are doing, to that level of detail. (No bog involved) Your pictures tend to indicate, you have a wealth of metal working machinery to work with. Is that all your own, or do you work in that trade, normally ?. Keep up the excellent work, & please keep posting pics. You'd be surprised, how inspiring this is to others, who may be considering tackling, something similar. Cheers Banjo
-
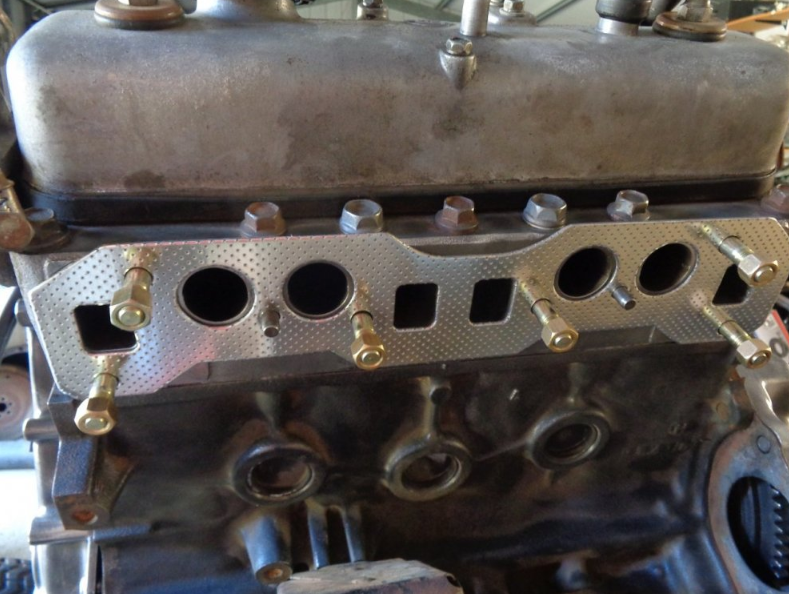
Hi Ben, Sorry to hear you are having so many issues with this particular problem. My only comment at present is, that the special one piece gasket you have purchased, does not look like the the one, we have available here in Australia. The one available to us, is quite thick, & tends to take up those small gaps, between manifolds & head face. It appears from your picture to be a metal gasket, with "facing" added to it. If it is metal, one would think, it wouldn't have the ability to "absorb", small clearance descrepancies between the inlet & exhaust manifold faces. Cheers Banjo
-
When trouble shooting electrical issues, in olde Corollas; the problem is often compounded, when You turn to the wiring diagram at the back of a manual; whether it be a Toyota factory "Yellow Bible" manual, or an aftermarket ones, like Haynes, InterEurope, or Gregorys. Generally, a mass of wiring lines, running all over the page, which are very hard to trace, & has your eyes straining, after a few minutes. Commonly, you are only interested in one part/section of the car's wiring, related to your issue at harnd, (say head-lights); but you get confused when it is swamped by the complete wiring diagram. Some wiring diagrams, depict various items, with a shape that is easily recognised. (eg: battery, headlight, or alternator) but many wiring diagrams, simply depict, the various items, as little rectangles or circles; (as above), with a number next to it, for which you have to look up the "KEY" or "LEGEND", to find out what it actually is. The simplest way, is to photo copy the wiring diagram, from the manual, then high-light with a texta pen, just the wires & electrical components, that you have an issue with. Altezzaclub, has often placed wiring diagrams, here in that format, & that certainly assists. However, even if you just isolate the wiring diagram for your area of interest, the little rectangular boxes with a "KEY" number next to them, & 2,3,4, 5, or 6 wires attached to it; give you no idea, as to what is going on inside the retangle. This is especially a problem, if the rectangle represents a switch, or a relay. A classic example would be the "hazzard switch", LEGEND 41, which is a little rectangle depiction with 6 off wires going into it. (good luck with that one) I was looking at a problem at the weekend, that I came across; whilst comverting all the lighting in my KE-30, to all LED lamps. I had previously also added to the complexity, by adding relays; so that lighting & dip switches, which originally carried heavier currents (especially in the case of the head lights), would often burn out the switch contacts. The conversion of lighting to LEDs, overcomes this problem altogether, as the same, or greater light levels, are produced, with much lower currents.. So I sat down, & drew a circuit of my KE-30 "Lighting Only" wiring diagram, & depicted within the relays & switches, just how they work, which greatly assists, whilst chasing lighting issues. I've even put the wiring "colour codes' to assist. However, please don't blame me, if some of the colours are incorrect. Even on the factory wiring diagram, you'll find wires that are labelled one colour at one end, & another colour at the other end. I remember well, several years ago, when completely rewiring the engine bay of my KE-30, that when I unwrapped the factory cable loom, I found badly crimped factory wiring, where the wire changed colour, inside the harness/loom. (Must have run out of that colour wire ?) I have depicted the Light switch & Dipper/Dimmer switch, as two seperate items, only for understanding; as to what goes on inside them. They are in fact, one unit. One of the issues with this switch is that; +ve 12 Volts power, is switched to the headlights, with a relay; but the switching, of the same high currents, betweeen low & high beam; is accomplished with fairly small switch contacts in the lighting switch itself, which switches to the ground/negative side of the supply. This, often burns the contacts in the switch, & requires a replacement switch. (Been there, done that !) https://www.rollaclub.com/board/topic/65882-after-market-ke-light-column-switch/#comments This problem can be overcome by either fitting LED head light bulbs; or fitting two relays between the Dimmer/Dipper switch & the head lights, which Altezzaclub has described on here previously. In the Light switch section, there are 3 positions. 1. OFF 2. TAIL 3. HEADLIGHTS + TAIL The Dipper switch is a little morre complicated, as you may want to flash the head lights high beam during daylight hours, when the lights are not on; so the dipper switch also has to turn on the Headlight relay, as well as select the high beam, when you pull back, on the spring loaded dipper switch. Hope someone, somewhere is helped by the above wiring diagram. Cheers Banjo.


-
Good point ! Ben; remember that the inlet manifold (aluminium) & exhaust manifold (cast iron) are made of two different materials, with different expansion rates, when heated & cooled. The use of a very thick hardened washer, is a necessity, to be able for the "pull down" on each manifold tab, to be flat & strong. Don't be tempted to file down the exhaust manifold tab, on the outer side, if it is thicker. I have once, long ago, filed the outer side of the aluminium mainifold tab/s; when it was the thicker, & it solved the issue, but it was not a lot of material removed. The really import fact; is that a straight edge across both manifold's gasket mating surfaces, should have no gaps of more than a thou or two. The heavy & thicker one piece gasket, with absorb any small alignment gaps like that. I can assure you, that I have done this job on 2-3 K Series engines over the years, & after, what I have described was carried out, the result was permanent, & I have never had to revisit them again. We have had a number of people on this forum, over the past 12 months, that have learnt, that sealing of the "inlet manifold track", is extremely important aspect of getting idle & tuning correct. All air entering the cylinders; must be air that only enters through the carby venturi, & not from elsewhere. P.S. One last suggestion. Once you have done this, & the engine is running sweetly again, make sure you re-tighten/re-torque the manifold stud nuts. Cheers Banjo
-
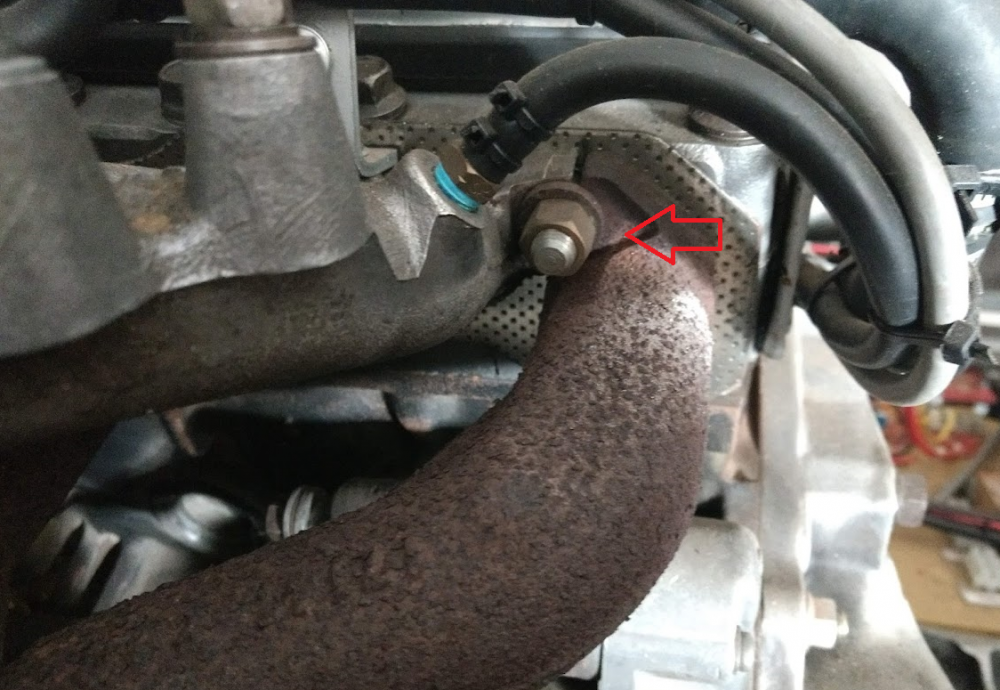
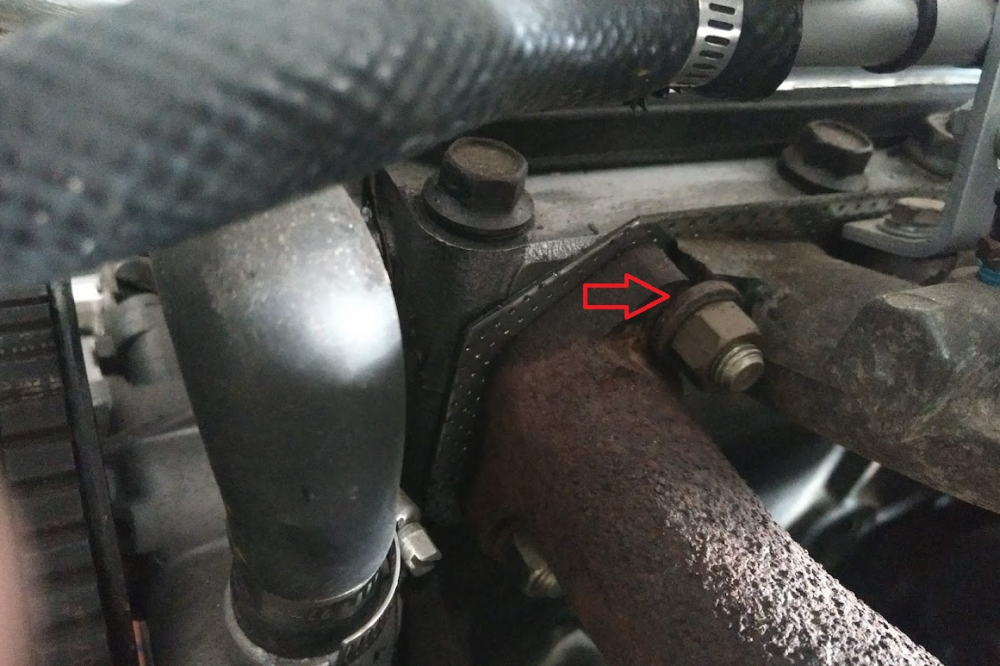
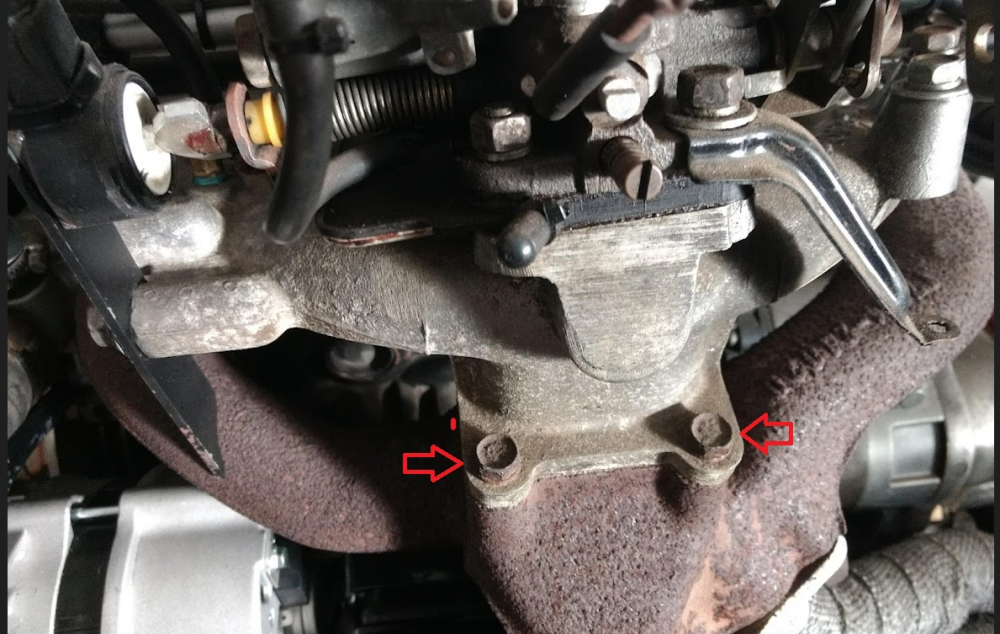
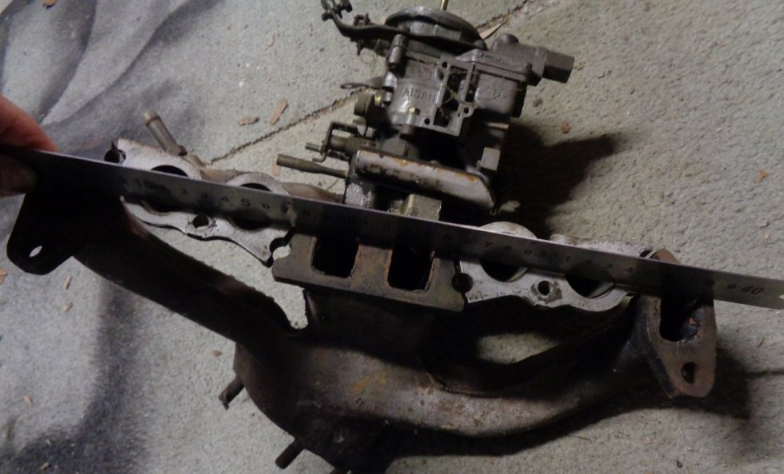
Hi Ben, The out of roundness, as you describe the gaps & spaces between exhaust & inlet, are not an issue, as very large thick washers should be used to clamp down both manifolds. What is more important, is that the faces of both inlet & exhast manifolds are in perfect alignment, & perfectly smooth; when manifolds & gaskets are fitted to the head. Bear in mind, that the inlet & exhaust manifolds are "bolted together", directly below the carby (see above). It is always a possibility, that these have been seperated at some time, in their long life, & bolted back together, with both gasket faces not in perfect alignment. Unfortunately, I've found over the years, these bolts will be almost "welded" to the exhaust manifold, because of the heat in that area. The flanges on the manifolds, where the big thick washes clamp down; must also be the same thickness, so the thick washers sit flat. A little bit of attention to detail in this area, & it will work, & your inlet sucking air in from unwanted areas, will be solved. Cheers Banjo
-
Electrical faults are always hard to trouble-shoot; but more so, when they are intermittent. Fuse blown very unlikely, but could possibly be the socket into which the fuse is lodged. More than likely, it is the relay, so I would see if there is another identical relay used in your KE70, & swap them, & see if the fault disappears. If previous owner has "been at the wiring", or done mods, that could easily be an issue. Might have an additional/extra wire wrapped around another, without being soldered or used with a terminal. Altezzaclub, knows all things about KE70 wiring arrangements, & there is probably a wiring diagram on this forum somewhere, you can acess, to trouble shoot, with reference thereto. Cheers Banjo
-
Yep, that is a problem area, many Rollaclub members have experienced. This post explains the issue & ways to fix it. https://www.rollaclub.com/board/topic/82146-new-to-rollaclub/?do=findComment&comment=731487 It is imperative that before you fit the mainifolds, that both exhaust & inlet manifold faces, that bolt up to the head, are alreeady in line. Check with a straight edge, before fitting. The one piece gasket is also a must. This thread might assist your understanding of the manifold issue. https://www.rollaclub.com/board/topic/74148-one-piece-manifold-gasket-k-series/#comment-715486 Unfortunately, it will require you to drop the exhaust pipe, & extract manifolds & carby, & start again. Cheers Banjo
-
Welcome Aboard ! Any decent & reputable auto paint supplier, who you give a code like 684 to; will be able to make it look a little darker to your specific requirements. Are you having the KE-35 professionally painted, or doing it yourself ? If professionally, then any good spray painter will also be able to modify the mix to your exact requirements, if you provide the 684 code, & advise you want it a little bit darker. Let us know how you go, & progress, & please post some pics of your resto KE-35. Cheers Banjo
-
Thanks for those suggestions ! In the case of the Corolla bonnet, I found that, was not necessary. There are two factory cut-out holes in the bonnet's structural ribs, that are in the perfect position, such they look perfectly "balanced", with the bonnet closed, from the outside. I totally agree; but unfortunately, those holes provided in the bonnet structual ribs, do not align with the radiator mounting bar. They are forward of the bar. I just cut a couple of pieces on thick sheet metal, & mounted them to the radiator bar, using bolts already provided. Worked well, & nice & firm. No flexing or movement of the plate, when closing the bonnet, & clicking in place. Cheers Banjo


-
Over the years, the ignition system, & how it functions; has shown itself, to become an area of our Rollas, that "non electrical" members, struggle with; especially when confronted with an "uncoperative", or "disfunctional" ignition system. The following article on the DIYAutoTune website, has got to be one of the best & clearest explanations, as to how ignition systems work, & what sort of issues are common. Read it a couple of times, & I think you will agree. https://www.diyautotune.com/news/tuning-tips/ignition-system-remix-by-greg-banish/ Cheers Banjo

-
Hi Si, I wasn't thinking about rods & pins quite that utilitarian. More something like Russell posted earlier in this thread. I was attracted to the failed ones, I bought, more because they are available in a variety of colours, that doesn't make them so obvious on the car, & blends in a bit, with the existing duco colour. There is a series out of the USA, called Quik-Latch, which appear to be all aluminium, without any plastic components. Anyone, previously used any of the Quik-Latch products ? Cheers Banjo

-
It's been quite a while since I said I would get some of these bonnet quick release catches. I did purchase a set, back in late May 2022, but didn't get around to fitting them until a couple of weekends ago. I had to make a couple of steel plates up, to mount the "ball" locking pins to, as there was no body work directly below, where I wanted the buttons to fit. They are tricky things to install, because the hole in the bonnet & the pin, must be perfectly aligned & centered. I got it all working & centered, but after about the third time I closed the bonnet, one of the locking buttons completely fell to pieces, with little springs etc. falling down in the engine bay. I collected most of them, & discovered, that the design is very poor. The ball on the end of the locking pin, self centers, in a little plastic insert in the round latch on the bonnet. This plastic piece, is threaded into the aluminium button assembly, with a very fine thread. Any side loading on this plastic piece, releases it from the assembly. A complete waste of time, & I won't be using them again. Cheap & Nasty ! So I now have two round holes in my bonnet, so am committed to finding a good quick release latch, that is far more substantial. Anyone used one, that they would recommend. I like those "olde school" ones, but doubt they are still available. Cheers Banjo.

-
My KE-30 2 door sedan turns Fifty next year, & it is in fairly reasonable original condition. However, the years are taking it's toll, on the non-metal parts. The other night I was out driving; testing some of my LED light conversions, & suddenly; the rear vision mirror glass fell down. It didn't break luckily. However, the reason it fell down, was that the plastic holder/frame for the mirror, had basically turned to dust. Luckily, I had another one from a my olde KE-55 2 door coupe, which went to Corolla Heaven a few years back, with a case of servere cancer in the top rear quarters. The previous night I was removing the interior light, to clean it up, & oil the switch, which was a bit stiff. I noticed that the head lining was turning to dust also.. In the illuminated environment, I could see all this dust coming down from the fabric, everytime I touched the light fitting. The lining is not torn, & at first glance, looks pretty good. It is a bit stained, in places, along the seams, & I was thinking of maybe spraying it. However, I'm concerned about breathing all those little particals in the air; with Winter on the doorstep, when often the windows will be closed. Time methinks, for a new headlining. So I searched this forum, for "head-lining"; & there were several suggestions from over 10 years ago, which basically suggesting taking out the liner, & taking it to your friendly "motor trimmer", to cut & sew a new one. That's fine, but for one major issue. The lining in the early Corollas, is suspended on rods, across the interor, which clip into the top body frame, with special little plastic clips, which are impossible to source. I remember well, when I stripped the KE-55 2 door coupe, they almost all broke. Others on here, have also asked where you can get these plastic clips. The common problem these days, with head-linings are, that the material, whether it be fabric, or vinyl, separates from the back board; & sags. Early Corolla's head-linings, were not made that way. There was no back board. I was wondering if there is any plastic or vinyl linings on the market, with a thick insulating backing, that could be simply glued to the underside of the roof, & just "cut & tucked" over the top metal surround lip. There are plenty of lining materials, available with a thin foam backing, but it would be nice, if there was one with a 25-30mm thick foam or insulating backing. So completely out of my depth here, so hopefully, someone on here has had this problem previously, & solved it. Open to all suggestions ! Cheers Banjo

-
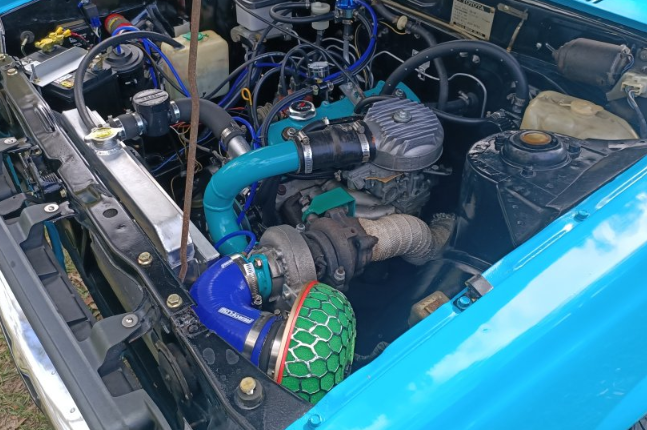
Why not try my suggestions no1 & no5 above; which do not require the bonnet to be cut or hacked, initially. (I'm assuming you have a stone tray underneath, the front of the engine bay) Drive it around for a week, & just see if there is any noticable difference, with the results of "heat soak". Another exercise you could try, which could only improve the heat soak situation, is to remove the LHS horn, & cut a circular hole in the front inner panel, & feed the inlet air to the turbo, from in-front of the panel. You might even be able to fit the air filter in between the rear of the grill, & the front of that LHS panel, where the horn, is currently mounted. Cheers Banjo
-
The old age question ! How do you squeeze all the parts into a smallish engine bay, to result in relatively cool air, finally entering the inlet manifold or plenum ? Now our friends in Europe in Nordic countries don't necessarily have this issue, but here in Oz, & other hot climates, it is a big problem; once you want to create HP, from dear little olde engines, which the Japanese designers never anticipated; ever being put to this task. This picture clearly & certainly demonstrates the issues we face, with intake, turbo & carby all next to each other. There are just so many parts that need cooling. The radiator, an oil cooler, an airconditioner radiator, & an intercooler or cold air intake, depending on whether you have a turbo or not. They all are needing space down at the lower front of the engine, which just isn't available, for all of them. Down low; because the lower these are fitted, the cooler the intake air. There are a few things, that can be achieved, in terms of airflows through the engine bay, that "will assist". Ideally, we don't want to draw air out of the engine bay, in an upwards manner, using upward rear facing bonnet outlets; unless you like stopping at regular intervals, to clean the film off the windscreen. Ideally, the air should pass over the engine, & down under the car, & out the back. There are several places this can be accomplished. 1. Remove the stone tray. Now that may not be an option, if you are rallying on dirt roads, but the engine stone tray, does hinder airflow into the engine bay, from under the car. 2. Open up the panels & supports, either side of the radiator, after repositioning the horn/s. 3. Position one of the radiators in front of the grill. (Not everyone's liking.) 4. A forward facing scoop on the rear of the bonnet, that forces air down between the rear of the engine, & the firewall. This air will ultimately pass under the floor, & create draft from front to rear, in the engine bay. 5. Another one I've seen from time to time, is to place some 25mm spacers & longer bolts connecting the rear of the bonnet, to the hinges, This results in a gap all around the edge of the bonnet; at the rear. As this problem is accute in this engine above; it might be worth a try, as it is simple to implement. Other than that, it is time, to fit, an intercooler ! Cheers Banjo
-
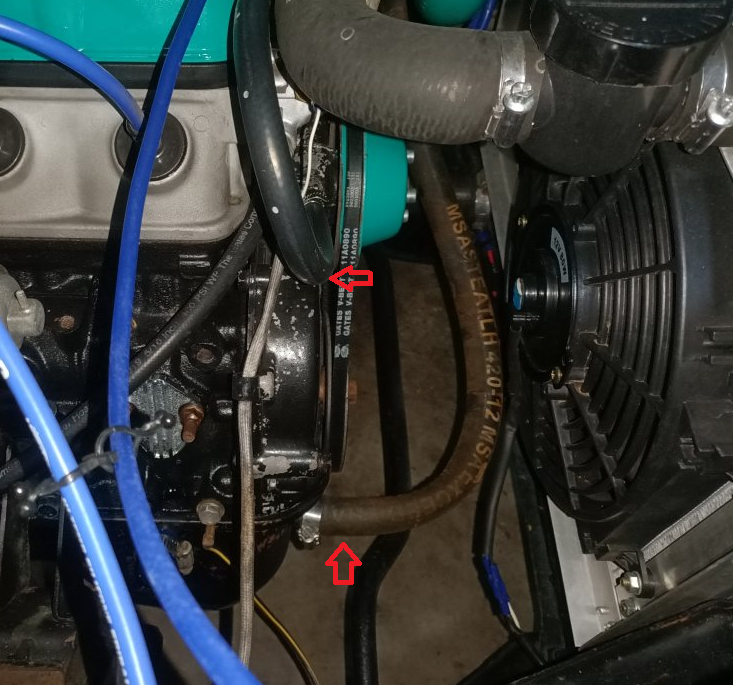
Tah ! I can now see that alternator tucked down under there. Thanks for the good comments re the TEFBA radiator filter. I'll definitely have to get myself one of those. I've been thinking about it for a while. Sad about the heat soak issue ! Would worry me that if it's that bad; that the rear cylinders could be running at a pretty high temps, without some recirculation of coolant, from the back of the block. Most piston & rings failures on K Series engines, are on cylinder 4. I have a K series engine here in the workshop, which will atest to that; & it was just stock standard. My experiments indicated that the removal of the mechanical fan, & using a thermostatically controlled electric fan is the very best option. That mechanical fan steals so much power. The ram effect of air passing through the radiator, only gets impeded by those fans. I'm interested as to where these two hoses go to. The one that appears to be connected to the front of the sump, appears to be scavenging. Not sure where the water hose to the return side of the water pump is connected to. I read your comment earlier on in this thread, that you had locked the dissy up. Is this a contstant static ignition advance setting, or is the dissy just providing a trigger to an simple single output ECU, which uses the dizzie, to direct the single coil, to the correct spark plug/cylinder. If so; that could also not assist, in your restarting issues, when the engine is hot. Is the electric fan wired up, so that it runs on, after the engine is switched off ? Sorry about all the questions, but I'm really interested. Particularly, as you've put so much effeort into it, but there are still some operational "issues". Cheers Banjo
-
Really awesome conclusion to a long project, Mate ! (aren't they always) Lot of quality workmanship & a lot of hard work all over; but particularly under the bonnet. I'm usually not a fan of "black background engine bays"; but on your KE it looks really good; especially with the highlighting of the rocker cover & fabricated inlet tube, in blue, the same as the body colour. I see you removed the mechanical fan, so I'm guessing there is an electric fan hiding down behind the aluminium radiator ? I'm guessing the master cylinder is original, as there is the bracket attached to the front thereof, to support the mechanical clutch cable. I did a Pajero swap years ago, & I'd forgotten that KE's had that big rectangular master cylinder. When I first looked at the engine bay picture, I thought, "how the hell did He fit the alternator down there under all that ?" I guess the turbo is up high enough, to just clear the alternator ? Battery move to the other side is always a good move, in KEs, but I guess was "compulsory" in your build. Can't remember anyone on here ever using a TEFBA radiator filter. It fits well where you have it. Seeing you've been driving it a bit, has the filter worked for you ? I was thinking to myself; I wonder if you are a plumber ? Lots of essential plumbing under the hood, but well done; as never easy to get a good result. Cheers Banjo
-
Earlier on in this thread, I mentioned . . . . I tried it out, & it did not work. To create some internal magnetism, to get the "Bosch" design alternator away, you need about 250mA (1/4 Amp). This circuit below, which I also found on the nett, does however, work well. Where is says "To Alternator field Terminal"; that is simply connected to the +D terminal on the "Bosch design", alternator. Cheers Banjo


-
Hi Ben, Welcome aboard ! What you describe is not unusual, & probably been experienced my mamy on here, with older K Series engine. There are two quite distinctly different issues here. The aluminiun spark plug tubes, are soft, as they are aluminium. They play two important fuctions. 1. The flat section of the bottom on the tube, through which the threaded section of the spark plug protudes, is "clamped", between spark plug & head, when you tighten the spark plugs up. Over time, this area of the tube gets thinner, & sometuimes even cracked & worn; as a result of the spark plug "tightening down action"; is not perfect, & in worse case can suck oil into the cylinder. 2. The second function is to prevent oil return path, from rocker oil feed, to sump, from leaking. It has a rubber under the top lip, to seal at that end, & the spark plug tightening on the flat at the bottom, to prevent from the bottom end. Because tha aluniniun is soft, the tube can effectively "elongate", & it will not seal properly on the rubber seal at the top. Solution, new aluminium tubes & rubbers. Bear in mind, that in your first picture, that whole void in there is wet with hot oil return to the sump, whilst the engine is running. Also check the sump breather relief valve on the top of the rocker cover. If that is blocked it will exaserbate oil leaks inside the sump/block/head area. That valve feeds back into the inlet side of the head, so you can easily understand the implications, if that is stuck "open". The "wet" spark plugs would maybe indicate a mixture too rich, rather than too lean, & maybe an issue with the needle & seat & float in the carby, not cutting off fuel flow properly. Maybe time to remove the carby, & completely clean & reassemble. Don't forget the crankcase pressure valve that protudes from the top of the rocker cover. Often neglected, which results in them being fully open, or fully closed. Take your time, & work through these three (3) areas, & I'm pretty sure, you will resolve your current issues. Cheers Banjo
-
Not going to argue over your observations. After all, you spend a lot of time on country roads in the dark, between Orange & Blaney. As You well know, I live on the outskirts of Brisbane, in a semi rural area, without a lot of street lights. I experienced initially, exactly what you describe; as a pool of bright light 30 metres in front of the car, from the bar LED setup. Now there are a variety of quality, sizes, & prices, of LED bar driving lights for automobiles. Certainly, if you want to see a mile ahead, & scare the living daylights out of all the sheep in the neighbourhood, then you buy the biggest; brightest; & probably most expensive LED driving lights, & mount them up of the roof, of the vehicle; or at least on the top edge of the bull-bar. What I am talking about, is the little LED bar driving lights, that are 12-20 inches in length, & mount down on a plate, which fits behind the front number plate. 1. By nature, (on a car), they are fairly close to the ground. 2. They are not very stable, as the number plate is often attached to the body work, & vibrates. 3. The angle of adjustment is very "finnicky", & a very small angle change will produce a very big difference, in how far the light will travel. 4. Even the loading of the vehicle, can change the angle of the LED bar light. If the pool of light is only 30 metres in front of the car, try adjusting the angle of the bar, on a dark night, in an unlit area; & you''ll definitely find their limits. P.S. Ultimately, the best solution, would being able to adjust the angle of elevation of the driving light bar, from the drivers seat. I presume, those products are available; but probably, dearer than the driving lights themselves. Cheers Banjo


-
It is very important, that the 12 volts fed to the alternator "idiot" charging indicator light, is a switched 12v, from the ignition switch. To describe it simply . . . . . When the engine is not running, the D+ terminal, is effectively at ground or earth potential. When you turn the ignition on, without placing it in the "start" position, the charge light illuminates, because the charge lamp, has 12 volts on one side (the ignition switch), & ground on the other (D+ terminal). When you start the engine, the alternator turns, & produces +12V. The D+ terminal basically then becomes the same voltage as the B+ battery terminal. The charge bulb then has +12 volt on either side of it, & with no volts across it,extinguishes. That's how you know the alternator is working. Now I have been guilty of this . . . . . . . . When testing an alternator output, I've simply joined the +D & +B (main battery terminals) together, to get it going. It works. But when you are finished, you must remove the link betweeen the +D & +B terminals. With the alternator off, the +D terminal, does not revert to look like a ground, because it is still connected to the battery +12 volt terminal. Internally the alternator, the +D terminal will draw a small magnetising current from the battery, & slowly drain the battery flat. I've experienced a fully charged battery slowly drain over a week or so, because I failed to remove the link, after testing. Cheers Banjo
-
Hi Graeme, We are about to find out ! I'll certainly keep you posted. I've got the meters here to measure the currents, so we can do a direct comparison. In general though, an LED should always give You more luminoous intensity, for a given power in, than any tungsent fillament bulb. Once you've driven with that "cool white" light out front, You can never go back to that "yellowie" light, again. Cheers Banjo
-
All makes perfect sense. When I first fired my alternator up, with the engine running, I had no 12 volt output. Then I remembered I hadn't connected the +D terminal to the ignition switch, via an "idiot/charge" light. Some alternator designs have enough residual magnetism in them, to get them up & away. Not the Bosch system ! It relies on the small current through the charge light, to ground inside the alternator, to create some residual magnetism, to get it up & away. Once the alternator is producing 12 volts, then it appears on the +D terminal; so effectly, the charge lamp has 12V on either side of it; & turns off. Normally, the charge lamp in the dashboard, is a small 3W-5W filament bulb. The only problem with this arrangement, is if the filament bulb filament blows, then there is the possibility that when you start the engine, the alternator will not produce an output. I came across this little circuit on the nett, that eliminates this by using an LED, instead of a filament bulb. I'll try it out tomorrow. I have actually read where people have used a 2 Watt filament bulb as an idiot light, & there was not enough current, to create enough magnetism, to get the alternator away. This circuit, should remove both those possibilities. Cheers Banjo

-
Thanks Si, I can see it very clearly now. Was the 140A version of the Aeroflow alternator you purchased, the chrome one, & that's why the reflection in your previous picture. What stops the two little brackets in your pic, drooping under the weight of the alternator ? Is the rear pivot bolt through the original cast bracket, tightened up so tight, that the two little flat brackets you made, can't move at all ? Cheers Keith


