

Banjo
Regular Member
-
Joined
-
Last visited
Everything posted by Banjo
-
I think I read about camber issues elsewhere on Rollaclub, when I was researching this, but it was in relation to fitting RA65 struts into a KE70, which required "modified" Sigma LCAs. I haven't read anywhere that the RA65 struts have any ill effects on a KE30/35/55. However, when I get the KE30 & RA65 struts side by side, and check the stub axle angles in relation to strut tube, I should have a better idea. If it looks good, I'll measure camber before, fit RA65 struts, then measure camber again, & post the results here. Cheers Banjo
-
I acquired a beautiful little 2 door KE30 sedan a few years ago, with 96,000 klms on it. I use it as a daily drive. It originally had a 3K & 2 speed auto, but now has a 5K & K50 (KE70) 5 speed gearbox, so is a lovely car to tour in. As these early Corollas were not known for their brake performance, I've had on my list, a brake upgrade for the past 6 months, and have been looking around at my options. I recently had the opportunity to acquire a set of Celica RA65 struts complete with vented disks, LCAs, steering knuckles, less calipers. I have measured them up, & the struts seem to be exactly the same length, as are the LCAs. As the RA65 springs will not fit inside the strut towers, so I will have to change the spings over. I intend to have the KE30 lower spring perches professionally welded to the RA65 struts, as I'm a "weekend welder" only. However, I'm a bit concerned at the cutting & grinding off of the lower sping perches without undercutting or damaging/weakening the strut tube. Also, how do you open up the central hole in the removed KE30 lower perch, to fit on the slightly larger diameter (51mm) RA65 strut tube ? Any advice or tips from anyone who has done this previously would be appreciated. I've gathered together a complete set of neoprene bushes for front & rear end, a set of new lower ball joints, and can get hold of a new set of new standard KE30 "King" spings. I think the KE30 dserves new springs after 36 years ! I've also ordered one of those little electonic inclinometers from ebay, so I can check the camber & castor angles before & after the modification. The RA65 strut stub axle angle seems to be slightly different to the KE30, and should hopefully provide 1 or 2 deg of negative camber. I also intend putting an extra inch of thread on the castor rods, and getting a little more castor, which others on Rollaclub have advised, improves the steering greatly. As the RA65 struts acquired has the original Celica oil filled shockers, I intend fitting a good set of new fron shockers. Gas ??? if the budget can afford it. I will top the mod off with either a new early Camry or Pajero master cylinder. Should make for a very straight forward & hassle free mod. I need to get a new set of calipers, so would love advice as to what 2 or 4 pot calipers will bolt directly onto the RA65 caliper mounting brackets, with little or no required mofications, other than possible spacing. Any advice or recommendations greatly appreciated. Regards Banjo.
-
The Jaycar kit sets provides two switchable maps ( for dual fuel), with 11 settable load sites, or one map with 15 settable load sites. It then automatically adjusts the load site RPM increment based on the max & min RPM limits you assign. I am using the the 15 load site map, and with a min RPM of 1000, & a max RPM of 6600, I get 15 sites 400 RPM apart. Other combinations are . . 1000 - 3800 RPM 200 RPM settable load site increment. 1000 - 5200 RPM 300 RPM 1000 - 6600 RPM 400 RPM 1000 - 8000 RPM 500 RPM For your example of . . . 500 - 6100 RPM 400 RPM settable load site increment. 500 - 7500 RPM 500 RPM However, the microprocessor then creates three more "calculated" sites between the settable load sites. It basically takes the difference between the advance at two consectitive "settable" load sites, and divides that by 4, which becomes the final load site increment. In my setup with 1000 - 6600 RPM the settable load sites for 3000 & 3400 RPM have advances of say 25 & 29 deg assigned respectively. The calculated load sites for 3100, 3200, & 3300 RPM would be assigned advances of 26, 27, & 28 deg of advance, by the micro processor. If I set the maximum RPM to 5200, I obtain increments of just 75 RPM. Even at 500 - 7500 RPM the load site increment would be 125 RPM. In this way, using a 15 load settable map, you actually finish up with 57 sites created,over the entire rev range you set. Cheers Banjo
-
The Jaycar programable kit could be your best bet, unless you want to pay big bucks for an imported unit from the USA. The Jaycar unit allows you to basically lock up your distributor advance mechanical mechanism, & completely recurve the advance in 100 RPM increments to suit your needs, whether turbo or naturally aspirated. It does everything the big buck profession units do, with a MAP input,or an onboard MAP sensor, plus an optional knock sensor that temporarily retards until the knock disappears. There was a good thread back in March about recurving distributors. March Thread I, like others, found a 5K distributor on a 4K, resulted in a poorer result, so I decided to build the Jaycar unit, and have just finished it, & have it working on the bench. My aim is actually to use it as the core of a waste spark ignition system, & do away with the distributor all together. I'll just have to leave the shaft in so the oil pump can run ! I'm using a crankshaft home made Hall Effect sensor, mounted on the bell housing, picking up a signal from a couple of rare earth magnets "buried" into the flywheel, on that land between the ring gear & the friction face. A north pole magnet fires 1 & 4, & a south pole magnet fires 3 & 2. It all works well on the bench. I've just got to do some basic programming of the advance characteristics of the existing distributor, so I can get it running on the engine, which will allow fine tuning to begin. The method, involves putting a degree wheel on the crankshaft pulley, and increasing the revs in 400 RPM increments & reading the advance created by the original current distributor. Would be interested to hear from anyone who has done this, because the method above sounds like a pain in the butt, if you haven't got an assistant. I looked in the Toyota yellow bible workshop manual for the 4k & 5K engines, but under distributor, they don't show any advance curve info at all. I thought I might set it at the static timing of 8-10 deg at 1000RPM, then say 35 deg at 3500 RPM, with appropriate settings inbetween, and then flat/straight line it above 3500 RPM. That should get the 4K I have on an engine test bed running. I'm fairly well advanced on the waste spark system, and have used a couple of old VT Comodore coil packs. It should be running within a week or so. If anyone has built the Jaycar unit and fitted it on a 4K or 5K, and have it operational, I'd love to hear as to what MAP sensor they used, and where they fitted it. I was thinking of screwing directly into the manifold, as there is a threaded hole there, with a bung in it. It's where I've always fitted a vaccum guage when tuning, and it works OK. If anyone is interested, I'll put some pics up of how it all goes together. P.S. Actually, I spent this afternoon making a degree wheel. I looked at them on eBay, but being a 'stinge" I just Googled "Images" of degree wheels, pinted one I liked out, glued it to a thin piece of cardboard. It turned out perfect. I'll fit it to the engine tomorrow, and initially, just see how close to true TDC, that little "nick" on the crankshaft pulley is. I can see my olde timing light getting a bit of use in the next day or so. Cheers Banjo.
-
It's probably not the starter motor ! Just a flat battery or maybe a battery terminal post connection that needs cleaning or tightening. Cheers Banjo.
-
OK ! I eventually got the info I wanted ! :dance: The PBR manual at my local Brake & Clutch centre lists the lip between friction area of 4K flywheel & outer area as 1 mm. This is what it looks like after having had machining of both surfaces. Cheers Banjo.

-
Stripping a 5K this weekend, & measuring & listing everything, before it's off to the engine rebuilders next week for rebore. The 5k already has a 4K flywheel,but it needs attention with a couple of shallow grooves in the 180mm dia. clutch plate area. This flywheel has probably been resurfaced several times in its life, as the raised 180mm section is probably only 1 mm above the flywheel surface. My question is; does anyone know what the height of this raised 180mm section is, above the flywheel surface, on a brand new flywheel ----->. I have a factory K Series repair manual, I got off eBay,which covers the 4K & 5K, but it doesn't give this dimension. I've also scanned our forums and can't find this dimension elsewhere. As I see it, this dimension is critical,as the driven plate is in contact with the raised 180mm section, but the pressure plate is mounted to the lower section of the flywheel surface. As the height of the raised section is lowered during resurfacing, without reducing the flywheel area <--------> accordingly, then the pressure on the driven plate would be reduced, resulting in possible slippage as the driven plates wears. (correct me if I'm wrong) I can't see that it is any great issue, as I gather a machinist would normally remove the three clutch plate locating pins before resurfacing. I would think it would simply be a matter of resurfacing the 180mm raised area, and then machining the outer face area, until the original raised height dimension was reinstated. The amount of material removed would not upset the flywheel, and as it's on the outer edge, it could only assist in making the engine a little more responsive with less flywheel inertia. If anyone on here has had experience in this matter, or resurfaces flywheels for "a crust", I'd like to hear their thoughts. P.S. I only raise this, as I have had flywheels resurfaced before, but only the 180mm raised section was machined. The outer lower area was never touched. Many thanks.

-
Hi Sam, Before you waste a lot of time on checking the engine, remove all the spark plugs and do a compression test on each cylinder, to check you haven't got a blown head gasket, burnt exhaust valve, or posibbly broken rings. If they are all OK, then you can start looking at other areas. Let us know what you find ! Banjo
-
Hi Scott, Sounds like the starting resistor next to the ignition coil has gone O/C. The ignition key shorts this resistor out, whilst starting, but places the resistor in circuit, when you let go of the key & it springs back. Temporaily short out the resistor & see if it runs OK, when you let the key go. If it runs OK, then replace resistor. Cheers Banjo
-
Hi Harry, Here is a post regarding your queries, that I posted back in May. Trust it assists a bit. I recently did an auto to manual conversion on my newly acquired KE30 2 door. The conversion was pretty easy, except for swapping the pedal box over, which has got to be one of the worst jobs on a KE if you are big, & don't fit between the drivers seat, with it right back, & the pedal area. Even with the seat removed it was a pain. Anyway, I digress. The "donner" k50 came out of KE70, so had the rear gearbox extension with the gearstick location right at the back. (actually, it fitted perfectly through the tunnel hole for the 2 speed Toyoglide auto) The rear gearbox mount on the K50 out of a KE70 is different to the mount from earlier KE series rear gearbox mounts, but lined up perfectly with the KE30 rear gearbox cross member, with just the need for two holes to be drilled a little further out to accommodate the rear gearbox mount holes. Everything went smooothly, and the tailshaft from the auto setup was exactly the right length. First run in it identified a bit of floor pan vibration. When I took a look, the exhaust pipe was just touching the floor, which it hadn't before the conversion. The rear gearbox mount from the KE70 was higher than than say a KE30 - KE55 type mount (which can't be used on the K50 ex KE70 extension housing), and was locating the rear of the gearbox upwards, such that the front uni had a bit more angle in it, & the exhaust pipe was closer to the floor. To solve problem immediately, I got hold of some longer cross member to floorpan mounting bolts (starter mounting bolts) and spaced the cross member lower to correct the added height of the rear gearbox mount. I used some very large flat washers, & just keep adding them until it was right. With 19mm - 20mm of spacing the gearbox sat properly, and I've now been driving it for several weeks, & it runs very smoothly. I am planning on making up two 20mm thick spacer blocks out of bar steel, & welding them permanently to the ends of the cross member. I'm just interested, as to whether anyone else has done a similar conversion & run into the same problem. Unfortunately the way the rear gearbox mount attaches to the late K50 externsion housing, it really has to be used, as other mounts would not adapt easily to the rear gearbox extension without a lot of fabrication. Love to hear some feed back on this one !
-
If you happen to be doing an auto to 5 speed manual conversion in yur KE-30, then a 5 speed gear box out of a KE-70 may be a better option. The 5 speed box in the KE-70s has the gear stick further back, and it pops up right through the hole in tunnel in auto models. You might have to open up the hole in the tunnel a little on the RHS to get it to go into 5th gear, off memory. Your existing tail shaft can be used OK. You will however, have to use the rear gearbox cross member from the KE-70, rather that your existing cross member, as the mounting point on the bottom of the KE-70 5 speed box is different. Good luck ! Banjo
-
The clutch arm rubber boot is still available from Toyota. I've just bought one from Motorama, & I've got another two (2) coming. I'll go and see if I can find the invoice, or plastic bag it came in, with the P/N on it and post it here. Cheers Banjo :dance:
-
Thanks Browland I remembered after I posted the above, I had a complete factory manual on the 3K 4K & 5K series engine. I looked up the lubrication section, (which is pretty short on detail) but it does show that all oil pumps in all K engines had a pressure relief vale incorporated. If that is the case, then the valve in the filter body I have, has to be a filter bypass valve as you rightly describe. However, what it does mean, is that some K series motors were fitted with an oil filter bypass valve & others not. The factory manual doesn't give the filter bypass valve a mention at all. Thanks again for your input. Cheers Banjo :dance:
-
I've recently had two oil pressure switches fail in as many weeks. I both cases oils was seeping out of the oil pressure switch between the electical spade terminal & the plastic/bakelite material that surrounds it. I took it out, looked around the garage, & replaced it with another identical one. A week or so after it did the same thing, leaking oil out of the same point. I don't know whether the two pressure switches I used were original Toyota fitted switches or aftermaket ones, which were added to engines I have over time. When the second one failed, I dug up another one off a 3K motor that had a button type electrical connector, rather than the spade terminal. It's been in for some time now, and the problem has been cured. The electrical wire in the harness that connects to the oil pressure switch is designed with a slot in it so it can be fitted to either type of oil pressure switch electrical connector, so I'm not sure whether Toyota used both types at times or what. I'd be interested to know whether others have ever had suffered an oil leak in this area. The oil pressure switches have a tapered thread on them, and you have to be very careful tightening them up, as too tight, will actually crack the aluminium housing into which it is screwed. Believe me, I did it ! Anyway, off with the housing & filter, and scout around the garage for another one. I found two, but they were different. They both fitted OK, but one had a pressure relief valve built in & the other had none. If the pressure relief valve is not in the filter housing then it must be in the oil pump in the sump. So presumably there must be some KE oil pumps with builtin pressure relief valves, and some without. That raised the question, what happens if a motor gets fitted during it's life with a oil filter mounting plate without a pressure relief vale, and an oil pump also without a pressure relief valve. I wasn't going to pull off the sump to have a look, so I I fitted a replacement oil filter housing with a pressure relief valve, because the one I cracked did not have a pressure relief valve fitted. I figured if the engine already had an oil pump with an oil pressure relief valve fitted, it couldn't do any harm to have two in series. Certainly better than having none at all. So what if my 4K motor of unknown origins, does not have an oil pump with a pressure relief valve fitted. As the weather is now just starting to cool off, maybe the pressure was higher first thing in the morning, with no relief valve, so it blew the oil pressure switch. The oil filter was new, so there was no more than normal resistance there. It seems a it hard to believe that oil pressure could build up so high to blow a pressure switch, as a older worn motor has a lot more clearance than a new one. Anyone experienced this before or has any ideas. Cheers Banjo :dance:
-
I recently did an auto to manual conversion on my newly acquired KE30 2 door. The conversion was pretty easy, except for swapping the pedal box over, which has got to be one of the worst jobs on a KE if you are big, & don't fit between the drivers seat, with it right back, & the pedal area. Even with the seat removed it was a pain. Anyway, I digress. The "donner" k50 came out of KE70, so had the rear gearbox extension with the gearstick location right at the back. (actually, it fitted perfectly through the tunnel hole for the 2 speed Toyoglide auto) The rear gearbox mount on the K50 out of a KE70 is different to the mount from earlier KE series rear gearbox mounts, but lined up perfectly with the KE30 rear gearbox cross member, with just the need for two holes to be drilled a little further out to accommodate the rear gearbox mount holes. Everything went smooothly, and the tailshaft from the auto setup was exactly the right length. First run in it identified a bit of floor pan vibration. When I took a look, the exhaust pipe was just touching the floor, which it hadn't before the conversion. The rear gearbox mount from the KE70 was higher than than say a KE30 - KE55 type mount (which can't be used on the K50 ex KE70 extension housing), and was locating the rear of the gearbox upwards, such that the front uni had a bit more angle in it, & the exhaust pipe was closer to the floor. To solve problem immediately, I got hold of some longer cross member to floorpan mounting bolts (starter mounting bolts) and spaced the cross member lower to correct the added height of the rear gearbox mount. I used some very large flat washers, & just keep adding them until it was right. With 19mm - 20mm of spacing the gearbox sat properly, and I've now been driving it for several weeks, & it runs very smoothly. I am planning on making up two 20mm thick spacer blocks out of bar steel, & welding them permanently to the ends of the cross member. I'm just interested, as to whether anyone else has done a similar conversion & run into the same problem. Unfortunately the way the rear gearbox mount attaches to the late K50 externsion housing, it really has to be used, as other mounts would not adapt easily to the rear gearbox extension without a lot of fabrication. Love to hear some feed back on this one ! Cheers Banjo :dance:
-
The good book says . . . . 5K & 5K-C Engine Oil Capacity Dry refill with oil filter 3.6 litres Drain & Fill with oil filter 3.4 litres Drain & Fill without oil filter 3.0 litres. Hope this assists Cheers Banjo :dance:
-
Definitely the combo switch, if the high beam comes "on" in one position, but not the other. Unfortunately, this is one of the weak points in these early Corollas, as the full high beam electric current passes through, & is switched by the combo switch on the steering column. There is no relay interface in between lights & switch. The switch contacts are pretty small & distort or burn, with high electric loads like those from the high beam. Bear in mind that the one you get from a wreckers will also have seen service. I have been able to save a couple over the years by cleaning & bending the switch contact arms. It's worth a try, if you've got a little time & patience. The ultimate solution is to insert a relay betwen the switch contacts & lights, so the the combo switch is only switching the small relay current. I've done the mod to one of my Corollas, and it works perfectly. The other benefit is your lights will be brighter, with no voltage drops across the combo switch contacts & all the wiring & connectors between lights & switch. Always mount relays close to the lights & run a fused supply to the relay directly from the battery. I'm just about to do the same mod to my KE-30. Cheers ! Banjo :y:
-
Here's a link that may help you. It's pretty straight forward & written simply. http://www.totallytriumph.net/spitfire/ski...your_head.shtml Hope that helps !
-
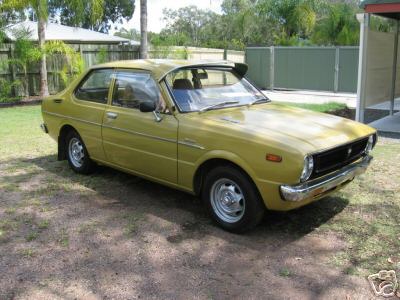
Here's a picture of my KE30 with a sunvisor.
-
Hey Teddy Only picked up this thread lately & it's too late. They've all gone ! :) :D :y: When can we expect some more rolla stickers ? I like the idea of rolla stickers on Corolla's all over the world ! I need two at least. Regards Banjo
-
Here's a link to a KE-30 clutch cable currently on eBay. http://cgi.ebay.com.au/TOYOTA-COROLLA-KE30...1QQcmdZViewItem Under $ 15.00 + freight. I received one today from the same source & it's just fine.
-
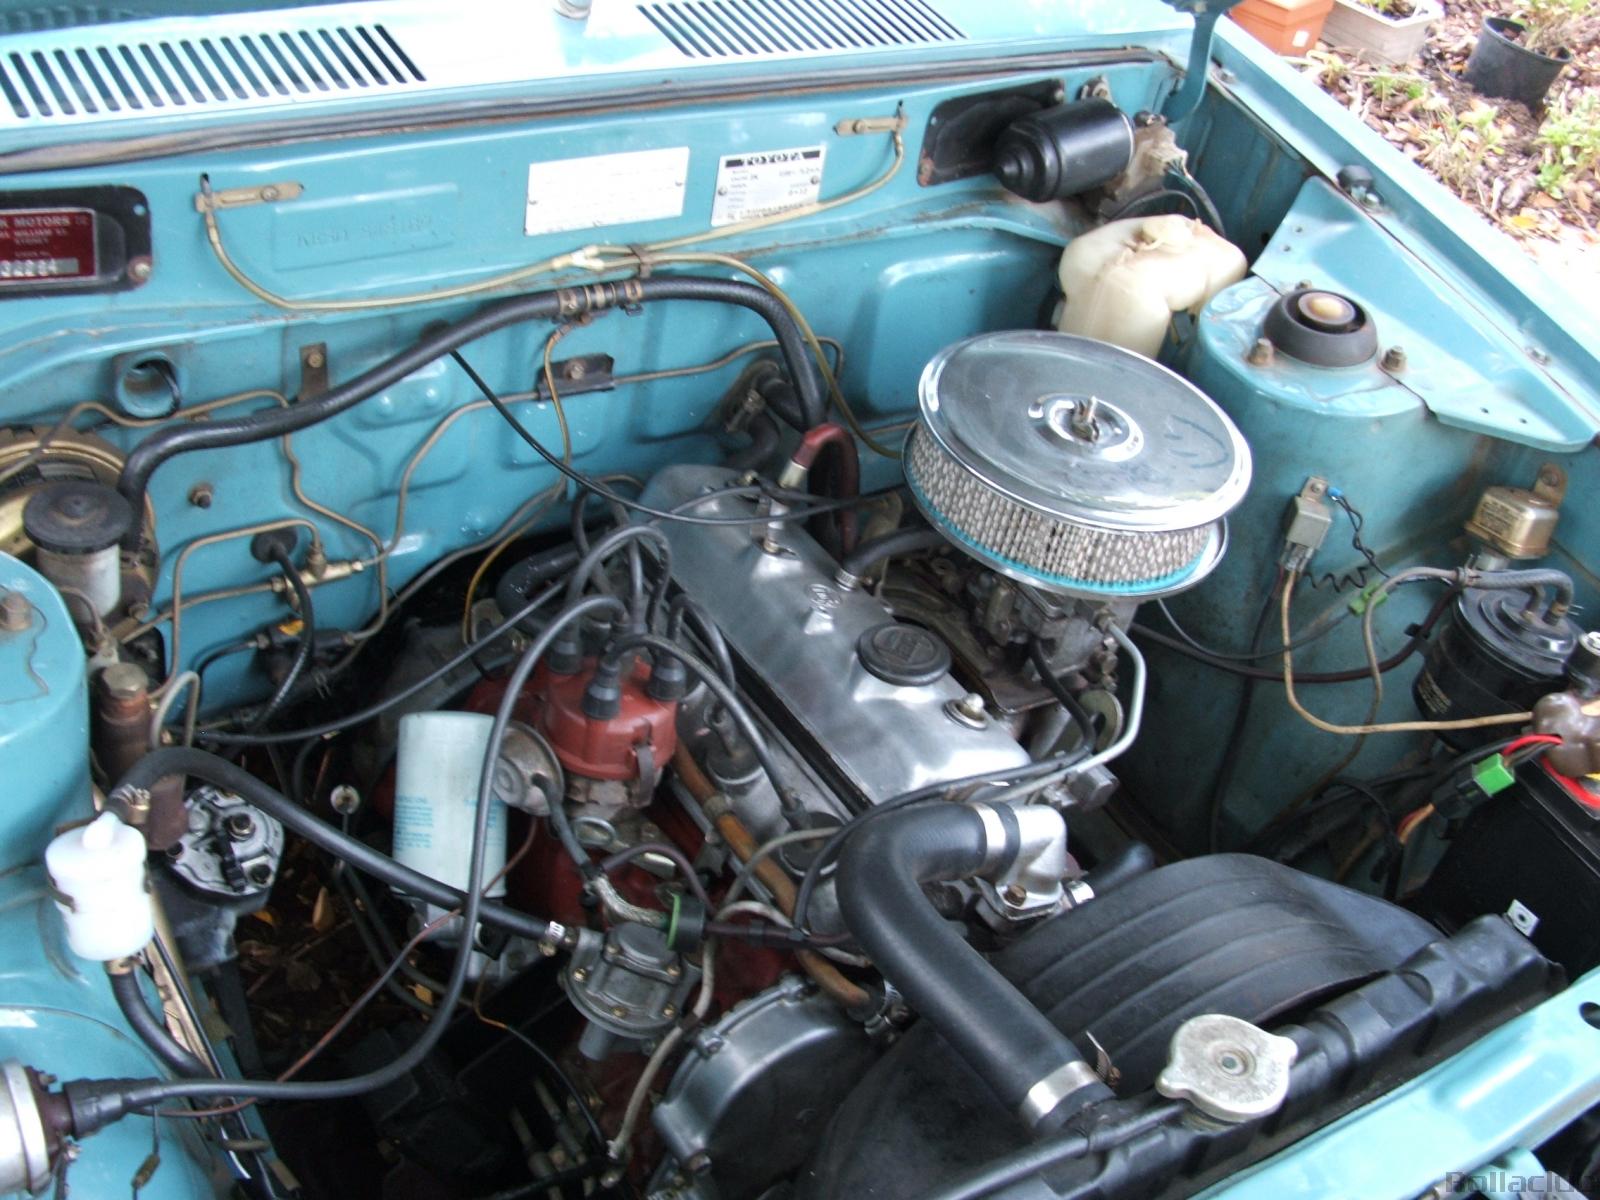 That's one very sweet clean engine 7 bay. A credit to you !
 -
-
-


