


altezzaclub
-
Posts
6831 -
Joined
-
Last visited
-
Days Won
134
Content Type
Profiles
Forums
Events
Gallery
Blogs
Everything posted by altezzaclub
-
You want a softer spring on the oil pump relief valve, the one we normally put a washer under to INCREASE the let-off pressure. Sadly it means pulling the sump off so you can see the system where it bleeds off the pressure over the stock setting. It may have been shimmed already for higher pressure, so you can take that out if it has. Otherwise you either change the spring, make the housing longer, or do something farm-spec like trim the spring a little shorter. You can see it here- http://www.toyotapartsoverstock.com/showAssembly.aspx?ukey_assembly=525989&ukey_make=1060&ukey_model=15450&ukey_category=21646&ukey_trimLevel=18320
-
These ones, the 'street' ones.- The urethane stands up to jumps and ditches OK, but the thrust bearing gets beaten to death. Sadly the urethane is molded around the bearing in the factory and you can't replace the bearing by itself, but they've done over a year's rallying and they weren't new when he got the car. $380 the pair, $110 odd each side for new thrust brgs with the urethane part. http://www.k-mac.com...yota/toyota.htm Don't be afraid to lathe the spring perch off the strut and reweld them on higher up. You want the shock to sit normally at about 80% of its extension, so when it lifts 20% more it tops out. That means it has 80% of its travel to go down when it absorbs the weight of the car coming down off a jump, rather than just 50%. If it tops out it doesn't matter, the weight of the strut plus disc & wheel just hangs off it OK. I expect you'll build a low tarmac set of struts and a high gravel set separately and just swap them over for each event. They will have opposite valving, the tarmac has easy down hard up, & the gravel has hard down easy up. We're running Kings Springs on the front, quite randomly, they were on there when he bought it. They're stock height KTFS14, but I don't know what rate they are.
-
Here- Drawn on for another thread, but those are the jets.

-
Those are the only parts that actually DO anything aren't they, the igniter is in two parts- a sensor and a computer? So if you replace those two you have fitted new items that do actual spark production and the rest of it all won't affect it. Mine looks like this, just two black boxes.

-
Those neatly sort out fuel supply and leak problems. If its a problem with the idle circuit it would be unlucky to have it happen with both carbs. What did this involve?? It will tell you what stopped it idling. I assume you have check-tightened all the bolts on the manifold in case leaning on it wasn't enough. You might need to remove the manifolds and check the gasket for breaks I think, seeing both carbs suffer the same problem. You can alter the half-choke idle speed and leave it to just richen the mixture, but that won't solve the problem.
-
LOL ! Run it richer this time, what the hell if it uses more fuel for a month or two. If it solves the detonation/head gasket problem you know what the trouble is. Do those needles have a series of grooves at the top where you attach them?? If you move the clip down by one groove it richens the mixture right through the range, and if you're on the bottom groove get one cut just below it by someone with a lathe. The O2 display will sort it out, I saw one for very cheap at some Chinese guage website over the weekend. here it is- throw away $20..... get a couple of suitable exhaust sensors from the wrecker and you're away. http://www.ebay.com/...d=290687426338
-
We're running a dirt-cheap strut top camber/castor plate, I'll look it up later- Some red plastic thing with a thrust bearing. Take the sway bars off and run without them, which is what I did to Steve in the Celcia. If you ever get fast enough to scare yourself with body roll at 140kph, let me know and I'll tell you the next mod... Don't weld the spider gears to the top hat casing in the diff. Fill a tooth gap with weld, then fill the three corresponding ones so they all hit at once. You need some free turn in there to let the car turn in and stop understeer. Springs I reckon should be as soft as possible but enough to stop coil-binding or bottoming out the shock. The Monroes are entirely wrong for gravel of course, they suck the car down into the dirt insterad of keeping the nose high. You can re-valve the stock wet struts yourself if you still have them. Make the holes on the 'compression' (going down) stiffer, and reduce the valving on the 'coming up'. Chat to TRDKE70 about his spring rates, but basically the fronts are just firm enough to land on and the rears are as soft as possible to get maximum squat. We're using 110lb/in rears and can't find anything softer at the wreckers. Make sure you have long soft bump stops, you can buy some lovely progressive ones that ramp up in density towawds the end. Stock old ones are pretty hard, I found some Falcon fronts that I fitted to the rear of the Celica. We have Sigma LCAs, gave us a max of about -4deg of camber I think, some of which we removed. Run zero or 2mm toe-in, although toe-out will make it turn in better. The trouble with toe-out is it makes the car nervous at speed and very darty. Run lots of castor. Stick to bushes if you can, I'm no rose-joint fan either. Take a look through 'how not to build a rally car', that was an understeerng too-low dog when he started and now it floats over (almost) everything and turns in beautifully then slides controllably...
-
How was it running the few days before you stopped it?? Easy to start then?? If the dizzy was screwed down tight the timing shouldn't have moved... so- Is the spark you have at the spark plugs sitting on the tappet cover?? or did you check it somewhere else? If you have spark at the plugs, does it backfire or cough when you crank it, or you get absolutely nothing?
-
The mechanical side is pretty bulletproof, except for wear in the bush and sticking of the weights. Electrically the cap and leads age and lose their insulatio, so you get misfires especially when raining. Those sorts of leaks you can see at night as sparks and plasmas running around the leads. Electronically its a black art.. like any semiconductor the parts can break down, run at a reduced performance or fail completely. That's your ignitor and sensor. What sort of problem does it have?
-
Wow that's nice! look after it, there are fewer and fewer around!
-
ohhh!! Fascinating! Did you buy the 4K twincam Riley, or is that another engine of Phil's?? So jealous.... What is the chance of a few more Kg on the torque wrench?? I assume you've checked for the bolts bottoming out and the threads are lubricated. A change to studs might allow for more torque for better sealing.
-

3K Bigport Head Or Just Shave And Port The 5K Head
altezzaclub replied to ke20rota's topic in General Mechanical
What are you going to do with the car?? daily to work? Race it? Weekend warrior? Bigger ports mean more top end and worse lower down, so a well-ported 5K will be better unless you're spending a lot of time over 5500rpm. While you're there, how does a car or ute's diesel stop when you turn the key off?? They have no ignition to kill, so do they have a decompression valve like a truck?? -
Where the roof corner had been severely crushed I couldn't straighten it, so I cut it out and sliced the spare car roof up. An hour with the welder had it butt-weld spotted into place after this photo, but being a roof it will never be perfect. Steve finished chasing moo-moos early and came down to weld over all my spotwelds, then grind them back to invisibility. Then it was time for our next road trip, a 7am start through pouring rain down to Sydney to pick up a 3SGE and a 4AGE-powered AE71 wagon, some rims and then out to Orange to drop me off and stay overnight, then back up to Armidale with Ashara driving the ute and Steve the AE71 (dunno if they swapped, they must be there by now!) ... and I don't have any photos! A 6-week semester in which time he will spend every weekend at home working on it, then two weeks holiday before a rally down on the coast! Its a tight schedule!


-
Steve's mate Matt came to visit and said his welding was crap. Instantly he had the MIG handle put in his hand and told to do better! ...which he did have a fair crack at, but he wasn't much better, and said his welder at home was much better... so a phone call to beg it off his dad and.. To be fair, the enormous old yellow welder in the back corner was bought to weld up bulldozers and tractors, not 0.9mm steel panel, but this new one was such an improvement! Still not Steerfast rallying, but much better than we had been doing! We had already sliced the top chassis rail off the spares car in the past, so we had to reconstruct that. Some 1.6mm steel was lying around so I shaped it up and hit it with the new welder.


-
After that I put the jack horizontally across the A-pillars and cut a brace to fit in and hold that shape. Now I had the screen fitting perfectly, and we welded the brace to a tag on each side. Its under a lot of compression, a random bit of steel fence picket I found outside! I'd taken the precaution of cutting the weld between the cage and the A pillar, and now a sizeable gap had opened up. We will bridge over that later to hold everything in place. You can see how trashed that pillar is by rust and repairs in the past. Speaking of rust, we decided to panel all of it out as we found it, so a day was spent cutting little bits of steel to weld in. Not a good shell to start with, but we should have done a Steerfast job on it to start with!


-
Anyway... Next day the screen pillar was high enough, but more diamond-shaped than we could use, so dash out time. A pile of junk made the car lighter.. ...and inside, I found no dash cross-brace at all, its all made of plastic! So I decided it was time to strip the loomb as well and throw out more weight. Then I could get down to re-shaping the slight diamond shape of the screen surround! The screen has to be within 5mm of the metal underneath it, all around the frame. Also, it needs about 5mm minimum gap all around the edge so it can't be touched by metal when glued in and when the car lands after a jump & twists and bends.


-
Now, Steve's dad Pete lives by himself on the farm, both boys are at UNE, so Steve and I had been doing some cooking to give him a break. He had a pork roast sitting in the freezer so we defrosted that one day and roasted it. The idea is to slice the pigskin (incredibly tough) rub it with oil, then rub salt into the cuts. Into the oven at a hot 220deg for 3/4hr to crisp it, then cut it back to 180deg, and in 4hours you have this massive roast with the most addictive crackling! It actually lasted 4 guys three or four meals. (except the crackling which lasted 10minutes!) I can't remember, but we made stirfries of the rest of it. Over 3kg to start with. Next door to the garage (which has a concrete floor) is our spares and tools store- Stuff we use often. Behind that is the less-likely spares store, stuff we don't need just now. We've expanded into the shearing shed area to start stacking the ever-increasing bits too.. Plenty of room in there, but we also have plenty of old stuff to clear out of the garage when we get time.


-
Back in the shed we had to remove the screen from the rally car (easy- its already smashed) and remove the good screen from the spares car (Hard- can't afford to smash it) Anyway, a guitar string and some bits of wood soon sorted it out. I hadn't done this before but in the end we developed a method that worked beautifully. With a good screen it was back on the truck rack to pull the pillar back up to where it should be. This time I chained down the scuttle panel above the firewall and hauled on the top of the pillar. I swiped the jack out of the ute and gave the pulley some help. After more creaking and groaning I left it overnight.


-
A back-breaking 36kg became 16kg without a plastic window, so we will do something there in the future! Actually, another Kg or two as I'll weld in a bit of exhaust tube as a higher-up intrusion bar above the cage, but still maybe 20kg instead of 36. ..and I'll need to weld in a panel from another door. A quick hack with a grinder took off the dented part, and then some subtle panel-beating tools re-arranged the door frame to what it vaguely was. I swapped hinges with the spares car (door already used in previous incident..) and rearranged the door frame in the car a little.. until it fitted!


-
The passenger's headlight bracket spans both bits of chassis and the holes lined up perfectly. I gave the panels a good 20mm of overlap. The bottom lines up with the top of the chassis rail, so it will be firmly attached. Meanwhile I took the passenger's door with its torn-back edge and stripped it. The car landed on that side first and slid along, peeling back the outer skin and rearranging the front of the door frame. It bent the hinges, jammed the door backwards against the B pillar and folded it into the door frame of the car so the door wouldn't open.


-
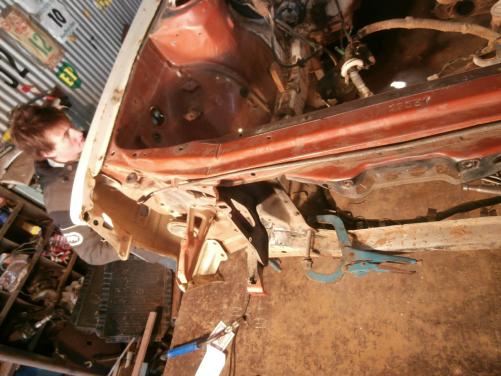
So 15minutes later we were at Bunnings buying a pipe wrench and a straight bit of timber, and an instant carpark alignment later we were all go! Once he found out it drive so well after an alignment and everything worked, the motor and drivetrsain is great, the body is great.... bang went the idea of another rally shell, its too good! What surprised me was how the toe-in made such positive camber, but it all sorted itself out nicely with half an inch of toeout added. We got back to Walcha late in the evening and stuck it in the woolshed. Now we had a guard to test our new engine bay before we welded it in, and it looked good.


-
That worked OK, but once the rail was straight it was obvious it needed to have the lower curve lifted and pulled forward. I figured using the tractor and a tree on it, bit it was less work to go and cut a half-nose off the spares car, a lovely straight rustfree RA40 that was born with the disadvantage of a fastback instead of a coupe back That took a day, then cutting the rallycar to suit took another, but soon I had the driver's side from just behind the turret and right across the front within 2mm. Then Steve's Dad had to go to town for a couple of days, so without having to chase mooies we grabbed the chance for a road trip. Swiping his Dad's ute we made a 6am start up to Coolangatta to catch up with my brother for a cup of tea at 4pm, then off to Brisbane to get a 6speed gearbox. Of course the guy was fitting an Altezza 3SGE to a Lotus Seven style kitcar and owned a turbo Glanza Starlet, so we spent an hour of more chatting The off to get a pile of RA40 doors. THIS guy had 6 RA's in his driveway and garage, 23s and 28s, a show car, a race car, a wife's car, another show car... and knew EVERYTHING about Celicas. That probably took a good couple of hours.. It was after 9pm when we picked up the mudguards from a 3rd guy, and after midnight when we got back to Coolangatta for the night. No food since an early lunch that day! Of course we couldn't leave the 6speed in the back of the ute overnight, so it went into the back seat and would punch a hole in the upholstery by the time we got home... I let Steve shoulder that one with his old man! Up at 5am as we had to head back up to Brisbane to catch a guy before he went to work at 7am, so no breakfast. That bought us a complete RA40 coupe that Steve got a one-day permit for, and we had Subway at 10am before we rego'd it and left. It wouldn't drive of course.... it must have been owned by an older gent for most its life, it really was in good condition, then some young guy who smacked the driver's guard and ruined the alignment. It had massive positive camber, toed in enough to howl the tyres and lift the nose WAY up in the air.


-
Then I folded up a little steel bar and bolted a chain to the crushed inner guard, and hooked on the hoist. To hold it down I grabbed a grinder and cut a couple of holes just above the chassis rails for a chain to go through. That chain we tied to the truck deck, then with much creaking and ominous cracking sounds we tried to lift the truck into the air. Once the top chassis rail was slightly higher than it needed to be we left it overnight. The timber pieces were to spread the weight along the rails and hold the chain off the metal edge.


-
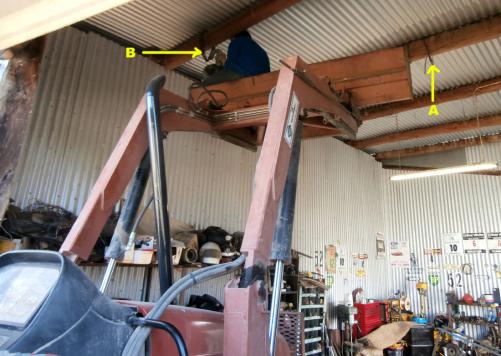
Well, another two weeks intense rally car building is over, complete with two big road trips and two new cars! Actually, this was all rally car repair rather than moving ahead with the build, so its pushed our faster motors off 6months each, but it will still happen. In theory the local panelbeating master (nowadays a custom car builder) was going to pull it all straight and sort the panelbeating, but his man had to go back to QLD and was off work for a week, so we decided to tackle it all ourselves. Steve had a thousand head of cattle to round up, drench, weigh, wean, move, and do whatever farmers do, so I was on it more or less by myself unless I could drag him in for particular jobs. We left the car on the truck, which, while it made the woolshed very cramped it was something to chain it down to as a chassis straightener and it gave a lovely steel workbench. Sadly I haven't taken enough photos over the time, but when I get busy I forget everything else. First up was a strip, throw all the panels in a pile and whip out the motor and gearbox, then look it all over. I reckoned we could pull the driver's side up and forward and outwards to get it back in line. We moved the 3ton hoist from is original beam with 4 turns of #8 wire, (for lifting engines out..) to the next beam, closer to the wall, on a hard steel chain. You don't do this off a ladder, I can't even pick that hoist & chain up...
-
Ah- education is expensive! Definately something tricky to look for. Now why would you want an old 18RC carb... we've probably got a couple lying around the farm right now. Keep an eye on the chassis mounts for the rear sways, they are pretty wimpy in the KE70 and likely to crack.


