

altezzaclub
-
Posts
6725 -
Joined
-
Last visited
-
Days Won
130
Content Type
Profiles
Forums
Events
Gallery
Blogs
Everything posted by altezzaclub
-
I've got Monroe GT Gas in the back, came off a KE70 at the wrecker because they looked brand new. Its quite stiff on stock springs, and handles well although it does have a Celica aftermarket sway bar fitted.
-
Rear Springs!! When you're under the car can you get me- the outside diameter of the coils, right across the spring. maybe 120-130mm the wire diameter of the spring wire itself. maybe 10mm the number of coils that are 'free' (not touching) when the car is sitting normally. (Jack under the diff) maybe 5 or 5& 1/2 to 6. the total number of coils in the spring. Maybe a coil or two more than the free coils. Then I can calculate the spring rate and see if we can use KP61s in the RA40 rally car. I've been hunting 1980s small cars at the wreckers but most have skinny stiff springs from being FWD. If you ever replace the rear springs we would love to buy them if that are less than 100lb/in rate! ..and I don't know how they keep cars in such good condition in Japan! It looks superb.
-
.and here is how to swap the rear shoes when one wears faster than the other. The 3.9 is definately taller around town, I cruise in third too much! I think I'll keep my eye out for a 4.1 and try that too, maybe have a diff for around town and another for trips away! I can't say I've noticed any difference from a wider rear track, but that will only show up on the next trip North I expect, through the mountain passes around Kandos. http://www.rollaclub.com/board/topic/65762-how-to-replace-rear-drum-brake-shoes/
-
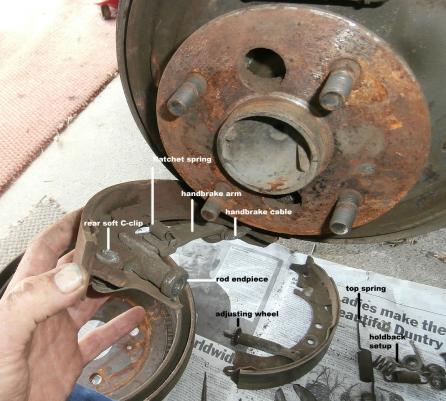
Then you can assemble that shoe onto the backing plate. Put the ratchet arm on and the other C-clip, fit the ratchet spring and then put on the hold-back spring. That will hold the shoe in place. Clean and lube the thread in the middle of the adjusting rod and slip that into place.. Now comes the hard part. I put the bottom spring on next, so the other shoe gets held on, then the hold-back spring, then the top spring.. No matter which order you do them in, it is still a battle for the top spring. After you have them in place the last job is to adjust the shoes outwards to touch the drums. You can do most of this without the drum on, just wind the adjusting wheel out until the shoes touch the drum as you put it back on. You'll have to slap the shoes around a little with the drum to get them even and centered, remember the adjuster pushes the top of the shoes out more than the bottom. Put both drums and wheels back on and press the brake and haul up the handbrake a couple of times. They will both be loose, so climb underneath and use a flatblade through the slot in the backing plate to turn the adjusting wheel. Spin the tyre as you do it, you will find it grips in parts of the turn and is free in others. Hit the brakes again to center the shoes and then spin the wheel, and adjust it some more if the grippy part of the turn vanishes. In the end the pedal should be high, the handbrake feeling good and the wheel should have most of a turn without friction. They will wear in within a day or two, and someone who rallies an RA40 said they used to adjust them up fairly stiff before stage one and by the end of the stage they were free! So- add anything I've forgotten!

-
Here is the C-clip opened up and you can see the thin spacer washer behind. Just swap your new shoe straight into that position and close the C-clip up with pliers. I gave it a quick clean-up with brakeclean and a brush, but I wasn't that fussy.

-
Now both shoes come off the backing plate. You can see the other C-clip holding the handbrake arm onto its shoe, and the ratchet spring holding the ratchet arm in place. Removing the C-clip will take the handbrake arm & cable off the shoe, allowing them to be fitted to new shoes.
-
I used vice-grips to lever against the hub and a flat-blade to push the top spring out of its hole in the shoe. There is a lot of grunt required to move the spring, or maybe I'm just getting old!

-
Now remove the soft C-clip on the outside of the handbrake arm pivot. There is another C-clip behind the shoe, they hold the little axle in place that the handbrake arm pivots on. C-clips are soft alloy that get crushed into place, I re-use them once but I wouldn't re-use them again, so buy them when you get new shoes. Use a flat-blade driver to open the 'C' up and pliers to push it off the axle. With the C-clip off, the ratchet adjusting arm will be easy to move away from the adjusting wheel and you use a flat-blade to wind the adjusting rod back in to its mnimum. This makes fighting the top spring off much easier! You can see that when you use the handbrake it pushes the adjusting arm down on that adjusting wheel, and if it moves far enough it clicks the wheel over once. Ths is how the rear shoes are moved outwards as they wear. There is a slot in the backing plate to adjust new shoes up into position, but of course with the ratchet arm in place you can only tighten the shoes up, not adjust them back.

-
Then the lower spring. I used a flat-blade screwdriver to push one end back into the brake shoe hole and then pliers to free the spring.

-
You start with the two hold-back springs. On each shoe a pin comes in through the backing plate from behind and has two washers and a spring fitted via a slot in the washers. Just hold the head of the pin with a finger behind the backing plate & use pliers to push the washer down and turn it 90deg. They will release the two shoes, that are now just held together by the top and bottom springs.

-
Here are the components that you need to take apart. Ths is passenger's side, so although the parts are the same the picture faces the other way.

-
OK, this was a little side-job when I fitted the RA60 diff to the KE70. On this style of drum brakes there is a leading shoe and a trailing shoe. The leading edge is the one nearest the hydraulic cylinder in the direction of rotation, so that is the edge that gets pushed out onto the drum and bites. It is the one towards the front of the car. As the shoe pivots on the bottom pin, the bottom of the shoe does not get pushed out as much and does not work as hard. Obviously having a slave cylinder at the bottom would fix this, but be more expensive and complicated. The trailing edge is the top of the other shoe, it gets pushed out by the cylinder but the edge does not touch the drum first, the contact point is further down the shoe. This means the leading edge shoe does more of the braking, and wears more. I thought that seeing I had everything apart for the diff swap, I would swap leading to trailing shoe and even the wear up. You can do the same with single piston (swinging caliper) disc brakes, as one pad always wears first there too. This job is the same as fitting new shoes. Sadly the one picture of the components that I took is of the passenger's side, while the other pictures are of the driver's side. Remember this when the direction things face has changed. First up is getting the drum off. Car on stands, handbrake off- As the shoes work they wear the drum away, so a lip forms on the very edge of the drum and that has to be dragged over the shoes. There are two holes threaded for 8mm bolts that you use to get the drum outwards.

-
...which is strange. It is only of a detriment when someone runs into you at 5kph and your car gets more damage without bumpers than with. At 60kph they just transmit the shock to the chassis and bend that a little more. I can't see them helping any pedestrian either.. and only the chrome ones look OK, the black ones were a world-wide period of absolute ugliness started by America. Still, in a tyranny you are stuck with the rules.
-

Toyota Car Show Photos From Southern California.....enjoy.
altezzaclub replied to verde2002's topic in Automotive Discussion
yah- and the 2-door Ke70s... -
Either of you guys made a remote booster setup on the other side of the car?? So the pedal rotates a tube that works the master cyl/booster on the pass side. Jusr something I'm thinking about... I like that reservoir idea, maybe not low but it gives some space.
-
What sort of carbs? Twin DCOEs for that price would be expected. I suppose in the end you sell a hot 4K to someone on here to gain some moey back. Yes, but that sort of conversion is pretty big- suspension, brakes, gearbox, diff.. it wll take time to assemble it all and get it done.
-
If the timing is retarded it overheats, so that could be part of the problem. Easy enough to check with a timing light. If you mark the pulley with white correction paint all the way around to 45deg and use a tacho, you can generate a timing curve from idle to 3500rpm, by when it should be at max advance.
-
..and then read this- http://www.rollaclub.com/board/topic/42407-the-girls-ke70/ What you really need is a conversion to manual, the 4K has hopeless performance as an auto. If your rebuild includes a re-bore see if you can get 1500cc 5K pistons, and don't forget to lighten the flywheel and have the crank balanced. The extractors can be bought here on Rollaclub for $220odd, the rest of the exhaust cost me $350, the cam can easily be regound with followers for $170, and you will need to decide what carbs to use- quad bike carbs, twin SUs, twin DCOE Webers, single DCOE Weber, 32/36 downdraught Weber are all used on here. There's even a couple of guys with gilmer drives I think too. Have fun!
-
Yes, you might be losing circulation by having a wrong-sized hose or junction somewhere. A small hose has become a bigger one and is stealing the water circulation, (throttle body one) maybe in a loop. or maybe what was a large part of the circulation is now going through a small junction and being strangled. Pull the pump and check it. The fact that it cools down when you rev it suggests the pump is not circulating correctly at low revs. Maybe the vanes are corroded and worn away?
-
Well, I got it all in and its running fine. The next big trip up to Walcha will tell. The story is here- http://www.rollaclub.com/board/topic/65709-how-to-fit-a-celica-diff-to-a-ke70/
-
How To Fit A Celica Diff To A Ke70
altezzaclub replied to altezzaclub's topic in KE70 Technical Articles
I'll let you know in 12months Dave. The arms didn't seeem to notice the extra 12mm spread, its probably taken up in the play within the bolts. 2minutes bleeding the brakes and they're as good as ever. When I'm on a gravel road someday I'll find out which end locks up. Its noticeably taller geared around town. WIth our 45deg angle parking it takes a litle more to climb up the road camber, and it cruises in 3rd at 50kph unless I remember to use 4th. -
I'd say so- flush the oil to get rid of as much shit as you can. The old idea was a 50:50 mix of diesel and kero, you tossed in 4litres, started it up and let it idle for 10minutes. Now you can buy special flushing mixtures. It wouldn't hurt to take the radiator out and flush it upside down with a garden hose. Bits of rubbish sit on top of the tubes and slowly block them.
-
How To Fit A Celica Diff To A Ke70
altezzaclub replied to altezzaclub's topic in KE70 Technical Articles
The final job was to fill it with a litre and a half of diff oil. This is the easiest way I've found. So, brakes are squishy as I haven't bled them, but a drive today seemed fine! Next job, limited slip diff.......
-
How To Fit A Celica Diff To A Ke70
altezzaclub replied to altezzaclub's topic in KE70 Technical Articles
With that in I had the whole thing done. I'd popped the drums off earlier and found that the leading shoe was worn most, so I swapped them around. I'll do a 'How-to' on rear brakes after this. You can see the sway bar now sits at the back of its mount on the diff, the 8mm is just taken up nicely. That's a Celica aftermarket sway, so I've gone up two sizes now. With the Celica springs the ride height was exactly the same as with stock KE70s, 610mm ground to wheel arch. Often I run cut stockies to drop the car to level, but it depends on how loaded I expect it to be.

-
How To Fit A Celica Diff To A Ke70
altezzaclub replied to altezzaclub's topic in KE70 Technical Articles
$230 later I had a combination driveshaft delivered to my door! Note the smaller diameter of the KE70 UJ at the top. and the fat Celica driveshft with the end cut off. He made a collar to match them.


