

Banjo
Regular Member
-
Joined
-
Last visited
Everything posted by Banjo
-
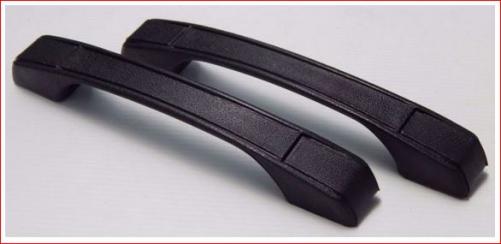
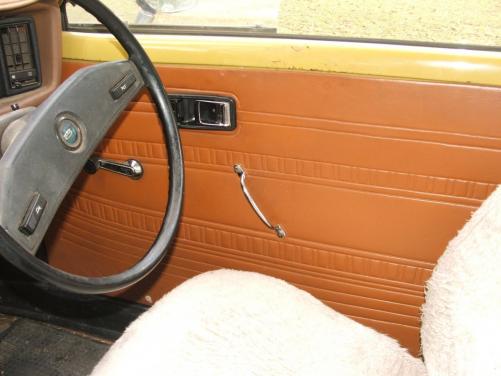
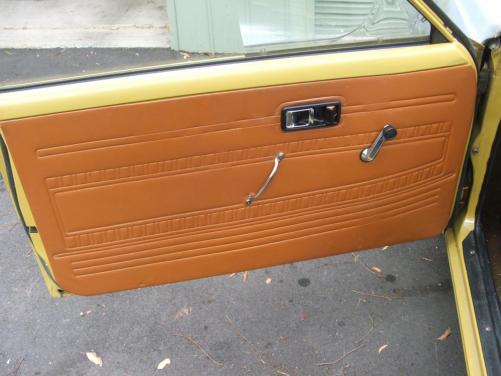
Hi Sven, Welcome aboard ! Thanks for the pictures of your car. Lovely daily drive. They were pretty much a disaster, those early model Corolla door pulls. Plastic & just broke, specially on the 2 door Corollas. Mine was do different. The later model KE55s had an arm rest/door pull, which was much more substantial, and I even considered at fitting the KE55 arm rests to the KE30, but the mounting points were no where near the same. I purchased a couple of reproduction/aftermarket door pulls, off ebay a couple of years ago, which were beige in colour, but they were ever worse that the original Toyota ones, & only lasted a couple of months. Eventually, I found a couple of chromed metal door "kitchen" type door handles at the local hardware store, (Bunnings) with the exact same mounting point centres as the original door pulls. I fitted these, and they are perfect, for this application, being strong, and look good. Cheers Banjo
-
-
Hi Steve, Do you mean the rotors are touching the rotors when turning hard left or right, or when the the steering is pointing straight ahead ? Where exactly on the LCAs are the rotors touching ? Just one side or both sides ? A pic showing where it is touching would help, as I'm scatching my head as to where you've gone wrong. Cheers Banjo
-
Nathan, Just looked up the "yellow" Toyota 3K bible & it doesn't help. Only tells you how to test it. How about trying to remove the lever arm, by driving out the pivot pin, & then extracting the lever arm. When I'm down the shed in an hour or so, I'll have a look, as I'm sure I've got one stripped down in a box somewhere. Cheers Banjo
-
Hi Nathan, Off memory, after separating the two (2) halves, you twist the diaphragm 90 degrees, & it pops out. Re-installing is the reverse. Cheers Banjo
-
Hi Marius, Oversize bearings & piston rings are only fitted to engines after the crankshaft has been reground, & the cylinders rebored. You don't just fit them to a worn engine to take up the wear. You would have to do a full strip & engine recondition to do that. Oversize bearings & rings come in various oversizes, which are chosen by the engine rebuilder, dependent on the amount of material they have to grind or bore. Whilst you have the engine stripped down, have the bores & grankshaft professionally measured, to see howw much wear they have. Be very very careful that you number each bearing halves, so that if you don't regrind, that they go back in exactly the same spot. How many klms has your car got on it, & what are the compression figures like ? Cheers Banjo
-
Hi Goose, Torque for pressure plate bolts is 21Nm. Tighten the bolts up in a star or diagonal pattern, using an aligning spigot for the friction plate. Make sure the driven plate is fitted the right way around. Cheers Banjo
-
Hi Marius, I just had a quick look at my KE30 original brake booster details. It has the following name plate details . . ASCO BRAKE BOOSTER Type: 44610-12070 No: 5A01192 AISIN SEIKI - JAPAN Many of these brake booster units are sealed units, which makes them difficult to service yourself. The ASCO one on my KE30 seems to have a crimp system to open it up, which may be possible, if you have the right tools. If you read through the repair website that Rob posted above, you will note that they can supply parts, but would rather not, due to a number of given reasons, including the possible difficulty with sealed units. I would think it would be highly expensive to either send your booster from Norway to Australia & back. They may supply you the parts, if you quote them all the numbers on your booster. The best way would be to try buying them on-line from one of the many Japanese outlets. Try Amayama. They are great from my experience. I just typed in P/N 44610-12070 on the AMAYAMA website, and they can ship a new one in 7 days. About USD 400 + Cheers Banjo
-
Hi Marius, The guys Rob suggested in South Australia, sound very good, but it doesn't really help you, as you are in Norway, where I gather, not a lot of early Corollas were sold or exist. However, a similar company in Norway, who service brake boosters, should be able to refurbish your booster, as boosters are rarely made by the company who manufactures the car, but are made & supplied by "brake" component manufacturers. The KE30 used a physically small booster, and transposing larger boosters from other cars, can be problematic, as you described what others have previously done ("butchered") to your Rolla. Another alternative maybe to scour the car wrecking yards for a booster with similar dimensions, from a late model car of a similar size. You will note that the mountings on the front of the booster for the master cylinder can vary, from model to model, but don't let that deter you, as you may also be able to change the master cylinder. A very popular mod here is to fit a Mitsubishi Pajero MC to a Rolla, if up sizing the front brake calipers. I bolts straight onto a KE30 booster (no mods). I wish you luck, and let us know how you fare. Cheers Banjo


-
Hi Mick, Just for interest sake. How many klms is on this 1981 Aunties Corolla ? More than likely, the rough idling will not be the result of what is causing the "ticking" sound. Carbies that have been sitting for a long time, can dry out and get blockages etc. inside the small internal passages. No doubt a good clean, with a "carby & throttle" cleaner, or a soak in a carby cleaner bath, will solve the idling roughness. Other issues causing rough idling is air leaks around carby, or at manifold to head mating. Keep us abreast of your progress. Cheers Banjo
-
Hi Mick, Quick tip you can try in just 5 minutes, to narrow it down, to possibly "tappets needed adjusting". Simply idle the car, then carefully unscrew the rocker cover oil filler cap, & listen at the oil filler hole with your ear. The tappets are only inches from your ear at this location, so if it is the tappets, then the "ticking" should be quite loud. Increase the revs slightly, and the ticking should increase in speed accordingly. Might be a good idea to put a tissue over your listening ear, with a light rubber band, so you don't get any oil spits in there. I'm hoping, for your sake, that it is the tappets, because that is a dead simple fix, you can do yourself on a lazy Sunday afternoon. Cheers Banjo
-
Hi Mick, No problem ! You didn't say were you are located, but I just found your earlier posts & the pictures you posted of your auntie's car. I gather you are in Victoria, if that's where your auntie lives. Disregard my previous comment about it maybe being modified by an earlier owner, as I would think, if auntie purchased it new, she probably hasn't added or changed anything, and it will be dead stock standard. Cheers Banjo
-
Hi Mick, Welcome aboard ! Ticking sounds in older engines are common place, and certainly more likely in a car that has been sitting for several years. However, if you have changed the oil several times & given it a few good hard runs, it should have freed itself by now, if it was something just sticking. The 4K-Cs to my knowledge only had solid lifters, unlike most 5K engines, that had hydraulic lifters, and these could have blocked up & are not pumping up, after sitting for years. The head would have to come off, if you were to try & take the lifters out. I would initially, just take the rocker cover off, which is not a hard job. If the tappets have adjustments on them, then the lifters are solid. If the tappets have no adjusters, then the lifters are hydraulic. (You just never know what the history of an older engine is, and what others before you, might have modified or changed on it) I would do a full tappet adjustment, and see if there are any wide settings. If the rocker faces are "grooved" where they contact the top of the valves, you may have to have them faced, or you can lap them yourself, on an oiled sharpening stone. Then run the car, & see what changes to the ticking, if any, are audible. If the ticking noise is evident, when the engine is idling, you can sometimes narrow down it's origin, using an automotive stethoscope. A cheap stethoscope can be made from a piece of hose with a rod clamped in one end, although not as sensitive as a professional one. Anyway, give those suggestions a try, and come back to us, in this thread, with what you found, and we'll see if we can help some more. Where are you located ? There maybe a Rollaclub member, close by, who is prepared to assist you. Cheers Banjo
-
Altezzaclub is probably right, that it would not be a good idea to use a thicker oil, because of your colder climate in Norway. Unfortunately, by the time it gets to the stage that you can smell the oil burning, it's probably time for the engine to come out, for a hone & new rings, or a rebore, if the bores are too "wavey". The smoke is usually the result of oil in the sump getting up into the combustion chambers, past the rings & pistons, although shot valve stem seals plus worn valve stems & guides will also produce a similar effect. Make sure the spring loaded valve on the top of the rocker cover is clean & working, because it reliefs pressure build up in the crankcase, which can also assist in driving oil up past worn rings. This usually happens because of carbon building up in the piston ring grooves, such that the rings can't move to effectively scrape the oil off the cylinder walls. There are some after market oil additives, that are claimed to seal smoking engines, but if they do work, it is usually only for a limited period. However, in some old motors, the build up between the rings, actually helps seal, & avoid more oil consumption. I once made the big mistake in an olde Corolla, of filling the tank with the best premium highest octane fuel available at the pump. By the time that tank had been consumed, the cleaning additives in the premium fuel, had loosened the carbon, and the engine was smoking like a steam train. Big mistake ! Cheers Banjo
-
Good Heavens that Glen Innes can be a cold hole ! This was my little KE30 at the Anna Bella motel at 7:00am last Friday. Fog right down to ground level, & they told me there was "black ice" down on the highway near Guyra. And a couple of days later, much warmer outside Grafton & at Lawrence on the mighty Clarence. Cheers Banjo


-
Hi Dave, Any bolt on upgrades you do to your 4K should be swappable to your 5K, if you manage to find one in NZ. Actually, a 4K-U with dished pistons, almost produces as much HP as a 5K, if you look up the specs. The Aisan carbies are getting pretty old now, but are very basic, and easy to work on. Repair kits are still available on ebay, and I see you can buy new Aisan replicas, cheaper than you can have an old one professionally rebuilt. Never met anyone though, who has purchased & tried one. The Aisan can easily be serviced, if you strip them, and completely clean them in a bath, to remove all the fuel lacquer build up in all the small internal passages. As a minimum, as Altezzaclub always advises, run a spray can of carby & throttle cleaner through every orifice. It helps to have the Toyota yellow bible manual with the carby circuit therein, but the following post on the link below, has some good advice & a better expanded circuit of the Aisan carby. http://members.toast...arbie_notes.htm There are very few adjustments visible on the Aisan carby, other than idle mixture, idle speed & the point where choke use, slightly increases idling speed. According to the "yellow bible" the pickup point of the secondary butterfly, can be adjusted by bending the little link, which slides in a curved slot behind the accelerator cable curved actuator arm. The slot could also be lengthened or shortened, to affect the point of secondary coming in, if necessary, if you feel that is contributing to your flat spot. The single biggest issue, is the worn shafts, and the leakage of air into the venturis, upsetting the A/F ratio. These carbies are getting very old & even the slightest leakage in this area has a great effect. This was brought home to me last week, on a trip down the New England highway from Brisbane to Sydney. The KE30 was running well, going up Cunninghams Gap in 4th gear. The engine was running sweetly, & well tuned, as the plugs colour was a near perfect light tan colour. 10 minutes north of Glen Innes, the engine started to "fluff", & I suspected a sticking needle & seat. Light was fading fast, so I decided to fix it in the morning. Morning saw a thick layer of ice over all the KE30, & my fingers were numb. I waited until 8:30am, when AutoOne opened their doors, & I grabbed a can of Carby & throttle cleaner, and took the top off the carby & cleaned needle & seat, & all jets, in the Woolworths carpark opposite. Reassembled, fired her up & off I went to Armidale, only to find she was still not going well, with top end restricted by about 10-15 klms/hr. I thought I'd drive to Armidale & then take another look. At a little town I had to stop at a pedestrian crossing & the engine cut out. Instantly I knew what the problem was. The idling shut off valve was not opening. I pulled over, and checked the connection, which I had unplugged to remove the top of the carby. The plug connection was intermittent & o/c. I plugged it in & out a few times, and away I went, with the engine as sweet as ever. It reminded me, that the main, secondary, & power jets, plus the idling circuit are not all independent, but work accummulatively. The idling circuit is still in play, even when driving & running, and does effect the A/F ratio, enough to make A/F ratio anything but perfect. Cheers Banjo
-
Hi Dave, Although today I'm running a 4KU in my KE30, I'm a real advocate of the 5K. I've had two and they are so much more responsive, with more power & torque, as long as you change or get rid of the 5K dizzy, whose advance curve is designed for commercial vehicles like the Hi Ace vans & Toyota forklifts. (good places to look for 5K in Ozz; not sure about NZ) I'll comment on the Aisan carby setup later today, as I am currently running my Corolla up the north coast of NSW from Sydney to Brisbane, after a run down the New England at the end of last week, to test a few mods I've done to the front suspension & brakes. Have put 2000+ klms on it in 4 days, a lot of which has been at 100klm/hr, where allowable. Had a little bit of carby trouble at Glen Innes in NSW, and stripped the carby & cleaned in Woolworth's car park. Thought I knew most things about this carby, but you can always learn more. I'll relate & answer your query later. Cheers Banjo
-
Absolutely love the videos ! But then I always knew I would, once you got it all sorted. That looks like so much fun. Just stick a good 5K in it ! That's the simplest way of getting some extra horses. Cheers Banjo
-
Hi Cameron, After working with the ARDROX 2526 at O/S 22 deg C, I shudder to think what the fumes would be like at 90 deg C. You'd want a full gas mask & helmet. You're right about it dissolving rubber. I bought some industrial long rubber gloves, that went up half way to my elbows. They were chemical resistant gloves, but felt like mostly rubber. After using the ARDROX 2526 for about 20 -30 mins, I could feel my hands getting wet & sweaty inside the gloves. I took them off, and the ARDROX was working it's way straight through the gloves. So anyone using the ARDROX, 2526, please do take precautions, but it does work well. Like Alteazzclub says, the nastier they are, the better they work. Next time I use it, to strip the boot lid, I will put a small tin of ARDROX 2526, in a tub of hot water, to heat it up a bit, & see if it even quicker to work it's magic. Cheers Banjo
-
Well finally got around to stripping the paint off my KE30 bonnet today, with the ARDROX 2526. 40 years of baked on paint. It worked extremely well. It helps to break the surface of the paint, with some 60 grit paper, to let the chemicals get into the paint, & do it's magic. However, you can just apply, & then scrape away one or 2 layers of paint at a time, and then apply again, until you get tho the bare metal. It's very toxic, and not to be treated likely. I used long chemical gloves, a mask, and a charcoal nose & mouth filter. Good stuff ! Certainly saves a lot of elbow grease. Cheers Banjo
-
Believe these are the studs ones you really need, which are available in the USA. https://sportcompactwarehouse.com/arp-am5-000-1lb-stud-m10-x-1-25?Year=1976&Make=Toyota&Model=Corolla& Cheers Banjo
-
What was the first model Corolla in Australia, that was supplied/fitted with an electronic speedo, with a pulse VSS fitted to the gearbox, rather than a cable drive ? Cheers Banjo
-
Hi Ian, Thanks ! Yes, I did notice the analogue trip & odometer dials on a couple of pictures I gleaned on the web. Must get down to the wreckers soon & have a hunt around. Cheers Banjo

-
I was working on a fellow Rollaclub members KE20 with a 4K engine fitted, a couple of weekends ago, chasing a few electrical gremlins, as the result of a dodgy electrician being let loose under the dash. It had been a long day, and we still had to refit the freshly cleaned & oiled distributor, as the timing light had indicated no auto advance, the bob weights having all frozen up. The day light was fading fast, and the engine had been turned over with the spark plugs out, when we measured the cylinder compression pressures. We still had to “time” the engine & find TDC. This is always a pain, and can involve at worst, removing the rocker cover, and watching the rockers on no 1 cylinder, or sticking your finger in number 1 spark plug hole, with the possibility of a trip to hospital, if your finger gets sucked in. I’d already put a bit of “whiteout” on the crankshaft pulley nick for lining up TDC, and not wanting to go through all that rigmarole of finding TDC, I took the quick method. There are two points in a cycle (2 revs of the crankshaft), where the nick in the crankshaft pully lines up with the TDC marking on the timing chain cover. One is TDC No1, and the other is TDC No4. So if you arbitrarily choose one of these, there is only a 50% chance of getting it wrong. So we set the crankshaft pulley nick arbitrarily against the TDC mark & installed the dizzy, with the vacuum advance mechanism parallel to the block, with the rotor button pointing to a point on the head, approx. between 1 & 2 cylinder spark plugs. Popped the leads on, in the usual 1, 3, 4, 2 firing order in a clockwise direction, looking down on the top of the dizzy cap. Hit the starter switch & there was a back fire, which woke the neighbours dog, and scared a few nesting birds in the tree above us. We had got TDC wrong ! Rather than line the nick on the crankshaft pulley up again, & then remove the dizzy & reinsert with the rotor button moved 180 deg, we simply pulled all four (4) leads off the dizzy. Connected No 1 spark plug to the opposite side of the dizzy cap (where no4 had been connected), then plugged the remaining leads to nos 3, 4, & 2 spark plugs, clockwise from no: 1 lead. Hit the starter, and away the engine went, and we were both home in time for dinner. From the time of the back-fire, to it running sweetly, took less than 1 minute. So if your ever in the dark, on a country road, & have to swap out a dizzy, this is a sure fire method of getting the timing right, without having to find TDC No:1 precisely. Hope this helps someone who is new to K engines. Cheers Banjo
-
Dave is spot on there. Quite common, & to be expected, when the rubber seals in the valve/tap are old & hard. Don't settle for a second hand one, as it will probably not last long. See if you can get a new one for the KE, but if not, there are plenty of aftermarket mechanically actuated ones, that are universal. Shouldn't set you back much more than $ 20, if these ebay listings are any guide. http://www.ebay.com....valve&_osacat=0 Cheers Banjo


