

Mechanical Sympathy
-
Posts
555 -
Joined
-
Last visited
-
Days Won
21
Content Type
Profiles
Forums
Events
Gallery
Blogs
Everything posted by Mechanical Sympathy
-
Doors and flares done. Need an extra pair of hands, but will likely get creative with some milk crates and cushions to hang these doors. Actually ʞ©$ɟ it, I'll go see Star Wars. edit; hung them loosely to see how bad my masking was. I'll fix that with a brush once the panels are on properly.


-

Brake Discs For A Ke20
Mechanical Sympathy replied to corollaTE27Fan's topic in KExx Corolla Discussion
Disc Brakes Australia have a listing http://www.dba.com.a...05AUG2011v2.pdf edit, apologies - not available. This shark has some; http://www.ebay.com....v4AAOSwR0JURXl6 -
Yeah the 4 speed will go anywhere the 5 speed does.
-
Thanks Rob, I think I know the one you mean; The similarity is coincidental, though obvious. I was mainly inspired by my son's Hotwheels cars rather than a love for 70's television. I wanted him to dig it, man. Monday beer and buffing bolt-ons.


-
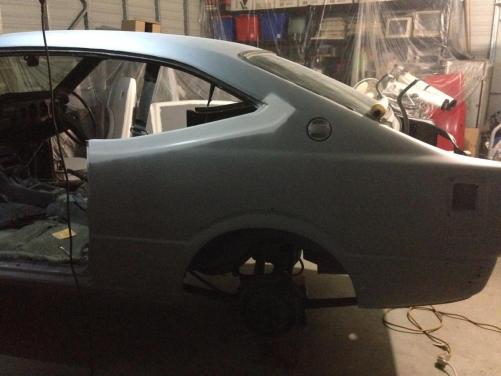
Ok well.. I didn't want to post too many shots of my junquey shed but what the heck - this is how it went down. Last week I spent every night rubbing panels, setting up the white stripes and then rubbing them again in 800 grit; Then Saturday morning I felt I'd done enough and started masking up; When I had full coverage, had a beer and reflected on my progress; Thought I'd see if the wheels matched the colour; Later that evening, after washing half a kilogram of red dust down the shower, I ventured back out with the day's final beer and peeled off the masking to have a look; Then on Sunday I backed it up with a quick rub down with 1200 over the rough bits, then hit it with the clear coat; It's very tempting to bolt it all back together now! I'll start putting the rear of the car back together but I'll leave the front end off for now until I swap the engine in so I don't get hand prints and lean all over it. Must finish doors and fender flares first anyway before the front can go back as guards need to be off to fit the front flares. I'm fingered today! Too much like hard work.


-
Not without a couple of mishaps - my timber bench seat collapsed while I was doing the roof. And my gun was either a jet or a fan - no in between - so I got a run(s) in the clear. Nothing some 1200 won't fix. But the gloss coat worked out well. Hopefully it keeps this lustre as it dries. The doors fell behind on the priming schedule so there's still a few jobs to do. Can't pack up the compressor just yet.

-
And that's the clear coat. Beer o'clock!

-
Hopefully will do a couple of tidy ups and a clear coat tomorrow;

-
Actually yeah the red rubber grease is the gear for brakes - it's vegetable based. Any petroleum or oil on brake rubbers or other hydraulic components will make them swell and perish. Sorry to send your thread off-topic!
-
Just a quick caveat for the viewers at home - never use petroleum-based grease on brake components, as this will rapidly destroy the rubber parts of your braking system. Use only silicon or synthetic lubricants specifically marked for use on brakes. Only good things come out of Toowoomba.
-
Procurement however, is one of my favourite project tasks. When I started working on the doors I carefully unclipped the rubbers off the plastic hole clips so I could reapply the rubber onto them later. But if I was honest, painting over the insitu clips is a bit half-arsed (more than usual) especially with a colour change . Phil's Rotarys was having a 25% off sale so I nabbed these for $75. Nek minnit special delivery to my desk - new thai-style coupe door rubbers! winning

-

-
Haha experience duly noted - I know I will see it, but will anyone else? Anyway there's at least a couple of runs so there's plenty of rubbing and fussing yet to do [sigh]. Yes I think I need some posters! I've got a hires copy of this poster saved, I should really pop down to Officeworks and get an A1 print run off.

-
Cheers Leeroy - thanks for reading. Here's a [don't look no different] post. Over the past couple of months I've knocked down several beers looking over the dozen or so dimples and dents that spray putty didn't fill. Then more recently I finally stumped the cash and purchased some colour and clear! This gave me the impetus to get out into the shed on week nights and attack the dimpled dozen with gusto and rub the whole lot over with 400 grit wet and dry.. I suppose in any project there's a point where you can no longer be bothered to chase the last 1% of divets and dimples, and I figured if paint won't cover them, some last minute blade putty will. So on the weekend I wrapped the contents of the shed in plastic and hit everything with the last (I hope) primer coat. Turns out acrylic primer is more forgiving than my eyes and though I'd considered giving the whole lot another 400 rub back before priming, turns out it wasn't necessary. I'd like to really knock this painting phase over in the coming week or two. With summer looming I have more hours of natural light after work that I can use to paint a panel or two each evening, before it gets too hot (and humid) and need to start thinking about using retarder. It'd be grouse if I could get some colour on before the end of the week. I'm tired with this part of the project and am looking forward to reassembly, detailing and engine conversion.


-
Ke55 Clutch Cable To Sr20De Trans
Mechanical Sympathy replied to JasonKE55's topic in Engine Conversions
You'll need to convert your clutch pedal to operate hydraulically. I'm using a TA22 clutch master as it bolts onto existing KE55 firewall holes without major modifications (you need to drill a hole in the clutch pedal for the master cylinder plunger), but others (silvia?) may also be suitable. -
Either the 3K or 4K clutch/flywheel setup will do. Just swap your existing 3K one over as it will be half the weight of a 5K or 7K flywheel Nonetheless a 5K clutch (and presumably a 7K) is too large to freely spin inside a K40/K50 gearbox bellhousing. I'd suggest that a KE70 gearbox speedo drive should be the same as a KE30 one.
-
To make the KE70 5 speed (or a 4 speed) fit the 7K, you will need to fit your 3K flywheel & clutch (get a new one) onto the 7K and install a spigot bearing in the end of the 7K crank. The shifter will be somewhat further back and will require trimming, but not enough to foul on the body strengthening member. Anecdotally people seem to get away with shimming up the engine mounts so the wider 7K sits a little higher on the standard crossmember, or using some combination of Town Ace/Corolla block mounts and engine mounts. In this case - coming from a KE55, it probably has something that fits already Wiring will be essentially the same, just plug like for like. You may want to fit the engine with your KE30 Corolla temp sender if it doesn't have one already, as a 7K one will probably read hot all the time even when it isn't.
-
It's Art If The Artist Says It Is
Mechanical Sympathy replied to parrot's topic in Automotive Discussion
Ah man! Just the other week I threw out a buckled KE55 bonnet for kerbside collection. It was gone before I returned with the trampoline. -
Waz' 4Agte Ke30 Build - Finally Starting
Mechanical Sympathy replied to handmade's topic in Rollaclub Rides
Have a read through here, but I wouldn't anticipate any "general arrangement" concerns with such a conversion. http://www.rollaclub.com/board/topic/67438-ke-conversions-engine-conversion-kits-ke20-ke30-ke70-ae71-ae86/page__hl__%20conversions -
Give it a go - if it's got anything above 4800 you'll know it's not a stock 5K !
-
Ke55 Coupe Front End Swap
Mechanical Sympathy replied to abstracto's topic in KExx Corolla Discussion
I've never seen it done, but have wondered if it was possible. When I eye-balled it once, the Trueno doors looked to be longer in front of the A-pillar. I suspect even if the front panels do indeed swap over, that the doors wouldn't match up. It was a completely unscientific examination however! -
Blue Thing: The Daily / Motorkhana Hack (Now Efi)
Mechanical Sympathy replied to carbonboy's topic in Rollaclub Rides
Back in the day Wheels (Motor?) magazine did a big 40 car COTY comparo and the Magna was the fastest in the corners on the test track, but out-gunned by the Commodore and Falcon on the straights. -
I'm calling it - 37 Levin (37GT is too obvious..) How long until I can I get my hands on a second hand engine and gearbox I wonder? It would be a nice little unit for an engine conversion! I'm ambivalent about the styling but I do like the concept - heck that's why I like 35/55 coupes. Could be compelling if they really are targeting a low 20K price (or $19,990).
-
1.5 litre 6 speed RWD 4 seater $2?K


-


