

LittleRedSpirit
 Global Moderator
-
Posts
4770 -
Joined
-
Last visited
-
Days Won
63
Content Type
Profiles
Forums
Events
Gallery
Blogs
Everything posted by LittleRedSpirit
-
I can help.
-
Just had the repairs authorised. Total value is 4800. Ive just ordered parts from Flos in Ireland on behalf of the smash repairer, had to buy the kouki lights as thats all you can get. Car will have a different look in future I guess. Kit comes with kouki headlights, parkers, grill, decal, and bumper lights. They will repair the bar and its mount. Any remaining Zenki bits will go on the shelf for a rainy day.
-
Crazy week in 2az86 land. Was working on the ra65 that I used to own, helping do the wheel bearings, and Wifey was shooting off to get a late lunch for us, but managed to back rather hard into the front of the AE86. I will forever have nightmares about that sound, but yeah, the end result is a smashed left headlight, parker, the freshly painted bonnet is dented and re kinked, and the left bumper mount and bumper is distorted, one smashed driving light, and the most annoying part, the rad support was pushed back a bit, and theres a little ripple and the right upper fender rail has moved over a bit as it was pulled. Long story short its gonna have to be realigned at the front, zenki parts are unavailable, so it will get a Kouki front and likely just repair the bar that's on it now cause you simply cannot buy a bar for these new any more. Cant get a left bumper mount so that's annoying too. No mechanical part was compromised, so it runs and drives. Wifey feels terrible, but luckily she's insured and so am I. Its going back to the same body shop that was just working on it, Northside Smash Repairs, and I've been named customer of the month, sarcastically. Not sure exactly how long its going to take to get it all sorted, the parts come from Ireland, and will take a few weeks, the car is at home waiting. Onwards and upwards. Oh forgot to say, the day before this madness I picked up a bride rail from a guy at Fernvale, and I ended up cutting it up and remaking it in a couple of hours to suit my sr recaro. Lowered the seat a lot, made more leg room, got more adjustment and kept in inboard a touch for safety. Barely drove it twice like that and wifey did her thing so I'm yet to fully test, but I think its a lot nicer, however you feel more through the floor of the car, as far as suspension goes.


-
Drove the car up to Maryborough over the weekend. It went perfect. Did some longer range highway economy numbers. 14.33klm/litre over 471ks (6.97 litres per 100klm). Consumed 32 litres. Very happy and on par with some earlier tests. Gives me a range of 645klm between fills on highway driving. Around town I got 9.6klm/litre from the last tank. Had a party with some mates on the Saturday night, stayed in his apartment, which is an old shop front in the main street, converted into a loft type dwelling. Its awesome. Such a big open space, awesome old brick walls, and hardwood floors, the things decorated in the brutalism style, which is his old mans taste, but works really well there.


-

Anyone wanna Discuss my ke70 stock 4K turbo
LittleRedSpirit replied to Robert maher's topic in Engine Conversions
I assumed this was a troll... -
Jap or se asian ones can...
-
He asked and apparently they ran ac on the track cause it was so hot drifting and racing in summer over there that they just gave up the 5 hp to have it.
-
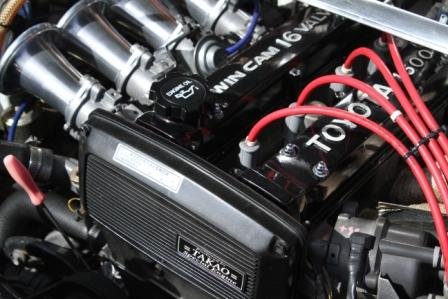
I believe Jamie is the second owner since tec arts sold it locally in Japan. The Japanese owner before him had held on to it, and maintained it pretty well, until ultimately auctioning it during a slow week at the Japan auctions. Jamie got a good deal on it, got it here, and noticed some things about the car, started researching and ended up finding out it was a parts research car for tec arts. Apparently used to test things that would ultimately be produced or go onto Tsuchiyas car, or the Purple tech arts car that everyone knows. Hes actually been able to find out a lot from tec arts, and corresponds with them about what is and isn't original to the car, and is kind of putting it back to original, restoring and cleaning and detailing and just making it what it is, a pretty cool and historic AE86 with a really well researched setup. Its got a straight cut T50, 4.6LSD, Takao Special 7ag, which is not the 7ag we know in Australia, but one of their 1.6 litre NA build recipes with 20v itbs, ae92 engine, and their own cam spec and headwork. Makes about 195 HP, revs to 11200 or something retarded like that. Jamie took me around in it after the show and warmed it up and just dumped it to kind of demo the response, and it just rocketed like no 4age I've ever experienced. Chatted for a while and we ended up taking each others car for a ride around the lot. So much unique stuff, like hand fabricated aluminium tig welded front bar mounts, carbon roof, concealed bracing inside the car. Its got electric mirrors, all the skirts and air conditioning, most of the interior, and weighs well under 900 kgs, so its almost 200 kgs under what a GT APEX edition should weigh. High rise exhaust manifold, lexan rear window, glass guards, bonnet and hatch. Has a really cool manually adjustable rev limit so you can decide not to pull 11200 if you get excited. Surprisingly it had a smooth cold idle, that became lumpier as it got warmer. Its tidy overall, and you cant really tell at first glance what the roof and guards are made of, it still looks like a pretty legit original Panda as much as it can.
-
Went to the United Show at yatala drive in. Won a raffle with a ticket I found on the ground. Drove this former Tech arts AE86,just around the drive in, so my years made. Great car with a great owner and a great story about how he came to get it, and later discover the history of it.


-
Yes more pics please.
-
Its hard to say, unless your 17. Perhaps, as the times have changed, the car culture isn't what it once was, what with anti hoon laws and all that bullshit. One things for sure, the 17 year olds aren't buying 700 dollar regoed manual ae71s any more like we were 10 years ago. They are buying whatever is 700 dollars today, and has potential to be fast. Its likely not a corolla.
-
Steam it off
-
Pretty happy with it, didn't try to make this bonnet perfect, its a bit rough and it has a hole in it, so just asked them to beat it as straight as possible and paint it all one colour. Door looks fine, and the window reg is like on a brand new car.


-
Excited to pick the car up today. Cant wait to see the bonnet.
-
The Facebook thing just proves how the money drives it all. I tried to visit club-K a while ago and my membership was terminated so I left it alone... must have been too long between visits.
-
Dug through a lot of old parts. Found a lot of bits and pieces I'm missing that the car could use. Also finally found a passenger stress handle and bought it, so my friends wont feel like they are going to die as fast. Ordered a generic 6 relay and blade fuse box, that will be mounted up near the battery and provide a tidy up of all the power feeds currently screwed to the left rear side panel. This will tidy up the interior, and also allow me to remove the stereo really easy when i want to go racing. Planning on attending a test and tune in about 9 days time, to see how the thing is performing.
-
Car is in at North side Smash getting the dent taken out of the door and the window reg changed. Also the bonnet is getting painted. Be nice to have it all 1 colour for once.

-
Throttle cable seems to work good, except the inner wire is 2mm and is a little stiff, so I think it will take some training to have it break in enough to return super smooth, as the throttle return spring is a bit light. With that in mind, I modified a spring to make a perfect additional throttle spring, and its perfect now. I also synced the inlet again and I have achieved the smoothest lowest idle yet. A steady 950rpm, minimal fluctuations, and steady afrs. With less air coming in, I have been able to adjust idle fuel and cold enrichment down, cranking fuel down and the cold start is better.

-
I weighed ma61 hub with rotor 6.1kg, ra40 hub with rotor 6kg, and the YR39 hub with rotor 6.6kg. They all give the same 37.5mm clearance from the wheel face to the friction face of the rotor. This seems standard on the Toyota hub and rotor designs of this era to clear a single piston calliper. As for the hubs: They are all about a 95mm bearing set width, across the middle from inner seal to the face where the grease cap presses in. This is guess what the bearings require to cover the stub axle. The vented rotor types have more offset space from the strut, to allow for the thicker rotors. YR39: about 70mm from inner edge to wheel face. About 21mm from wheel face to the rotor mounting face, leaving 49mm from inside edge to the rotor mounting face. Rotor is 45mm thick and leaves 4mm approx from rotor face to inner edge. MA61: about 72mm from inner edge to wheel face. About 32mm from wheel face to rotor mounting face, and that leaves 40mm from rotor face to inner edge. Rotors are 26mm thick overall, so that leaves 14mm inside. RA40: about 60mm from inner to wheel face. About 33mm from wheel face to rotor face, leaving 27mm from rotor face to inside edge. Deduct the 16mm thick rotor assembly and you get 11mm from the back of the rotor to the inner edge. The snout is obviously longer on this hub, as the wheel is set 60mm out, not 70 or 72mm. Ill firm these up when I get some vernier callipers to measure with. Mine broke. At that time Ill make a spreadsheet that's useful. One thing that's obvious, the ra40 hub gives less offset than others, and if I use the ma61 or YR39 hub, I end up with 20 or 24mm more front track respectively. My front guards wont enjoy that, it might mean switching back to a stock length LCA from the XT130 LCA. I guess if I was dead set on 4 piston callipers, Id be trying to use the YR39 rotor on the MA61 hub to maximise the distance from friction face to wheel face, which would be around 49mm with that combo, but it pushes the inner rotor edge just past flush with the inner hub edge, which means you need a more complex bracket that steps back. This isn't a deal breaker, but I'm tempted to make a set-up that's so oemish its not funny, with cost, and ease of service and parts collection being the priority. I noticed the zze122 has the same rotor dimensions, so I might try and investigate those callipers. Being Corolla platform the master cylinder change wont be too much, and to make the drums work I might just need to go to the bigger wheel cylinder size. Using a single piston later model calliper it should be cheap and easy to obtain and have easy parts availability. I also wont need to do any real trickery with the bracket which keeps cost down and also means I can use the stock hub and rotor combo from the YR39. Should be an easier thing to find for people, rather than a combo of multiple things.
-
Sometimes you need to tap the end fold of the LCA a bit flatter to make clearance, but not usually with rcas.
-
So the Venhill kit arrived, and I fabricated a new throttle cable. I ripped an old one apart and wire brushed the threaded adjuster and nuts. I used a Genuine one from an ma70 because it has Teflon inside the adjuster. I etch primed the metal parts, scrubbed all the plastics clean and cut the firewall end off of the old ke70 cable. I cut, pulled and drilled the ends out to suit the 7mm cable housing for the 2mm Venhill wire. I then super glued the adjuster onto the cable housing, and posed it up to find the length of the housing. Once established I ran the inner wire through about 400mm extra and then cut both with the angle grinder. This gave me spare wire to sort to length. Before cutting the ke70 cable up I measured from the pedal clips shoulder to the end of the cable, 147mm, that is the magic number of extra wire vs housing. I marked this point and finished off the cable by ensuring all the correct bits went on in the correct order and orientation, then I soldered on the cable end for under the dash. I did the birdcage technique to ensure a strong bond that cant pull off. Very happy. I also found a couple of adjustments to make to the itbs, which also helped the throttle return as crisp as possible. Once I adjusted idle, all was good. Been researching a brake upgrade. I have these 25mm Liteace rotors that seem really well vented and only make the hub 600 grams heavier than the ra40 solid rotor.


-
Its the earlier style, whereas the later drums in the 80s seemed to have the ratcheting adjustment. I had an ae71 once that had a locking drum. When I pulled it apart the adjuster was backwards, and it ratcheted tighter every time you pressed the pedal and didn't release. Flipped it and it worked fine.
-
There's 2 ways to do it, pop the cover on the back and stick in a tool and crank it over, but I find it easier to take off the drum and clean it out and do it from the front. There's two sprung levers in my drums, as they are from the old corona mx13 diff. They simply interlock, and adjustment is given by their relative positions. I can just adjust it with a screwdriver by pushing it over the required number of teeth. I always scribe the base position mark so I know where I started if I move it too much.
-
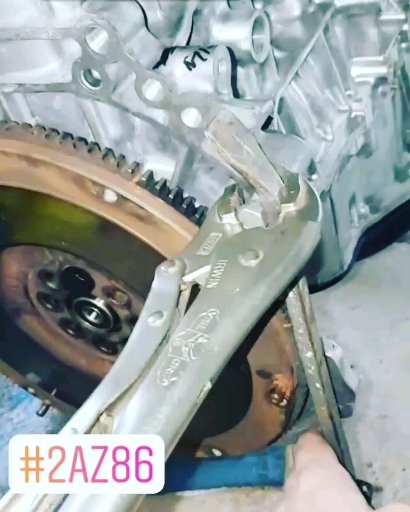
Here you can see the salts left behind by the coolant leak. This is my heater delete mod, its 5mm Aluminium plate sealed on the original gasket and holding the dipstick ala factory. This was the real culprit, this thing wasnt tight where the heater pipe lived before removal for rwd. You can clearly see the trail of the leak. I love this road, it takes you to a place called camp Somerset, it would be a great road for a time trial event, it just rolls over the hills until coming alongside the lake shore. Only downside is the 2 cattle grids, because they come up fast and unexpectedly. There's also a portaloo there, which comes in real handy after a drive. When I lowered the car, i did not realise the custom top mount brackets were in need of clearance, as they both hit the arms and kinked them. I've since put straight arms in and clearanced them properly. You can see the tell tale marks here on the brackets. And the 2 bent arms in situ awaiting removal. Dent from a Junkies Kneecap. 2azfe needs this much fuel pressure. My little flywheel locking rig. Handprint from a Meth head. Only real men hack up perfectly good things to make other things perfectly better, lol. I was particularly proud of the one hole that pierced the alloy rib all the way through. You could say bonnet clearance is not quite a thing.


-
Putting 2 and 2 together, you see small bubbles after bleeding with the cap off at idle, it ejects the coolant at higher rpm. It could well have a blow from combustion pressure to water jacket that wont affect oiling, it will just pressurise the heck out of the cooling passages at higher revs and cylinder pressures. Compression test the engine. Pressure test the cooling system at the same time and see how much pressure in the water jacket coincides with compression events in the engine. If there's any correlation you will have your answer.


