Banjo
Regular Member
-
Joined
-
Last visited
Everything posted by Banjo
-
Hi Russell, See you've switched to the KE70 "slanty nose" Cowrolla ! I like the two tone colour scheme. Should be very cheap, to keep the tyres in good nick ! Looks like it would be real easy to get underneath, when doing an oil change. No need for hoist or ramps at all. Cheers Banjo
-
Hi Russell, That is one very sweet looking flat nose KE70 ! It looks to be in immaculate condition. Is it a low mileage original, or has the car been reco'd at some point in time? Love to see some more pics, & maybe some interior a shots. You've done well ! Cheers Banjo
-
That's a little bit cheaper, than if you took your two (2) brake slave cylinders, to a specialist here in Australia, for reconditioning. Last time I checked, which was about 2-3 years ago, they were quoting locally here, about $ 130.00 to recondition two (2) front brake slave cylinders. Have you actually taken the suspect cylinder off & had a look inside ? I've experienced the very same issue you describe previously; & after after 20 minutes with some wet & dry fine emery paper, & a new set of rubbers only, the problem was solved. P.S. Good idea to completely replace the complete brake fluid in the braking system at the same time. Over time, the brake fluid "absorbs" moisture, & that is what causes the corrosion, & gumming issues, from what I've personally seen, over the years. Hope that assists. Cheers Banjo
-
Hi Russell, I'd take them both off & have a quick look inside the slave cylinders. You might find it is cheaper to just buy a new ones on line, than it is to have a brake specialist reco them. Cheers Banjo
-
Hi Ian, You were lucky ! I have a V6 Camry, & years ago we were on our way to holidays at Crescent Head, near Kempsey. Trailer behind, 2 kids on board, wife & everything needed for 2 weeks hols. Pulled up at Coffs for a early tea, before the last run to Crescent Head. All back in the Camry, & the key will not turn/unlock at all. No spare key to try. So I remove the barrel, tie the key to the ignition switch barrel, so the computer thinks the key is inserted, & short the appropriate wires, so it will start & run. Off we go, & got there safely. Next morning rang a locksmith in Port Macquarie. He was out fishing, & wasn't prepared to come up to Crescent Head to fix it. So I drove to Port, & met him in a park. He fitted all new plates inside the barrel, which were severely worn. He advised Toyota had a bad batch of plate material back in the late 90s that affected lots of Hiluxs & Camrys. Never an issue after that, since I had the new plates fitted. Cheers Banjo
-
Hi Graeme, PM sent ! Cheers Banjo
-
Nope Keith ! But just as good. I have two pieces of soft wood that I sandwich the valve stem in the bench vice, with the valve sticking out of the vice horizontally. Then with the hand drill, & a brass drill circular wire brush, I clean both sides of the valve poppet head, cleaning all soot & carbon, without scratching the valve seat. Works for me. Col, you wouldn't believe what was the matter with this B & S engine. This is the very first time, I've ever done anything at all to the engine, besides oil & filter changes. The previous run of the mower was about a 4 hour stint; as with all the rain in S.E. Qld., you can actually watch the grass grow. I started the engine up a week later, & it was backfiring & lacked power. Felt like it was running on one cylinder. Checked the plugs & they were very "sooty". Cleaned them, but problem persisted. Suspected carby, with stuck needle & seat; but no; all good. Checked compression. Very low on one cylinder. Removed rocker covers. One cylinder has a bent pushrod, & the other pushrod had fallen out altogether, & was lying there; also bent. Serious, me thinks. What I couldn't get over intially; was that one push rod was steel, & one was aluminium. Something strange, so off to Dr Google. What I read in the next 30 mins, blew me away. When these air cooled engines get really hot, the aluminium head metal expands quicker than the steel valve guide. This results in the valve guide moving upwards, to the point where the spring cannot be fully compressed, & bends the push rod. B & S knew about this "design fault" & made one of the push rods (intake) aluminium, so it would be sacrifical, & prevent the whole engine destroying itself. Still can't believe it. All it needed to stop this from happening, was to put a very small shoulder on the outer, at the bottom of the valve guide; & machine a location for that shoulder/step, in the head. What ? Like this one . . . . https://www.youtube.com/watch?v=ZKEUBW7M3F8 Still shaking my head ! Cheers Banjo

-
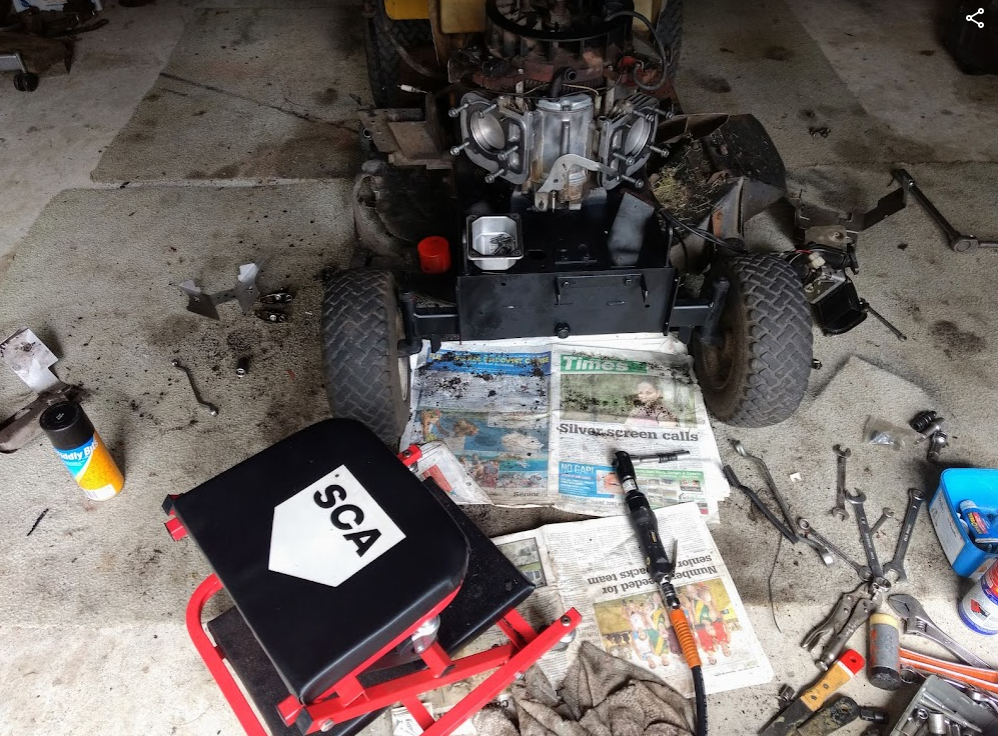
Unless you are in "the trade", Doing a decoke & valve grind is not something, you do every week. I can go several years between such exercises. However, at the weekend, I had need to carry out same. Not on a Corolla; but on my trusty Greenfield ride on mower, fitted with with a B&S V twin 22Hp air cooled engine. It did cross my my mind, however, that this engine, which I can lift with two hands, puts out over 50% of the HP, that my olde 4K engine does; an engine you need a chain block to lift. I have all the gear to do a valve grind, but as with anything, not used often; things like the rubber suction caps on the end of the lapping tools have gone a bit hard, & not as flexible as they used to be. In addition to that, the end of the valve, where you "stick" the suction cap, can be a bit pitted, & the vacuum technique used to keep the valve & tool as one, doesn't work anymore. So I could've headed for SCA to grab a new one, but came up with an idea, that worked brilliantly. I always carry a couple of rolls of double side adhesive tape. There is one I have which comes from Bunnings, which is about 23mm in width, & very thick at about 2mm. I cut a bit off, & suck it to the end of the valve. Trimmed it so that it didn't exceed the diameter of the valve; & then with the valve, in the head, pressed the lapping tool rubber cup, hard down on the exposed double sided tape. Worked absolutely perfectly. Only one problem, When I opened my little olde cylinder of valve grinding pastes (coarse & fine) I found they were both very dry & in lumps. Could've needed a trip to SCA, but I tried to revive the hardened lumps, & it worked perfectly. Put a few lumps in an upturned lid of an jam jar, or similar. Add a little bit of sewing machine "light" oil, (also referred to 3 In 1 oil), to the hardened lumps, & at the same time, break up the lumps with a small screwdriver, or sharp object. Didn't quite get the job finished, as a big thunderstorm came, with threatening hail, & it was time to get the vehicles under cover. Oh well, there's always next weekend ! Cheers Banjo


-
I recently lost my key ring in Jaycar, while browsing, with my KE30 ignition key on it. Luckily, I’ve always kept a spare key screwed to the sub floor, for just such a situation. However, it left me with just the one key. I don't see them very often, but did see a pair of genuine Toyota KE series key blanks, out of Malaysia, on ebay a couple of weeks ago, so ordered them. There was always the risk they could be Chinese copies, but I was prepared to accept that risk; as, after all, it is only a key blank. I was surprised that they arrived so soon, & they are perfect. If they are a copy; then they are a bloody good copy. The Toyota Motors & Japanese Toyota symbol, are exactly like my remaining original one, I have. So I head off to my local friendly "olde school" locksmith this afternoon, to have him cut the two blanks, using my sole remaining original, olde & worn ignition key, as a template. "Sure, I can do that" the locksmith advised; but you "didn't have to buy blanks, as I have plenty of them". Actually, about 200 off. He pulled one out to show me, & they certainly were blanks; as they had no Toyota symbol or logo on them. At least my blanks would look like they were original, after they had been cut. He explained to me, that the reason, He carried so many of these blanks; was that all early Toyota models used the exact same key blank. However, he was quick to point out, that the barrels were in all cases, a little bit different, depending on what Toyota type & model of vehicle it was. He declined to use my original key as a master, to cut the two new blanks. "Too worn, to result in a good job", was the comment. "I'll just use the keys number !" "Hold on", I said; "my car is going on 50 years olde (actually 48), & you are telling me, there is a profile kept, & it is computerized ?" "Yep !" OK, so on closer inspection, there is a tiny number, "KXXXX" stamped into my original Toyota ignition key. So He punches this number into his computerized machine, & a minute so later, I have two brand new keys. Hold on, me thinks. There were no computers around when my Corolla was manufactured; or if there was, they were crude early versions, long before mass data storage. My friendly locksmith explains that there was always records kept of key codes, but they were paper based key profile records, of which registered locksmiths, could obtain. However, over the years, all those early key code profiles have been digitised, & are now simply a computer file, which is loaded into the machine, so it has as many profiles that are available, worldwide. Apparently updates come out 2-3 times a year. So home I go, & I've just tried them out, & they work perfectly, although a little tight. He had warned me, this would probably be the case, & suggested initially putting a coating of light oil (sewing machine oil) on the key shafts, before inserting them. So I live & learn; & now happy, that ignition key losses, or wearing, will not be an issue, in the near future. Cheers Banjo

-
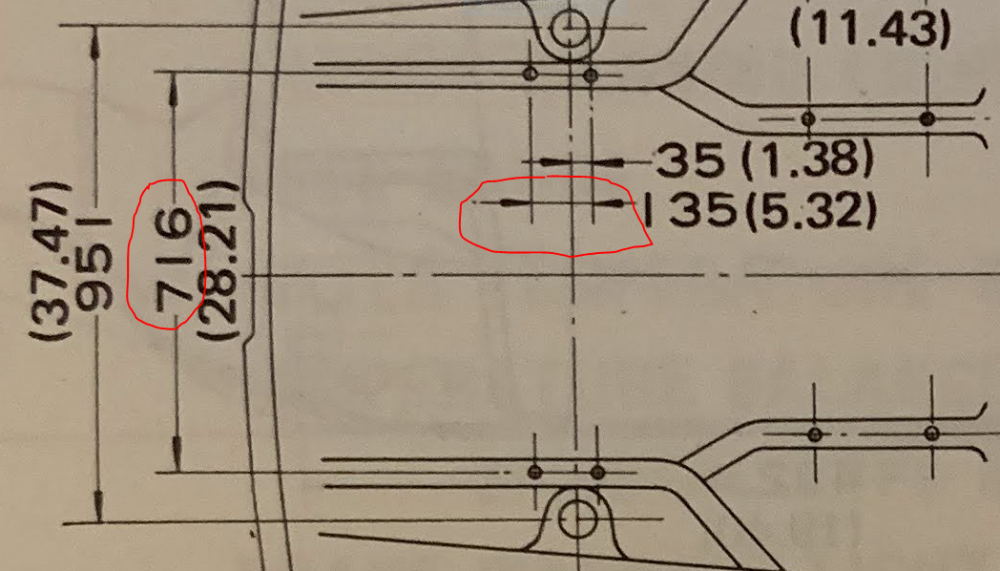
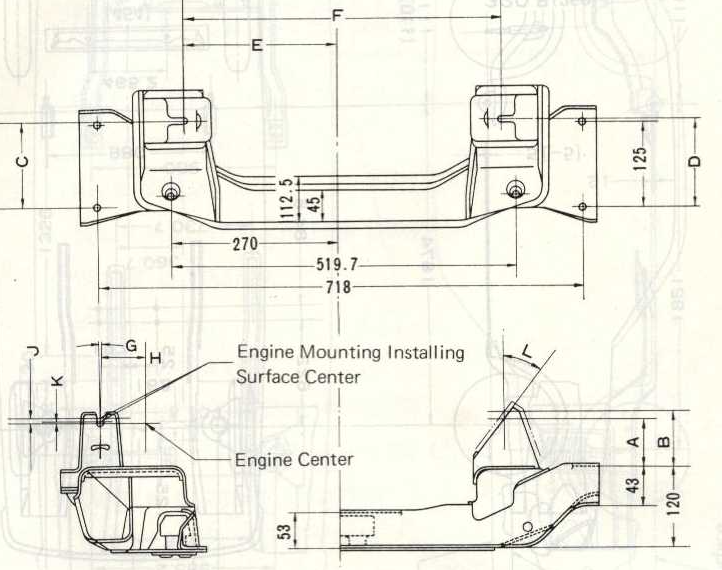
Ok ! It appears that your TE27 dimensions for mounting the front cross member, maybe a tiny bit smaller than those on the KE3X & KE70 series. The drawing indicates the dimension across the engine bay, between the rails is 71.6 cm, where the KE30 appears to 71.8 c. (2 mm difference) The distance between the holes on each side, in the "chassis rail", appear to be a little bit wider apart than my KE30. (13.5cm as opposed to 12.5 cm) When you got hold of your Starlet cross member; did you drop it into the chassis of your KE27, & see if the mounting holes lined up ? I'm presuming, that the only reason, you cut the rack 7 pinion mounts from the Starlet cross member, was that the Starlet cross member, was not a drop-in option, in your TE27 ? I'll see if I can find a body dimension drawing on the net for the KE3X series. I did have a KE55 coupe chassis here, but it had bad rust in it, in the back pillars, so I've cut it up, & it has gone, so I can't measure it. I'm pretty sure the KE35 & KE-55 shared the same front cross member. I did come across this drawing on the net from the Toyota Chassis repair manual, for KE & TE Series. It advises the dimensions for the KE series, between the rails is 71.8cm, & the distance between the holes is 12.5 cm, which is what I measured on my cross member last night. Cheers Banjo

-
Thanks Sebastian, Excellent ! It's morning tea time here in Australia, on Tuesday, 22nd, so will have a look at your dimensioned drawings. Cheers Banjo
-
Hi Sebastian, So I went to the shed last night, & had a look at the cross member I have on one of the two (2) engine test beds I've made. Luckily, it still has the rack & pinion clamps in place. So from what I can measure, without removing the engine, the centre to centre distance between chassis mounting bolts for the front cross member is 75cm. Could you measure this distance for me on your TE27, as it should be easy, with nothing in the engine bay at present. I'd be very interested to find out if the Corolla various KE models & the Starlet, used the same mounting point dimensions. The other useful dimension would be the distance between the bolt holes on each side, of your Starlet front cross member. My KE30 dimension is 12.5cm, where I have the question mark below. These are the two (2) dimensions, from your Starlet front cross member, I would like to have. I did find this old pic on the ClubK site, which appears to indicate the K2, K3, & KP front cross member dimensions across the enginge bay are indentical ? Many thanks ! Cheers Banjo


-
Hi Sebastian, Lovely bench ! Love your work ! You've just pushed "my button" here, as that is a project, I've, for a long time, wanted to try on my KE30 2 door sedan. That is; convert the steering to rack & pinion, or maybe even power assisted ??? My question is whether the Starlet front cross member "chassis" mounting bolt centre to centre measurement, matches exactly, the chassis rail to rail measurement on your TE27 ? Did Toyota standardise this measurement for all the early Corolla's, so front cross members are "interchangeable ? I actually bought a KE70 front cross member, from someone on Rollaclub, years ago for $ 20. I just wanted it to mount on a a couple of timber sleepers, so I could build a simple engine test bed. It was from a KE70. Now the KE70 cross member differed from other KE front cross members, as the KE70 had rack & pinion steering; so had the rack & pinion brackets already there. I'll have to go out in the garage later, & measure it up, which might be a bit difficult as it has an engine mounted on it. Altezzaclub, should be able to provide an answer, as He is the source of all info regarding KE70s, on this forum. With it all jigged up there, on the bench, were you able to measure any steering geometry angles etc. ? Steering geometry, & the ramifications of changing it, is a whole subject all by itself. https://en.wikipedia.org/wiki/Ackermann_steering_geometry Cheers Banjo

-
Lumpy cams rarely provide the luxury of a smooth steady idle. What sort of electronic ignition dizzy have you got ? Is it one of the 5K Toyota ones, or an aftermarket electronic module inside a 3K or 4K dizzy, that simply replaces the points ? We can certainly assist you, but a few pics posted here of your setup, including inside & outside the dizzy, & any vacuum lines to the Webbers & manifold, would help. A picture usually tells more than a thousand words. More pics, & more details, the answer will be easier, & quicker will be to you sorting this out. P.S. Any idea what the grind on the lumpy cams are ? Is it a 4K engine block ? Cheers Banjo
-
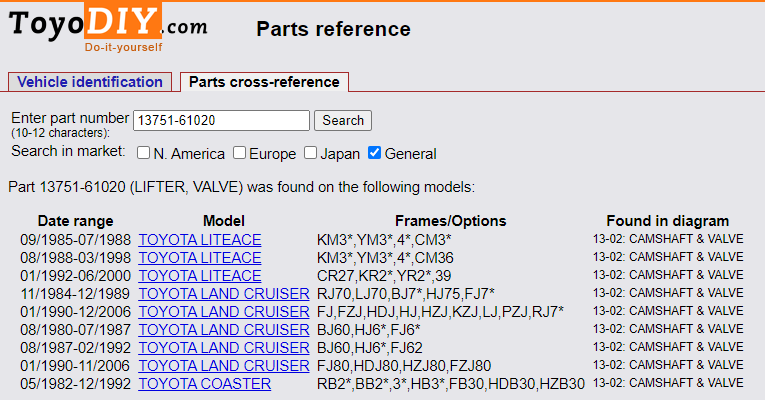
Hi Tyson, Glad you got to the bottom of that issue. If you still want to go down the solid lifter path, read carefully the links I gave you, earlier in this thread. If the geometry of new lifters; push rods, rocker shaft pedestal height & rocker face sweep coverage is not just right, then you will not get the results you want. https://www.rollaclub.com/wiki/index.php?title=Tech:Engine/K_Series/5K-C/5K_Hydraulic_To_Solid_Lifter_Conversion Here are a list of all the Toyota vehicles that use the solid lifter (13751-61020) , that should fit your 5K motor. What was the specific reason, you wanted solid lifters for ? Are you trying to get to a very high rev range. I've had two 5K engines with hydraulic lifters in them, over the years; & never had an ounce of trouble with them. Cheers Banjo
-
It still gets down to below zero, just west of Brisbane, in Winter. Even on the carby engines, the choke; besides closing off the intake opening, to a degree; also increased the idle back stop, to increase idle speed. Ah ! But one day, when this bloody pandemic is over, I might drive down to Orange to visit you; & if that's in the "colder" months of the year, I'll definitely need automatic idling control, west of the great divide ! However, although there are a few "feedback" control systems in a modern automobile, the idle control, in cold weather; is probably the most visible one to the average driver. I happen to love feedback systems, & their control, especially when it is differentially proportional. (as it approaches it's final target rpm, then is slows up & approaches that point very slowly) In Winter you start the car up on a cold morning, & instantly it starts (enriched mixture), & the idling sits at say 1250 - 1300 rpm. You leave in the drive while, locking the house & garage door, & by the time you are ready to leave, 10 minutes later, it has reached it's warm idling temp of 900-950 rpm. I love just sitting there watching the rev counter, & seeing the idling speed slowly creeping down to it's final set speed, as the temperature increases. However, idling bypass valves, by their nature are quite small, & because they are not in use for most of the time, they do "gum up". I always pull them off my Camry & wife's 2009 Corolla, & completely clean them when they get their yearly service. P.S. The other thing I love about automatic idling control, is when you disconnect the ECU electrically, & it "forgets/loses" all it's settings. When you take it for a drive after reconnecting the battery, it initially runs at an elevated idle speed, but "learns"; & after a short run, is back to the original initial cold start idle speed. I note you can still buy an aftermarket TPS for the 7K engine on ebay for just under $ 60 (Aust) Cheers Banjo

-
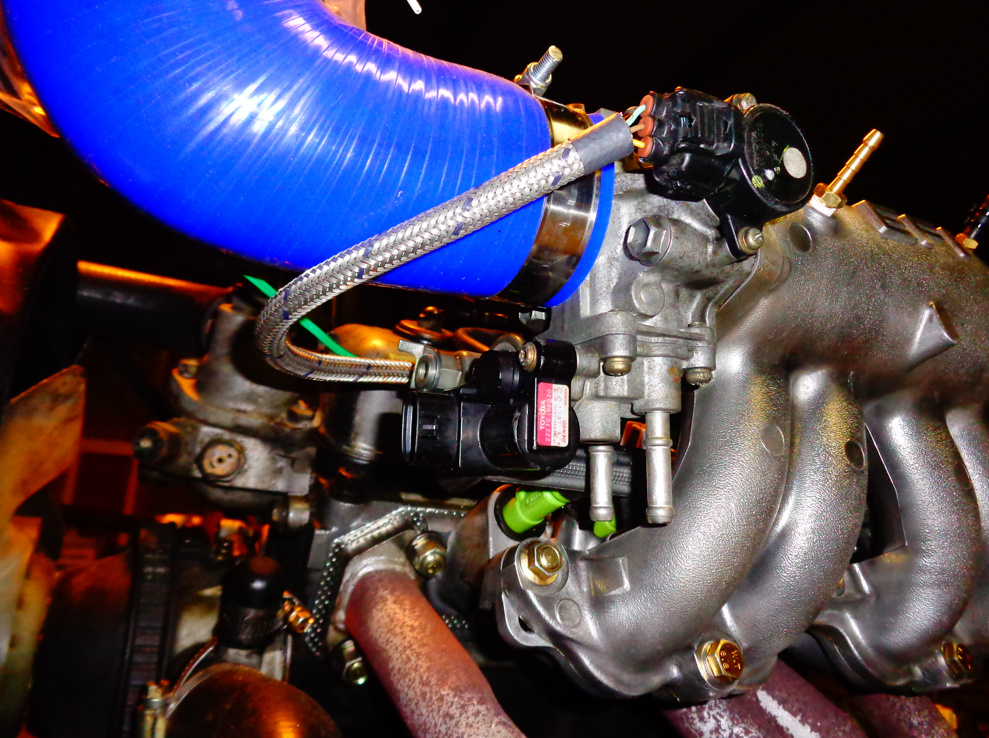
I'd be very interested if someone knows of another throttle body that will fit, or could be adapted to the 7K EFI intake plenum. I have one here on a 4K engine, that I have been experimenting with over the years, by converting it to EFI, & several different ignition systems. The trouble with the one I have is, that the "idling bypass valve" is stuffed, & the price for a replacement, is ridiculous. I was going the just block up all the idling arteries, & fit an external one; around the butterfly, but if I could find a whole late model throttle body one from another Toyota engine, with a very similar inside diameter, then that might be a better & more successful option, in the long term. Cheers Banjo


-
Yeh Dave ! This is fantastic to follow. Can't get over the dedication. Most dedicated guy I've come across, when most of us on here, would not take on a project like that, with so much "cancer". I take my hat off to him. I'll certainly be following this thread. I must have been living under a rock, as I've never heard of using dry ice to lift sound deadening material in olde cars. In my defence, I've never had to lift any, & never researched it. There a number of utube videos on the net, & it certainly works well, in floor wells, but a bit harder on vertical areas. https://www.youtube.com/watch?v=4FqkxgcjRQQ Cheers Banjo
-
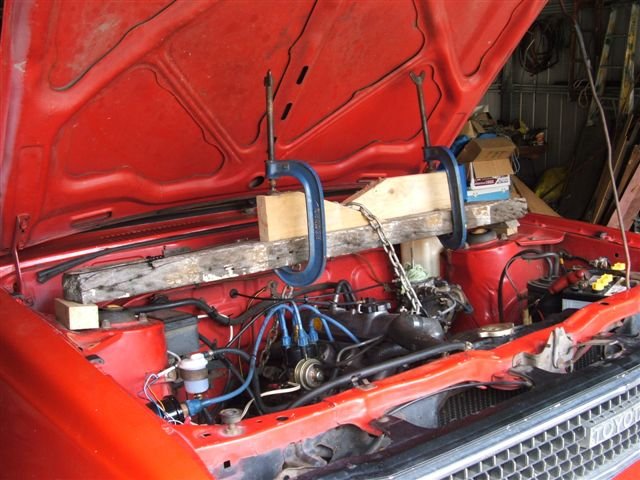
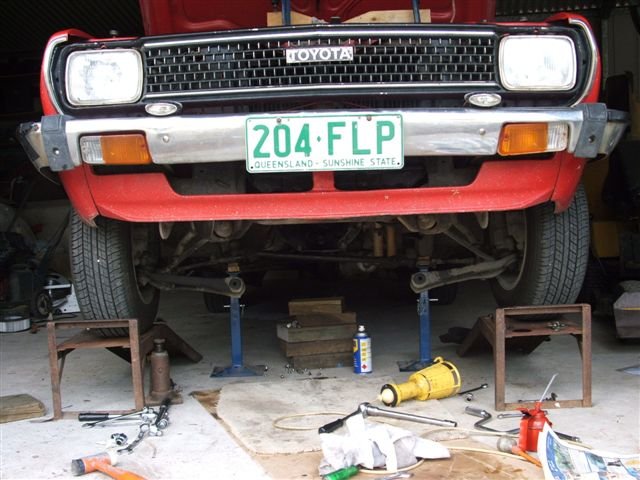
Like Altezzaclub says, it's a difficult job, & very frustrating with the cross member in the way. I did it quite a few years ago, & it is relatively easy to remove the cross member, & then have full access, to the sump. All you have to do is hold the engine up, as with the front cross member removed, there are no front engine mount points. The following pictures really describe how I did it, without going into a lot of description. Cheers Banjo

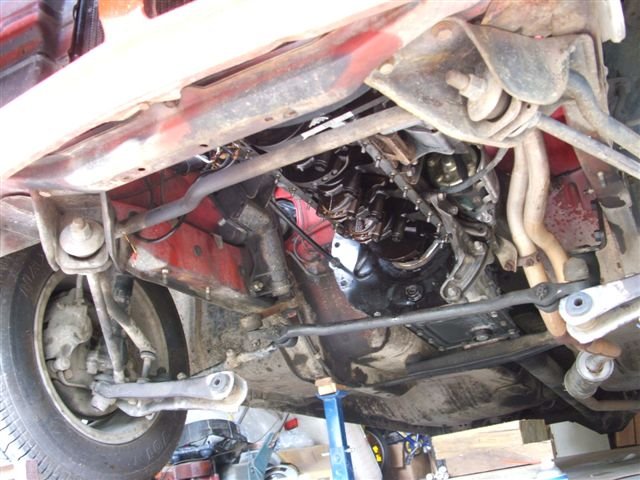
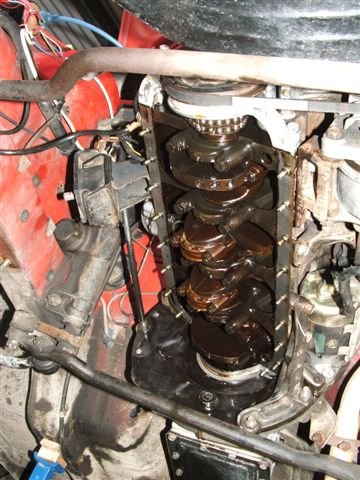
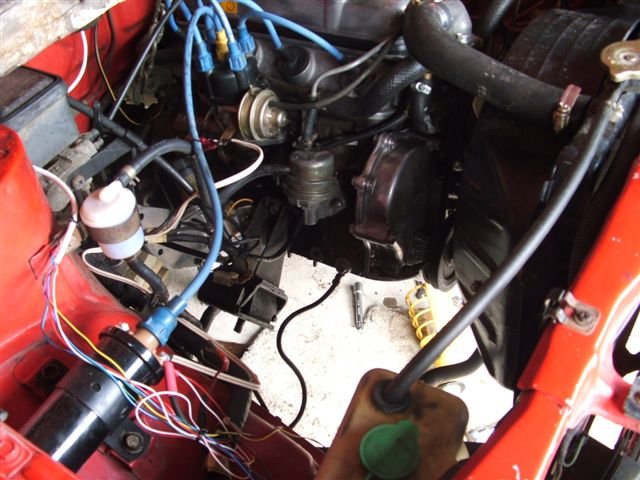
-
Only one word for this project resto. . . Incredible ! It does indeed look "handsome", even in it's current format. Where did you procure the carbon fibre hood/bonnet ? How much did it cost ? Have you had a chance to measure the weight difference between the original steel hood & the carbon fibre one ? These olde Rollas were over built in those days, where there was no computer aided design. Their power to weight ratio, was abysmal, by todays standards. There are two ways of improving the power to weight ratio. Increase the power, & lower the weight. A bit of both, is a very good compromise. The balance would also be the relative cost of each method, of improving the power to weight ratio. I'm in awe of your dedication. Good luck ! Cheers Banjo
-
Hi Tyson, Interesting, that you are now going to look into the oil filter as being a possible source of your oil pressure issues, there was a couple of good discussion about this subject on this forum. https://www.rollaclub.com/board/topic/73606-addressing-low-oil-pressure/?tab=comments#comment-711455 https://www.rollaclub.com/board/topic/76876-toyota-3k-engine-problem/?tab=comments#comment-723121 Not all oil filters are born equal. The filter on the K Series engine, is fitted upside down, when compared to most cars. Filters can appear equal on the outside but there are non return, & bypass valves often inside, depending on the make. I use an oil filter on my 4K & 5K engines, that looks like a standard Corolla KE filter, but is actually used on a Mercedes Benz car. I think it is mentioned in the link before. The filter number has 423 in it. the Australian version made by Ryco is Z423. Cheers Banjo
-
Hi Hasitha, Good luck with that one. Even if there was a computer program to communicate with the ECU, you would probably need an olde DOS based PC, to run it. I think those olde ECUs, were pretty basic, & just indicated faults & diagnostics in the ECU, by blinking the engine warning light a number of times, where you counted the blinks, & the referred to a manual. I found an olde 7KE manual on the net, which you might care to read, & see if that helps you. https://www.scribd.com/document/540871784/Buku-Manual-Toyota-7ke-Kijang-Kapsul-18-Efi-Compress Cheers Banjo
-
Hi Tyson, Is the grub screw brass or steel ? By stripped, I guess you mean the allen key socket, won't grip to allow you to turn it. It could well have been fitted with some sealant on the thread. Try drilling out the centre of the grub screw with a small drill, then increase in drill size, but not that you damage the thread. Once you have a hole right through, squirt some penetration oil in, & let it sit overnight. Then try to remove it with an appropriate sized "easy-out". Cheers Banjo

-
"That blue KE70is so cool" Sure is ! Love how they have utilised the original engine mounts & fitted the "orange rail" that supports everything associated with the conversion. I looked up the website for the Autolibre organisation. Interesting read ! Came across this one on there ! EV conversion car, with a wind turbine generator on the roof, to reclaim the energy you have used to go forward, to recharge the batteries. Sorry ! Very low efficiency me thinks ! I'd be a bit worried about the bits of string or rope, tying it to the roof rails ? P.S. Wouldn't like to be driving behind this car ! Cheers Banjo

-
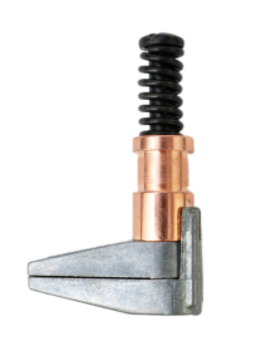
Hi Sebestian, When I read your comment, "Thanks for all the kind words, indeed it is a big project ahead", I couldn't help thinking this might be another project Binky ! I'm really impressed with your determination to see this through, Mate ! For those reading this thread, who have never heard of a Cleco pin, below is a link that explains them well. https://www.youtube.com/watch?v=_DcNvt9_O3Q Plenty available on ebay, here in Australia. Cleco also make a side clamp one for sheet metal & the like. I will be watching this thread with interest. Good luck ! Cheers Banjo