

Banjo
-
Posts
2028 -
Joined
-
Last visited
-
Days Won
98
Content Type
Profiles
Forums
Events
Gallery
Blogs
Everything posted by Banjo
-
Yep Pete ! Completely agree. Have never been to Japan, but if I do, I would be heading straight to Nagakute & Nagoya, to wander around the wonderful car museums the Japanese have there. http://www.speedhunters.com/2013/07/corolla-to-hilux-toyota-75-continued/ My personal problem would be, that although it is wonderful looking at these beautifully restored examples, I would be very frustrated with the fact that you can't lift the bonnet, & see how they did it, & put everything together, on the working side of the cars. Many years ago I was in London, & visited the big museum there that has everything from planes, to trains, & cars. I had never seen anything like it, & returned for a further 2 days, as I couldn't drag myself away from it. Cheers Banjo

-
Would just love to go to one of these shows ! https://www.facebook.com/media/set?vanity=technotoytuning&set=a.4700501443323007 Cheers Banjo

-

So Who is Going to do the First KE Rolla EV Conversion ?
Banjo replied to Banjo's topic in KExx Corolla Discussion
Aussies to the rescue ! Read about these guys in our local Jimboomba Times just today, & found it on the net. Love the bit about building it in their hotel room in the UK, & the cleaner seeing it, & thought it was a bomb. Good on ya aussies ! "But we spoke to the police after it all and they actually congratulated us on the work that we were doing." https://www.abc.net.au/news/2021-03-06/qld-kingston-ewaste-global-energy-poverty-indonesia-powerwells/13206106 Cheers Banjo -
So Who is Going to do the First KE Rolla EV Conversion ?
Banjo replied to Banjo's topic in KExx Corolla Discussion
There are always two sides to a coin. Here is the other one, already emerging ! https://www.abc.net.au/news/2021-10-25/electric-car-solar-battery-storage-waste-recycling/100564234 Cheers Banjo -
So Who is Going to do the First KE Rolla EV Conversion ?
Banjo replied to Banjo's topic in KExx Corolla Discussion
Interesting column on this subject on the ABC website today, looking from it as "a consumer". https://www.abc.net.au/news/2021-10-21/what-is-stopping-australians-buying-electric-cars/100524242 I occasionally travel to Canberra on business, & thought a good way to get some miles under the belt, in an EV car, would be to maybe hire one, having never driven one. I just checked the net to see if may car hire companies in Australia, are hiring EVs. Not many, it seems, but I did notice that Hertz are hiring the Tesla 3. I would be interested if anyone else on Rollaclub; has tried an EV car, either by hiring it, or a friend's car; & what your first impressions were. After reading that article today, with mention of "range anxiety", I could see how that could become very real. I've always loved driving in the outback, & in my younger days, that's where every holiday was spent. In a petrol car, you always carry one or two full jerry cans in the boot, to extend your range. You can't carry a couple of spare batteries ! The scenario, which always worried me back then, was getting lost or taking the wrong turn, because of poor or no sign posting. Driving on an outback road with few if any other road users, & not knowing how far to the next habitation, always created anxiety. I really think the hybrid solution is an idea solution short term for Australian drivers, until the EV car market gets more established, unless you are a pure "city only" driver. I recently read the detailed description of the Toyota hybrid arrangement, & it sounds brilliant. Only issue for me, is they are very expensive, & very complicated, so support Australia wide may be an issue. I've only had to call a tilt truck once in my life, but these days it is so common, as the NRMA, or RACQ roadside assist man, can do little to get you going again, unless it's something fairly simple. Cheers Banjo -
So Who is Going to do the First KE Rolla EV Conversion ?
Banjo replied to Banjo's topic in KExx Corolla Discussion
Hi Dave, That's a good site, & right here in Qld. I came across this commentary the other day, which Altezzaclub, will be in full agreement with, I'm sure. https://thenextweb.com/news/are-classic-cars-still-classic-if-converted-evs-yes-they-are I agree with you Dave, that there is always resistance when major events/things, that change in the world. Remember the history of when the world went from horses to cars. These new "fangled things", were so dangerous that the authorities of the day, forced each car to have a man walking in front of it, carrying a "red" flag. It's only early days, as yet, & the next 10 years will reveal lots & lots of changes. For people like Altezzaclub & Banjo, who love the sound of all that air rushing in & out of an engine; someone will produce a little box you attach under your dash, that emits those long loved engine sounds, in complete synchronization with the position of your right foot, on the "speed regulator pedal". I do however, believe that the long distances we travel between towns in regional Australia, will mean that fuel powered cars & trucks will be around for many years to come. Every little town has a petrol station. Under that big concrete apron is a very large tank, which is just a a very big existing "battery of power", waiting to be used. Difference is, I pull in; fill up, & I'm off in 5 mins. Just before this bloody pandemic, I delivered a car to my son in Canberra. I drove from Brisbane to Canberra in the one day, including a forced stop in Grafton, to get a flat tyre repaired (1.5 hour). If I had been in an electric car, having to stop every few hours for a charge, I'm sure it would have been after midnight, before I arrived. I believe there are already people working on this problem. We all used to take our barbi gas bottles to BCF or Bunnings to get them filled. Now you just call in at the servo, & swap it", when you fill up the petrol tank. Batteries will become so light & advanced eventually, that we'll probably just do the same with cars. Swap the battery. I seem to remember early days in Brisbane, when I think there were electric buses; & the battery was pulled along behind in a trailer. The bus just called into the depot; & they hooked on another fully charged trailer. Like this . . . We are definitely in a period of "a time of change". There are those that embrace it; & those that take a little longer. Anyway, electric vehicles are not that new. Circa 1904 Cheers Banjo

-
Here's an interesting topic today, in the press, with a lot of detail: & very much Australian. EV Conversions in Australia. A very good read ! So in this piece, there is mention of current EV conversions to VDubs (Beatles), Dato utes, Range Rovers, Commodores, & even a DeLorean, but no mention of a Corolla ! Has anyone on here ever considered this, or looked into the requirements. Within a couple of months, we'll be just 10 years from the Olympics in Brisbane. Before that date (say 2030) most manufacturers will have gone EV, eg: Volvo. I have noted in the USA, that there is frantic bidding on every "written off" Tesla; just to get hold of the drive chain; presumably for conversions. Hope this topic gets some comments. Maybe Josh & Keith can start a whole new business venture in Blayney ? P.S. Then, I just might start off "small", & VE my ride on lawnmower/tractor, like this guy. https://youtu.be/FLu1UOr9RSs Cheers Banjo

-
Unbelievable what is still out there undiscovered ! Col, did you take a note of the mileage reading on both ? As Pete says, "That corolla is hella clean." Just looking at the bumpers & hub caps, it looks so pristine. Oh, & that rear screen slated venetian. Cheers Banjo
-
You're a real artisan Dean ! Hat's off to you. Love your work. Wish I had the patience to take on things like that. Bit like an artist with a blank canvas. In this case; a standard guard; which you just build up, until you get the look you want. Keep the photos coming, once that new shed is built. Cheers Banjo
-
No Spark/No Start issue- 1974 Corolla - 2TC -
Banjo replied to MoeJZ's topic in TExx Corolla Discussion
Hi Moe, I trust you sorted out your Accuspark issues, as they are simply the most reliable, non contact trigger system, you can use, if retaining the distributor, as part of the ignition system. One of my Rollas, has had an Accuspark in it, for years. Other than change the spark plugs as necessary, I have not touched it in years. It is just so reliable ! When I first installed it, I placed a "limp mode" switch in it, in case my Jaycar electronic module failed out on the road somewhere. I've never had to use the "limp mode" switch at all. If you search this forum, for "Accuspark", there are a number of threads. Here is one that may be of interest to you. https://www.rollaclub.com/board/topic/73743-electronic-distributor/?tab=comments#comment-712673 Any questions or queries, please give us all a yell. Cheers Banjo -
No Spark/No Start issue- 1974 Corolla - 2TC -
Banjo replied to MoeJZ's topic in TExx Corolla Discussion
Hi Moe, Although that being a poor utube video, you have connected it up correctly, out of the car to test the coil, according to the video. There are only 4 items in your test setup. 1. The battery. 2. The Ignition coil. 3. The spark plug. 4. The HT Lead between coil tower & the spark plug. The battery is OK. The ignition primary winding is working OK, as you are drawing current through it, when you touch the wire to the spark plug base (which is battery negative. The problem is in the secondary (HV/HT side of the circuit. If it was the spark plug, then the plug would have to be short circuit inside between centre electrode & outside case, or open circuit between, top of spark plug (where HT lead connects) & the centre electrode. Substitue a brand new spark plug to check that is not the case. If is was the HT lead between the spark plug & coil, that is easily proven, by using a new or another HT lead. They won't have all gone O/C at the same time. That only leaves the coil itself as the suspect. With a multimeter, you can measure the primary & secondary resistances. Primary resistance is very low. (couple of ohms at the most between + & - terminals) Secondary is very high as much as 10,000 ohms) My guess is that the secondary winding of the ignition coil being open circuit, but I think you advised the coil was replaced with a new OEM one. Cheers Banjo -
No Spark/No Start issue- 1974 Corolla - 2TC -
Banjo replied to MoeJZ's topic in TExx Corolla Discussion
Hi Moe, Just read this thread from end to end, trying to work out where something has gone wrong, which is obviously out of the ordinary; as you seem to have tested every individual component, with no positive result, in terms of discovering the issues source. I gather you drove the car around successfully, with a standard coil, ballast resistor & points, without issue. Did the car ignition fail whilst you were driving, or did you park it overnight, & it just wouldn't start the next morning ? If it failed, whilst you were driving it; were you "fanging" it at the time, or just sedately driving around ? As part of the solving of the problem was fitting an electronic module in the distributor, (in place of the points), that may have exacerbated the issue, if that module was not installed properly. I agree with the suggestion to replace the system to standard points; but I guess you have done that, & it still does not fire. As you are not getting a spark at all, we can assume it is not a fuel issue ? Has this engine always been an easy starter, or has it been a difficult starter in the past. What brand of electronic module did you fit to the the dizzy ? Here are a few things I've come across in the years of solving this issue on standard ignition setups. Insulator in the points assembly breaks down & although the points open & close, there is a constant s/c across them. The fine spring behind the carbon bush in the dizzy cap, breaks creating a gap too big in the spark circuit, for a standard coil with ballast resistor to jump. If HT leads between dizzy cap & spark plugs,, & centre dizzy cap to coil tower, are carbon track ones (for low noise interference into radio) then they are known to cause issues. One of the best tests you can do, to see if the issue is LV, or a HT issue, is to try starting in in the pitch dark at night. If there are any HT issues with it breaking down inside leads/cap etc. you will see it clearly. There is one little issue, that could be causing this problem, that hasn't been mentioned as yet. "Timing" Timing issues can be caused by breakages, such as a spring breaking or coming off inside the bob weighs advance / retard mechanical mechanism, in the bowels of the dizzy. Another one, although rarer, is the pin retaining the gear to the bottom of the dizzy shaft breaking & rotating the gear around a bit, before jamming. In K series engines, we have even had the pin locating the camshaft sprocket, to the camshaft proper; sheer & cause all sorts of issues like that. I would take out all spark plugs, so it easy to turn over the engine, & check all the timing, at timing marks on the engine, & the alignment of the dizzy rotor button to the spark plug lead points etc. I wish you luck, & will be very interested when you eventually find the cause of your woes. Cheers Banjo -
OMG ! I don't think the USA Space Shuttle was built as strong as this Mini ! Do you calculate the weight of that roll cage ? That's a work of art. Cheers Banjo
-
Read this interesting article on hybrids entering motorsport next year (2022). http://www.vicorpower.com/resource-library/case-studies/powering-innovation/delta-motorsport Are you & Josh going to be lining up, to fit a hybrid, to a motor sport vehicle ? Bet it has been cold in Blayney this week, & you've both had that wood fired heater running constantly ? Cheers Banjo
-
Absolutely beautiful ! And a credit to your determination & workmanship. Cheers Banjo
-
I'm always amazed how much modern cars rely on the "flexibility of the body itself", to provide a percentage of the ride comfort; & not totally rely on the suspension entirely. How much does the stitch welding add to the stiffness of the body total. I've always been amazed how when you jack a Rolla up on one corner only, so the whole end of the car is off the ground, how much the "unjacked" corner sags. It is quite measurable. Cheers Banjo
-
Love your work Keith ! Keep the pictures coming. Really enjoying the evolving story. Very envious, as I've always dreamt of owning a rotisserie like that. Here's a guy that built one out of wood ! https://www.thirdgen.org/forums/body/681758-building-wooden-body-rotisserie.html Cheers banjo
-
Hi Dean, I can see you are a perfectionist ! It will look great in the end. Your's looks a bloody sight better than this guys one 1 Cheers Banjo

-
Hi Dean, I've never had the patience to take on something as radical, as you suggest, but admire your enthusiasm & commitment to your car. The way you don't just rush into something, but think about it, & even mock it up, is a great attribute. I love the idea you had of taping the body work, so as not to damage the paintwork, then gluing the prototype spoiler to the tape. Is the dummy spoiler cut out of plastic, thick cardboard, or plywood ? Looks great ! Would the final product be "bolt on", or made to be a permanent part of the boot lid ? Cheers Banjo
-
Further to this little episode early last year, the strangest thing happened last week. Another Rollaclub member, Jamie, came around last week, to pick up a wiper motor for her KE25, that I'd fixed up some time ago. We headed over to my messy garage to find it, & she was interested in the 5K on the test bed, with the "trigger wheel" & "COP" conversion. I hadn't played it for a while, as other things had taken up my time, so when I went to start it, the battery was pretty flat. After she had gone, I put the battery on charge, & later on in the afternoon, I took the charger off, as it was 100% full, & I decided to make sure it started. It did not have the COP conversion on at the time, as I had been testing a new type of trigger "disk" with small rare earth magnets, acting as the teeth, being picked up, by a Hall Effect sensor. I'd put the dizzy back temporarily. The engine started & was sitting there idling OK, I gave it a few quick revs, & out of the corner of my eye, something on the other side of the engine, was moving abnormally. It was the distributor cap. I rev'd it again, & again the cap moved. I then noticed, that I had removed the cap previously; probably to check where the rotor was pointing, & had just placed the cap back on loosely, & had not clipped the dissy cap down. I could not believe what I was seeing; the cap had a gap of probably 10mm, between it & the dissy body, & it was bobbing around with no clips holding it in place at all; but the engine was running OK. All that was basically locating it was the ignition/spark plug leads. I rev'd it a couple more times, watched the cap jumping all over the place, & could not believe my eyes. The gaps between the center of the rotor, & the carbon bush in the top of the cap, plus the gap between the end of the rotor, & the four spark plug lead contact points; must have been all over the place, but the engine ran perfectly, with just the slightest miss, every now & again. Stopped the engine, & fitted the cap properly, & put that down as a first: and a true indication, of how a spark can jump in free air, without causing the engine any issues. Now I will admit, that the tower ignition coil that was in use, was a high energy type, with a possible HV output capacity of around 40 kVolts. I might fit the little adjustable HV gap device pictured in the previous post, to the centre point on the dissy cap, & see what sort of gap, I can achieve, before it won't run. Cheers Banjo
-
Hey Killar, You mean, something like this ? Cheers Banjo
-
Hi Pete, Me either, but I've done it to most small cars I've owned. 1. Generally larger tyres have a wider tread, & therefore more contact/grip/traction with the road ? 2. Generally larger tyres are greater in diameter, so slightly less revs required to cruise at the same speed ? 3. Generally larger tyres produce a greater track width, with better & safer handling ? 4. Generally larger tyres on small cars, results in lower weight on the tread, & less wear/longer life ? 5. Generally larger tyres create a more pleasant looking vehicle ? Take this late 1950s early 1960s Ford Anglia 105E Piddly little 510 x 13 inch wheels. I've seen wheels bigger than that, on a wheel barrow. I know, because I used to own one once. I put 640 x 14 Holden wheels on it, & the 640 x 14 Holden tyres were cheaper than I could buy the 510 x 13 tyres. Lower it a bit, & then the car became a different animal. Green one looks scared . . . . . . The Red one looks like it could take on anything. Mind you, if that's not to your liking, you could make the wheels & tyres just a little bit bigger. Cheers Banjo


-
Yes R.I.P. ! (Rust In Peace) dear olde KE55 Coupe. Not as shiny as yours ! When I stripped it for parts, I then cut the body up, & the rear end floor & wheel arches, went to someone up on the Sunny Coast, who was wanted to "Tubb" his rear end for enormously wide rear tyres. It was when I cut through those quarter rear panels, I realised how much the pillarless design, relied on that area for strength & rigidity. Toyota, in their wisdom, added maybe 3-4 extra layers of steel sheet between inner & outer areas, for increased strength, for the pillarless design. Trouble was, they were raw mild steel, with no paint or prep. on them at all; & when moisture got in, around that large rear glass rubber, it got into that raw steel, & the result was a disaster. I never even took a photo of the rust, it was so appalling, but totally hidden & lurking. The other thing a lot of people don't realise about modern car body resign; is how much the rigidity of the body, relies on those two big sheets of glass in the windscreen & rear window. I once saw a car, (a Toyota Crown) literally break in half, because the owner, drove around on dirt roads, for a month, whilst awaiting a new rear glass, to arrive from overseas. Cheers Banjo

-
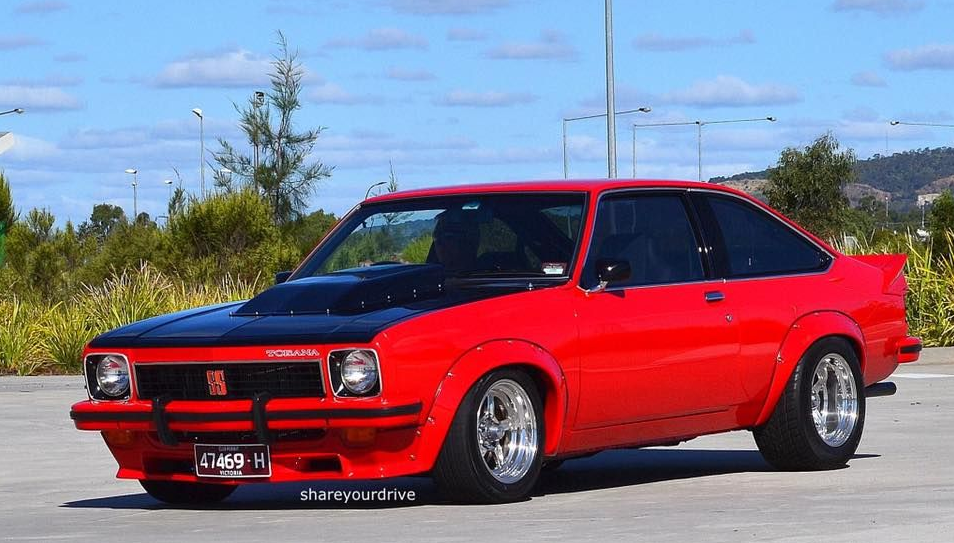
That looks beautiful ! Great job. Makes me very nostalgic for my olde KE55 Coupe, that went to Corolla Heaven, with Cancer, in the rear window quarters. Actually, mine was red also, & I put two guages just behind the gearstick, as you have. Best Rolla I ever had ! Cheers Banjo
-
Hi Joe, Welcome aboard ! Check this thread on this forum out. https://www.rollaclub.com/board/topic/37596-ke2-steering-box-removal/ Cheers Banjo


