

altezzaclub
-
Posts
6725 -
Joined
-
Last visited
-
Days Won
130
Content Type
Profiles
Forums
Events
Gallery
Blogs
Everything posted by altezzaclub
-

Fuel Tank Repair Kit - Anyone Used One?
altezzaclub replied to ke70dave's topic in Automotive Discussion
We used the epoxy putty on the rally car tank at a braized joint that was weeping fuel. It didn't adhere as well as I expected, the fuel would leak out under it until I realised the system wasn't venting through the new-style cap on it. Once I drilled out the one-way valve in the cap it was OK, the problem was pressure build-up as the temperature rose during the day. CRC used to make a treacle-thick epoxy in a kit with a patch of fibregalss cloth, that used to work better. -
This might be late, but I'm planning a horizontal bar across the car between the main hoop legs that will be bolted to the transmission tunnel. Is that the one you said you weren't keen on? I figure the transmission tunnel is the weakest part of the floor and this would help strengthen it. If you cut the whole floor out between the sills I don't think the car would be significantly weaker. I suppose the giant 'X' of diagonals in your hoop will do the some of that work, as well as resisting twist of the main body.
-
well... its all here- http://www.rollaclub.com/board/topic/69126-how-to-build-a-rally-car/page__gopid__680040#entry680040
-
Making A Ke20 With 2 Way Lsd Turn Corners.
altezzaclub replied to crunk81us's topic in General Mechanical
Work out the fastest speed you ever get to in a street sprint and then work back through engine revs & whichever gear is 1:1... so you hit that top speed at max revs in (usually) 4th gear with a 'whatever' diff ratio. I'd expect a 4.8 The lower the gear ratio the faster you'll accelerate. Do it like this- 185/60X13 RE88 has a circumference of 1.735M, so in a Km it turns 1000/1.735=576times At 160kph it will turn 160*576/60=1535rpm The motor is hauling 7000rpm through a one to one gear, so the diff ratio you need is 7000/1535=4.6 If your tyres are bigger then you need a lower diff. We use a 4.8 in the rally car, with 14" tyres, as its all acceleration and hopefully no long stretches at 6800 in 5th!! -
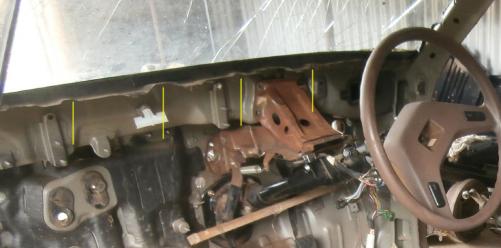
No, but you'll have to find those nuts from underneath by the look of it. You can see in this photo I had the dashtop out on the bonnet and the rest of the dash was inside, although pretty well taken apart. Sadly I wasn't trying to remove the dash to do anything in particular with it, so I just hauled it all out without noting how I did it.

-
Not unless they're halfway through pulling a dash out! You're looking for 8mm studs facing downwards between the black steel panel in picture C and the dashpad, I think... Not something you can see in a car with the dash still in! Yep, they're there- I just lay on the floor of The Beast and right up under the windscreen was a nut on a stud. In the most impossible to reach place of course!


-
Why Do You Think We Need A Govt??
altezzaclub replied to altezzaclub's topic in Rollaclub Social (Off-Topic)
Ah- THIS is what Govts are for! Distorting the free market and stopping people getting what they want! This time Aussie is on the receiving end for once! http://www.drive.com.au/motor-news/australias-fastest-holden-grounded-under-prohibitive-laws-20140508-37x0q.html?utm_source=outbrain&utm_medium=cpc&utm_campaign=outbrain_amplify -
Cam grnders reckon 0.4" is the max for stock springs, but one of the Mods on here has run more lift than that with no problem on stock springs. Might have been Philbey- it was mentioned last year. Crow sell valve springs for higher lifts, or get Holden 202 off some particular motor. Just search Rollaclub for it, its on here somewhere.
-
Park Lights Not Working, Help Please!!
altezzaclub replied to liamke70's topic in KExx Corolla Discussion
...unless someone jams them in and ruins the little pins. Take them out and let us know which way around they are. If one bulb is harder to turn than the other it would suggest one is jammed in backwards.. -
Isn't there a whole lot of 8mm nuts under there that hold the dash pad down with studs?? The studs are fixed into the steel frame of the pad and point downwards through slots in the black steel dash top. That's the panel you see at the very front part of where the winscreen is glued in. I did it on the rally car earlier this year and it all fell apart OK. I can't remember the sequence of which part came off before what.
-
From further up the coast... I'd say its not worth running it past 6000rpm. The mans from Vancouver- http://www.hachiroku.net/forums/showthread.php?t=25084

-
Surely the stuff of wet dreams! What can your father in law find for you over there.... even a 2-door KE70 with a 2TG!
-
Damm those 2-door sedans are rare over here! It doesn't sound like it needs much work, you're starting with a good engine/gearbox combination already.
-
Find one at a wrecker and remove it... take a squeeze bottle of soapy water. Its not the sort of thing that will stand being mailed.
-
Rollmaster Fitting Instructions?
altezzaclub replied to megamannz123's topic in KExx Corolla Discussion
Yes, the holes are related to the cam teeth, so you go forward a hole, forward a hole, then forward a tooth and back a hole. Well, that's my Datsun experience, I have never had an adjustable K camwheel. What you need is the head on, the cam in place with only two rockers in a cyl and a dial guage on a valve collet top. You put a circular protractor on the crank pulley and turn from TDC. When the cam lobe opens you will see it instantly on the dial guage and read it off the protractor. That will let you set it up according to the cam cutter's specs, and then you change it a coupe of degrees either way once you have it all running and want to change the power band. You might as well build the little steel fitting that holds the dial gauge on the head somewhere, and we drilled the pulley bolt and tapped it for the circular protractor. That way you are set up for doing this for decades to come. -
Park Lights Not Working, Help Please!!
altezzaclub replied to liamke70's topic in KExx Corolla Discussion
Here's the lights wiring diagram- You can see that a greeen (G) wire supplies the park lights from the tail light relay. Power to that is the white wire from the fuse in the kick panel relay box, and switching is by the LG (blue & green) of the light switch. Use a $10 multimeter to see that you have power at the bulb and a circuit to earth.

-
Making A Ke20 With 2 Way Lsd Turn Corners.
altezzaclub replied to crunk81us's topic in General Mechanical
ah- also forgot to mention left foot braking.. If you left-foot brake deep into the corner you can modulate the pressure to hold weight down on the nose while turning. So you brake hard to get the speed you want but don't lift your foot right off while you turn until you start to accelerate. Even on fast corners where you don't need to brake & change down, just leaning on the brakes a little with your left foot will stabilise the car. You don't need to lift off the power. Another skill that is not promoted by the Govt mainstream but it is worth learning. -
Making A Ke20 With 2 Way Lsd Turn Corners.
altezzaclub replied to crunk81us's topic in General Mechanical
A weaker or no front sway if you have one. The weight transfer onto the outside tyre forces it down onto the ground for more grip. A stiffer rear sway, or fit one if you don't have one. That will help lift the inner rear wheel so it stops understeering, and you rely on the diff to give it drive. More front camber, so when it rolls onto the outside tyre the tread is flat on the ground. Camber will wear the inner edge of those nice RE888s, and toe-out will wear the inside edge even faster. Toe-out will make it very darty and it will change direction qucker, but it will feel less stable at high speeds. How about swapping for a 1.5 or a one-way. They turn in much better as they disengage on over-run, then pregressively lock up as you accelerate. -
E85 no doubt soaks up water from the atmosphere too, then rusts the fuel tank out. But as the world is still running out of petrol we'll all end up using it! Mine run fine on the United 10% ethanol, and although straight 98 uses less fuel by about 1-2L/100km, the price difference makes it not worth it.
-
Ke70 Engine To Gearbox Compatibility
altezzaclub replied to AntonyLupin's topic in KE70 Technical Questions
I don't think so, the K series was discontinued as a unit, neither motor nor gearbox was worth putting onto something else. You'd blow the K gearbox up with much more torque I expect. Start looking for a T-series gearbox and an A series motor if you want to modernise. The T50 gearboxes were behind the Tseries motors and then carried over to the more modern A series engines. -
If you have lots of cars and are prepared to put the oxy sensor plug into each exhaust manifold they are excellent. The narrow-band I have on the SUs was great for shaping the needles, but once I had them set up the guage doesn't do anything. I'll take it out and mount it in the wife's Pulsar SSS one day to check that, but the gold KE70 will have to wait until I weld a nut onto the downpipe. But one and rent it out!
-
Ah rats! Too much to machine away Taz? I was planning on using this on my next big build!
-
http://iview.abc.net.au/programs/for-the-love-of-cars/ZX9979A001S00#playing Until the end of the July. $15000 for a dismantled, rusty wreck of an Escort... KE70s are now just where the Escorts were when the Harris' started street-racing them, common, cheap and under-appreciated.
-
If you're keen, have a measure-up of the Corona clutches. You would have to get the K flywheel skimmed across the face (get it lightened at the same time!) and re-drill the pressure plate holes out near the edge for the Corona pressure plate. Mainly, you have to ask the clutch shop to put a K core into the Corona clutch plate so the larger diameter clutch plate fits your gearbox input shaft. This gives you a larger clutch that has a greater clamping pressure on a larger clamp area. It will take greater power and last longer. We used to do it on the Datsun 1600 rally car using a 240K clutch.
-
The Weber throttle is back to front compared to the stock Aisin, so you'll have to change the throttle cable setup. The square fitting with the arm in the middle is the accelerator pump, it works on a square diaphram like a fuel pump instead of a piston in a cylinder like most carbs. Spend a few hours learning about using them from posts on here, and PM guys to find out what jets they used. They are the cheapest improvement you can get for the 4K. Now add a cam grind, a set of extractors and a free-flow exhaust! Welcome in!


