altezzaclub
-
Posts
6725 -
Joined
-
Last visited
-
Days Won
130
Content Type
Profiles
Forums
Events
Gallery
Blogs
Everything posted by altezzaclub
-
A build thread would be miles better than Facebook, that is a lousy way to display photos. Maybe its because I've never bothered wth it that it doesn't seem as clean and logical as a Rollaclub topic. The car looks nice, you must have tipped some fair money into it by now. What carbs do you for it?
-
LOVE this photo! Porting is stunning too! http://www.rollaclub...ttach_id=115349
-
LoL! Yes, pics! If it is as good as you say, then $2000 to $2500 I'd say. There are quite a lot around $1500-$2000 that are in very good condition with 100-150,000km on, but not immaculate. I paid $1800 for the blue one, and $900 for the gold one, both with just over 100,000km on. The gold one was cheap as it needed a head gasket from a failed radiator. Steve recently bought the best one I've ever seen from a little old lady for just over a grand I think it was.

-

How Much Can Be Machined From 5K Head?
altezzaclub replied to megamannz123's topic in KExx Corolla Discussion
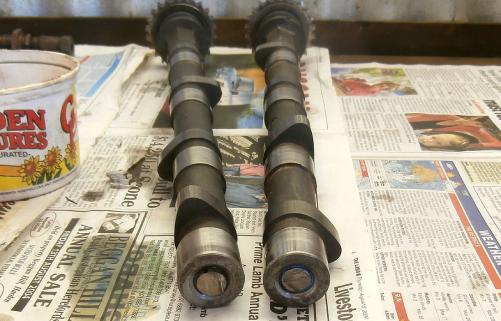
Depends what driving you do with it- All trips or night drags and you can use over 285deg, but driving around town and getting out of the gutter would be a pain. The 169 is good, it still uses stock springs. The theory is that lifts over 0.4" need the Holden 202 springs, which is what Richard just bought for his Tighe cam. I think its a 150A, and he does mainly long trips to Uni and back and lives in the country. Mr T himself said "Yeah, OK, I'll fix you up with something.." and it has one set of lobes at 311deg and the other at 290 odd...Not something listed in their catalogue! Anyway, it always pays to chat to the guy who will cut it and explain what you want the car to do and what else you are doing to it. If you're up and down the Te Karaka Road, (one of my all-time favourites!) then get something 280-285deg. Compare the Aussie cams with what you can get locally in NZ, we can always mail you one from here... http://www.tighecams.com.au/COROLLA3K.htm -
With the cams in we could start setting tappet gaps, a long job in these motors. With the exhausts all fine we found the inlets had two valves with no tappet gap, one with 12thou as it should, and one with 24thou... The first thing to do was undo the cam bearings 5thou and re-measure, and repeat until we had a gap on those two tight ones. Turned out one was about zero gap to slightly negative, and one was about -10thou! this was quite troubling.. In theory they should be around 12thou, even with Steve lapping them in. The exhausts were fine. There is only the valve length, the shim thickness and the cup involved, so we pulled the cams out and measured all the shims and all the cups. they were all fine, so it was as puzzling as ever. We thought maybe the big valve gap was due to a bent valve, so we had to build a tool for a leak-down test. First job was to drill out a spark plug.. yeah, we broke two as the drill bit was juuust too big! So a smaller bit and the third one was copper core.. that allowed us to screw it into the cylinder with a brake hose on it that had a schrader valve in from a ruined rally tyre. The compressor tyre pump gun put 100psi into the cylinder- We used a bit of tube to listen for leaks in the ports, and thought a couple of valves were dodgy, but not really leaking, so finally decided to pull the head off again. We had already ordered new shims of the various sizes needed but they would take days and days to get to us. We tipped the head upside down and filled all the combustion chambers right up with turps. After a couple of hours they hadn't leaked at all! We checked everything and all seemed fine, and I can't see how the motor ran with those (lack of) clearances, and I can't see anyting that could cause them! Seeing we had it off we measured the combustion chamber, the head gasket and the piston crown height and figured out it has 11:1 compression! ..and we were out of time! So I'm back in Orange while Steve has 6weeks of Uni, we still have an 18RG to finish, and the rally car got nothing done on it really! Richo is happy tho', blasting about in his 345K Ke30!


-
It got colder and the heater was replaced by our old fire again, with the chimney out the door. Not the best idea, but still great to stand around! Along the way we re-found the linisher Steve had discovered a while back, hoping to use it to shape the roll cage pipes, but apparently you can't get belts for them. With the head on we started on the cams... and along the way we noticed a problem that had been there since Steve bought the engine.. No oil plugs in the back of the cams!!! The cam grinder must have forgotten to put them back in some years ago, and it was obvious when we checked the cam bearings... the further down the head you looked, the more graunched the cam bearing were as the oil ran out! We searched around the steel junk-pile and found a solution- A stock KE70 spring! Once cut & lightly filed they could be hammered neatly in with a bit of silicon... Actually I think we did one with silicon and one with araldite, due to a difference of opinion on which was best!


-
The head had suffered from all the pistons hitting it many moons ago, so we popped it on the block without a head gasket and used a grinder to slowly relieve the combustion chamber and clean up the piston crowns... Why is this?? Well, you are never meant to skim an 18RG head or the piston crown touches the hemispherical head, but that head had been welded up for corrosion in the past and skimmed time and time again as the guy welded. In fact the valve seats were touched by the fly-cutter so much was removed! That explained why grumpy was faster than the rally car! While Steve was doing this I was distracted by an old kero heater we found in a shed, and I fired it up on the turps used for painting.. Naturally it was blocked up and I ended up stripping it completely and re-buiding it. After the head was sorted we started putting on the timing chains and cover. This was always a major source of oil leaks, as the motor had been in a crash and the timing cover was smashed then welded. Steve didn't have a flat steel plate so we bought one from the local engineer, about 200x150 and 15mm thick. Then he settledf down with some wet 'n dry sandpaper & the timing chain cover and sanded it straight. The welding had left quite a distortion in it where the head sits, and it eventually lost over 1.5mm. We made another thick gasket to bring it up to the correct height and then painted the cover. We did the sump as well and fitted them on-


-
The crank went in, followed by pistons with their new rings. We fitted an uprated oil pump, not the raped one we found in a "race" engine he bought. This is how someone changed a mid-sump to a front-sump to fit it in a Celica... The head was next, we hauled out the 18RG valve extraction tool I'd been working on last time, something we had to make as the standard sort of valve spring compressor won't fit around the wide twin-cam head. The drill press stand was lying in the Woolshed anyway... Surprisingly it worked, although its really a two-man job. One guy holds the press handle down and the other uses a magnet and a screwdriver to get the collets out.


-
Ok, the first job was to move the rally car, so it needed the Bilstein front struts from the RA 40. First problem was that the nicely cleaned and painted KE70 steering arms just didn't quite fit the RA40 struts, so after a lot of pissing about we raided the wreck and cleaned up the RA40 arms. With them in place we found the 3 turret holes on a KE70 have a unique pattern that nothing else will fit, so new cross-strut bar ends and new camber-tops would be needed on the RA40 struts. Then we found that even with the stock KE70 strut top the RA40 spring top wouldn't fit in the turret, so we moved further down and used a stock KE70 spring top, which meant a KE70 spring.. This meant we could push the car out even if those springs will not be any good for rallying. The photo has the KK70 spring gear on the RA40 strut that we moved the spring perch up on last year. Steve wanted to build the 18RG motor for Grumpy as we had all the bits for that but didn't have the roll cage tube yet. We got started and of course the tube arrived, but he was dead set on bulding the motor rather than the cage.. "It will only take a couple of days..." First was to free up an engine stand that had a spare 18RG on, so we strapped that down into a wheel barrow. Next was to paint Grumpy's block... he reckoned floro pink marker paint, so I said a clear coat of urethane would be needed. The bonus was a lovely crackle effect over the white undercoat!


-
How Much Can Be Machined From 5K Head?
altezzaclub replied to megamannz123's topic in KExx Corolla Discussion
Sounds good! If you get a chance in the future swap the cam for something around 275-280deg, it will work better with the compression and twin carbs. -
How Much Can Be Machined From 5K Head?
altezzaclub replied to megamannz123's topic in KExx Corolla Discussion
That cam is fine, similar to mine at 265deg. It pushes the pushrod up an extra 1mm or so, and if you skim the head half a mm that is still only 1.5mm more pushrod movement. Some cams alone increase it over 2mm. The bit of paper in the photo here is actually graph paper. http://www.rollaclub.com/board/topic/42407-the-girls-ke70/ Are you porting the head too? Its a simple and free way to get extra flow if the ports are smaller than the gasket & manifold diameter. -
Well, another fortnight of holidays has slipped past and not enough got done! I picked up the 18RG bits from the engineer on the way up to Walcha so we had all the bottom end balanced, and we ended up concentrating on assembling that. Its the first of 4 or 5 motors Steve had bought for the Celica and we need to get them running in an RA40 one by one and sell them off. That's the motor for his road Corona Grumpy, the one from Speedhunters, and he'll have to update that build thread. Little bro Richo and I put his 345K together and that is now running, quite a little monster with a 4K block, 5K pistons, a 3K head and a wild cam. He spent a day or two getting the best setup for the Weber DCOE he has and once it is run in I expect to see some neat graphs off a dyno app he d'loaded. It just walked away from my stock KE70 and sounded like a 13B when crawling along in 1st gear. The build thread he has for it will be updated. I'll download my camera tomorrow and update this thread too.
-
How Much Can Be Machined From 5K Head?
altezzaclub replied to megamannz123's topic in KExx Corolla Discussion
Put a piece of graph paper on the combustion chamber and run your finger around it. You should get a dirty outline of the chamber, or use a felt-tip pen. Then count the number of mm squares on the graph paper to get the area of it. Once you have the area it is easy to work out the amount to cut off to get your 5cc gone. My 4K chamber is 30sqcm, your 5K is smaller I think. I'd say you could take 40thou off and not worry about the rocker on the valve, as that is more a factor of the cam. What cam lift are you aiming for? We just measured Steve's 18RG, which was skimmed to death before he used it, and found it was 11:1. It's skimmed so much the valve seats have been touched by the cutter! No wonder it flew! -
I've never done it but I can't see why anything would change. You have- Starter main 12V cable- use eitherstarter Solenoid activator lead-same for solenoid Oil pressure switch- use the same one if you like Water temp gauge lead- same as oil pressure switch Alty wiring- and you can use the same alty. Dizzy wire from coil- both the same. and that's about it. The 4K carby might have a fuel cutoff solenoid on it that you will have to run a 12V ignition wire to.
-
No, you shouldn't need new cam bearings, they don't touch the bearing surface on the cam. You should get the followers ground by them as the new cam lobes will want to wear the follower surfaces to match. I had Crow grind mine, but there are half a dozen biggish companies do them for K motors, including Tighe, Camtech, Waggott, Wade...
-
Bad luck man! Good thing you weren't quietly sitting in it at the time. You could get a free shell from Steve that needs the passenger's sill replacing, but its up in Walcha...
-
I Need Help With The Timing For My 3K Engine
altezzaclub replied to jfgarro's topic in KExx Corolla Discussion
two of those things seem to work in opposite directions- Pinking at full throttle or high load is from too much advance, but poor fuel economy and poor revving is from not enough advance. When I was watching my ignition with a timing light it reached its maximum of 36deg before 3000rpm. You can mark the pulley with white paint spots at every 5deg and measure your own advance curve if you have a tacho. Buy some octane booster and put that in the fuel to see if it stops the pinking. If it does you will have to retard the timing or use octane booster all the time. You might buy a bottle of octane booster at a spares shop or just buy toluene at a paint or chemical company. I used 10% toluene with petrol in the rally car. If it doesn't stop it then the pinking must be from some other problem. Possibly the Petronix is advancing too fast in the rev range, or the maximum advance is too much. Do you have any data on the ignition curve from it? -
Lookin good! I'm dying to know what that first 2T looks like inside!
-
Dang! that is NO room! Even for socks it will be struggling... Make the trumpets J-shaped so they point vertically!
-
Rear Brakes Wanting To Upgrade From Drums....
altezzaclub replied to BigMacTobz's topic in KExx Corolla Discussion
I wouldn't get too carried away, the front brakes do all the work so fitting rear discs is not around the top of the list for performance. Just fitting a Tseries diff with drums will give you larger diameter shoes that are wider as well, and have bigger pistons, all designed for the heavier Celcia. What are you fitting to the front?? ..and if its like most KE70s, the brake lines will be old, soft and cracked, so lots of braking effort gets wasted there! -
manifolds are the limiting factor, & the most common four are- Stock manifold with adapter plate takes a downdraught Weber 32/36 Lynx manifolds for twin SUs Single Weber DCOE manfolds are still made new, Redline I think or Weber importers. Twin DCOE manifolds are also new. http://www.weberperf...php?cPath=29_51 and that is the order of price and performance I'd say. The coolest challenge would be bike quads, vacuum demand carbs like SUs with needle jets, and you just need a simple home-made manifold. Keihin or Mikuni. So if you're after a simple performance increase go for the 32/36 D/D, usually off a Ford Cortina but also on a myriad of Euro cars from the 70's and 80s. For a bit more go and fuel economy try and find a Lynx SU manifold and a pair of inch & 1/4 SUcarbs like mine. ..or its probably easier to get a single DCOE Weber and fit that. Your other question raises an interesting point that has not been addressed by the Govt- what is the status of a forum?? We are different to a car club, as you will find out if you try to join Toymods. They want names, addresses, telephone numbers, sponsors.. all the stuff a bank wants! Forums are pretty laissez-faire and no-one has the same legal status as formal club officers, which is probably why they don't get recognised as agents for legal documents like rego.
-
Why Do You Think We Need A Govt??
altezzaclub replied to altezzaclub's topic in Rollaclub Social (Off-Topic)
Well, its not improving.... I get the email newsleter from the Howick Ratepayers Group in Auckland, where we moved from. -
Well done! Always happy to help, and I hope you enjoy a nice car. If you can keep it rust-free it will last for years.
-
Somewhere very smooth! We used to blast around new roads in subdivisions before they built any houses..
-
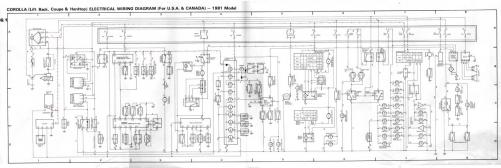
First check the fusible link from the battery into the system. There might be one, there might be three, but see what happens when you turn ignition and headlights on then wiggle the wires. Wiggle the battery terminal wires too, one might have a bad connection. Then check the voltage for 13.5-14V while the car is running to make sure the alty is charging the battery, or check the battery for charge at a battery shop. Vancouver Island is hard on batteries. Then, if you can, replace the ignition setup completely by jumping from battery positive to the coil positive. That will liven the whole circuit shown in this wiring diagram by red dots. If that make the car run smoother then the bit you by-passed (the actual key setup) is the problem. This is a KE70 diagram for USA, but I'm sure its very similar. Hang onto it, its the best copy I've found! Then get back to us and let us know what happened.