

Banjo
Regular Member
-
Joined
-
Last visited
Everything posted by Banjo
-
OK, Jeremy; Lets look at the facts. As the oversized (+0.025") big end shells you removed, were in the engine, & it rotated OK, we have to assume the rod journals have been ground undersized at some time, & had oversized slipper shells fitted. However, if brand new +0.025" shells have now been fitted & they are tight, then either . . . . . 1. The crankcase journals were not ground undersized to 0.025", and the grind was something less, & very worn 0.025" shells were fitted. OR 2. The new +0.025" shells are incorrectly marked or labelled. Stranger things have happened ! In the absence of accurate vernier calipers, so you can measure each journal at three points, you really have no option, but to reinstall the shells you removed. It is possible that these are also very worn & that's why your oil pressure is low. One option you have is to "shim", the rear of the big end bearing shells. Bear in mind that oversized shells come in various sizes. +0.005, +0.010 etc. so a +0.025 has plenty of white metal on it, as the shell metal backing would all be the same thickness. I've never shimmed a big end shell, but an old mechanic, once showed me one how to do it, and it certainly worked for him. With the rod & cap ends & slipper shells spotlesslessly clean, he would line the shell backing contact area with 1 or 2 cigarette papers. (Tally Ho was the brand I think he used) Before fitting the shell bearings, he would work each end of each shell on wet & dry emery paper, so they could come closer together. He'd then assembly wet, & tighten, & then spin the crankshaft. He would do this a little at a time, until he felt it was just getting tight, & then put enough cigarette papers behind, until it spun freely. He did this with each journal one at a time, with no other rods connected. It could take him all day, although I must admit he was working on an old straight 8 cylinder American car at the time. This may seem an extreme fix, but if you are in the jungle" & do not have the measuring equipment, or resources to do a complete repair, this might be an option. Frankly the problems you have had with this 4K in your "Jeep", I would suggest that you try & get hold of one of those 4K or 5K long second hand engines, you told us as being freely available in the Philippines, & assign this engine to the scrape heap, or as back-up spares. Cheers Banjo
-
I've had a problem with poly bushes also. I fitted SuperPro blue bushes all round, on my KE30 2 door, front & back a few years back. I like Pete, used all the lubricant supplied. Initially I was happy with them, & to some extent, the bushes on the front, have been pretty good. However, my issue has been the rear ones creaking & groaning. It's bloody horrible, especially at low speed going over speed bumps in car parks etc. If you Google noisy polly bushes, there are some classic Utube videos with audio, to make the point. https://www.youtube.com/watch?v=QwlofW23Jyk https://www.youtube.com/watch?v=Hl2HeNrut7s https://www.youtube.com/watch?v=fpEZUbHVhUs I have spoken to Fulcrum about it. Apparently, they dry out, and that's when the creaks start. Fulcrum advised that they have now changed the design of the bush, such that it has little grooves on the inside that retain more grease. I believe they may have also changed the grease type also. They suggested I remove the bushes & regrease them, & the problem will go away. Apparently, there are still a lot of the old (obselete) pulley bushes being sold on-line cheap, without the grooves. I happened to unwittingly get these. Frankly, I'm not interested in removing & regreasing the bushes every couple of years. I am definitely going back to the original rubber bushes, and will also be placing an order for a set of rears initially, from Amayama, although I note a complete rear set will set me back about AUD 150.00. In the next few months, I am going to remove the springs & have them reset, so the new bushes will be fitted at that time. I may be wrong, but the way the rubber & poly bushes work, appears to be quite different, to natural rubber ones. With the poly bushes, all friction surfaces are lubricated. There is no lubrication with a rubber bush. It uses a crush tube & a "squashing" action, such that the rubber in the spring actually becomes a torsional component. Anyone who ever removed an old rubber bush from a 40 yo Rolla, can testsify that the rubber binds to the crush tube & the the spring eye. I've even had to drill & file out, old bushes sometimes. I thing the secret to the rubber bushes, is the quality of the rubber itself. Despite the cost, I would not be lulled into purchasing cheap rubber bushes, of which there are plenty on line. OEM ones hopefully are the real deal. Like to hear any other comments regarding this. Cheers Banjo
-
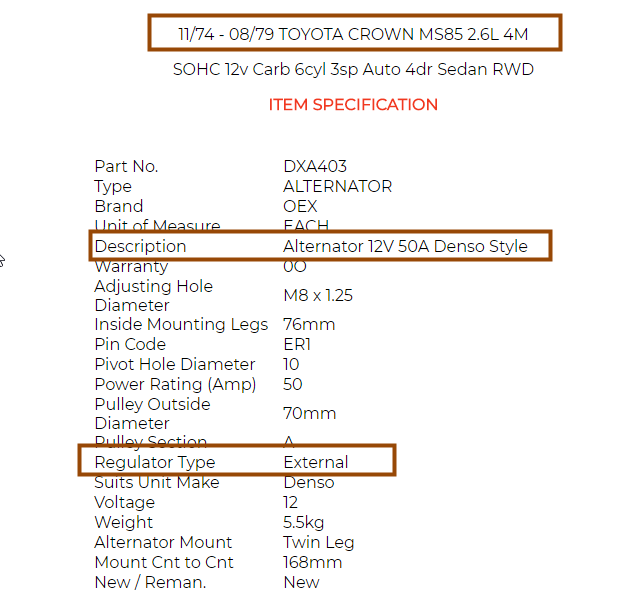
Old MS85 Crowns are now a bit over 40 years old, & could well have had an alternator originally with an external regulator. My check of the web indicates that. However, when a car gets to 40 years old, anything can change in that time. Very easy to identify. If it is an alternator with an external voltage regulator, & you have to replace it, I would be upgrading it with one, with an internal regulator, with a bit more output than the origial 50A. Cheers Banjo
-
I recently purchased a 2004 Echo for my daughter's first car, & it has proved to be a wonderful car. I've be going over it completely, & would now drive it anywhere, as it is so reliable. The drivers door actuator was playing up this week, so I have removed all the door lock mechanism & door handle. No mean feat, as there are lots of pivots & levers in there. The actuator is a sealed unit, & I would like to test it on the bench, to confirm it is completely dead. It has a 6 pin socket at it's base. I have scoured the internet looking for an identification diagram, for these 6 pins, and/or a wiring diagram for the 2004 Echo, but have been unsuccessful in locating either. Can anyone on here help in pointing me to a source of either of these electrical diagrams. Much appreciated. Cheers Banjo
-
Hi James, As it has broken off so far up, under the hex head of the bolt, you could possibly get a piece of steel bar, a metre long, & drill a hole in it, in the middle, so it just clears the bolt. As you have a welder, you could weld the bar to the broken bolt, & then use it like a "T" bar, to put some force into it. Weld it, as low as possible. (take the water pump off) If it doesn't move at all, or the bolt shaft starts to twist, then it will have to be off to the machinist, as you don't want it breaking off again. Being up front, it might have got some water into it, and is rusted in proper. You don't want it breaking off just below the surface of the block, so the machinist doesn't have a flat surface to get an exact centre point for drilling it out. Good luck, & let us know how you go. Cheers Banjo
-
Hi James, I wish you luck at the machine shop. I think head bolts are a very overlooked item, but can cause issues, if not installed correctly. When our K Series engines are 40 odd years old, you never quite know what has been done to them by others, in the past. Theoretically, the head bolts stretch when they are pulled down, & should be replaced at some stage, but it doesn't happen very often. The first thing to check when putting a head back on a block, is to ensure the threaded holes in the block, for the head bolts are perfectly clean. Some spray degreaser & a air nozzle, can usually fix this, but you must wear goggles. Use a bit of stiff wire to unblock any rubbish at the bottom of the holes. It is a good idea to run a die down the thread in the hole, but if not available, then a head bolt, with a perfectly clean thread, and a bit of light oil on the thread, will usually suffice. You should be able to wind the head bolts down by hand, without any binding. Next ensure all the head bolts are the exact same length. Take one head bolt, & fit the thick hardened washer, & screw it into a hole until it touches the bottom. Pull the washer to the top, & with a steel ruler, measure the distance between the top face of the head, & the underside edge of the washer. Note this measurement "A" to the nearest mm. Now measure the thickest of the head from the bottom face of the head, to the top of the head bolt boss. Add to this the thickness of the head gasket, which compressed, will normally be about 2-3mm. This total measurement should be approx. 10mm greater than measurement "A", previously measured. If not, then you might have the wrong length head bolts. This is very important, when swapping heads. You do not want the head bolts ever bottoming out in the bottom of the block threaded holes. I personally have always put some sewing machine oil on the head bolt threads, before fitting & tightening them up, in sequence as per the manual. A drop of oil on the top of the thick washers does not go astray either. Never tighten head bolts down on aluminium heads without using the thick hardened washers ! Oh, and use a tension wrench. If you haven't got one, then borrow one. Cheers Banjo
-
Hi James, The head bolts on the K series engine are a substantial bolt. There are probably harder aftermarket ones available, but I have never heard of a standard head bolt snapping off like that. From what you describe it sounds like it snapped off just below the hex head of the bolt. It sounds like the bolt is so rusted in at the thread, that the bolt thread has not moved at all. You really have no option, other than to lever the head & block apart. In doing so, you may score the inside of the head bolt hole in the head, but it is soft, so should not do too much damage. What are the condition of the other head bolts you removed OK ? Was this bolt on the back or front corner of the head ? My guess is it was a rear corner, as the back of the engine runs hotter than the front as the engines get older, & the cooling water circulation at the rear of the block deteriorates, as gunk builds up in the water jacket. Were there big thick hardened washers under the head of each head bolt ? If the washer is omitted, then the bolt can bottom in the threaded hole in the block, causing all sorts of grief. From memory, not all K series head bolts are exactly the same length. There is always a possibility that the bolts are too long. This problem can be exacerbated, if the head has been excessively skimmed at some time. I would suggest that once you get the head levered off, that you take the block to a machine shop where they can professionally remove it, although it might take a few days. I'd hate to see you lose a good 5K block, if you have a go, & it doesn't work out. A machine shop has several options. If they can't get it to move after a day or so of penetrating oil, they can cut the head bolt off flush with the block top, they then can clamp the block & drill/machine out the centre of the bolt, right to the bottom. More penetrating oil, & a large easy out, might then prove to be your salvation. Let's know how it goes. Cheers Banjo
-
Hi James, Let me get this straight. You are removing the 5K head, & got all head bolts out, except one, in the corner of the head, which wouldn't budge. So you dad welds on a spanner, because the bolt head had rounded corners. The bolt came out, but in the process broke off. So the bolt head is off, but the head still won't come free of the block. If the head bolt had broken off in the block, or at the surface of the top of the block, then the head would come away easily. If it is still stuck, then the bolt must have broken inside the head, & must be twisted or distorted, such that the head won't come free. If the bolt head with welded spanner has come away, then you should be able to look down the hole in the head & see the remaining mangled/twisted bolt shaft. Be very careful levering away the head, as the head is aluminium. You will also need the remaining part of the bolt shaft, to be able to unscrew t from the block, once you've put some penetrating oil down the thread. Might take a day or so to free it. Cheers Banjo
-
I have no idea why you would want to run the car without the alternator connected. However, your very first test is to ensure all major "power" connection points between battery & alternator on both the +12V side, and the chassis side. Check all earths between chassis & engine block. Make sure every other electrical load in the car is turned off. Lights, radio fan etc. Then connect a multimeter across the battery terminals, without the motor running, & note the DC voltage reading. Then start crank the motor & note the mulitimeter DC voltage reading, during cranking. Then run the motor at a fast idle, & note the DC voltage reading on the multimeter. What ECU are you using for the EFI conversion ? If you feed us back some answers to the above questions, we might be able to provide some more suggestions. Hopefully, your inspection of all electical "power" connections, will find the culprit, & all will be fixed. Cheers Banjo
-
Whilst in Canberra over Christmas, helping move my son into an apartment he had just purchased, I happened to spot a DMC-12 DeLorean, in the apartment complexes underground car park. I've never seen one in the flesh before, as there are so few of them in Australia. I had of course seen them in auto mags over the years, which is why I recognised it. To be truthful, my first impression at a distance was, it must be a replica. However, after walking all around it & looking closely, I realised it was the real thing. I'm back in Brisbane now, & started researching it, to make myself fully aware of the history of this extraordinary bit of automemorabillia. Strangely enough, I was watching tele yesterday afternoon, & saw a re-run of Classic Car Rescue, in which those pair of idiots restored a DeLorean. After researching DeLoreans this morning, on Wikipedia https://en.wikipedia.org/wiki/DeLorean_DMC-12, if I was back in Canberra today, I could probably determine whether it was a 1981 or 1982 model, from all the subtle exterior changes the short lived car had. However, one thing has got me wondering. The Delorean, production cars, had unpainted stainless steel panels, which were not a structural part of the car. They had an unpolished finish, such as would result from the use of a "flapper" wheel, which is what they used in Classic Car Rescue TV series resto. Wikipedia tells me that there were 3 off factory gold plated models produced, & a fourth was gold plated by it's new owner after production. I have read or heard somewhere, that there were a very limited number of DeLoreans produced with a burnished bronze type finish. The one I spotted in Canberra, was one of them. It is not painted on, as I looked at it closely, & you can see the grazed pattern in the metal work. I haven't done any research on Deloreans in Australia, but did notice there was one for sale in Mackay Qld. mid this year for about $ 48K. There was another up for auction, in Tasmania. Next time I'm in Canberra, I'll try & find the owner of the car, & see if I can't learn a little more about this unusual classic. Here is a picture of one that obviously resides in Australia. If anyone reading this, has any knowledge on the "bronze" finished ones, or their total numbers in Australia, please let me know, Cheers Banjo

-
Great example why "sleepers" don't usually become "cop bate", despite their age. Had two boys in blue follow me one night in Greenbank, only 2 klms from home. They thought I'd come from the local Tavern, but I'd only pulled out of the shopping centre adjacent. After blowing, & coming up negative, they then asked a lot of questions about the KE30. Even popped the bonnet, but was not so much to check it, but that the older copper had had one in the family, & the younger one, had owned one, in his younger days. They loved it, & had a few stories to tell. We were on the side of the road about 20 mins. Post Script to this story . . . . My neighbour popped in to see me the next day, to see what I'd done to get pulled over, as He had driven by whilst I was in conversation with the two boys in blue. "Just chatting about my Rolla", I replied. I often come out of the Post Office in the afternoon, to find someone looking it over, with a story to tell, about their association with Rollas. Most families in Australia, have had a Rolla in the family sometime. Cheers Banjo
-
Told you it was possibly Jeremy. If you have the vehicle high enough on jacks or stands, you can lift it by yourself with you knees bent, with heels on the ground, & knees supporting the bell housing. Your hands above your head, then just lift, & support / align the extension housing, & push it forward. Cheers Banjo
-
Love a Rolla story with a happy ending ! Cheers Banjo
-
Hi Jasper, Did you make Melbourne OK, last night. ? Love to know you made it, & all your hard work was worth it ! Cheers Banjo
-
Just back from Batemans Bay. Good that you got it all sorted finally. Clutch cable replacement, nearly always requires a clutch cable at the at the firewall. Hope you have safe trip back to Melbourne this evening. Cheers Banjo
-
Just check that the new friction clutch plate that has been supplied is the right one. There are two different splines used in Rollas. One has 19 splines & one has 21 splines. Strangely enough, the 21 spline one, will fit a gearbox shaft with 19 splines, but the noise when you move off is frightening. Don't forget the splines are straight cut, so sometimes you have to just rotate it ever so slightly, for it to line up, so the splines don't "butt". Hope it works out today. Cheers Banjo
-
I've only done it twice in my life, but a foot of broom handle, a rasp, & 30 mins of patience, can produce a clutch plate alignment tool that works well.
-
Hi Jasper, Just back from the shops. Unless you have a drill & easy-out to remove the broken bolt, you probably haven't many other options, if you are heading off tomorrow. As it is a long drive, you won't be changing gear that much, until very close to home. Think you'll be right. Just don't red-line it on the way home. Ha Ha ! Cheers Banjo
-
Hi Jasper, The return spring is on the outside of the gearbox & is purely there to return the clutch arm to a point where the throw-out bearing is not in touch with the pressure plate fingers. The only way that the clutch could be partial engaged, is if the clutch cable adjustment at the firewall, was such, that there was no freeplay at all in the clutch pedal at all. Highly unlikely, that is the cause of your slipping. Make sure the clutch cable inner moves freely, inside its sleeve. It is a good idea to remove the cable, hang it vertically, & feed oil down it's inside. Let us know how you fare. Cheers Banjo
-
I've never used a gearbox jack ! Serious; & I'm average & definitely don't pump iron. Cheers Banjo.
-
Hi Jasper, Gearbox removal in your Rolla is fairly easy, & accomplished with very few tools, but there are a couple of prerequisites, I suggest you do. 1. Before you do anything, lift the bonnet, & take off one end of the top radiator hose. 2. Also crack the two (2) off 17mm bolts at the top of the bell housing from inside the engine bay. 3. The most important thing is to get the car up as high as possible at both ends, on a concrete pad, and make sure it is super substantial & very safe. Cannot stress this enough. 4. Take the gear stick & boot out. Disconnect the speedo cable. 5. The rest is easy. I've done it many times without a gearbox jack. Lie on your back, parallel to the car, with your head towards the back of the car. Slide the gearbox off & sit the gearbox on your stomach, then lower to the ground beside you. 6. Reinstall the gearbox the same way. 7. The clutch driven plate can be realigned without a realignment tool. Assemble by sight but only just nip up the pressure plate bolts. Slide the gearbox on to align the driven/friction plate perfectly. Slide the gearbox off. Tighten the pressure plate retaining bolts evenly working from one side to the other. 8. Reinstall gearbox. 9. You biggest problem might be refilling the gearbox with oil, if you don't have a large oil siringe. P.S. A pressure can of super degreaser from SCA, and a bit of emery paper to rough up the flywheel & pressure plate surfaces should get you back to Melbourne. Good Luck ! Cheers Banjo
-
Hi Graeme, If RobRoy can't help, or their solution involves hacking your existing dizzy too much, another alternative is to get another DENSO 3K dizzy, & fit the Accuspark to it. I've got a really good 3K dizzy you can have, if needs be, like the one pictured earlier in this thread. The 3K dizzy is a lot smaller than the Bosch dizzies, so is really neat. Cheers Banjo
-
Good luck Pete ! Silicon Chip don't usually tell you what they have got in the pipeline, until the month before. The only thing that would be a welcome upgrade would be a PC interface, so you could set the programmable ignition up, without the hand controller. That said, once you get the advance curve right, the controller is not needed again, unless you want to use it as a real-time readout. With the knock sensor and it's ability to retard at first sign of detonation, you can really give it a fair amount of advance, & then note the operational points, where the knock sensor activates, & then back off the map in that area. I read an article by Julian Edgar, (whom I believe was involved with John Clark at Silicon Chip, in the original design of this project) about using a simple acoustic pickup with amplifier & headphones to pick up the onset of detonation. Julian has always advocated that the two best tools for tuning a car on the road is the acoustic detonation device, & a O2 sensor with dash readout. His articles on AutoSpeed are always a good read. Cheers Banjo
-
I had an aftermarket pressure plate (out of India) do a similar thing, several years ago. The spring steel material wasn't up to scratch, & lost tension, but not as quickly as what you just described. Cheers Banjo
-
Hi Jasper, If it is an oil seal which has finally broken up, then that could well put a lot of oil into the clutch area. The flywheel will fling it around everywhere. With the rubber boot off, and a torch, you will see that clearly. Don't think you can degease it, but even if you could, it would oil up quickly, and you could get stuck half way home. Cheers Banjo

