

altezzaclub
-
Posts
6828 -
Joined
-
Last visited
-
Days Won
134
Content Type
Profiles
Forums
Events
Gallery
Blogs
Everything posted by altezzaclub
-
Pull the starter off & take a look at the gears, both on the starter and the teeth on the flywheel. The motor stops in the same position each time you turn it off so the wear is always on the same teeth when you start it. Ring gears used to wear the teeth off enough that the starter wouldn't engage properly, but these days they do seem to last longer. Then clean the starter shaft & put some grease or oil on it & oil the bush at the end. That will improve it for a couple of years.
-
Yes.. The new ones will pull 100amps, so if you're motor doesn't start easily an old battery will not crank for long. The old starters pull half that, so in theory they can crank for twice as long. For the coil, the high-speed starters will create a larger voltage drop too, the coil will notice that 100amps being pulled out. That's where the ballast resistor on the old 4K really helps. However if Mitsubishi made the 4G13 to take a reduction starter motor I'm sure they engineered the whole motor to work with them OK.
-
Well, another couple of years of running around.. I was doing the annual polish when I came across a rust hole in the bottom of the rear guard on the nav side.. I'd seen it last Xmas when doing the same & thought 'I must get onto that', and put a bit of tape over it.. Inside I'd painted it with some white enamel just to stop it rusting more, so this time that was all wire brushed, treated with phosphoric acid and then a coat of a high-zinc enamel. Doing that made me paranoid enough to look at every seam very carefully, and any crack in the paint meant the factory sealer was dug out and new seam sealer applied. Then it as all undercoated and a can of aerosol colour finished it. Down in both side wells and across the back.. Next will be cleaning under the rear guards and re-spraying with some tarry underbody sealer, hopefully to make it last another decade or two. The boot area is the weakest place on the car, the front never seems to flex as much, but eventually I'll get to look at that end too. I'm thinking about insuring it with Shannons, I've never had the car insured, just third-party property, but an accident that writes it off (easy to do!) will mean the chances of finding another in this good a condition are slim indeed. There is one superb example of a wagon in a South Australian dealership, it was about $15000, now I see its $18000.


-
Its a good thing you are that finicky! Most people would just use them and wonder about a faint misfire now and then.. if it makes a difference at all. I wonder if they are all genuine OEM and that is within the acceptable range of saturation times? How many Yaris owners would notice? You might take a portable test rig to your Toyota dealer and try them on the bench before you buy!
-

Squeal/Screech After Clutch Replacement
altezzaclub replied to blktoy35's topic in General Mechanical
Yeah, surely have to be the thrust bearing just touching the pressure plate fingers. Maybe its slipping on them as its a bit stiff being new, only when you push the pedal does the bearing start to rotate. Does it do it when you're not moving? If it doesn't, what's the difference? Revs? Can you feel how much gap there is for the thrust bearing arm to move forward when the car is idling, or does it normally sit just touching the pressure plate. Might wear itself in and stop... or not! -
"Where can I get the Front Radiator Crossmember for a KE20-25 look for the spare tire panel also " Your local wrecker.. I don't expect there to be any new parts for those bits any more. Can you weld some 1.6mm steel plate onto the existing crossmember instead?
-
"Before I filmed that clip, I balanced carb butterflies and reset the baseline tune. " But the clip showed no hose on the barb in the inlet manifold, so that air leak would make it run terribly. As a quick check, run it with the hose set up as normal for the brake booster/PCV, then pop the hose off and put your thumb over the hole, or anything to block it. See if the motor runs the same, which it should unless there is a leak in the booster/PCV. Don't forget there are several different distributors on these engines, some with adv/retard knobs, some without, some large and some smaller.
-
"Whats odd to me, is that shining the timing light on the crank pulley shows the timing line jump around between 0 degrees and 10 degrees on the cam cover. " Not unusual, slop in the cam chain, slop in the oil pump gear drive to the cam, slop in the dizzy bush holding the shaft.. Try putting the sensor for the light on the HT coil lead, it will flash for all cylinders then. Its always worse when the engine is idling and over-running a touch, worse with hot cams, but vanishes when the engine is pulling on acceleration. Build a home-made dyno so you can check it under load! It might be better if all Weber throats are working the same and delivering the same amount of fuel and air, so the motor doesn't surge on one cylinder and flip the dizzy weights out to advance it briefly.
-
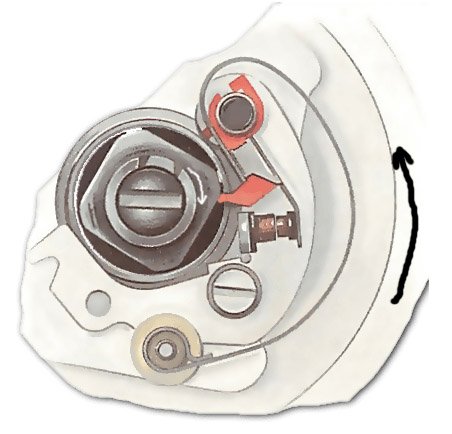
Here we go- The points rubbing block should look like this as you lock the dizzy on 10deg BTDC. You can see the rotor turns clockwise as per the white arrow, so you have to set the timing by turning the dizzy body anti-clockwise as per the black arrow. If you did it like this I would believe your work, rather than the timing light, so long as the weights are working correctly.
-
Hang on, I'm confused about 'beginning' and 'end'. So the rotor turns clockwise, and that would mean the rubbing block of the points touches that red line before it goes over the hump of lobe on the shaft. Is that what you see? I'm expecting that you had the ignition on, the dizzy loose and turned it back and forth opening the points, then set it as you turned the distributor anti-clockwise and the points just opened, which is when they should spark. The rotor shaft turns clockwise so the distributor has to be turned anti-clockwise when setting it. So long as the rubbing block ran over that red line before it reached the peak of the lobe. I can't find any pictures to illustrate it, the net is full of electronic 4K dizzies now, and Ebay stars getting famous...
-
Ah, no vac advance, I couldn't tell from the movie, it looked like a hose as the camera flashed over it. So that's another possible cause gone. Put the PCV hose back on and see if that makes a difference. Then check the carb tuning. I see you have an overhead linkage between the carb, so if you undo one arm it makes the carbs independent and you can check that each throttle closes cleanly with a 'click' and then do it up again. I assume the rotor turns the way you expect? Clockwise, so the 10deg timing as the points open is ahead of the rotor lobe. That puts the rubbing block where the red line is in this image as the points open, not on the other side of the peak. There is an unlikely chance that the springs & weights are broken, under the points plate. They sit at zero as you set the 10deg by hand, but as soon as you start the engine they fly out to max advance for the timing light. However max advance should be about 40deg, then they hit the stop pin. You could take the points plate out and check underneath that everything is clean, greased and working. Good luck!

-
It sounds like there is a manifold leak somewhere. Get some plastic tube about 5mm diam by 400mm long and put one end to your ear while listening to each of the carb throats. They should all sound the same. If they do, move the hose around the inlet & exhaust manifolds gaskets, the head and the exhaust junction & where the carbs go onto the manifold. You will hear a leak very easily. If the carb throats don't sound the same, it will be the idle screws that need matching and the carbs themselves. The carbs have an adjustment on the linkage between them to open one and close the other. The idle screw is on each throat. Before you do that, take the linkage off between the carbs and listen to each one shut. The throttle plates should make a distinct clear 'click' as they close, if they don't they are sticking open. It will never run right without the carbs being balanced. "When the engine was on the firing stroke of cyl #1, the inlet retracted fully a 1/4 of the pulley diameter before hitting TDC, which I believe is normal. It lined up perfectly on the timing chain cover. " Yes, I would expect that too. That last 90deg give you the compression. -The vacuum advance hose is still on, so the manifold is pulling the timing too advanced. Always check timing with no vac advance, just plug the tube. After you have 10deg BTDC you put the tube back on and lower the idle speed to something nice. -If you mistook the direction the dizzy was turning and had the spark on the wrong side of the rotor shoulder it could be quite far out, although I'm talking 20deg, not 60! I've done that before. Hmm.. what is the manifold port in this picture for?? Is it open to the engine? A big hole like that will stop it running too. Let us know how it goes.

-
Don't rush, things are getting hot between Greece & Turkey these days- Greek-Turkish escalation in the Aegean in 2023 – Turkey may intervene https://warnews247-gr.translate.goog/economist-ellinotourkiki-klimakosi-sto-aigaio-mesa-sto-2023-i-tourkia-isos-kanei-epemvasi/?_x_tr_sl=el&_x_tr_tl=en&_x_tr_hl=en-GB Turkish provocation with an F-16 fighter flight over the occupied Pentadactylo https://warnews247-gr.translate.goog/tourkiki-proklisi-me-ptisi-machitikou-f-16-pano-apo-ton-katechomeno-pentadachtylo-vinteo/?_x_tr_sl=el&_x_tr_tl=en&_x_tr_hl=en-GB I use that site to keep up to date with Ukraine, but there's been plenty of poking each other by Greece and Turkey over the year. Turkey's invasion of Syria might keep them occupied over the next few months.
-
Ah, so familiar! They just fill up with rust & sludge in the rear water jackets. Are you going to fit Banjo's bypass to get the hot water circulating around the back of the engine?
-
Nice second car too..!
-
"Could of the ball on the bottom of the gear stick broken off" Yes- About 50years ago I put my Lotus Europa in for service and they broke the bit off the bottom. I found it had happened before & been welded, but the mid-mounted North-South engine had a torturous path to the gearbox and a lot of stress on the lever. There's a couple of other spots where a pin could break or selector jump out, but you'll only find out when you strip it. Start with the getting the gear lever out & have a play with the selector rods before you pull the whole box.
-
I took the easy route and used a Celica, also wider but nowhere near the arches with stock rims. However the Hilux seems to be the most common conversion, although if you're at a wrecker take a look under the newer vans. There are 5-linked rear diffs with disc brakes under some of the vans, and they look lighter than the Hilux.

-
Bound to be fixable, most likely the 1st gear selector is either broken inside the box or wore the tips out so much it has jumped off the gear. How does the gear lever feel? More sloppy than usual? Jammed solid? In the usual place for 1st gear or further forward/backward?
-
There is no good news in this area... The layshaft needle bearings are a Toyota product it seems, I have never been able to find any for sale anywhere. This means you cannot rebuild a K series gearbox if they are noisy. The needles mark the layshaft, which they run on directly, grinding away the hard steel surface so it is a massive job to get the shaft built up again then machined circular again. I don't know how to check a gearbox outside the vehicle without pulling it apart. If you could turn 20 or 30 K series boxes by hand at different wreckers you might learn the difference in the feel, or it may be something you just can't feel by turning the shaft with no load on it. Just buy one, try it, take it back if its noisy.. They must all have over 250,000km on by now, so they will all be worn. It is the one component that will take our K series off the road in the future.
-
Yes, the K40 and K50 boxes are quite easily swapped. The box is basically the same, they fitted 5th gear in the tail section, but there are different tail sections on both boxes for different Corollas. This was to keep the gear lever in the transmission tunnel hole on different models, so you might find a K50 that leaves the gear lever too far back. Same with going from auto to manual.
-
Well done! The way to set timing is to- Get #1 cyl to TDC by watching the rockers. Put the crank back to 10deg before TDC. Go back to 20 or 30deg before, then forward to 10deg which takes up the chain slack. Turn the ignition on and slowly rotate the dizzy against the direction of the rotor travel then forwards until it sparks. You want the points just opening, and the rotor pointing to #1. If the plug leads don't agree, swap them around. That will give you the coil firing about 10deg BTDC and the car will run fine. Tweak it a bit with a timing light when you have it running. --------- The plug I don't recognise either, it looks far too modern for an old Corolla. Take a multimeter and check the resistance between the motor & the chassis, the alty and the chassis and the chassis to battery negative. They should all be under 5ohms.
-
Well, rigging a load cell on the arm would be right up your alley, you just need water to provide the friction force and keep it cool. If you weren't in QLD I'd say hook it up to an electrical generator and run power to your hot water cylinder! Something to plan in the future...
-
Dyno! You'll need a dyno to tune it to the best ignition timing curve and see how many more KW it gives! Even a simple water-driven setup...
-
That's good, major problem sorted! Turn the ignition on and take off the dizzy cap. Stick a flatblade screwdriver across the points and open & shut them. You should see a good fat spark. If you do, stick the lead from the coil near an earth and see if the spark jumps from the coil lead to the car body. Say 3mm gap.. If you don't see a points spark, the problem is prior to them. No ignition current or the points are shorting out etc. Have the points open and check for 12V with a multimeter or test light. No spark or if the spark is weak, it could also be a condenser problem So, no points spark, chase the 12V supply, chase the points earthing when they shouldn't, change the condenser. Points spark but no coil spark, maybe the coil is a dud or there's a break/short in a wire. Measure the resistance of the coil circuits. Yes, electronic ignition is better, but beware the advance curve in the usual electronic dizzies sold is a dog, the car will be slower unless you change the springs under the plate.
-
I've only got the wiring for a KE70, but I expect they are similar. The motor is where the speed is controlled, the +1 and +2, so you need to check if you have a blue/orange (L/O) & blue/black (LB) taking power to the motor when its all turned on. Your colours might be different. The S pole is the self-park & flash power for the washers, so you get the one wipe then park. If you don't get power from the LB then you know the problem is in the switch. Stick a temporary power wire into the LB and see if it speeds up, then you know if the motor is good (or not). Take the wiper arms off if you haven't already and oil the many joints and pivots...


