


altezzaclub
-
Posts
6825 -
Joined
-
Last visited
-
Days Won
134
Content Type
Profiles
Forums
Events
Gallery
Blogs
Everything posted by altezzaclub
-
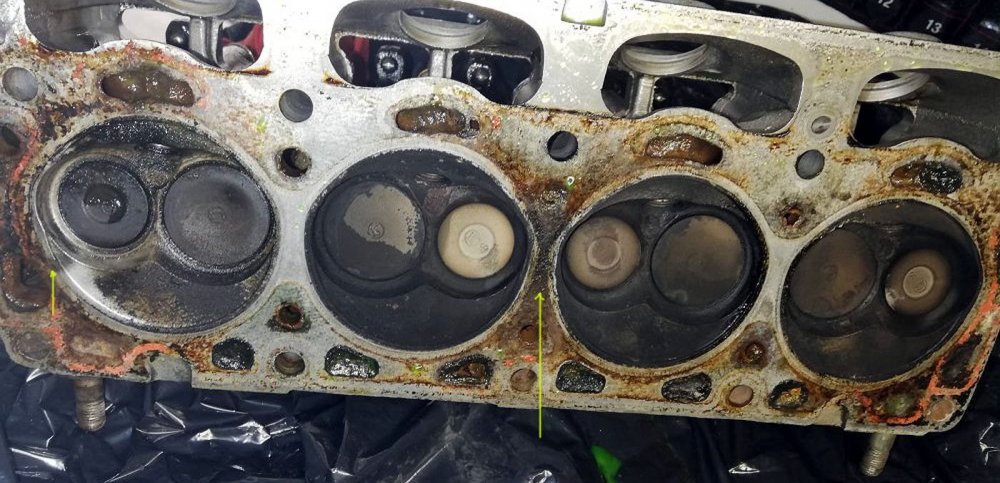
Well, I've never driven a 3K, but Wiki says- 3K, 1166cc, torque 67-69 4K, 1290cc, torque 72 5K, 1486cc, torque 85lb.ft The 4K is 10% greater in capacity, and the 5K 15% greater again. You can see that in the torque, the 68 to 72 (6%) is less than a worn motor to a more-worn motor, while the jump to 85 (18%) is noticeable. So not much between a 3K and a 4K. You could warm the 3K up to make it faster, but that is all revs to get power, rather than getting any more torque. You could slip a turbo or supercharger onto it, but if you had that much money for fun you could fit a 4AGE. Even a cam, a head job, twin carbs and extractor, and a bigger exhaust will add up in dollars. A 5K would be a great choice, but there aren't that many old forkhoists or vans around now. The Y motors would be a close fit too, also out of vans etc, and they're out to 2L with 120lb.ft of torque. Price up rings and bearings on the 3K, do yourself a head job if the valves and seats are OK, get it skimmed and look for a cam with more lift but not much more duration. I can't think of a cheaper way for a little more grunt unless you're a welder who can make his own turbo manifold. All that stuff I did to The Girls KE70 made it a lovely car to drive, although fitting the 4AGE to it was chalk and cheese. Not so much faster, but it doesn't notice hills. Oh, and #4 cylinder wasn't doing any work, it shouldn't be any blacker than the others. Was the gasket blown between #2 & #3, the usual place when a head warps? or was it a problem at #4, the area where the motor gets really hot due to shit in the block? Banjo has a lovely solution for that, he made a bypass system that moved water around the back of the head more efficiently. The water holes at the front of the motor are blocked off by the gasket to force water to circulate to the back, so Toyota became aware of this problem early on. You know, you could cheat by fitting a 5-speed box and lowering the diff ratio.. Quicker acceleration & up the hills, and let 5th drop the revs for cruising.
-
What Dave said!! ..and remember 56% more power will be more than 56% more heat, so get an alloy radiator as well. I expect you'll sink the same amount of money again into the whole project, the new ECU will soak up a lot. The Haltech Sprint 500 is $1200 plus, & tuners don't work for less than $1000. As Dave said, buy the ECU and learn how to use it. Check the sales conditions very carefully, if it blows up you may or may not get a refund. It doesn't run a boost controller by the look, so it boosts as hard as it can and the BOV on the inlet controls the pressure going in. A great way to get power, but they radiate massive heat straight into the back of the radiator and then into the sump as the red-hot exhaust goes under it. With the Mitsi Evos we build for gravel and tarmac rallies, controlling the heat is the biggest headache. If you think your car runs hot now....
-
Those plugs will fit a whole lot of options the Japanese have but your car doesn't. You'll need to web search a wiring diagram and look at the colours of the wires. Chase the over-heating quite soon, its easy enough to cook a motor over the summer. When does it overheat? and how easily does it cool down again?? Fan come on OK? fan only does something until about 20kph, after that the airflow from moving does the work. Short out the sensor straight to earth & make sure the gauge goes to full hot. Start it cold with the rad cap off and check the gauge when it first gets warm from sticking your finger in it. Check the gauge again when its too hot to put your finger in.. Obviously a thermometer is the best tool, but use what you have. At least you know the gauge shows 'warm' or whatever when the thermostat opens, and hot for your hand is about 55-60deg. That's some sort of range or temperature.If you have a thermometer and find that halfway on the gauge is about 90deg, that's fine, and 3/4 gauge is worth worrying about. Alternatively, look up the resistance of the sensor and measure it with a multimeter, both hot and cold. If it is in spec then the sensor is fine. If the gauge reads correctly at those temps the gauge is OK. Then check the thermostat in a pan of boiling water to make sure it opens right up, or just replace it. Pull the rad out and flush it backwards. Let us know how you go-
-
As well as what Dave said, tip the block on its side and scrape all the rust and gunge out of the water jackets, particularly around number 4 cylinder. The slow water flow at the back of the engine means the rubbish piles up around there and causes overheating. Clean ALL the stud holes out with a rag on a screwdriver, then with a rag soaked in petrol on a screwdriver, then with a bolt of the same thread that has a wedge cut out of it with a grinder or hacksaw. That will clean the threads out. I usually spray it with Brake-clean aerosol after that and wipe them out again with a rag. Make sure you clean all the bolts and nuts, and oil them when assembling. The manifolds need a straight-edge along them too, the differential expansion of the alloy & cast iron distorts them over the years and leaking exhaust gaskets result. What I did is here- https://www.rollaclub.com/board/topic/42407-the-girls-ke70/
-
Well, they did the job OK.. That's all we put in the Purple People Eater for Steve, but Josh uses them to make the body rigid. The speeds are higher these days, acceleration is much better and WRC is just astounding to watch, but looking at Racing Fail or Chopito each Friday night shows that cage damage is pretty rare even in some big crashes. We bought a wrecked Evo3 that had been imported as a rally car from Japan and hit a tree on the front driver's corner really hard. The cage broke as the tree came into the steering dept, and you could see the rust in the tube. The body was a rustbucket with fibreglass over the floor to hide it, I'm amazed the crew survived. It doesn't seem to take much to make a car strong enough to survive a big impact. One day I'll measure the torsional rigidity before and after fitting a cage, and then after putting in the gussets that attach the cage to the body. Up the windscreen A pillars, across the rear seat floor, & on the B pillars.

-
Good grief! November already! Well, we got sort-of half a cage in each of the Subbie and the Evo5, but decided we needed to get the Evo5 ready for Whiteline. Then Josh had a spell of driving the big Kenworth, and I've only just got back down there this week. The underside has been cleaned and painted- The rear of the cage is finished, it mounts onto the rear suspension towers- The front is in place. You can't put your fingers anywhere between the cage and the bodywork, it is jammed in there- An hour ago we tweaked the last gussets into place- So there's just some welding up of the tacked gussets here and there, and the cage is finally done. No orders for a MiG cage please! The two bars heading forwards go through the firewall and weld onto the front suspension towers, so its end to end.. The car should be stiff! Then it heads out the back shed for painting while we tackle the Subbie, then get the Evo5 running for Whiteline, and FINALLY back onto the CAKE!


-
You'll find that question asked a few times in the forums. Sadly the answer is that seeing the 4AGE was available, no-one bothered to do much for the poor old 4AFE. How much do you want to spend? New air filter system? Quad throttle bodies? Extractors and larger free-flow exhaust? I don't know who will grind the cams for them, but there's that to do. Really you could look at pulling the head off and porting it, like any petrol motor. I'd say, first find out what holds the motor back. Somewhere must be someone who has found the weak link & made it better.
-

So Who is Going to do the First KE Rolla EV Conversion ?
altezzaclub replied to Banjo's topic in KExx Corolla Discussion
Aluminium is the only household product worth recycling, it takes a lot of electricity to turn bauxite into metal so once you have it you make sure it stays as a metal. Copper would be the next, lead, and the contents of the catalytic converters. Steel is OK in bulk, and then the rest of the cardboard, plastics etc only exist because of public money subsidies. The first part of the Save the Planet with taxpayer money that is still going on in Glasgow. I can't see much advantage is hammering those batteries to bits unless some components are water soluble. You end up with such a mess it makes separating compounds more difficult. You could see the typical mess on the floor in one photo, so I expect they're not flammable when powdered! I don't know what happens to the crushed cars from the wrecker, they don't strip anything so to get the organics out you would need to hammer-mill the entire car and burn the result. That would get rid of the cardboard, the paint, the grease/oil & the plastics, leaving copper wires, aluminium components and steel as pieces all mixed together. The wrecker said after 2007 the bottom dropped out and the Chinese just emptied the ships straight into the harbour to get them moving again. Massive pollution either way, but like any of the third world, someone got paid a lot of cash to ruin an environment he didn't care about. Yeah, I wouldn't sleep above an electric car on charge.. just look at the airliners with the batteries in the tail to replace the APU. -
Am I getting scammed at the smog check place?
altezzaclub replied to oldpops's topic in AExx Corolla Discussion
hmm.. tricky.. you're talking about the performance-killers that Australians unbolt and throw away the moment they buy a Corolla. No smog testing here. He just said the EGR wasn't working, so it may be 'not working' by not opening even if the diaphragm is fine. So if it jammed shut the car will go better than ever! ..and I'm sure your one car in umteen million emitting more smog than they like won't kill the planet! If it is stuck open I expect you'd notice a poor idle, but if its stuck shut it might not make enough difference to see. That might be why it fails at low speed and not higher up, usually at low speed the vacuum would open the EGR to let exhaust back into the intake, but the lack of vac at more normal speeds would see it closed. Here's a generic sort of trouble-shooting. Given the different types of EGR valves, it is always best to follow the troubleshooting procedures detailed in the service manual, however, there are a few generic steps that can help to pinpoint diagnosis: Read any fault codes on electronically controlled EGR valves using a diagnostic tool. Check that all vacuum lines and electrical connections are connected and positioned correctly. Use a vacuum gauge to check the vacuum supply hose for vacuum at 2000 to 2500 rpm. No vacuum at normal operating temperatures would suggest a loose hose, a blocked or faulty ported vacuum switch or solenoid or a faulty vacuum amplifier/pump. Check the vacuum solenoid while engine is running. On electronically controlled EGR valves, activate the solenoid with a scan tool and check the vacuum at end of pipe. If the solenoid does not open when energized, is stuck in the open or closed position or has a corroded electrical connection, loose wire or bad ground, EGR operation will be affected. Identify the root cause before replacing. If possible, check the movement of the valve stem at 1500 to 2000 rpm. The valve stem should move if the valve is functioning correctly – if not, and there’s vacuum, there’s a fault. Apply vacuum directly to the EGR valve using either a hand vacuum pump or scan tool depending on the type of EGR valve. If there is no change in idle quality, then either the EGR valve is faulty or the passages are completely restricted. If the engine idles rough or stalls, the problem is being caused by a malfunctioning control system. Remove the EGR valve and check for carbon build up. Where possible, remove any carbon, being careful not to contaminate the diaphragm. Inspect the EGR passageway in the manifold for clogging and clean if required. But a good one is apparently to reduce the ignition timing a couple of degrees. See here- https://community.cartalk.com/t/ca-emissions-test-fail-hi-nox-at-low-speed/32210 -
So Who is Going to do the First KE Rolla EV Conversion ?
altezzaclub replied to Banjo's topic in KExx Corolla Discussion
Well,you can work this out Banjo- Tesla use a range of batteries from 60KW.hr to 100KW.hr, so lets take a 90KW.hr. That's apparently 410amp.hrs at 375volts. Our conversion batteries are 180amp.hr at 3.2volts, so we'd need about 120 of them in series to get 375volts. That would still be 180AH, so to boost capacity we'd need twice as many to get 360AH. 240 conversion batteries would weigh 670kg, a good comparison to the 2.2ton Tesla with 550kg of battery. They would take up 0.9 of a cubic metre, each battery is about 300x70x180mm, tall, skinny and average long. Say 30 lying down under the parcel shelf in the boot, 170kg, and another 30 in the engine bay to balance with 170kg in the nose, leaving 180 to put where the back seat was! Now you have a 2-seat KE70 (that's fine!) which weighs about 1.6tons and does 1-100kph in a few seconds! ..and a mortgage for the 240x$260.. um, $62400 cost of the batteries! -
So Who is Going to do the First KE Rolla EV Conversion ?
altezzaclub replied to Banjo's topic in KExx Corolla Discussion
The trouble with electric is they have max torque at zero rpm, and it falls off from there. The Tesla model S develops it all from 2000-3000 like a Falcon rocket going straight up, then it levels off until 5000, then declines to 12000. So they always talk about zero to blah blah because that's where they are really fast, and around town that's what most the driving is. So you'll never beat them in traffic light drags, but going from 80 to 130 repeatedly in the mountains won't be so impressive. I hacked this image to move the graphs back to the same point at 80kph. Under that the Tesla is quicker, end of story. Above that the Corvette will overtake a Model S and walk away, but the Tesla is still pretty damm impressive, an M3 won't catch it in the mountains. I think I'd find them too quiet to be any fun, I love that acceleration roar, but I'm sure I'll never find out!
-
So Who is Going to do the First KE Rolla EV Conversion ?
altezzaclub replied to Banjo's topic in KExx Corolla Discussion
Haha! Of course I've looked at it, but the weight of a Tesla Model3 is over 2.1tons, and for a 4-door sports sedan that's bit extreme! Throw out the 4AGE and put in an electric engine.. sure.... then add 500Kg of batteries somewhere where they won't ruin the handling! At least Blaney is under 100km/day, making the trip to the farm at 500Km plus would be tricky! I'm a firm believer that they will never replace petrol cars with electric cars unless batteries store 5times the power they do now, and we completely replace the National Grid, so Corollas are pretty safe as they are. -
What do these rims fit? Help Please.
altezzaclub replied to Derek S's topic in KExx Corolla Discussion
Yeah, the stylists said "we need bigger wheels to look cool" and the engineers said "OK, we'll go to 16" but we'll need 5 studs" then the accountants said "First we'll have to go down to 4x100pcd for the smallest cars and save 50c." Try here Derek- Daewoo & Hyundai apparently. https://tire-size.net/#wheel -
What do these rims fit? Help Please.
altezzaclub replied to Derek S's topic in KExx Corolla Discussion
Sadly it seems you are right.. I've spent an hour or two at the wreckers looking for FWD hubs to put on a KE70 front suspension and it seems once they got over the first couple of years of FWD manufacturing everyone went to 4x100 for small cars or 5-stud for medium cars. I was hoping for some post-2000 Toyota FWD setup to give a KE70 an extra 200mm of track. Those rims will fit the 1980s AE90 Corolla, but not after that. The 1991- AE100, were already 4x100 then. https://www.wheel-size.com/size/toyota/corolla/1988/ -
Why Do You Think We Need A Govt??
altezzaclub replied to altezzaclub's topic in Rollaclub Social (Off-Topic)
Well well, you want to kill someone, no problem, but DON'T ever carry a book or something that is 'objectionable', THAT will really get you into trouble! Probably its a booklet on how to use Ivermectin to stop Covid, or how useless those vaccines are. "Police alleged the man's threat to kill was made between July 13 and September 7. That charge carried a maximum penalty of seven years' jail. He also faced two charges of supplying or distributing an objectionable publication on August 5. The maximum penalty for those charges is 14 years' jail." -
No Spark/No Start issue- 1974 Corolla - 2TC -
altezzaclub replied to MoeJZ's topic in TExx Corolla Discussion
It wasn't a positive earth Accuspark unit by mistake?? -
No Spark/No Start issue- 1974 Corolla - 2TC -
altezzaclub replied to MoeJZ's topic in TExx Corolla Discussion
Excellent! Nice to get a solution! You'll probably get a better spark out of the electronic unit when you get one that works, but at least now you're not under pressure. -
OK, new look/update/something, and while it locked me out for a couple of days its all working now. Thanks Boss-
-
No Spark/No Start issue- 1974 Corolla - 2TC -
altezzaclub replied to MoeJZ's topic in TExx Corolla Discussion
"1. Converted to electronic ignition ( problem started prior to this ) " Ah- I didn't realise the significance of this until your reply above. So, there's very little can go wrong in a points setup, as Parrot said power comes in from the coil negative (which you checked and has 12V) goes through the body to an insulated terminal that puts it into the points arm. Then it shorts out as the points close & the current flow causes the coil to surge. The condensor charges up and discharges as the points open & shut. What can go wrong.. The wire breaks internally as it goes through the dizzy body, so power doesn't get to the points. If its on a clip terminal there it can get loose. I've seen them where the motor works until you go around a corner and then it dies as the wire sways. The short wire on the points breaks The insulated terminal fails so power leaks away continually. The points arm spring breaks so they float open and shut. The screw holding the points loosens and you lose the points gap. The condensor breaks down internally and bleeds power to earth, or its screw gets loose and it doesn't work. You can check all this on the bench with the old dizzy in a vise. You can even hook the old coil up to it and have it fire a spark plug. The new electronic dizzy is probably fine, although it depends on whether you replaced the wire from the coil negative to the new dizzy. The old wire might be dodgy, but if you fitted a new wire it means a real puzzle! ---------------------------------------------------------------------- We stopped in a special stage one time when the motor was cutting in and out & as navigator I leapt out to lift the bonnet and see what was wrong. The condensor (on the outside of the Datsun dizzy) had broken off its tab and was hanging on the wire, sparking as it swung against the dizzy. As it sparked the motor ran, when it swung free the motor died. That never made sense with my understanding of what a condensor does, so I looked it up right now, and its more complicated than I thought! Technical Talk – Ignition Condensors Basically the function of a condenser in a coil ignition circuit is to reduce the spark at the contact points as they open in the distributor and thus minimise burning and pitting of the points. Arcing is caused by the effect of self induction in the coil as the points interrupt the flow of current. The resultant collapse of the magnetic field produces a high voltage to be generated in the primary winding which then tends to flow across the points, thus causing burning or pitting. This current flows into the condenser and charges it as the points open. The rapid collapse of the magnetic field produces this high voltage in the primary windings, which can be as high as 250 volts. This further charges the condenser and the consequent collapse of the field causes a high voltage to be induced in every turn of both primary and secondary windings. As the secondary winding has about 100 times the number of turns of the primary, the voltage can reach as high as 25000 volts. Normally this voltage is not reached as it is limited by various factors such as point gap, compression, engine revs. Etc. so only sufficient voltage is produced to produce a spark at the plug. As the spark is produced at the plug gap the energy in the coil, stored in the form of magnetic flux, begins to drain from the coil through the secondary circuit thus sustaining the spark for a fraction of a second or several degrees of crankshaft revolution. During this interval the condenser discharges back through the primary winding producing an oscillation of the current flow in the primary circuit for the brief interval that is required for the primary circuit to return to a state of equilibrium. The condenser DOES NOT DISCHARGE UNTIL AFTER the spark has occurred at the spark plug. This information was taken from a Delco Remy electrical equipment book. http://www.austin7club.org/Ignition%20Condensors.htm -
No Spark/No Start issue- 1974 Corolla - 2TC -
altezzaclub replied to MoeJZ's topic in TExx Corolla Discussion
"10. Tested Spark at each plug and wire including directly from coil. ( No SPARK ) " You could- Disconnect the coil negative, run the high-voltage wire from the coil to the dizzy onto a spark plug earthed out on the body, then earth the coil neg with a wire that you tap on and off an earth a few times. That will cause the coil to fire and a spark to jump across your spark plug. Even better, you could turn the engine by hand to line the rotor up with a spark plug, use that plug lead with a plug in it lying on the motor and short the coil out as above. That checks out your whole system except the module in the dizzy that shorts the coil negative out. I expect that is where the problem lies, as you've thoroughly checked out everything else. One check would be to grab an aerosol can of refrigerant used to check electronic components and spray it over the modules inside the dizzy, although it does seem like its time for a new electronic setup in the distributor. You could check any clearances in the dizzy module, if its a hall effect magnetic one there will be a few thou gap between the arms and the sensor, but I think its unlikely that is your problem. -
Well, the last pre-CAKE jobs are in the workshop this week. Josh did a driving stint in the Kenworth then got into the ute tray- There's still quite a lot of work on this yet. Its within 1.5mm of dead square in 3 dimensions, I know I wouldn't be that fussy! Meanwhile I've been making foot-plates for a cage in the Subie. They were both waiting for the Mini to finish, so if we can knock them out in the next few weeks its finally CAKE time! Mind you... sunny spring weather is arriving, and today is footings day for the new workshop extensions..


-
How To Tackle That Engine Conversion-
altezzaclub replied to altezzaclub's topic in Engine Conversions
Classic examples- Massively overpriced, poorly planned and many hours of work to finish. https://www.gumtree.com.au/s-ad/east-fremantle/cars-vans-utes/1982-toyota-corolla-xx-manual-sedan/1277681660 https://www.gumtree.com.au/s-ad/cranbourne-north/cars-vans-utes/1984-3sge-beams-ke70-unfinished-project/1279563872 https://www.gumtree.com.au/s-ad/runaway-bay/cars-vans-utes/sr20-ke70-ae71-wagon/1275286410 -
Banjo found this one, a real classic so long as you don't set fire to it with a welder! https://www.thirdgen.org/forums/body/681758-building-wooden-body-rotisserie.html
-
Well... almost! The Mini has gone back to its owner to be prepared for some Bathurst work. Josh was asked to do a couple of days driving a gravel truck, but while they were checking it they found cracks in the tailgate hinges. It has unusually long hinge arms that allow the tailgate to swing a long way up, I don't know if that's part of it, but the cracks were along all the horizontal webs, top and bottom, and there were no vertical gussets. So we ground it all out and welded up what we could on the truck to hold it in place, then took the whole tailgate off and laid it flat. (pays to have a bobcat at home!) A sheet of 6mm alloy panel and a few days later it was in much better condition. I was surprised, Josh pointed out that a max tonnage was gravel up about 400mm, and the bin is only full if you carry grain. On Friday it was all back together and amazingly the pins went it with no problems. Next we had the exhaust flexible joint to replace along with the steel angle that carries the fuel line from one side tanks to the other. Something had clouted the steel angle and bent it up to rub the flex apart. That left the afternoon to take the Evo3 for a wheel alignment and take out some rear toe-in, but it was beyond adjustment and into modification.. So we slotted holes in the lower control arm and Josh set it up this morning, all set for tomorrow's rally sprint when I get back in the suicide seat after 40years.. Then Gladis locked down all of NSW so that won't happen either!! Still, we're definitely closer to KE70 work, and the weather is improving so we can drag the CAKE out of the mud and get it up the hill!


-
...make one of these!! You will never regret it! A shell only weighs a few hundred Kg, this rotisserie is way overbuilt, it rolls 4WD utes! We slip castors under the feet at the corners and push the whole shell around as we need. You can make one out of wood if you prefer carpentry, but any simple construction to hold a shell and let it roll over makes body repairs/strengthening so much easier.


