

altezzaclub
-
Posts
6825 -
Joined
-
Last visited
-
Days Won
134
Content Type
Profiles
Forums
Events
Gallery
Blogs
Everything posted by altezzaclub
-
"Does the interior insulation or car underbody coating contain asbestos? " No, its why cars explode & burn so well in movies! Asbestos was used in clutches & brakes, and in some gaskets although that was rare. I've never heard of it in underbody, or seen it in interior insulation. Generally its easy to identify. Synthetic fibres are all the same diameter, like grass or reeds growing, so they are singular along the edge of say, fibre-cement board. Natural fibres start off large and split down to small ones, like a tree and its branches, so you see some fat & some thin. A magnifying glass helps, although a microscope is better. With covid around any worries about asbestos have vanished!
-
I spent a stack of hours chasing bulb holders to mount on an aluminium sheet and replace the rotted plastic ones in the tail lights.. Then I came across these- I ordered a set last Sunday, and amazingly they were here Saturday morning. I was pretty excited to plug them and replace these ones- Then I noticed the earth had come apart here, and actually they were just twisted wires with some tape around them and the bulb earths are just the bare wires pushed down the side of the bulb. Mine are all soldered-. When I went to put them in I found the earth tag in the middle of the boot didn't exist. ..and of course they didn't fit at all! The screws are all in the wrong place, although the middle one will do, and they strain to fit at the edges. "Sealing" just doesn't enter into it! When I plugged them in the left hand indicator was the brake light flashing, the brake light was the reverse light and there wasn't a reverse light.. It was easiest to pull all their wiring and bulbs out and put all the old gear into their plastic cases. CBF drilling new holes tonight, I'll finish it tomorrow. At least the lights all work as they should- So, all in all, $55... not too expensive, but the quality is cheap, the assembly work cheaper and its not designed for our cars anyway!! If they flogged the plastic cases by themselves for $15 it would be a better buy!


-
Came up nice... About 60kg all up from the amount of pipe that went in. I jacked one rear wheel until both were off the ground and the shell is rigid! Floor joined to B pillars, through the roof bars and joined to A pillar. I'll jack the KE70 and actually measure the twist before and after a cage. Do that Subbie too.
-
Back in Orange last week, the red truck is running fine and working already. I had a panic when it started making a howling like a trombone as the speed built up, but it turned out to be a hose-clamp on the inlet wasn't tight enough and the boost was leaking out past the silicon rubber. This week we finished the Mini cage, it goes back today to be prepared for events like the Bathurst 6hr. I reckon you could throw it down the side of the Mountain and walk away with a bit of luck. So, next is a bit of work on the Evo3, there is an invite-only rally sprint in a week and we have an invite. There is a Subaru cage to build, but a mig one not a tig, so a week of hard work should do it, and THEN we can start on KE70s!


-
Well, as far as I know you can't buy the layshaft bearings for a K40 or K50, so you just can't rebuild them now. That's them finished unless you can grind the shaft down to fit some other bearing. Then T50s will be next, some shortage of parts in a few years means we will be looking at J160s to use. Really, the whole 4AGE/T50 is 40years old and we need some current-ish lightweight revvy 1.6 or 2L motor that is still useable in RWD and has gearboxes to suit. The Hondas are definitely a start, the F20 from the S2000 and the newer K motors if they can go RWD. Mazda MX5 motors and gearboxes run right up to now, and the BMW N20 pulls 240bhp from 1.6L in RWD. They will all take as much work as Littleredspirit put into the 2AZFE, just in different areas, but we need something to give us a decade of running into the future.
-
Sounds good, but no doubt difficult! First, go talk to a couple of engineers and find out how much they will charge to certify it, and what they want you to do. Some people have paid thousands and had to change suspension and brakes, my guy in Sydney was un-worried and charged $800 or so for the motor and gearbox conversion only. You'll need a hydraulic clutch, which means a different pedal box to make it work. If you're lucky an AE71 one will do, or just manufacture the clutch part onto your current one. Engine and gearbox mounts for sure, and the cross-member for a 4K has the sump curve at the wrong end, so an AE71 cross-member too. The gear-lever will be in the wrong place, but I figure you'll survive. The radiator hoses also, but I ran a length of galv water pipe under the fan to get both rad hoses on the driver's side. The stock rad ran fine but took a few minutes to cool back down after a solid run up a hill in the summer, so I eventually bought an alloy one. That has massive over-capacity for a 4AGE. Get an electric fan set up too. If you get a FWD motor you'll need to change the water housing setup at the firewall end and fit in a remote thermostat. The ECU had me puzzled for a week, but in the end its very straight-forward. You'll need a plug off the ECU of an early Camry or similar as the AE86 has a chassis wiring plug for the ECU that your car (and KE70s) don't have. That supplies ign power and permanent power. You can get a CORE relay from a newer car or just use relays to make the pumps stop when the motor does, ie in the event of a crash with ignition still on. Buy a few rolls of wire in different colours and some micro-labels, don't make a birds-nest mess like I did! One day when I have time... New driveshaft obviously, I had Knox in Melb do mine after I couldn't get rid of a vibration. I changed to a Jap-style banjo diff from a Celica too. You'll need a RWD exhaust manifold, depending on the motor and how much exhaust they sell you. I chopped up a VL Commo one, rather than buy a set of extractors for $500 odd. Fit a catalytic converter too, if you want it road-legal. Your fuel tank is under the boot floor. Fit an in-tank lift pump that feeds a little surge tank. Take the outlet from the surge tank to the high-pressure injection pump. See if you can get both of them under the floor at the back inside a mudguard, or put the surge and main pump in the engine bay like I did. You don't need a giant shiny 1L surge tank that won't fit anywhere except in the boot of a drift car! Remember any flexible line in the feed system has to take high pressure, about 50psi. Find an air-box and filter at the wrecker that will fit in the engine bay. I wouldn't buy a wire mesh K&N if I were you, easy, but not a good filter. We've just tossed one off the EVo3 rally car as it had dust inside it. My conversion starts here- and some more here- ..and I expect you're a bit past reading-
-
Doesn't time fly! This year its been 80km a day down to Blaney and back to work at Josh's, and a couple of trips up to Walcha, all without problems. Its done 50,000km since I took that photo at 188888km, and coming back down the Bylong Valley and Sofala showed me its still a marvellous car to drive! I played with the late corner oversteer on right-hand corners and under-steer on lefts, and maybe a Watts linkage would be interesting to try. That would get rid of the roll oversteer from the panhard jacking the body up on right-handers, but Toyota were build a budget car and the panhard is adequate. Still doesn't idle nicely!
-
The usual reaction is... 'over my dead body!'.. But that may change when we're getting beaten by them. Funnily enough, last Thursday I came up to the farm to fix the blown had gasket on the big 1960s Ford D-series truck. Then a day or two back Steve sends me a text saying Orange and Blaney have both been locked down! Funny thing is, although they are both locked down I wouldn't be able to travel between them. The head gasket blew out in #6 cyl, no sign of burning or any other problems, so 20:1 compression and 30psi on the turbo gives them a hard time. As it happened, the gasket set from Autosurplus arrived quickly, so I thought I'd stay up and finish the job. Sadly its being done in the dirt-floored truck shed with no doors, and even the dam next door is leaking into it! When I got the head off it only had one dowell in the block, and as its tilted at 45deg I spent ages making another dowell to hold the gasket in place. I finally tried it 20minutes ago, and found Durapro don't make allowances for dowells in the head gasket!! So I've been chopping the side out of two bolt-holes in the head gasket with a grinder! The head weighs a good 70-80k, a struggle for two guys to get it over the chassis and onto the block, and of course its freezing cold, blowing a gale, and about to rain later this arvo! Snowed a couple of days back... too cold for Covid! Check out the bolt pattern on the head- the tightening sequence is from the middle, along the twin bolts at the top to the front, along the bottom zig-zag to the back, then around the other half of the top. 70lb.ft, 90, then 90deg. The turbo sits tucked into the chassis rail, hopeless to get to.

-
It does look superb! Back when I was doing this to Datsun 1600s I found the guards are already quite light, but the doors were heavy. The bonnet & boot were worth doing too, but the gain was not so much. The before and after weights as you do it will be interesting.
-
Well, the most extreme case was that Moke. Those simple roll bars took 30mm out of the sag when we jacked it before and after. Of course we never thought to jack the Evo5 before seam welding it. Sorting the difference in stresses between the Evo3 on gravel and the Evo5 on tarmac tracks is a real mind exercise. I dropped into the wrecker on Saturday & he showed me a nice blue slanty KE70 in the workshop. He said he'd sell it to me for $2k, I knew the car & I'd spoken to the owner in the past. Monday I went down to get some photos.. and its sold for $2500! A bit rusty in the rear arches, otherwise just an average daily. I'll try to find out who bought it and get him on here.

-
Haha A carpenter.. well why not, it looks like it works well! We figured out it takes two guys a week to clean and seamweld a shell. The cleaning is 90% of it, scrapers, hard wire wheels, softer wire wheels to get into the join between the panels, and that's not counting painting afterwards. Josh wants it super-clean, and his welding is immaculate. I made the mounts for the main hoop today, Graham was making seat mounts and Josh was hitting the Mini with the Tig. We were quite used to stepping through the windscreen with the shell on its side... This will be the biggest (and hopefully only!) rebuild the Evo5 gets, making it a strong, reliable tarmac car.


-
We've refurbished the rotisserie Josh's Dad used to build P76s on, and the Evo5 shell was on that this arvo. Graham & I can start cleaning underside of the shell up and putting seat mounts in, while Josh can get back onto the Mini.. I can tell you, welding on the bottom of a car while its on its side is much much better than above your head on a hoist!!


-
Arrgh! More distractions... The Mini is getting welded up, all TiG so very slow, today we had to take the rear windows out to get flanges welded from the main hoop to the B-pillar. Buuuut.... an art object in the form of a close-ratio sequential 6-speed gearbox for the tarmac car, the Evo5, turned up a week or two back... and that needed a new shifter setup through the firewall & new electrics, so that meant the dash out, and that meant we should move the seat back to where Josh really wanted it, and that meant the brakes should go to twin master cyl so pedal box out and that meant.. a car that now looks like this! "How To Build A Racing Car" coming up! First, a mockup of the driving position to decide where the floor-mounted pedals go, the seat goes and the steering goes. Get all that sorted, clean the shell up and respray it, and then a new cage in. Make a new dash with new looms, fit seats, fire extinguishers, battery and fuel lines, all planned for a 500bhp motor in the future! Once the terrible weather is over I'll slip some work in on the CAKE along the way!!


-
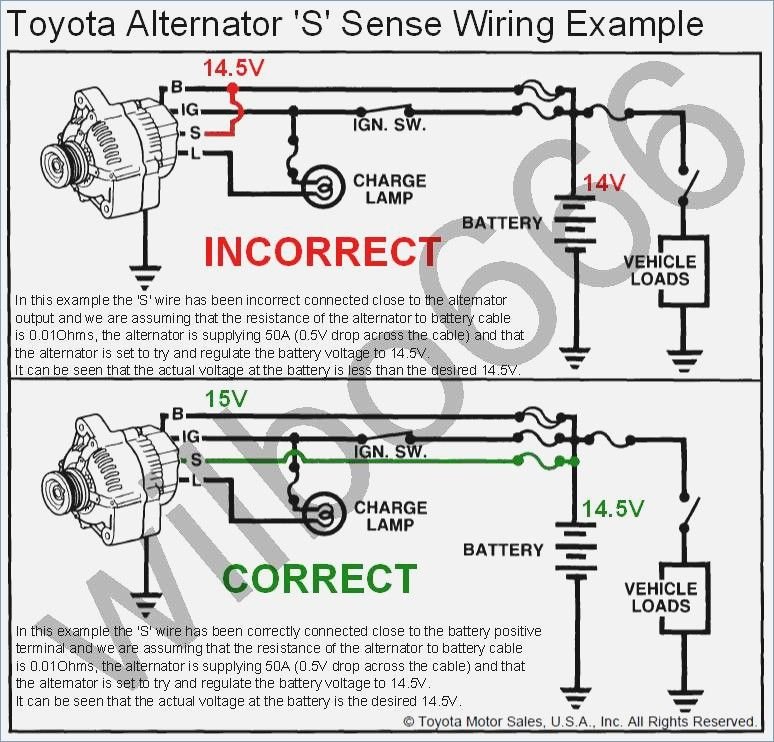
I expect the coil will not draw more than 10amps, that leaves about 10amps for other uses in their usual 20amp relay. Here's a handy diagram of wiring an alty in- Its illustrating why jumping the S onto B is not ideal, although I've done the same and don't seem to suffer from the drop in voltage at the battery. You can see you need the ignition light to be controlled by the ignition switch, and that is happening somewhere under the dash. Then a wire goes from the lamp to the alty and earths out when its not charging, lighting the lamp. That's the purple circuit below. Keep that, and if you want to jump across the orange line from coil to alty, make sure there is a fuse in it. That line activates the alty, the main current of power from the alty is the blue line going to the fusible link line and into the battery and car as a whole. The fact that Toyota didn't run the alty off the coil wire means there's probably a reason not to, but I don't know what that is... Here's the factory wiring setup from these guys- http://wilbo666.pbworks.com/w/page/39441708/Toyota%20Alternators They run a 10amp fuse in the line from Ign to Alty. If the IC regulator in the alty blows up you don't want the same problem again.


-
Here's the KE70 setup, it must be very similar. That black/orange on IGN2 does the 'running' voltage to the coil and is also a feed to the engine fuse. If your 55 had a 12V coil you probably don't have that wire, it would all run off the BY IG1. Are you running a newer alty with an internal regulator? If the 55 had an external regulator it would look more like this, the USA T motor. In the end, just hunt around with a multimeter until you find an ign positive and trace it back to see what its for. Hook that onto a relay with power from the battery or alty, and feed it to whatever needs to be ignition-controlled. At the worst, run a new wire from the ignition key into the engine to feed a relay. I've put my coil onto a relay with the 4AGE, it cuts down the current that the coil feed carries from the key right around the engine bay, just like yours. Of course when the relay burns out I'm in the same boat.


-
Coil ignition would be the obvious one, use that to run a relay with coil and pump both on it. It depends on how you wired the 4AGE in to start with. Alty would be another, that has an ignition controlled feed. Wipers would be a bit out of the way, probably the passenger's kick-panel if its like a KE70. Indicators would all be inside the column, as would the accessories like lighter and radio. Do you have an electric fan on it?? The slantys have a purple wire going from drivers side to passengers that was ignition controlled, I assume for the 4AC coil. Which loom did you get to repair it with?? KE55?
-

Why Do You Think We Need A Govt??
altezzaclub replied to altezzaclub's topic in Rollaclub Social (Off-Topic)
"Asked if a foreign diplomat may have spread the virus, given they are exempt from hotel quarantine, Professor Sutton replied: "We simply don't know. I wouldn't rule anything in or out."" Yup.. they're looking after us all right! The rules are that the peasants get shafted as usual but the Govt do what they like. No Covid-spreading hotels for diplomats, and Govt ministers getting busted for breaking their own rules all the time. They have continued to travel to these all-important world meetings between the pigs and the farmers. Meanwhile Fauci's email leaks show the Americans knew Covid came from the Wuhan Lab but tried to hide it. Now they're willing to sacrifice Fauci to demonise the Chinese and blame them, omitting to point out the American Army Bioweapons lab at Fort Detrick was closed down in 2019 due to 'failure of biocontainment systems '. Of course while the mainstream media are picking up on the 'Lab-created' rather than 'eating a pangolin' story, they are failing to point out that the Americans. under Fauci, financed the building of the Wuhan Lab and paid to run it after gain-of-function experiments were banned in the USA. No-one is calling for all Govts to ban bioweapon experiments, so don't expect this to end well in the future. Covid is only the first one..! A Chinese virologist who was among the first people to tout the Wuhan lab theory said the coronavirus is a bioweapon and Dr. Anthony Fauci was among the scientists and organizations who knew about it and tried to hide it. In a Wednesday night interview on Newsmax, Dr. Li-Meng Yan said Fauci's emails, which were published by Buzzfeed and the Washington Post on Tuesday, proved he knew about the Chinese gain of function research before the pandemic started. 'These people knew what happened, but they chose to hide for the Chinese Communist Party and their own benefits,' Yan said. She published three reports - two last year and one this year - and she didn't mince words in latest report - published March 31: 'The causative agent of COVID-19, is not a naturally occurring pathogen but an Unrestricted Bioweapon. 'It is a product of the bioweapons program of the Chinese Communist Party (CCP) government, the network of which includes not only the CCP scientists but also certain overseas scientists and organizations.' All three reports were published without peer review on Zenodo. The Wuhan lab leak was considered at first to be a crazy conspiracy theory that was pushed by the far right to blame China for the pandemic until President Joe Biden said his administration is looking into it. British intelligence reportedly assessed the theory recently and upgraded its likeliness from 'remote' to 'feasible', according to The Sunday Times. Then came Fauci's email dump on Tuesday, when more than 3,200 of his emails from January to June 2020 were obtained and published by Buzzfeed and the Washington Post. Yan referenced one of these emails during her interview with Newsmax. On February 1, 2020, one of Fauci's direct reports, Dr. Hugh Auchincloss, wrote in an email to Fauci that the 'experiments were performed before the gain of function pause but have since been reviewed and approved by NIH (National Institutes of Health).' Fauci and Auchincloss were discussing a paper that Fauci sent him. Its a bit like the BOM ignoring the fact that the Earth hasn't warmed since 2016, that ocean temperature is dropping, and now sell cold weather as 'a delight for snow-skiing' to the peasants. This doesn't sound like global warming to me... By now you've read all about the first really big winter storm system of 2021, with a cold pool of air and snowfalls likely as far north as the NSW Northern Tablelands and even elevated parts of southern Queensland - but where can you go to throw a snowball or two? A little further down the page, we've compiled a quick guide to some of the likely snow hot spots - actually, make that cold spots. -
Well, next event, the Armidale Rallysprint went OK too! A little work and we have a reliable car that is quick.. Quick means 2nd to the Audi Quattro all day until the last stage when the exhaust flexi gave up and the flames set the rack boot on fire... Anyway, third is fine! Back to work, the Mini cage needs finishing.. with this sort of quality its not fast work, but its getting there, and then the CAKE! There may be some delays as we might be re-building a well-known Purple People Eater KE70 rally car, something to look forward to!

-
"I seriously considered a WRX, but family shouted that down as a thug car! " You dodged a bullet! Mate Rob on here has one he's trying to get going, but that means two motors both with run bearings.. Common problem with them. Golf- rocketship with strange, clever, opaque way of doing things! We swapped the whole Golf-R mechanicals & electrics into Josh's Mum's 1.4L Golf 6, there was some fascinating stuff in there. Beautifully made though, the $700 headlights are a work of art. Four electronic boxes in each headlight, all made in different countries. Still, 4WD 2L turbo...
-
OK, that was a busy day! 9 stages well run and well organised. He was working his way in with a 2nd place in stage 3, but then a puncture in stage 4 cost 6minutes or so. Never mind, we battled with strange noises, fire underneath from the exhaust flexible joint letting go (same as last Orange Rally!) and catching up with the car in front, and finally made it to the finish! Now we have a turbo system that works we will strip the whole car again, check everything and make plans to improve a lot of little things. Before then we will get the Mini cage finished and start on the CAKE! The roads were much rougher than this picture, maybe a third of the field didn't finish, and its mainly Evos versus Subarus with a lot of 1970/80s RWDs chasing them. Speeds are up over 200kph on gravel these days, you need 4WD & turbo power to be at the pointy end of the field.

-
Well... nope! The Garrett lasted a few runs yesterday before blowing up in spectacular fashion! Once again we spent the afternoon & night pulling it all off and cleaning it all, then installed the last new replacement turbo of Chinese design. This time we definitely blamed the boost control somewhere, for although the computer only displays a max boost of 23psi the nav was watching the manual gauge as it ran off the end at 35psi. We went back to an old waste-gate, which meant manufacturing fittings to fit that and welding it all up. Another midnight, and now I'm just late for catching up with the car before driver's briefing!!
-
Ah rallying... Wednesday we get the Evo3 running and we have a day of testing before the publicity run on Friday and the rally on this Saturday. I rock up on Thursday to find Josh didn't like the noises the rear diff was making, so his Dad went to Sydney that morning to get the close-ratio gearbox that was finally ready... because the replacement diff has a lower ratio and changing a ratio in a 4WD means changing the front diff inside the gearbox as well. So, it was out with the rear diff, which checked out OK on the bench, but seeing we had it out and the new gearbox coming we swapped diffs, and then into removing the gearbox. The new close-ratio box turned up just after we got this one out, so it was reversing the morning's work for the afternoon. By 10pm we had it running again with a handful of other small improvements, and as this is Friday morning right now we should make today's publicity event. With the Garrett on and a week of rainy weather, he reckons it might have too much grunt now, a most unusual complaint for a driver!!

-
The ballast is there to drop the voltage when the engine is running, so its working OK. The ballast is bypassed on the 'Start' part of the ignition key, there is a 2nd wire that sends 12V straight to the coil for starting. It sounds like this wire is broken or come off. On a KE70 the ballast feed is black & orange, the start feed is red.

-
Ah, distractions distractions... The Golf runs, although there are a few days left in the interior to finish it. The sequential close-ratio never made it in time so the Evo3 is being assembled with a new Garrett this time, otherwise pretty much the same. Josh scored an antique fireplace so that was refurbished and lifted into place, just before the weather gets really cold. A new chimney is in place and he tells me it runs fine! Yeah, 8mm ratchet ring spanner that was not working so well... We FINALLY got the new CAKE out of the wreckers, with the month of sunny dry weather we've had Jase was happy to use the forkhoist to lift it out for us. This shell has NO rust around the boot rubber, almost unheard of, and only a hole in the very bottom of the rear sides as usual. Now it can sit for a month while we finish the EVo3 preparation, finish the Mini cage and argue over which non-rally Evo we will work on first. I swear he's trying to get the whole set, we have a 3, a 5, a 7 and a 9, mainly is bits around the shed! Hopefully we can have the CAKE running over winter and drop the orange body back to the wrecker. The next question will be, do we aim the CAKE at the bottom end of motorsport, a cageless gymkhana car, or do we half-cage it and get it up the ladder a little to hill-climb or drift hack or whatever....


-
" So before I pulled the 4AGE out I decided to comp test it, in which, no joke it lost compression on cylinders 1-3 while I was testing it.... All had 30psi except cyl 4 which had 140psi. So plan is to rebuild it, I pulled the head off on the weekend and couldn't see any obvious signs as to why it lost comp. " That's fascinating! I can't see it being a head gasket or a crack, which doesn't leave much except valves sticking open from not being used, or a fault with the meter. Its possible rings broke in those cylinders if they were glued up from sitting. Make sure to tell us what caused it. Otherwise, the Corolla looks excellent, and the background looks Queenslandish, so rust-free is surprising.


