


altezzaclub
-
Posts
6830 -
Joined
-
Last visited
-
Days Won
134
Content Type
Profiles
Forums
Events
Gallery
Blogs
Everything posted by altezzaclub
-
Start with Ian Carpenter at Kreative Enterprises in Windsor, he did mine & I found him very helpful.
-
Great Western is crushing post-2000 cars now. He's keeping a few KE70s & KE55s there, old Dattos and stuff.
-
no no, that was the radiator overflow!
-
Start talking to your local engineers, Govt has a list of approved ones. I had the 4AGE certified in Sydney, nothing else done to the car, cost about $600. Often bills are well over $1000.
-

83 wagon rack and pinion swap
altezzaclub replied to almostreallygood's topic in AExx Corolla Discussion
which should already be in there if it is an AE71..... Look for captive nuts or bolt holes on the back of the crossmember in the car. It will have extensions welded on the back edge to take the rack mount bolts.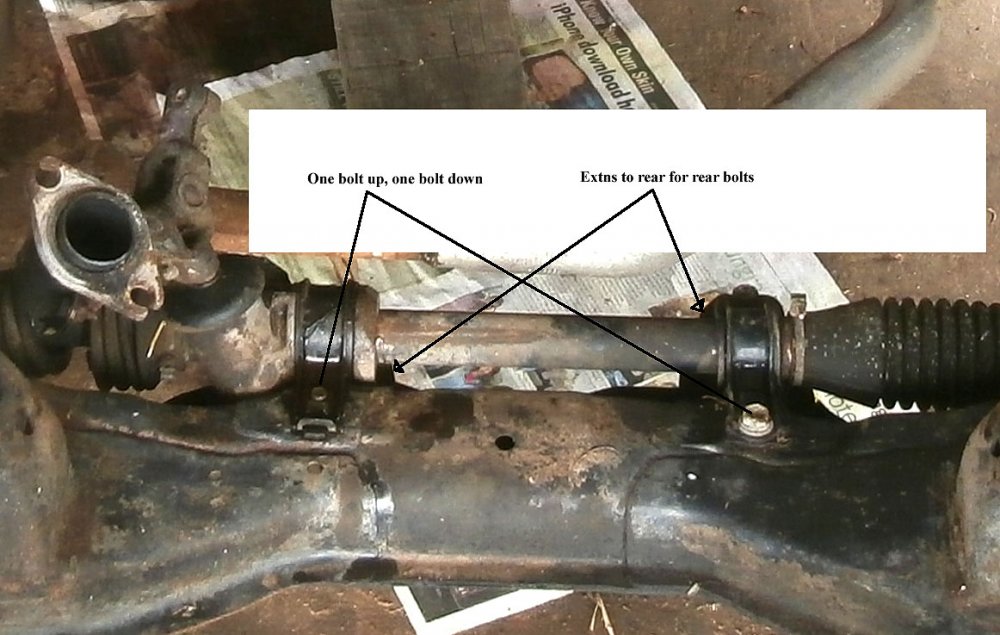
-
That goes down into the chassis rail and allows fresh air into the canister as fuel vapour is drawn out.
-
Yep, that's what inlet vac advance does. Then the weights opening should stick another curve on the timing as you accelerate, and when you back off at high revs you have the weight advance plus that vac advance. Out to 45-50deg advance at a guess. Then along came ported vacuum advance for the emissions control. Not that a 4K in a dirt bin hauling up hills in 1st gear will ever need stuff that only works at highway speeds and cruise throttle! But on a road car you can set a lot of idle advance with inlet vacuum and run a leaner idle. Megasquirt one day!
-
Nooo ! ! You're right, the Mintylamb has gone!! Dammit, it was so goodl! Teglerizer will do similar, but nowhere near as nice to use. http://www.teglerizer.com/cgi-bin/needle090db.cgi OK- what needles are in there now? I had AAP in mine, but i don't think they were used on a K motor before I bought them from a guy on here. They were too lean & I bought a pair of ABH from Fabre, the agents in Sydney. They were too rich so I sanded down the AAPs in the areas needed. Luckily I bought a display meter off someone on here too, so I ran two oxy sensors from the wrecker, one in an extractor branch of each carb. You could assume they are the same anyway, and just run one mixture meter in the exhaust somewhere. Then its a matter of warming the motor up (the oxy sensors don't work until hot) and reading the mixture as you drive around doing daily stuff. I'll find the data on which 'station' on a needle refers to which rpm, and then where you have a lean flat spot you sand the needle 20 rotations at so&so station to make the needle thinner and the mixture richer. You'll need calipers to measure down to one thou If it is rich over all areas, raise the jet to lean out all stations. If it is lean all over lower the jet. If it is rich in some areas you can't fix that without new needles. I have a very lean idle, about 17:1, downhill is the same a lean cruise at 100kph of about the same, but it richens to 14:1 as soon as you go up the slightest incline, even if you don't touch the throttle. Boot it and it goes to 10:1. You can do a lot with SU carbs, I've never finished experimenting with them, I just got distracted by a 4AGE in that car and the 4K with SUs went into my gold car.
-
Yep, do that first. Setting points and timing will alter idle speed, but by the time you do that you'll be an expert on the carb!
-
Well well, maybe the previous guy was chasing the same problem. Get a 10ml plastic syringe from a chemist, you don't need a needle, and use it to pump 5ml petrol into the hole the solenoid was in. Then take out the idle screw and do the same. Really you should tke the carb off and pull the jets out so you can hose out all the jets and their passageways. You can buy a can of carb cleaner to do the same, I just use syringes because they're always lying aound here. Of course none of this may be necessary, you might just have to re-set the idle speed... You could try that first- put the solenoid back in, warm it up and just screw in the idle speed screw at the throttle stop. Wind the idle mixture in half a turn and out a turn to see if that makes a difference too. If it runs better then prepare to set the tappets, set the points, set the timing and re-set the mixture. Then you know its all as good as can be. If it still backfires and runs badly then you can assume there is something blocking the idle circuit that needs to be flushed out.
-
Run through "The Girls KE70". I fitted them to it and bought new needles then sanded the needles down to get a good mixture right through the rev range. A leaner needle is made of thicker brass so you sand it back to make it richer where you need it. There is lots on the web about needle selection (or there used to be) especially the Mintie active needle chart.


-
I'd be tempted to disable it and try it, so it flows fuel all the time. Cut the front nose off would be one idea, so it can't seal. Another would be to disable the spring that holds it forward to seal, open up the back where the wire goes in. ...or space the body backwards with more washers so it can't stick forward far enough to seal. That would tell you what it does when you turn the motor off (maybe you won't even notice if it isn't working at all) and tell you if the solenoid is the idle problem. Ultimately, find another one. We'll have them in the Woolshed somewhere if you're desperate.
-
If you end up doing as Banjo said, once you have a new wire soldered on stand the unit up in a vice and run masking tape around the circumference of the metal so it stands up as a circular dam. Then fill it with epoxy. You should end up with a solid plug of epoxy 5-10mm deep holding the wires in place and stopping the soldered joint taking any stress. I had to do exactly all of this to a temp sensor where the wire fractured off flush with the plastic housing.
-
Easy enough to check, just run 12V to the solenoid wire and see if the solenoid goes click. If it does, fire it up and see if it idles.
-
Haha! WTF! Electric bonnet opening and power steering! WIMPS! But Such lovely toys and such beautiful engineering! Even if it takes an 8hr day to make one small bracket.. & a CAD heater.. next will be 3D printing! So, Aug 2013 to now, we could still beat them finished!
-
Well, that was interesting.. A stock rad weighs 4.1kg, and the alloy one is lighter at 3.3kg. But while the stock one only takes 1.6kg water, the alloy takes 2.4. So they both weigh 5.7kg when full, but you can see how the alloy can disperse more heat, especially as its larger, 20mm wider and deeper in the core. I bolted the driver's side onto the stock mounts, the lower one needs a new hole and a spacer. The passenger's side needed a plate, a strip of 1mm galv about 70mm wide, to bolt the wider frame on. The same fan is on, although using the given holes on the other side, and I need to make another brace for the floating edge. The temp gauge runs in the same place, so a stock radiator can handle a 4AGE generally, but it doesn't have anyhing left in reserve for hot work. I put a thermometer in the top of the rad and let it idle up to warm. Well, vented discs & rad done, but I'm sure there are still things on my project list...


-
Well, drove it around the town this morning, no change in normal driving. The pedal has a good feel, doesn't go down a noticeable amount, but if you lean on the pedal the response is sharper. It will get a tryout when I go up to Walcha next. Find yourself a Daihatsu Move!
-
Overall, it went well! I bought the Daihatsu Move ventilated discs then had the spacers made, and the whole $230 conversion is here- I've got the radiator out, but did nothing else due to this brake distraction. Now back to this rad project...
-
Well, I've certainly had bigger headaches! The backing plate has an obvious place to sit due to the indent for the LCA, and then it can be rotated forwards or backwards to suit the mounting holes. The center hole of the spacer was a half-mm too small, perfect to file out and get a perfectly tight fit located onto the stub axle. The 4 bolt holes were a best-guess and drilled to 8mm then filed to 10mm to get them exactly where they needed to be. One hole has an overlap, but not in a direction that is important. After the first side I made a paper template so the other side was easy. On the strut there wouldn't be 5thou of movement in rotation, and zero laterally. With the enginering finished it was a matter of assembly. The hub and disc went on- Then the calipers-The biggest pain appeared now. I went to swap the brake hoses but the hard-line 10mm fitting on the chassis end rounded itself off in my brake spanner. They sieze in there after a decade. I had to keep the KE70 lines and change the caliper, so much swearing and brake fluid everywhere! It lines up perfectly in all dimensions, very surprising really! The wheel clears fine too- So there you have it, back on its wheels with the brakes bled, but I can't drive it as I'm halfway through doing the alloy radiator conversion! The pedal may go down a tad more, hard to say without driving it, but it should as the Move has larger pistons. The Move caliper & pads (new) weigh 3.2Kg, the KE70 caliper & pads (worn out) weighed 2.4Kg. The Move disc on a KE70 hub weighs 11.55Kg, the KE70 setup is 10.85. So we've added 1.5Kg to each side.. a nuisance, but hopefully not noticeable. I even scored a set of almost-new pads, a swap for the KE70 ones that were down to their last few mm!


-
Well Ben, i'll finish the vented disc experiment and you can do the Bill Sherwood dry-sump-with-stock-oil-pump one.. Solves all sweeping corner problems!
-
Put up a new topic with some photos Numbaly, it'll help people planning to do the same. People may have unrealistic expectations of a 1.6L, but I love mine!
-
OK, bit the bullet and saw my local engineer. He copied the spacers into steel and I went back to the wrecker to get the other side, and actually pay for the parts I'd borrowed! The engineer welded the big one into the Move backing plate- and I slotted the hub holes a mm so it all fits on his spacer here. Now I can drill the holes in the Move backing plate to suit the KE70 strut and try it all! So far $50 for the Move parts and $180 at the engineer.


-
Pete is Steve's dad, up in Walcha. He used to rally too, back in the '80s. He's had R44s for years, but Raven 2s are still too expensive so all his have been carbed. I think the Lycoming is an outdated piece of crap, but you don't get any choice for personal helicopters really. The splash lube didn't do the job in the last one and it chewed a lobe off the cam, one that works two pushrods. I mean really?? Splash lube in the 21st century!! At least Continental put the camshaft under the crank in the sump, not up on top! The injection is a massive step forward from the 1930s, or whenever they designed it. Anyway, the latest one seems pretty good at starting in temperatures under 5degrees.
-
Yes, the SU carbs also react to altitude as the thinner air can't pull the slide up as far. Pete has found that the timing is the thing that starts an R44, it drives him mad that some aviaiton engineers can give him a freshly tuned helicopter back and it won't start on a cold morning at 3300ft. It will crank on full rich until petrol drips onto the ground. A different company will give it back and it starts every time. A manual control on the 4AGE idle speed bleed screw has been on my mind..
-
Damm that looks good! The T pistons are like the 18RG's, so they don't propagate flame very well when cold or lean either. Its funny because hemispherical heads were the absolute peak of technology in the 50s and 60s, until they realised bathtubs were just miles better for just the reasons you mentioned.


