

Banjo
-
Posts
1933 -
Joined
-
Last visited
-
Days Won
95
Content Type
Profiles
Forums
Events
Gallery
Blogs
Everything posted by Banjo
-

Bathurst Te37 Levin (Oh And Some Gemini Stuff)
Banjo replied to parrot's topic in Automotive Discussion
Just got an email from TechnoToyTuning this morning, for their BlackFriday sale. On their Instagram site, is a picture of a Te37 / SR5 that lobbed up at one of the meets they were at. Oh, they were an awsome looking, classic, aggressive looking coupe ! Or this one ! https://www.youtube.com/watch?v=lvT8PQTBuRk If you like Levins, then this vid is a good way to enjoy a cup of coffee & relax, . . . and dream ! https://www.youtube.com/watch?v=7csP_Nq1eG4 Cheers Banjo

-
Hi Alon, If you are into the bare metal look; then if you haven't watched this very olde MCM video, you should. Only if . . . . . what not to do ! MCM VW Golf Bare Metal Project Cheers Banjo
-
Welcome Aboard ! We like Liteaces ! They have 5K engines in them ! Where are you located ? Cheers Banjo
-
What a weekend ! https://www.youtube.com/watch?v=Ld_-6JitVyE Some of those camera men have nerves of steel; or are very trusting !
-
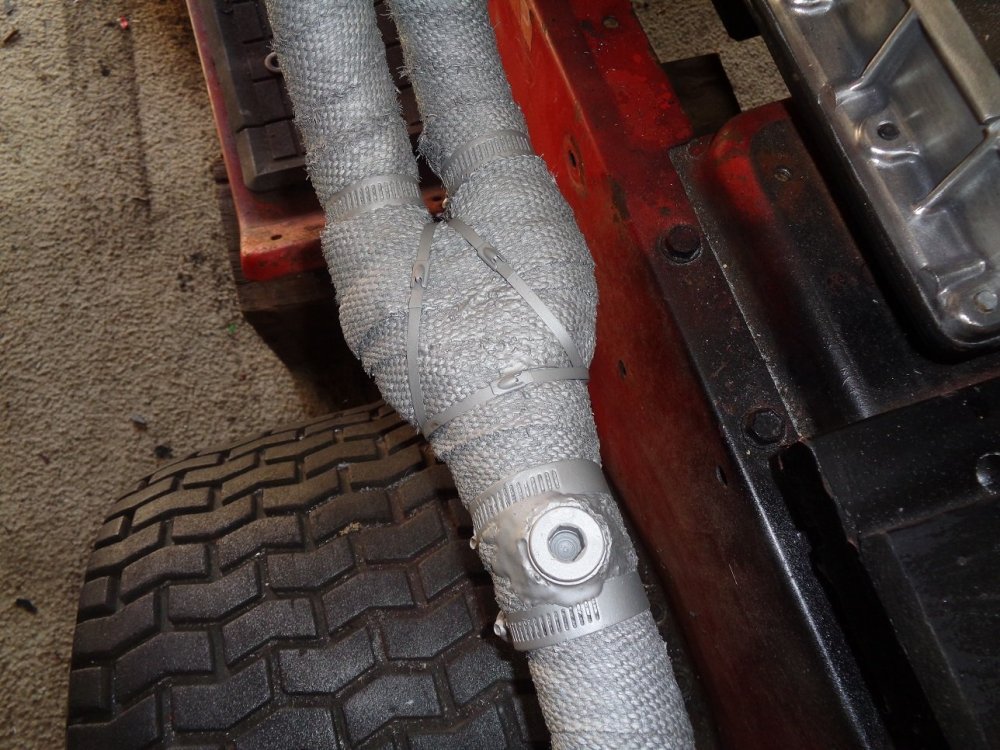
I did a bit of cleaning up, on the collector area, as suggested, & although not using the tie wire, I did make a triangle, using the Bunnings stainless steel ties, which are heaps better than those supplied with the heat tape. I had so much tape left over, I even lagged the front box, just because I had it. Always hard to know how much tape you need, if you've never done it before. For those interested, I ordered 15m of 50mm wide tape. With all that pipe depicted below wrapped, with a generous overlay, I still had 4.5 meters left over. Cheers Banjo


-
Did your KENT vernier large timing chain sprocket look something like this, or was it one with an off-set pin for adjustment ?

-
From your latest test, I can pretty safely say, the issue is one of "timing". All you have to do is find where the timing error lies. There are really only two places. The timing chain & sprockets, or the dizzy alignment with the camshaft centre gear. Do you mean by above that the dots on the two sprockets, were both on the outside, & aligned with a line passing through the centres of crankshaft & camshaft ? Even one chain link out in this area, can cause havoc. Was there any special instructions that came with the Kent camshaft ? With the keyway in the crankshaft vertical, at the top, that is at TDC for no 1 & No 4 cylinders. Interested to find out where the error lies. Cheers Banjo


-
I think you have found your problem. In my last post I said, "it may well be too advanced" Do you know how to make a TDC piston stop tool, & find true TDC ? Plenty of details on the net, with videos. https://www.youtube.com/watch?v=PD0ZRc7Dy28 I made one out of an old spark plug. What brand of duplex timing chain did you use ? The small sprocket is keyed to the crankshaft, but the large upper sprocket is aligned with a pin that comes out of the front end of the camshaft. Some vernier type TC sprockets have a number of holes, set distances, either side of the TDC location hole, to advance or retard the valve openings. Are you sure a pin locator was used. It sounds like the top sprocket might have moved/rotated slightly. After determining the true TDC, with the piston stop tool, you may find that the timing chain cover, is going to have to come off, to see where the issue really is. When you assembled the engine, before fitting the head, did you bring the cylinders 1 & 4 to the top of the block, & check that the crankshaft pulley timing mark aligned with the markings on the timing chain case. Is there any chance you used a timing chain cover from a different K series engine ? Their timing marks are not all in the same place. I think you are close to finding the issue, but as we are not in Portugal, it's you who will have to try out all these suggestions. P.S. I was so hoping, the problem would be the dizzy out one tooth, as that is so easy to fix. Cheers Banjo
-
Hi Austin, I have very good news for you. The KE30 auto console perfectly suites the manual conversion. I think I remember cutting away, just the barest amount of plastic. I'll take a pic of mine tomorrow, & post it in your post here. Cheers Banjo
-
So how was the WRC at Coffs Harbour ?
-
Is the roughness at the higher revs, or over the whole range ? Have you looked at the possibility that the dizzy is out one tooth. Very easy to do, & does often provide a symptoms like you describe. What type of Toyota dizzy are you currently using. Points, Reluctor, electronic ignitor ? Is this roughness the kind when you are missing one spark plug lead, or is it a shaking kind of roughness ? The first one is like a hiccup every now & again, where the second one has the engine rocking erratically on it's mounts. I know you realise, that once you put a 290 deg cam in the 5K, you will never get the smooth idle you enjoyed with a standard curve. That is the trade off; but I gather, what you are seeing is a lot worst than that. Get that timing light working. They can often tell you a lot, just by observing what the flashes are doing. It may well be too advanced, but the timing light will uncover that. Cheers Banjo
-
Hi Austin, I have a 2 door KE30 that came from factory with 2 speed auto & Jap diff. I did the KE70 5 speed conversion, & it worked perfectly, with the original auto tail shaft. However, you might want to go B/W diff, as the original auto diff, will probably be a 1.43:1 ratio, & you might like sometime a bit taller like 4.11:1 or even 3.89:1, if you can get one. With the B/W diff you will require a different tailshaft, as the tailshaft/diff flanges are different. This Ke70 5 speed mod does however require the following. Opening up the hole in the "tunnel" a bit at the rear end. Acquiring a manual pedal box. Acquiring a manual clutch cable. Bypassing the auto park switch, which stopped it from starting. Best mod you'll probably ever do to your Rolla. Cheers Banjo
-
Hi Francisco, Always a bit of a nervous time, when you start up an engine for the first time, especially when you have put so much time & effort, & money into it. Look at it on the bright side. It does start & run, despite the running being rough. All we have to do is now find out why it is running, below your expectations, & rough. The audio is a bit poor, as you mentioned, so that doesn't give us a lot of clues.I'm going to fire a whole lot of questions to you, & after we have your answers, we might be in a better place to offer valid suggestions. 1. Did you assemble the engine, or was it put together by the people that did the machining ? 2 Was the engine checked with a degree wheel, after assembly, by you or others, to ensure the valve timing was correct ? 3. I presume you replaced the original single timing chain, with a duplex, which has a vernier adjustment ? If so, what was the vernier initially set at ? 0 degrees ? 4. Does the engine feel, or sound like it is starving for fuel ? 5. Is the engine now in the car, with a gearbox on, or on a test stand ? 6. Have you got a timing light, that you can check the timing & advance ? 7. Without spark plugs in, is the engine very tight to turn over ? 8. Have you got an oil pressure guage attached to the engine ? 9. In the video, were you revving the engine, or was it surging like that all by itself, with a static throttle setting ? Fire us back some answers, & we'll go from there. P.S. My first best guess is that the dizzy, has been installed 1 tooth out, & the rotor arc'd end is running out of lining up with the distributor cap posts, inside the cap. At the higher revs, it could be causing it to feel like it is running on 3 cylinders. If one cylinder was dead, & it was only running on 3, it would show up instantly on the plugs, which I guess, are all brand new. Cheers Banjo
-
Hi Johno, Welcome aboard ! Which suburb are you located in, in Brisbane ? There are a number of members in Brisbane, who would be willing to give it the "once over", & get you started, in the right direction. Is that a picture of the car you are buying ? It looks more like a KE55 that a KE30, but does look very clean, & unmolested, as you say. How many klms are on the speedo ? Let us know. Cheers Banjo
-
Hi Michalis, Off memory, the JAP 4.31:1 ratio diff was fitted to Corollas with auto transmission. Manual transmission models, were often fitted with 4.11:1 ratio diffs. The 3.89:1 ratio diffs were not fitted to any Corollas as standard, from memory. However, I am led to believe, that the Datsun 1200 & 120Y series, used the 3.89:1 ratio diffs, of the same origin as Toyota, & that if you can get hold of a 3.89:1 crown wheel & pinion set new, a good diff reconditioning company should be able to swap them over, & lap them in for you. A lot od Datsun 1200 utes had 3.89:1 ratio diffs. Others on this forum may be able to confirm or correct my thoughts, as I haven't actually done it myself, but I do have it on my "bucket list", as I have a KE30 with a 1.43:1 ration diff in it, that I would love to fit a 1.389:1 diff into it. Here is a listing I found, that has a number of 3.89:1 & 3.9:1 ratio diffs http://www.difflap.com.au/ratios/gearratios_ad.htm Cheers Banjo
-
Excellent work ! Ideal placement up in that back RH corner, but then with the Nissan in the bay, there ain't too many other places you could put it. I put my commercial aluminium catch can in a similar area. Works well ! Nik of "Project Binky" would be proud of you. Did you make a cardboard cut out, & use it as a test box, to make sure it fitted in the space OK ? That's what Project Binky do all the time. http://www.badobsessionmotorsport.co.uk/project-binky-episode-13/ Cheers Banjo

-
And the little bits they couldn't quite get right, they filled with molten lead solder ! https://www.youtube.com/watch?v=87fuTnBS2bE https://www.ebay.com.au/itm/LEAD-SOLDER-STARTERS-KIT-suit-PANEL-BEATING-VEHICLE-RESTORATION-LEAD-FILLING-/252839052209
-
You watch this very early MCM utube video. https://www.youtube.com/watch?v=11zpXnFStNo Cheers Banjo
-
Hi Tim, If it turns out not to be a fuse, then it could well be the relay 130. Not sure where this is located in the KE70, but if it is like the earlier KE30/35/55s, it could well be located behind the kick plate plastic cover, just to the RHS of the drivers right foot/leg. Rollaclub members on here, with a KE70, might like to confirm, or correct this location. Cheers Banjo
-
I'm presuming your 82 Corolla is a KE70. Sedan & Wagon wiring are almost identical. Here is the circuit for the part of the diagram you are interested in. There is also a relay (item 130) involved. Here is the legend, to identify the bulbs, which are all in parallel. Give us a yell, to let us know whether you got it sorted. According to the wiring diagram, the fuse feeding all these parker & dash lights etc. is a 15A. One of these, are your best friend, in these situations. Cheers Banjo


-
Hi Tim, Your parkers & dash lights are usually on the same circuit, so if it is a blown fuse that is causing the issue, you can easily resolve that, by looking at the layout & identification of the fuses on the fuse box lid, or simply remove each fuse, one at a time, & look through it, to see if it is open circuit. Cheers Banjo
-
Hi Dave, The same concern crossed my mind. Whilst wrapping it, I used a spray bottle of water, (just like my wife does when she is ironing the clothes) to soften the fibreglass wrap, & I did note how porous the material was. That's one reason why I used over half a "rattle can" of Hi Temp paint to seal the whole thing. I actually ran the engine for a while, before I applied the paint, to ensure no moisture was trapped inside. When I've got it all finished, I might pour some water over it, when I've got the test rig outside, & see whether it all runs off. The wrap does result in a less "tinnie" noise level, which is nice. Cheers Banjo
-
Thanks again Ben ! I went to Bunnings & bought a packet of 10 off stainless steel ties, 4.6mm x 250mm long, for just $4.60. (Electrical Section) Looked pretty much the same as the ones that came with the fibreglass wrap. Same design, same technique. Tried one when I got home, & it was like "chalk & cheese". These pull up nice & tight, & do not slip back at all. The packet was labelled by a company called STAHL, & were made in Taiwan. I'd say the ones that came with the kit were a China copy, where they didn't quite get it right. Tie wire is a good idea. I might give that a try around the "collector" area. Actually, if you look closely at the area you highlighted above, I did leave one of the temporary plastic zip ties there to see how it fared with the heat. The big one going around the collector is a long one that was supplied with the tape kit, but it is loose, so I might pull both these off, & tie them off as you have suggested, & see how it looks & works. Cheers Banjo
-
Thanks Ben, I'll have a look this afternoon. I'm a regular at Bunnings, but haven't come across them before, but then I wasn't looking for them before ! Cheers Banjo
-
Whilst doing some programming for the pulse trigger decoder, for my distributorless 5K, & not working directly on the engine, I decided to fit an O2 sensor mounting point on the standard exhaust pipe. I then added some fibreglass wrap on the pipe. It was more for protection, rather than good looks, as I'm working around the engine in shorts, I don't want to burn my legs accidentally (which has happened previously). The fibreglass wrapping kits are very cheap on-line, & for about $20.00, I got 15m of tape + 10 x S.S. ties, free postage, with plenty of tape left over. Now I've never done this before, nor had the need, so watched a couple of on-line videos, of how to go about it, by pre wrapping it loosely, & then dampening the tape with water, to soften, & give the tape a bit more flexibility as you wrap. That all worked out fine, but when I came to fitting the S.S. ties, I ran into trouble. They just wouldn't pull up tight, like I expected. I watched the videos again, & they made it look so simple, by just pulling it up tight, bending the end over, cutting the excess off, & pushing it back 180 deg into the clasp. I actually managed to get just one to do that, but it was a pain. Then I realised it wasn't really tight. I looked at the clamping arrangement, & it has a tiny "rough" ball inside, That grips the S.S. ties & "jams" it. I wasn't happy, & didn't know whether it was my technique, or that I had just scored some "cheapy" ties, in my cheap on-line purchase. I finished up, just buying some ordinary S.S. hose clips at SCA, which worked perfectly, as depicted below. To stop the wrap from losing tension, as I wound the tape tightly around the pipe, I used oridinary plastic zip ties to temporarily hold the wrap in place, until I got to the end, & fitted the metal hose clamps. I then thought, this is so easy, why doesn't some one make a hi temperature plastic zip tie for this application. I looked on line, & did find some rated up to 240 deg C, but that is probably not high enough. Has anyone come across some Hi Temp zip ties, in their travels ?? Anyway, I finished up spraying the installed fibreglass wrap with high temp paint (colour aluminium), for exhaust systems. I saturated the porous tape, & put it in the sun for a day. I then refitted the exhaust pipe to the engine, & ran it, until the pipe reached operating temperature. It had the effect of "baking" the wrap on, & gave what appears to be a very good reliable finish. It was only an experiment, & time will tell. If anyone, has some personal experience with wrapping exhausts, or has some tips, please add here. Cheers Banjo


