

Banjo
Regular Member
-
Joined
-
Last visited
Everything posted by Banjo
-
Hi Caleb, OK ! I was guessing there was a thermofan, but like Altezzaclub, could not see a switch, to automatically turn it on & off, because it is near the dashboard, & only manually switched apparently. Here is an easy way to fit one, except instead of using it to fit a temperature sensor, you will use the adaptor to fit a Tridon thermofan high temp switch. Have a look at this video, which would work well, with your existing top hose. You can buy those adaptors on ebay, quite cheaply. https://www.youtube.com/watch?reload=9&v=X1J_SgpgV68 Here's another link, about thermofans & controlling them, which might be of interest to you. https://www.rollaclub.com/board/topic/75038-cooling-system-issue/page/2/#comments Cheers Banjo
-
Welcome Aboard ! Where are you located ? In Australia, most KE55s already have disk brakes fitted on the front wheels, with drums on the rear. The rear drums on the KE30s & earlier models than the KE55, had 7 inch drums, off memory, but the KE55 had 9 inch drums. I've got a reconditioned BW rear end out of a KE55, already sitting in my garage, awaiting yours truly to swap it into my KE30. It has 9 inch drums. There are numerous ways you can upgrade the front rotors & calipers. If you search this forum, you'll find several suggestions, which often include replacing the front struts. If you like to take a couple of pics of your front & rear brakes, with the wheels off, we might be able to give you a few ideas, if what exists is stock standard originals. P.S. To be honest, most would agree that good brakes were not one of early Corollas great features. However, there are plenty of ways you can improve them, depending on how much you are prepared to spend. Fitting disks to the rear end is usually not feasible, unless you change out the whole rear end, for something that already has disk brakes. Unfortunately, that usually results in shortening the rear end width, which can be expensive, as it has to be done professionally. Cheers Banjo
-
Hi Caleb, After downloading the pic of your engine bay, & rotating it 90 deg C, so I didn't get a crink in my neck, I can see what you mean, about being "throw together". Nice big aluminium radiator & thermofan, I guess. Lots of extra wires draped around here & there, & all that spaghetti junction small rubber hoses around the carburetor, for all the California emission control stuff. (That's what the C in 4KC stands for) I'd get rid of all that eventually, as when it gets that old, it usually don't work any longer. The rear gearbox rubber mount, are a known point to fail, as they usually get a good covering of oil, from the rear of the gearbox. Have seen them come away from the mounting metal, & also "shear" right through the rubber. Easy to repair. Just hold the gearbox up with a jack, & remove rear gearbox support cross member, complete with mount. The front engine mount of the carby side, is also usually, the one that will fail. It is close to the exhaust pipe, & if the heat shield protector has fallen off, it gets exposed to the exhaust heat, & the rubber breaks down. Easy to replace, without removing the engine. Like Big G advised. A good 30 minutes, with some degreaser spray & a brush, should clean the engine itself up, so any leaks get exposed. Front wheel bearings, are likewise, very easy to replace. Cheers Banjo
-
We'll some days, you have a win; & yesterday was one of them. My careful testing, was not too scientific, or in a laboratory, but it worked. It took over an hour to do this simple test, as the water had to be added a litre at a time, so that the water trickled into the tank, & didn't cause any "waves', or create disruption of the water level surface. The results of the test were very encouraging, although I won't be able to use all 14 off switched level point in the sensor, as the lowest one, is below the point, where fuel can be sucked out by the pump. I could possibly lower the pick up point a bit, but think, I'll just stick with 13 switch points rather than the 14 available. I don't specifically know how these sensors work, but it appears to be a number of magnetically switched reed switches, which are basically equally, distributed up the length of the vertical tube. I believe a little magnet, in the float, probably switches each one in turn. The results are in the table above. I will now draw a graph of with the capacity & LED switching points, overlaying them, & see how much non linearity there is. Here is the LED Bar-O-Graph, indicating about half way through the test. I was pleasantly surprised, that the two top LED & switching points arrived, before the tank filled. As soon the last top LED illuminated, at 57.5 litres, I stopped filling. I then took the central pick up assembly out, & believe it or not, the water level was less than 1 cm below the top of the tank. I carefully added more water, & after half a litre the tank was just over flowing. The positioning of the top , or highest switching point, is nearly perfect. It also indicates the tank is closer to 60 litres than I thought. The useful capacity of the tank with the standard pick up point, is about 47.5 litre, or 45 litres, if you want to avoid running out of petrol. I was so pleased with the way the electronics worked, I added a couple more inputs. One was an input from the parking or head light circuits, that dims the LEDs for night driving,, so they are not too bright, or distracting. The other input was a need to disable the "damping function", of the sampling. The last thing you want is the bar-o-graph LEDs, blinking on & off, as the fuel sloshes around in the tank. By taking several readings, say 1 minute apart, averaging those, say every 5 minutes, then updating the LEDs, results in a very stable display. However, if you are testing, as I have been, I need instant updates of the LED display, so can now switch between instant & delayed response. I actually ran out of I/O on the 18 pin micro I was using, but have just received a slightly bigger one with 20 pins & subsequently a bit more I/O capacity. I will put this "rats nest" on a PCB now, transpose the code across to the bigger micro, & might actually put the tank in my KE30, & drive it around for a couple of weeks, or tank fulls, to see how it performs in practice. I'll then pull, it out, & put the submersible hi-pressure EFI pump in the tank. I'll come back & update this once I checked the linearisation, but based on what I've seen, it's not too far out. Cheers Banjo


-
Here's my tuppence worth of advice Rob. By "internal circuit breaker", do you mean one that is built into the MIG welder itself, or the one in your switchboard ? A circuit breaker, is basically an isolator switch, but also acts as an automatic fuse if the current (amperes) being drawn, exceed the rating of the switch. A RCD is a totally different device, that prevents electrocution, by comparing the current going into the device, on the active wire, to the current coming out, on the neutral wire. If it differs by more than about 30mA, (30 thousandths of 1 ampere), then it automatically trips. 30mA through the body across the heart area, can kill you. Basically, if there is less coming back out the neutral, the missing current is leaking to earth. That's why some refer to RCDs as "earth leakage detectors". If it is the RCD switch that is tripping, do not use it, until it has been "meggered" & tested by an electrician. Often in workshop equipment, & particularly welders, on which there are lots of air flow slots, the inside electrics get covered with rubbish, which can often create a leakage path to the frame or ground of the welder. Have it checked out please. Cheers Banjo
-
Hi Caleb, Well, at least you live in "the right state", & the Sunny Coast, is even better. Which area ? I know there a couple of guys on here around Caloundra. There are few members up there, so hopefully, one of them may respond. Photos of your engine bay would be good, or a particular item or part, you are concerned about. There are those on here, that can spot things, that are "out of place", very quickly. Keep firing away with questions or queries. There aren't too many "aging issues" with these olde Corollas, we haven't already come across, addressed, or have the solution to fixing them. Good luck ! Cheers Banjo.
-
Hi Caleb, Welcome aboard ! Totally agree with Altezzaclub, that your immediate, & most pressing problem, is probably starter motor related. However, that does not necessarily indicate that by inference, that the starter motor is faulty. The starter motor is the one electric item in your KE70, that draws more power & amperes, than any other piece of electrical equipment. Any connections at both the battery terminals, or the main earth connection to the chassis, are known places, where you could get large voltage drops, whilst trying to start the car. I would have hoped that the Battery World guy would have checked & inspected those, but you never know. So before you do anything else, one thing you can do immediately, with few tools, is remove battery terminals, & any high current lead connections, between the battery & the starter motor, & clean them all with a wire brush, until there are no signs of corrosion, which can appear as a fine white power, or a "bluey" gunk. Does the car in general & engine bay, look like it has been neglected ? When the car runs, & is driving, how is it's performance ? Is it relatively smooth to drive ? A car of this age, which is a new acquisition, usual requires a complete check over, of fuel, electric, & engine conditions, even if it appears to be going reasonably well. Where are you located ? There may well be a forum member, close to you, who would be welcome to give it the "once over", and assist. If you happened to be in Brissy, then, I'd only be too happy, to have a look, if you brought the car around. Luckily, the 4KC was one of the most popular & reliable of all the K series engines, & there are still plenty of spares available. They are also very easy to work on. Cheers Banjo
-
No, if the standard fuel sender unit, read the last 10 litres, then the float would have to be below the bottom end of the fuel pick up point, & therefore you would run out of petrol, before the guage actually got to minimum. My 1974 KE30 has a separate fuel guage sender unit at the end of the tank. The tank I am using is out of my deceased KE55 Coupe. It has the sender unit, in the centre, as part & parcel of the pickup point assembly. I have had that unit out of the tank, & when the float is hanging at minimum, the float is slightly higher than the bottom of the pickup point, as it should be. P.S. Already got a "nice chunky wooden one". It is my cheese board. Luckily, my wife drives a Corolla also, albeit, a bit younger than my KE30. Cheers Banjo
-
Update on this little project, which was interrupted by work commitments. The circuit I designed around a microprocessor, plus one of those multi_LED stack barograph thingies worked well. I set it up on my tank test stand, & slowly added, 1 litre at a time of water down the tank inlet, with a plastic funnel attached. 1 litre plastic jug, with markings, (courtesy of wife’s kitchen cooking cupboard), provided accuracy. I also replaced the normal fuel pickup assembly, & fitted a bit of fuel hose, so I could blow down it, after emptying each 1 litre jug of water. Once the water level reaches the tip of the pickup pipe, you can hear the bubbles. When it covers the pickup point, you know, because you can suck on the tube, & the water comes up. Well, that revealed my first lesson. The bottom two (2) switches of the fuel level sensor, had already illuminated the first two LEDs, before the water level was over the bottom tip of the pickup tube. So that limited me to only using 12 off the switches in the fuel level sensor, with 14 off switches. It also revealed that there are approximately 8-10 litres of fuel, left in the bottom of the tank, when you finally splutter & pull over on the side of the road, when the engine runs out of petrol. Initial thought was . . . I will have to get hold of a shorter level sensor. (There was a 250 mm one listed on ebay, identical to the 350mm I have. So I continued to add 1 litre at a time, & the LEDs progressively lit up, until the very last LED was illuminated. By this time I had filled the tank with approximately 48 litres of water. However, the tank was not full, as when I removed the fuel pick up assembly, I could see the level of the water, was below the top of the tank. I continued to add my 1 litre jugs of water, & can report that the tank was full, with a total of 55 litres of water. That seemed to add up, as when I fill my Rolla, it always takes a bout 38-40 litres, (depending how close to dead empty it is) So 55 litres less the 10 you can’t use, is 45 litres. That means when I fill up, there is still about 5-7 litres left, before the engine would have stopped. So I’ve got a fuel sender, with 14 off level switches, the bottom two of which can’t be used, & the top two trigger/switch, before the tank is full. It then occurred to me, that if I retained the level sensor I have, but lifted it up vertically, it may solve the issue. All it involved was to build a little plastic mounting block for the sensor, sited on the top of the tank, that would lift it up vertically, so hopefully, at least one of the bottom switches could be used, & that the top two, could indicate right up to full tank. So back to wife’s kitchen cupboard to cut three (3) x 100mm square pieces of plastic, out of her bread-board, which I then drilled & cut, using the level sensor top plate as a template. Pictures below, show what it finished up looking like, when mounted to the tank. So tomorrow, will be the big test, when I borrow my wife's 1 litre jug again, & we will see if this theory, works out in practice. Cheers Banjo P.S. Sorry, got to rush now, & get to the shop, before it closes, & grab a new bread board, before my wife returns home.


-
And here is me thinking, that's why we are always trying to make our Rollas go faster . . . . . . . . . . . . so we could catch some ? Bugga ! Talking Oils: I had a look at links in Papa's post, & came across the following product, which is an oil filter magnetic separator, that sits between the existing screw on filter, & the base. I am quite aware of magnetic particle collection, & have had a rare earth magnet, glued into my 4K & 5K sump plugs for several years. It works a treat, & I am always amazed each oil change, how fine the magnetic pieces are, that it catches/attracts. However, I've never come across this particular product. It has a whopping magnet inside it, & apparently lasts for maybe 100k klms. https://www.youtube.com/watch?v=Q4vW4XHBvGU It is even available on ebay. Has anyone ever used one ? Would fit easily on the K Series engine, me thinks ?. Cheers Banjo

-
Looks like Altezzaclub, & I have posted the same info, at the same time.
-
OK Papa, Glad to be of assistance. I have a "yellow bible", Toyota Factory manual in front of me, which covers all the K series engines, from 2K to 5KC. The valve clearances & torque settings are the same for all K Series engines, except the 5K & 5KC. The 4K manual Altezzaclub has offered you, will cover the info you need for the 3K. Oil Pump: Tip Clearance: STD 0.0016" - 0.0063" LIMIT: 0.008" Side Clearance: STD 0.0012" - 0.0035" LIMIT: 0.0059" Body Clearance: STD 0.0039" - 0.0063" LIMIT 0.008" ___________________________________________________________ Torques: 1: Rod Caps: 29-37 ft/lbs 2: Main Bearings: 40-47 ft/lbs 3: Head Bolts: 40-47 ft/lbs 4: Exhaust Manifold: 15-21 ft/lbs _____________________________________________________________ Valve Clearances: HOT: Inlet: 0.008" Exhaust: 0.012" COLD: Inlet: 0.005" Exhaust: 0.009" ___________________________________________________________ That means, nearly all the white metal has been worn away. If they are standard ones (not oversize), & you can't obtain new ones, then I would use the best bearings shells from both motors. If they are really worn, & you still have to use them, you could use the "olde mechanics trick", of putting one or more Tally-Ho tabacco papers, under the slipper bearing, to lift them up. This usually requires filing the ends of the bearing slippers slightly, so has to be done carefully. I've never done it myself, but remember in my youth, watching my then girlfriends Dad carry this procedure out, on a very old flat head straight 8 cylinder Packard engine. It took him all day ! Give us a yell, if there is any other info you need. Cheers Banjo
-
Hi Papa, As you have both oil pumps out, take off the bottom pickup plates on each, & check & compare clearances between the tips of the "star" rotors & the casing around them. Off memory the base plate wears badly, so pick & use the one with the least indent wear. The pressure bypass spring loaded valve in the oil pump, can be packed, to increase spring pressure, & therefore pressure at which the bypass opens. Someone on this forum here, has previously described what thickness is required. Think it was 3mm off hand, but don't quote me. Unfortunately, the oil pumps are throwaway, once they wear out. Plenty available on-line, & pretty cheap here in our part of the world. If I am rebuilding an engine's bottom end, a new oil pump is essential, but I guess in this case, this very old engine hardly demands it, unless, the oil pump turns out to be the root cause of this engines issues. Cheers Banjo

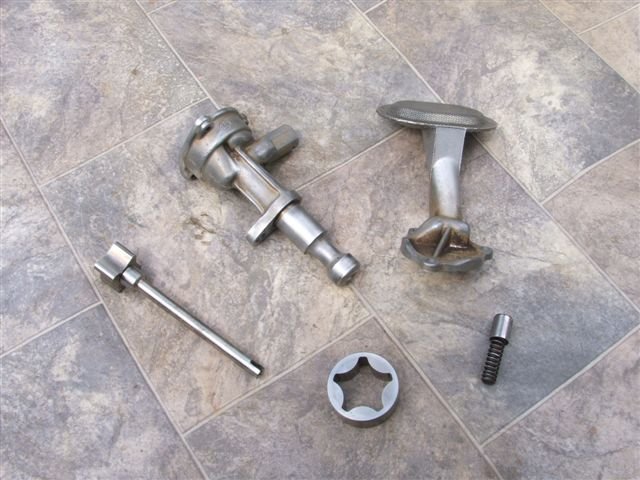
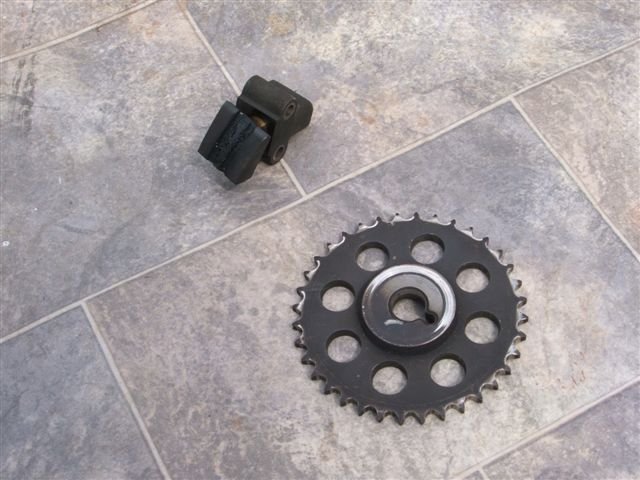
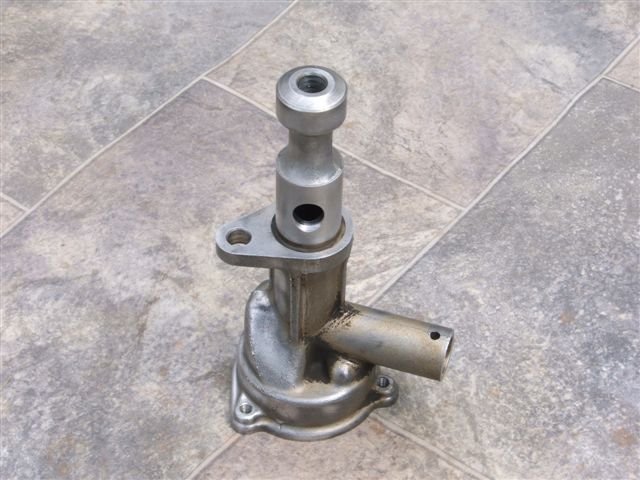
-
Good point ! There is a oil filter suitable for the K series engine that is used by Mercedes Benz. It's identical, except it has all the valves in it, to stop oil draining, through the bearings, when the engine is cooling down. I've got one on my 4KU. Works a treat. It has the numbers 423 in it's P/N off memory. I'll go take a look at it, & confirm, & see if I can find the Mercedes number, so you could cross reference it with oil filter suppliers you have there in Costa Rica. My research shows this oil filter, suitable for your friend's 3K engine, was fitted to Mercedes Benz models 260, 260E, 180E, 190E, 220E, 230E, & 300E. Here is the Australian made one I use. https://rycofilters.com.au/catalogue/part/index/part/Z423 There was a lively discussion about this topic several years ago here on Rollaclub. https://www.rollaclub.com/board/topic/73606-addressing-low-oil-pressure/?tab=comments#comment-711458 Cheers Banjo
-
Have you changed your battery lately, or completely disconnected it. The auto settings might need resetting. Easy to do. Just open & close the window with your finger permanently on the button, but hold it there for 10 seconds, after it has closed or opened. Also could be a window motor on the way out. Apparently they do fail. Plenty of videos & advice on the net. Just search Toyota Power Window Reset https://www.youtube.com/watch?v=uECJ8TSwRJ4 https://www.youtube.com/watch?v=-x7C6rkLAN8 Let us know how you go, & whether that advice assists you. Cheers Banjo
-
Glad I was wrong with my guess about the fault being "camshaft" related. The timing chain tensioner is oil pressure fed, so I'm guessing again, that the engine is pretty old & tired. If I ever have the timing chain cover off an old K engine, I usually replace the tensioner piston/rubbing block. However, that will not make much, if any difference, if the oil pressure is already low. I would suggest that you clean the wire strainer on the bottom of the oil pump with a wire brush, before reinstalling, to ensure there is no impedance to oil intake flow. Sounds like it might be time to fill the engine up, with a higher viscosity oil, to help improve the oil pressure a bit. When you do get the engine running, if you have access to an oil pressure guage, I would test it, at the point below the oil filter, where the oil pressure switch is sited. That reading might tell you a lot about the engine condition, & bearing clearances, when cold, & after it heats up. Let us know what you find. Cheers Banjo
-
Hi Papa, Welcome aboard ! Hope we can assist. As you have the sump off, I'm assuming the engine is still in the car. My best guess, is that the issue is associated with the camshaft, or something that drives off it, based on what you have told us, that you have discovered already. I suggest removing the timing chain, by removing the camshaft sprocket. Then replace the sprocket, (without chain) & turn the camshaft over by hand, & see if there is any obstruction or jamming. If there is, then remove the dizzy, & see if that makes any difference. If not, then remove the oil pump. My guess is it might be a broken oil pump. Last resort, if the oil pump removal does not indicate the fault; is to remove the rocker gear, & try turning the camshaft again by hand. With no dizzy, oil pump, or valve springs to compress, it should be quite free to turn. P.S. Also make sure the pin in the front of the camshaft, for the camshaft sprocket, has not sheared. Has been known to shear, in K series motors. Please let us know what you find. Cheers Banjo
-
-
Link to KE10 Brake Upgrade in the RollaClub WiKi https://www.rollaclub.com/wiki/index.php?title=Ke10_Disk_Brake_Conversion Here is another link, that is 10+ years olde, but might assist also, with ideas, & possibilities. https://www.rollaclub.com/board/topic/27635-ke10-front-brakesuspension-upgrade-options/
-
Hi Carlos, Welcome aboard ! Sadly, brakes, in general, were not a strong point, on most early Corollas. That's why you will find plenty of different suggestions on this forum, & others, as to how to transpose disk brakes from other Toyotas to your KE17. My KE30 has Celica RA65 struts, & rotors & calipers from two different model Toyota Cressidas. Suggest you do plenty of reading & research before deciding on what to go for. any queries, or questions, please give us a yell. Cheers Banjo
-
Hi Michalis, Welcome aboard ! Plenty of wiring diagrams on this website. Search wiring diagram, & you should find them. Member "Altezzaclub" is "the king" of KE70 wiring diagrams, & has numerous examples in his posts on here. Search Altezzaclub's posts & you are sure to find what you are after. There are only 277 pages of his posts. If you would like to explain in particular, which area of the wiring you have an interest or related problem; we can probably be of more assistance. There are not too many Rolla electrical issues, that haven't already been addressed & solved already, on this forum. Cheers Banjo
-
Interesting possible co-operation between two great Japanese car manufacturers, I read recently, in researching later model RWD engines suitable for Rolla transplants/conversions. https://www.topmiata.com/toyota-gt86-mazda-miata-mx-5/ Cheers Banjo
-
Hi Pete, Like you, I have resisted for years, on the same premise as you had. Within the last year, I've grabbed a set of "one size fits all", $ 2 SuperCheapAuto ones, each time I'm in their local store. They last a couple of weeks each time, so the expense is not great, & if you get them very greasy; then it is just "in the bin" with them. Have found I have "warmed" to using them, & find I don't have so many nicks & scratches on my hands, as usual. So far, so good ! Cheers Banjo

-
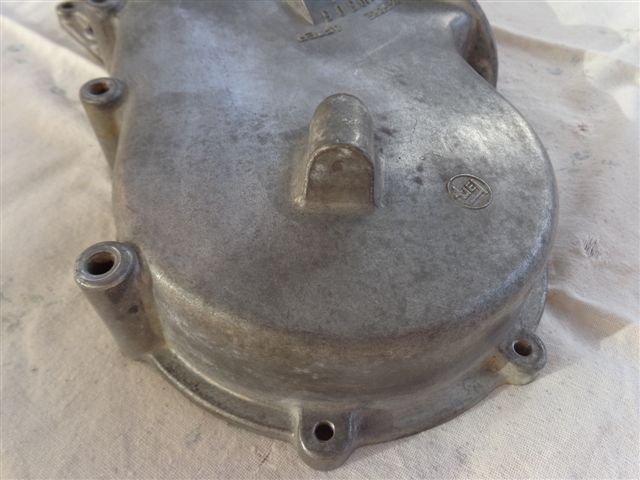
Most of the early K Series engines had a PCV breather outlet point on the top of the rocker cover, & an inlet point, that was pretty useless, as it was in very close proximity. I have modified my 5K engine by fitting a hole in the middle of the timing chain cover, which creates a crankcase ventilation air path right through the crankcase, up to the top of the head. I noticed AKE030 has posted a picture of his 3K engine in "Cars for Sale" section, & that it depicts a rubber hose coming off the front on the timing chain cover, on his 3K. I'd be interested to know where that hose actually goes, as that's the first time I have ever seen one, with the hose fitted ? ? In a standard 3K series engine, the inlet for the crankcase ventilation, came off the top of the rocker cover, where AKE030 has the little after market filter, & it plugged into the underside of the standard carby air filter. I've had two (2) off these 3K timing chain covers over the years. One had a hole & air pathway through it, but it was so small, it seemed to be useless. The other had no hole in it at all, so Toyota obvious just used the blank timing chain covers, without drilling the hole. I even had one that had the "flat" on the casing protrusion, "facing out", rather than up, with what appeared to be, a factory fitted stud & nut, fitted for obvious bracing or mounting of something. Cheers Banjo

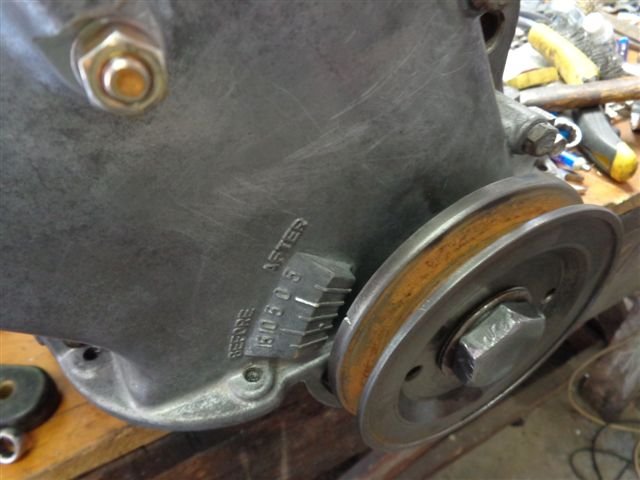


-
Good one Bayley ! Glad it was something simple. Cheers Banjo


